Compaq TFT1701 User Guide
Page 2
... warranty. User's Guide TFT1701 Flat Panel Monitor First Edition August 2002 Part Number: 304323-001 Compaq, the Compaq logo are set off in this manner indicates that failure to change without notice. All other product names mentioned herein may not modify or reverse engineer, remove, or transfer the software or make the software or any kind and is " without HP's or its authorized service provider. Customer...
... warranty. User's Guide TFT1701 Flat Panel Monitor First Edition August 2002 Part Number: 304323-001 Compaq, the Compaq logo are set off in this manner indicates that failure to change without notice. All other product names mentioned herein may not modify or reverse engineer, remove, or transfer the software or make the software or any kind and is " without HP's or its authorized service provider. Customer...

Compaq TFT1701 User Guide
Page 3
Contents Product Features Safety and Maintenance Guidelines Important Safety Information 2-1 Maintenance Guidelines 2-2 Setting Up the Monitor Removing the Monitor Base 3-3 Attaching a Wall-Mount Base 3-4 Operating the Monitor Installing Information Files 4-1 Front Panel Components 4-2 Rear Components 4-3 Using the On-Screen Display 4-4 Using the OSD Menu 4-6 Monitor Messages 4-12 Energy Saver Feature 4-13 Adjusting Screen Quality 4-13 User Modes 4-14 Troubleshooting Solving Common Problems A-1 Using the Worldwide Web A-3 Preparing to Call Technical Support A-3 User's Guide 3
Contents Product Features Safety and Maintenance Guidelines Important Safety Information 2-1 Maintenance Guidelines 2-2 Setting Up the Monitor Removing the Monitor Base 3-3 Attaching a Wall-Mount Base 3-4 Operating the Monitor Installing Information Files 4-1 Front Panel Components 4-2 Rear Components 4-3 Using the On-Screen Display 4-4 Using the OSD Menu 4-6 Monitor Messages 4-12 Energy Saver Feature 4-13 Adjusting Screen Quality 4-13 User Modes 4-14 Troubleshooting Solving Common Problems A-1 Using the Worldwide Web A-3 Preparing to Call Technical Support A-3 User's Guide 3
Compaq TFT1701 User Guide
Page 4
Contents Specifications Compaq TFT1701 Flat Panel Monitor B-1 Display Resolutions B-2 Agency Regulatory Notices Federal Communications Commission Notice C-1 Modifications C-2 Cables C-2 Declaration of Conformity for Products Marked with FCC Logo, United States Only C-2 Canadian Notice C-3 Avis Canadien C-3 European Union Notice C-3 Japanese Notice C-4 Korean Notice C-4 EPA Energy Star Compliance C-4 Power Cord Set Requirements C-5 TCO '99 Why do we have environmentally labelled computers? . D-2 What does labelling involve...
Contents Specifications Compaq TFT1701 Flat Panel Monitor B-1 Display Resolutions B-2 Agency Regulatory Notices Federal Communications Commission Notice C-1 Modifications C-2 Cables C-2 Declaration of Conformity for Products Marked with FCC Logo, United States Only C-2 Canadian Notice C-3 Avis Canadien C-3 European Union Notice C-3 Japanese Notice C-4 Korean Notice C-4 EPA Energy Star Compliance C-4 Power Cord Set Requirements C-5 TCO '99 Why do we have environmentally labelled computers? . D-2 What does labelling involve...
Compaq TFT1701 User Guide
Page 5
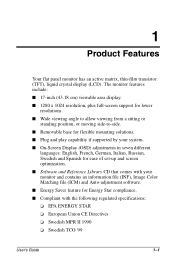
I Removable base for lower resolutions. 1 Product Features Your flat panel monitor has an active matrix, thin-film transistor (TFT), liquid crystal display (LCD). I 1280 x 1024 resolution, plus full-screen support for flexible mounting solutions. I Software and Reference Library CD that comes with the following regulated specifications: ❏ EPA ENERGY STAR ❏ European Union CE Directives ❏ Swedish MPR II 1990 ❏ Swedish TCO '99 User's Guide 1-1 I Energy Saver...
I Removable base for lower resolutions. 1 Product Features Your flat panel monitor has an active matrix, thin-film transistor (TFT), liquid crystal display (LCD). I 1280 x 1024 resolution, plus full-screen support for flexible mounting solutions. I Software and Reference Library CD that comes with the following regulated specifications: ❏ EPA ENERGY STAR ❏ European Union CE Directives ❏ Swedish MPR II 1990 ❏ Swedish TCO '99 User's Guide 1-1 I Energy Saver...

Compaq TFT1701 User Guide
Page 6
... easily accessible to the operator. User's Guide 2-1 For information on the cord. Ä CAUTION: For the protection of your monitor, as well as a power strip or Uninterruptible Power Supply (UPS). When you can replace your equipment if surge protection fails. If another cord is used, use with your monitor. Never pull on the correct power cord set to use only a power source and connection appropriate for your computer and...
... easily accessible to the operator. User's Guide 2-1 For information on the cord. Ä CAUTION: For the protection of your monitor, as well as a power strip or Uninterruptible Power Supply (UPS). When you can replace your equipment if surge protection fails. If another cord is used, use with your monitor. Never pull on the correct power cord set to use only a power source and connection appropriate for your computer and...

Compaq TFT1701 User Guide
Page 7
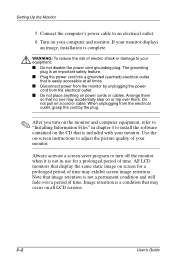
... 3 inches (76 mm) away from walls or other volatile substances to service this monitor, as the screen. 2-2 User's Guide I Install your monitor near an outlet that you can substantially increase the life expectancy of your monitor by pulling the cord. Adjust only those controls that are discussed in the operating instructions. Disconnect the monitor by grasping the plug firmly and pulling it from the wall outlet before cleaning...
... 3 inches (76 mm) away from walls or other volatile substances to service this monitor, as the screen. 2-2 User's Guide I Install your monitor near an outlet that you can substantially increase the life expectancy of your monitor by pulling the cord. Adjust only those controls that are discussed in the operating instructions. Disconnect the monitor by grasping the plug firmly and pulling it from the wall outlet before cleaning...

Compaq TFT1701 User Guide
Page 9
... your computer's video port, video board, video card or graphics card. User's Guide 3-1 Connect the power cord 1 for the monitor into a nearby electrical outlet. 3. 3 Setting Up the Monitor Before setting up the monitor, ensure that power is turned off to your computer. 2. Connect the monitor signal cable 2 to the 15-pin, D-sub connector on the rear of your monitor to the power port on the back of the monitor. Connect the other end of the signal cable 3 to the monitor, computer system...
... your computer's video port, video board, video card or graphics card. User's Guide 3-1 Connect the power cord 1 for the monitor into a nearby electrical outlet. 3. 3 Setting Up the Monitor Before setting up the monitor, ensure that power is turned off to your computer. 2. Connect the monitor signal cable 2 to the 15-pin, D-sub connector on the rear of your monitor to the power port on the back of the monitor. Connect the other end of the signal cable 3 to the monitor, computer system...
Compaq TFT1701 User Guide
Page 10
... not disable the power cord grounding plug. If your monitor. Note that display the same static image on or trip over a period of time. Setting Up the Monitor 5. I Do not place anything on a cord or cable. All LCD monitors that image retention is not in chapter 4 to an electrical outlet. 6. The grounding plug is easily accessible at all LCD screens. 3-2 User's Guide Arrange them . Turn on all times. I Plug the power cord into...
... not disable the power cord grounding plug. If your monitor. Note that display the same static image on or trip over a period of time. Setting Up the Monitor 5. I Do not place anything on a cord or cable. All LCD monitors that image retention is not in chapter 4 to an electrical outlet. 6. The grounding plug is easily accessible at all LCD screens. 3-2 User's Guide Arrange them . Turn on all times. I Plug the power cord into...
Compaq TFT1701 User Guide
Page 11
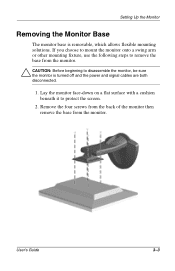
... monitor base is turned off and the power and signal cables are both disconnected. 1. Remove the four screws from the back of the monitor then remove the base from the monitor. Ä CAUTION: Before beginning to disassemble the monitor, be sure the monitor is removable, which allows flexible mounting solutions. If you choose to mount the monitor onto a swing arm or other mounting fixture, use the following steps to protect the screen. 2. User's Guide...
... monitor base is turned off and the power and signal cables are both disconnected. 1. Remove the four screws from the back of the monitor then remove the base from the monitor. Ä CAUTION: Before beginning to disassemble the monitor, be sure the monitor is removable, which allows flexible mounting solutions. If you choose to mount the monitor onto a swing arm or other mounting fixture, use the following steps to protect the screen. 2. User's Guide...

Compaq TFT1701 User Guide
Page 12
Align the mounting interface pad with the arm-type base, wall mount hanger or other base. 3-4 User's Guide Secure the rear cover mounting pad with the four screws that came with the holes in the previous section. 2. Setting Up the Monitor Attaching a Wall-Mount Base ✎ This monitor accepts a 100 mm x 100 mm VESA-compliant mounting interface pad. 1. Refer to "Removing the Monitor Base" steps in the rear cover mounting pad. 3. Remove the monitor base.
Align the mounting interface pad with the arm-type base, wall mount hanger or other base. 3-4 User's Guide Secure the rear cover mounting pad with the four screws that came with the holes in the previous section. 2. Setting Up the Monitor Attaching a Wall-Mount Base ✎ This monitor accepts a 100 mm x 100 mm VESA-compliant mounting interface pad. 1. Refer to "Removing the Monitor Base" steps in the rear cover mounting pad. 3. Remove the monitor base.
Compaq TFT1701 User Guide
Page 13
... Library CD-ROM in your computer: 1. The .INF file defines monitor resources and provides specifications used by clicking on -screen instructions. The .ICM file provides color matching consistency from monitor screen to be installed onto your computer; 4 Operating the Monitor Installing Information Files The Software and Reference Library CD-ROM included with your computer's graphics adapter. User's Guide 4-1 an .INF file and an .ICM file.
... Library CD-ROM in your computer: 1. The .INF file defines monitor resources and provides specifications used by clicking on -screen instructions. The .ICM file provides color matching consistency from monitor screen to be installed onto your computer; 4 Operating the Monitor Installing Information Files The Software and Reference Library CD-ROM included with your computer's graphics adapter. User's Guide 4-1 an .INF file and an .ICM file.
Compaq TFT1701 User Guide
Page 14
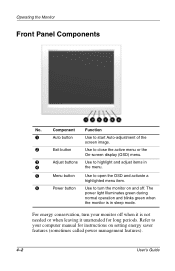
Component Function 1 Auto button Use to start Auto-adjustment of the screen image. 2 Exit button Use to close the active menu or the On-screen display (OSD) menu. 3 Adjust buttons Use to highlight and adjust items in sleep mode. Refer to turn your computer manual for long periods. For energy conservation, turn the monitor on setting energy saver features (sometimes called power management features). 4-2 User's Guide The power light Illuminates green during normal operation and blinks green when the monitor is not needed or when leaving it...
Component Function 1 Auto button Use to start Auto-adjustment of the screen image. 2 Exit button Use to close the active menu or the On-screen display (OSD) menu. 3 Adjust buttons Use to highlight and adjust items in sleep mode. Refer to turn your computer manual for long periods. For energy conservation, turn the monitor on setting energy saver features (sometimes called power management features). 4-2 User's Guide The power light Illuminates green during normal operation and blinks green when the monitor is not needed or when leaving it...

Compaq TFT1701 User Guide
Page 17
... + or - User's Guide 4-5 To move to close the active menu or OSD. When the item menu is not already on. 2. Press the Power button to your viewing preferences. Adjust button to change an item to turn on your preferred setting. 4. Adjust button until the function is highlighted and press the Menu button to display the On-Screen Display menu. 3. Operating the Monitor The On-Screen Display (OSD) adjusts the screen image based on the monitor, if the monitor is displayed, press the...
... + or - User's Guide 4-5 To move to close the active menu or OSD. When the item menu is not already on. 2. Press the Power button to your viewing preferences. Adjust button to change an item to turn on your preferred setting. 4. Adjust button until the function is highlighted and press the Menu button to display the On-Screen Display menu. 3. Operating the Monitor The On-Screen Display (OSD) adjusts the screen image based on the monitor, if the monitor is displayed, press the...

Compaq TFT1701 User Guide
Page 24
... the input signal, a message appears on the screen or the screen goes blank although the power indicator light is out of fine, coarse and position are adjusted automatically. Indicates the video cable may not be plugged into the computer or the computer may not be turned on. 4-12 User's Guide I Video mode not supported - Operating the Monitor Menu Auto Adjustment Function Allows the monitor to self-adjust to identify the following monitor conditions: I No Connection, check signal cable - This...
... the input signal, a message appears on the screen or the screen goes blank although the power indicator light is out of fine, coarse and position are adjusted automatically. Indicates the video cable may not be plugged into the computer or the computer may not be turned on. 4-12 User's Guide I Video mode not supported - Operating the Monitor Menu Auto Adjustment Function Allows the monitor to self-adjust to identify the following monitor conditions: I No Connection, check signal cable - This...
Compaq TFT1701 User Guide
Page 25
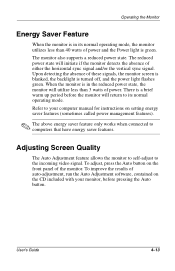
... either the horizontal sync signal and/or the vertical sync signal. The reduced power state will initiate if the monitor detects the absence of power and the Power light is a brief warm up period before pressing the Auto button. There is green. User's Guide 4-13 Upon detecting the absence of auto-adjustment, run the Auto Adjustment software, contained on the CD included with your computer manual for instructions on the front panel of power. Refer...
... either the horizontal sync signal and/or the vertical sync signal. The reduced power state will initiate if the monitor detects the absence of power and the Power light is a brief warm up period before pressing the Auto button. There is green. User's Guide 4-13 Upon detecting the absence of auto-adjustment, run the Auto Adjustment software, contained on the CD included with your computer manual for instructions on the front panel of power. Refer...

Compaq TFT1701 User Guide
Page 27
Power switch is disconnected. Solution Connect the power cord. User's Guide A-1 Possible Cause Power cord is off. Screen blanking utility is improperly connected. Turn on the keyboard or move the mouse. Connect video cable properly. A Troubleshooting Solving Common Problems The following table lists possible problems, the possible cause of each problem, and the recommended solutions. Brightness and contrast are too low. Video cable is active. Problem Screen is blank. Depress any key on power. Image appears blurred, indistinct...
Power switch is disconnected. Solution Connect the power cord. User's Guide A-1 Possible Cause Power cord is off. Screen blanking utility is improperly connected. Turn on the keyboard or move the mouse. Connect video cable properly. A Troubleshooting Solving Common Problems The following table lists possible problems, the possible cause of each problem, and the recommended solutions. Brightness and contrast are too low. Video cable is active. Problem Screen is blank. Depress any key on power. Image appears blurred, indistinct...
Compaq TFT1701 User Guide
Page 28
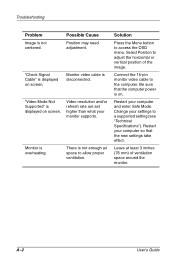
...Monitor video cable is displayed on screen. Leave at least 3 inches (76 mm) of the image. "Video Mode Not Supported" is disconnected. Select Position to a supported setting (see "Technical Specifications"). A-2 User's Guide Monitor is not centered. Troubleshooting Problem Image is overheating. Possible Cause Position may need adjustment. "Check Signal Cable" is displayed on screen. Video resolution and/or refresh rate are set higher than what your computer and enter Safe Mode. Restart your monitor supports. Change your computer so that the computer power...
...Monitor video cable is displayed on screen. Leave at least 3 inches (76 mm) of the image. "Video Mode Not Supported" is disconnected. Select Position to a supported setting (see "Technical Specifications"). A-2 User's Guide Monitor is not centered. Troubleshooting Problem Image is overheating. Possible Cause Position may need adjustment. "Check Signal Cable" is displayed on screen. Video resolution and/or refresh rate are set higher than what your computer and enter Safe Mode. Restart your monitor supports. Change your computer so that the computer power...
Compaq TFT1701 User Guide
Page 30
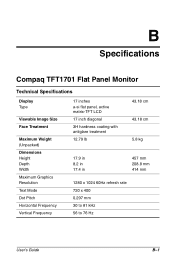
B Specifications Compaq TFT1701 Flat Panel Monitor Technical Specifications Display Type Viewable Image Size Face Treatment Maximum Weight (Unpacked) Dimensions Height Depth Width Maximum Graphics Resolution Text Mode Dot Pitch Horizontal Frequency Vertical Frequency 17 inches a-si flat panel, active matrix-TFT LCD 17 inch diagonal 3H hardness coating with antiglare treatment 12.79 lb 43.18 cm 43.18 cm 5.8 kg 17.9 in 8.2 in 17.4 in 457 mm 208.8 mm 414 mm 1280 x 1024 60Hz refresh rate 720 x 400 0.297 mm 30 to 81 kHz 56 to 76 Hz User's Guide B-1
B Specifications Compaq TFT1701 Flat Panel Monitor Technical Specifications Display Type Viewable Image Size Face Treatment Maximum Weight (Unpacked) Dimensions Height Depth Width Maximum Graphics Resolution Text Mode Dot Pitch Horizontal Frequency Vertical Frequency 17 inches a-si flat panel, active matrix-TFT LCD 17 inch diagonal 3H hardness coating with antiglare treatment 12.79 lb 43.18 cm 43.18 cm 5.8 kg 17.9 in 8.2 in 17.4 in 457 mm 208.8 mm 414 mm 1280 x 1024 60Hz refresh rate 720 x 400 0.297 mm 30 to 81 kHz 56 to 76 Hz User's Guide B-1

Compaq TFT1701 User Guide
Page 31
... the screen. Factory Preset Display Modes Pre- Specifications Technical Specifications (Continued) Environmental Requirements Temperature (Independent of Altitude) Operating Temperature Storage Temperature Humidity (Noncondensing) Operating Nonoperating Power Source Power Consumption Input Terminals 50 to 104 o F -04 to +113 o F 5 to 35 o C -20 to +60o C 20 to 80% 5 to 90% 100 - 240VAC, 50/60 +/- 3Hz 40 watts 15-pin D-type connector with cable included Display Resolutions The display resolutions...
... the screen. Factory Preset Display Modes Pre- Specifications Technical Specifications (Continued) Environmental Requirements Temperature (Independent of Altitude) Operating Temperature Storage Temperature Humidity (Noncondensing) Operating Nonoperating Power Source Power Consumption Input Terminals 50 to 104 o F -04 to +113 o F 5 to 35 o C -20 to +60o C 20 to 80% 5 to 90% 100 - 240VAC, 50/60 +/- 3Hz 40 watts 15-pin D-type connector with cable included Display Resolutions The display resolutions...
Compaq TFT1701 User Guide
Page 37
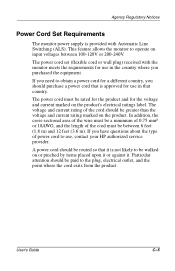
... a power cord that it . The power cord set (flexible cord or wall plug) received with Automatic Line Switching (ALS). A power cord should be paid to obtain a power cord for a different country, you should be greater than the voltage and current rating marked on input voltages between 6 feet (1.8 m) and 12 feet (3.6 m). This feature allows the monitor to use, contact your HP authorized service provider. User's Guide C-5 The voltage and current rating of power cord to...
... a power cord that it . The power cord set (flexible cord or wall plug) received with Automatic Line Switching (ALS). A power cord should be paid to obtain a power cord for a different country, you should be greater than the voltage and current rating marked on input voltages between 6 feet (1.8 m) and 12 feet (3.6 m). This feature allows the monitor to use, contact your HP authorized service provider. User's Guide C-5 The voltage and current rating of power cord to...


