Evo Notebook N600c Software Overview
Page 9
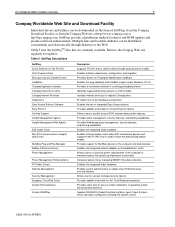
Evo Notebook N600c Software Overview 9 Compaq Worldwide Web Site and Download Facility Individual drivers and utilities can be downloaded, in select Armada docking station models Enables software ... base Enables the integrated network adapter on ArmadaStation I and II Allows users to customize power requirements of the computer to maximize battery life and set up hibernation functionality Increases battery life by managing SMART drive data collection Enables the integrated video hardware Enables system administrators to update client ROM and setup over...
Evo Notebook N600c Software Overview 9 Compaq Worldwide Web Site and Download Facility Individual drivers and utilities can be downloaded, in select Armada docking station models Enables software ... base Enables the integrated network adapter on ArmadaStation I and II Allows users to customize power requirements of the computer to maximize battery life and set up hibernation functionality Increases battery life by managing SMART drive data collection Enables the integrated video hardware Enables system administrators to update client ROM and setup over...
Evo Notebook N600c Software Overview
Page 14
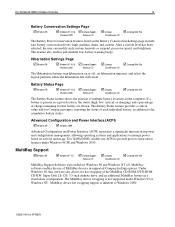
... logical partition where the hibernation file will reside. Advanced Configuration and Power Interface (ACPI) ! Compaq ! Evo Notebook N600c Software Overview 14 Battery Conservation Settings Page ! Windows NT 4.0 & Windows 2000 ! Windows 98 ! Compaq Web Site QuickRestore CD The Battery Status feature shows the position of the MultiBay CD-ROM, DVD-ROM, CD-RW, Super Disk...
... logical partition where the hibernation file will reside. Advanced Configuration and Power Interface (ACPI) ! Compaq ! Evo Notebook N600c Software Overview 14 Battery Conservation Settings Page ! Windows NT 4.0 & Windows 2000 ! Windows 98 ! Compaq Web Site QuickRestore CD The Battery Status feature shows the position of the MultiBay CD-ROM, DVD-ROM, CD-RW, Super Disk...

Hardware Guide Evo Notebook N200 Series
Page 3
... Reference 3-3 Hotkey Procedures 3-3 Switch Display and Image (Fn+F4 3-4 Adjust System Volume (Fn+F5 3-4 Initiate QuickLock (Fn+F6 3-4 Set Power Conservation Level (Fn+F7 3-5 Display Battery Charge Information (Fn+F8) . . . . . 3-5 Adjust Screen Brightness (Fn+F9 and Fn+F11). . . . 3-5 Hardware Guide iii
... Reference 3-3 Hotkey Procedures 3-3 Switch Display and Image (Fn+F4 3-4 Adjust System Volume (Fn+F5 3-4 Initiate QuickLock (Fn+F6 3-4 Set Power Conservation Level (Fn+F7 3-5 Display Battery Charge Information (Fn+F8) . . . . . 3-5 Adjust Screen Brightness (Fn+F9 and Fn+F11). . . . 3-5 Hardware Guide iii

Hardware Guide Evo Notebook N200 Series
Page 4
... Easy Access Buttons 3-9 Using Default Settings 3-9 Using Custom Assignments and Schemes 3-10 4 Battery Packs Charging a Battery Pack 4-1 Using a New Battery Pack 4-1 Replacing or Adding a Battery Pack 4-2 Replacing a Primary Battery Pack 4-2 Attaching an External Battery Pack 4-6 Removing an External Battery Pack 4-8 Storing a Battery Pack 4-10 Recycling a Used Battery Pack 4-10 5 Removable Drives Adding a Drive to the System 5-1 Caring for Drives...
... Easy Access Buttons 3-9 Using Default Settings 3-9 Using Custom Assignments and Schemes 3-10 4 Battery Packs Charging a Battery Pack 4-1 Using a New Battery Pack 4-1 Replacing or Adding a Battery Pack 4-2 Replacing a Primary Battery Pack 4-2 Attaching an External Battery Pack 4-6 Removing an External Battery Pack 4-8 Storing a Battery Pack 4-10 Recycling a Used Battery Pack 4-10 5 Removable Drives Adding a Drive to the System 5-1 Caring for Drives...

Hardware Guide Evo Notebook N200 Series
Page 6
... circulation around the computer and the AC Adapter during setup on external AC power, not on battery power. Hardware Guide 1-1 Prevent direct exposure to AC power. I Run the computer during use and while charging the battery pack to components, and ensure that correct device drivers load: I Do not set up the computer...
... circulation around the computer and the AC Adapter during setup on external AC power, not on battery power. Hardware Guide 1-1 Prevent direct exposure to AC power. I Run the computer during use and while charging the battery pack to components, and ensure that correct device drivers load: I Do not set up the computer...

Hardware Guide Evo Notebook N200 Series
Page 8
The battery light remains on while the battery pack is charging and turns off when the battery pack is on because the battery pack is charging. Turn on because the computer is fully charged. I You are prompted to external power. The battery pack began to charge as soon as the computer was connected to begin software setup. Turning on the computer When hardware setup is complete: I The battery light 3 is on . I The power/suspend light 2 is on the computer by sliding and releasing the power switch 1. Hardware Guide 1-3 Hardware and Software Setup 3.
The battery light remains on while the battery pack is charging and turns off when the battery pack is on because the battery pack is charging. Turn on because the computer is fully charged. I You are prompted to external power. The battery pack began to charge as soon as the computer was connected to begin software setup. Turning on the computer When hardware setup is complete: I The battery light 3 is on . I The power/suspend light 2 is on the computer by sliding and releasing the power switch 1. Hardware Guide 1-3 Hardware and Software Setup 3.

Hardware Guide Evo Notebook N200 Series
Page 10
...of charge in either initiate Hibernation or shut down the computer. Hibernation is complete, you may not be reported accurately until the battery pack has been calibrated. After Software Setup After the initial setup is an energy-saving feature and safeguard that saves all information in...icon does not display on the Desktop after initial setup is the sole power source, you left off. I Calibrate the battery pack. Although Hibernation can use a new battery pack that is complete, select Start > Run. For calibration information and instructions, refer on this CD to run the...
...of charge in either initiate Hibernation or shut down the computer. Hibernation is complete, you may not be reported accurately until the battery pack has been calibrated. After Software Setup After the initial setup is an energy-saving feature and safeguard that saves all information in...icon does not display on the Desktop after initial setup is the sole power source, you left off. I Calibrate the battery pack. Although Hibernation can use a new battery pack that is complete, select Start > Run. For calibration information and instructions, refer on this CD to run the...

Hardware Guide Evo Notebook N200 Series
Page 13
... . 4 Drive light On: The primary hard drive or any drive in Suspend* The power/suspend light also blinks when a battery pack that is the only available power source reaches a critical low-battery condition while Hibernation is disabled. *In Windows XP Professional and Windows 2000 Professional, the term Standby replaces the term Suspend... On: Caps lock is on. 3 Scroll lock light On: Scroll lock is on . Blinking: Computer is in an optional Mobile Expansion Unit is being accessed. 5 Battery light On: A battery pack is charging.
... . 4 Drive light On: The primary hard drive or any drive in Suspend* The power/suspend light also blinks when a battery pack that is the only available power source reaches a critical low-battery condition while Hibernation is disabled. *In Windows XP Professional and Windows 2000 Professional, the term Standby replaces the term Suspend... On: Caps lock is on. 3 Scroll lock light On: Scroll lock is on . Blinking: Computer is in an optional Mobile Expansion Unit is being accessed. 5 Battery light On: A battery pack is charging.

Hardware Guide Evo Notebook N200 Series
Page 19
... models.) ✎ The RJ-11 jack functions only when an internal modem is installed in the computer. A Look at the Computer Rear Panel Components 1 External battery pack connectors (2) 2 RJ-45 jack 3 RJ-11 jack 4 External monitor connector 5 Mobile Expansion Unit connector 6 USB connectors (2) Connect an optional external...
... models.) ✎ The RJ-11 jack functions only when an internal modem is installed in the computer. A Look at the Computer Rear Panel Components 1 External battery pack connectors (2) 2 RJ-45 jack 3 RJ-11 jack 4 External monitor connector 5 Mobile Expansion Unit connector 6 USB connectors (2) Connect an optional external...

Hardware Guide Evo Notebook N200 Series
Page 20
Holds the combination modem/NIC (network interface card). Hardware Guide 2-9 Contains 1 memory expansion slot, which supports a memory expansion board providing up to 128 megabytes of RAM (random access memory). Secures the primary hard drive in the hard drive bay. Holds the primary hard drive. A Look at the Computer Bottom Components: Bays and Compartments 1 Battery bay 2 Memory expansion compartment 3 Hard drive bay 4 Hard drive bay retaining screw 5 Mini PCI (personal computer interface) compartment Holds the primary battery pack.
Holds the combination modem/NIC (network interface card). Hardware Guide 2-9 Contains 1 memory expansion slot, which supports a memory expansion board providing up to 128 megabytes of RAM (random access memory). Secures the primary hard drive in the hard drive bay. Holds the primary hard drive. A Look at the Computer Bottom Components: Bays and Compartments 1 Battery bay 2 Memory expansion compartment 3 Hard drive bay 4 Hard drive bay retaining screw 5 Mini PCI (personal computer interface) compartment Holds the primary battery pack.

Hardware Guide Evo Notebook N200 Series
Page 21
Produces single sound channel (monaural) sound. Allow airflow to the computer. Secure an optional external battery pack to cool internal components. Ä To prevent overheating, do not obstruct vents. 2-10 Hardware Guide A Look at the Computer Bottom Components: Speaker, Latches, and Vents 1 Battery release latch 2 Speaker 3 External battery pack security latches (2) 4 Intake vents Releases the primary battery pack from the battery bay.
Produces single sound channel (monaural) sound. Allow airflow to the computer. Secure an optional external battery pack to cool internal components. Ä To prevent overheating, do not obstruct vents. 2-10 Hardware Guide A Look at the Computer Bottom Components: Speaker, Latches, and Vents 1 Battery release latch 2 Speaker 3 External battery pack security latches (2) 4 Intake vents Releases the primary battery pack from the battery bay.

Hardware Guide Evo Notebook N200 Series
Page 23
A Look at the Computer Additional Standard Components The components included with most computer models. ✎ This illustration does not include printed documentation or such components as the hard drive and primary battery pack, which ship inside computer bays identified in previous sections. The following illustration and table identify the standard external components included with the computer vary by geographical region and the computer hardware configuration ordered. Identifying additional standard components 2-12 Hardware Guide
A Look at the Computer Additional Standard Components The components included with most computer models. ✎ This illustration does not include printed documentation or such components as the hard drive and primary battery pack, which ship inside computer bays identified in previous sections. The following illustration and table identify the standard external components included with the computer vary by geographical region and the computer hardware configuration ordered. Identifying additional standard components 2-12 Hardware Guide

Hardware Guide Evo Notebook N200 Series
Page 27
... until a power-on password Set power conservation level. I To use the Fn+F5 hotkeys, press scroll lock+scroll lock+F5. Fn+F7 Fn+F7 Display battery charge information. Fn+F4 Fn+F4 Adjust system volume. Fn+F5 Fn+F5 Initiate QuickLock.* Fn+F6 Enter power-on password is set and QuickLock...
... until a power-on password Set power conservation level. I To use the Fn+F5 hotkeys, press scroll lock+scroll lock+F5. Fn+F7 Fn+F7 Display battery charge information. Fn+F4 Fn+F4 Adjust system volume. Fn+F5 Fn+F5 Initiate QuickLock.* Fn+F6 Enter power-on password is set and QuickLock...

Hardware Guide Evo Notebook N200 Series
Page 29
... to open the Power Schemes window. Press Fn+F11 to display charge information about any battery pack in the system. Battery packs are identified by number: (1) battery pack in each battery pack. Display Battery Charge Information (Fn+F8) Press Fn+F8 to increase screen brightness. In Windows 2000... Professional, press Fn+F7 to decrease screen brightness. The display indicates which battery pack is charging and reports the amount of charge remaining in battery bay and (2) optional external battery pack. Adjust Screen Brightness (Fn+F9 and Fn+F11) Press Fn+F9 to open...
... to open the Power Schemes window. Press Fn+F11 to display charge information about any battery pack in the system. Battery packs are identified by number: (1) battery pack in each battery pack. Display Battery Charge Information (Fn+F8) Press Fn+F8 to increase screen brightness. In Windows 2000... Professional, press Fn+F7 to decrease screen brightness. The display indicates which battery pack is charging and reports the amount of charge remaining in battery bay and (2) optional external battery pack. Adjust Screen Brightness (Fn+F9 and Fn+F11) Press Fn+F9 to open...

Hardware Guide Evo Notebook N200 Series
Page 35
...system charges whenever the computer is used for the first time. Although you can use a new battery pack that has been fully charged to run the computer, battery charge displays may not accurately report the amount of the computer. The computer supports up to the ...Utilities guide, "Power Management" section, "Calibrating a Battery Pack." Hardware Guide 4-1 Using a New Battery Pack A new battery pack should be fully charged before it to external power. I An optional external battery pack is a 4-cell lithium-ion polymer battery pack that can be used only by attaching it is...
...system charges whenever the computer is used for the first time. Although you can use a new battery pack that has been fully charged to run the computer, battery charge displays may not accurately report the amount of the computer. The computer supports up to the ...Utilities guide, "Power Management" section, "Calibrating a Battery Pack." Hardware Guide 4-1 Using a New Battery Pack A new battery pack should be fully charged before it to external power. I An optional external battery pack is a 4-cell lithium-ion polymer battery pack that can be used only by attaching it is...

Hardware Guide Evo Notebook N200 Series
Page 36
... Guide Close the display, then turn off the computer before removing the battery pack. 1. If replacement becomes necessary, use the following procedures. Ä CAUTION: To prevent loss of information when removing a battery pack that may delay Hibernation.) ❏ For information about initiating Hibernation from... select Start > Shut Down > Hibernate, then select the OK button. (Extensive drive activity may never need replacing. If the battery pack in Windows XP Professional or Windows 2000 Professional, refer on this CD to the Utilities guide, "Power Management" section, "Setting Power...
... Guide Close the display, then turn off the computer before removing the battery pack. 1. If replacement becomes necessary, use the following procedures. Ä CAUTION: To prevent loss of information when removing a battery pack that may delay Hibernation.) ❏ For information about initiating Hibernation from... select Start > Shut Down > Hibernate, then select the OK button. (Extensive drive activity may never need replacing. If the battery pack in Windows XP Professional or Windows 2000 Professional, refer on this CD to the Utilities guide, "Power Management" section, "Setting Power...

Hardware Guide Evo Notebook N200 Series
Page 37
Remove the battery pack retaining screw. Battery Packs Removing the battery pack retaining screw Hardware Guide 4-3 3.
Remove the battery pack retaining screw. Battery Packs Removing the battery pack retaining screw Hardware Guide 4-3 3.

Hardware Guide Evo Notebook N200 Series
Page 38
Battery Packs 4. Inserting a primary battery pack 4-4 Hardware Guide Remove or insert the battery pack: ❏ To remove a battery pack: Slide the battery release latch toward the rear of the computer 1 while tilting the battery pack out of the battery bay 2. Removing a primary battery pack ❏ To insert a battery pack: Insert the battery pack into the battery bay at a 45 degree angle 1, then tilt the battery pack downward into the battery bay until it is seated 2. Remove the battery pack 3.
Battery Packs 4. Inserting a primary battery pack 4-4 Hardware Guide Remove or insert the battery pack: ❏ To remove a battery pack: Slide the battery release latch toward the rear of the computer 1 while tilting the battery pack out of the battery bay 2. Removing a primary battery pack ❏ To insert a battery pack: Insert the battery pack into the battery bay at a 45 degree angle 1, then tilt the battery pack downward into the battery bay until it is seated 2. Remove the battery pack 3.

Hardware Guide Evo Notebook N200 Series
Page 39
5. Replace the battery pack retaining screw. To return to your work: a. Open the display. c. Turn the computer right-side up. Battery Packs Replacing the battery pack retaining screw 6. Hardware Guide 4-5 b. Turn on the computer or exit Hibernation.
5. Replace the battery pack retaining screw. To return to your work: a. Open the display. c. Turn the computer right-side up. Battery Packs Replacing the battery pack retaining screw 6. Hardware Guide 4-5 b. Turn on the computer or exit Hibernation.

Hardware Guide Evo Notebook N200 Series
Page 40
Close the display. 2. Removing the battery connector plugs 4-6 Hardware Guide Slide the external battery security latches toward the inside of the computer 1. 4. Battery Packs Attaching an External Battery Pack 1. If you use the computer without an attached external battery pack. Turn the computer bottom-side up. 3. They protect the battery connectors and should be replaced whenever you are attaching an external battery pack for the first time, remove the battery connector plugs from the computer 2. ✎ Retain the battery connector plugs.
Close the display. 2. Removing the battery connector plugs 4-6 Hardware Guide Slide the external battery security latches toward the inside of the computer 1. 4. Battery Packs Attaching an External Battery Pack 1. If you use the computer without an attached external battery pack. Turn the computer bottom-side up. 3. They protect the battery connectors and should be replaced whenever you are attaching an external battery pack for the first time, remove the battery connector plugs from the computer 2. ✎ Retain the battery connector plugs.


