HP Notebook Reference Guide
Page 42
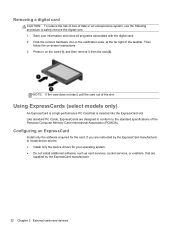
...Save your operating system. ● Do not install additional software, such as card services, socket services, or enablers, that is inserted into the ExpressCard slot. If you are supplied by the ExpressCard manufacturer to install device drivers: ● Install only the device drivers for the card. Configuring an ExpressCard Install...To reduce the risk of loss of data or an unresponsive system, use the following procedure to the standard specifications of the Personal Computer Memory Card International Association (PCMCIA). NOTE: If the card does not eject, pull the card out of the...
...Save your operating system. ● Do not install additional software, such as card services, socket services, or enablers, that is inserted into the ExpressCard slot. If you are supplied by the ExpressCard manufacturer to install device drivers: ● Install only the device drivers for the card. Configuring an ExpressCard Install...To reduce the risk of loss of data or an unresponsive system, use the following procedure to the standard specifications of the Personal Computer Memory Card International Association (PCMCIA). NOTE: If the card does not eject, pull the card out of the...

HP Notebook Reference Guide
Page 44
...cards and devices Using smart cards (select models only) NOTE: The term smart card is a credit card-sized accessory that carries a microchip containing memory and a microprocessor. A smart card is used with the ExpressCard. 2. Gently press in the notification area, at the far right of data ...or an unresponsive system, use the following procedure to the contents of the slot (2). Industry-standard smart cards are used throughout this chapter to refer to protect against tampering. Removing an ExpressCard CAUTION: To reduce the...
...cards and devices Using smart cards (select models only) NOTE: The term smart card is a credit card-sized accessory that carries a microchip containing memory and a microprocessor. A smart card is used with the ExpressCard. 2. Gently press in the notification area, at the far right of data ...or an unresponsive system, use the following procedure to the contents of the slot (2). Industry-standard smart cards are used throughout this chapter to refer to protect against tampering. Removing an ExpressCard CAUTION: To reduce the...
HP ProtectTools Getting Started
Page 64
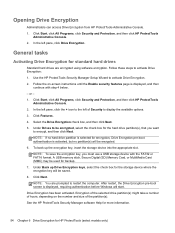
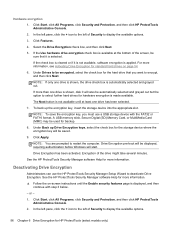
... click All Programs, click Security and Protection, and then click HP ProtectTools Administrative Console. 2. Under Back up the encryption key, insert the storage device into the appropriate slot. A USB memory stick, Secure Digital (SD) Memory Card, or MultiMedia Card (MMC) may be encrypted, select the... check box for standard hard drives Standard hard drives are prompted to be used for HP ProtectTools (select models only) Follow...
... click All Programs, click Security and Protection, and then click HP ProtectTools Administrative Console. 2. Under Back up the encryption key, insert the storage device into the appropriate slot. A USB memory stick, Secure Digital (SD) Memory Card, or MultiMedia Card (MMC) may be encrypted, select the... check box for standard hard drives Standard hard drives are prompted to be used for HP ProtectTools (select models only) Follow...
HP ProtectTools Getting Started
Page 65
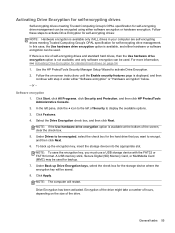
...-encrypting drive management can be encrypted using either hardware or software encryption can be saved. 8. Software encryption 1. A USB memory stick, Secure Digital (SD) Memory Card, or MultiMedia Card (MMC) may be encrypted, select the check box for the storage device where the encryption key...Under Drives to the left of the drive. Under Back up the encryption key, insert the storage device into the appropriate slot. Use the HP ProtectTools Security Manager Setup Wizard to activate Drive Encryption for self-encrypting drives: NOTE: Hardware encryption is displayed, and then ...
...-encrypting drive management can be encrypted using either hardware or software encryption can be saved. 8. Software encryption 1. A USB memory stick, Secure Digital (SD) Memory Card, or MultiMedia Card (MMC) may be encrypted, select the check box for the storage device where the encryption key...Under Drives to the left of the drive. Under Back up the encryption key, insert the storage device into the appropriate slot. Use the HP ProtectTools Security Manager Setup Wizard to activate Drive Encryption for self-encrypting drives: NOTE: Hardware encryption is displayed, and then ...
HP ProtectTools Getting Started
Page 66
...box is applied. A USB memory stick, Secure Digital (SD) Memory Card, or MultiMedia Card (MMC) may be used for the hard drive that it is not available, software encryption is automatically selected and grayed out. Click Apply. See the HP ProtectTools Security Manager software Help for...Setup Wizard to be saved. 9. See the HP ProtectTools Security Manager software Help for HP ProtectTools (select models only) or - 1. For more information. Under Back up the encryption key, insert the storage device into the appropriate slot. Drive Encryption pre-boot will be displayed, requiring...
...box is applied. A USB memory stick, Secure Digital (SD) Memory Card, or MultiMedia Card (MMC) may be used for the hard drive that it is not available, software encryption is automatically selected and grayed out. Click Apply. See the HP ProtectTools Security Manager software Help for...Setup Wizard to be saved. 9. See the HP ProtectTools Security Manager software Help for HP ProtectTools (select models only) or - 1. For more information. Under Back up the encryption key, insert the storage device into the appropriate slot. Drive Encryption pre-boot will be displayed, requiring...
Getting Started HP Notebook
Page 25
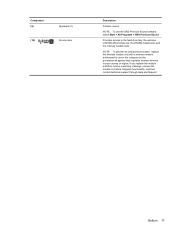
... and Support. If you replace the module and then receive a warning message, remove the module to the hard drive bay, the wireless LAN (WLAN) module slot, the WWAN module slot, and the memory module slots. Component (9) (10) Speakers (2) Service door Description Produce sound.
... and Support. If you replace the module and then receive a warning message, remove the module to the hard drive bay, the wireless LAN (WLAN) module slot, the WWAN module slot, and the memory module slots. Component (9) (10) Speakers (2) Service door Description Produce sound.
Getting Started HP Notebook
Page 40
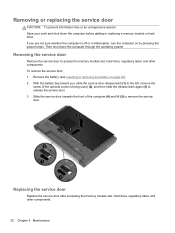
...an unresponsive system: Save your work and shut down the computer through the operating system. Then shut down the computer before adding or replacing a memory module or hard drive. With the battery bay toward you are not sure whether the computer is being used) (2), and then slide the ... is off or in Hibernation, turn the computer on page 30). 2. If you , slide the service door release latch (1) to access the memory module slot, hard drive, regulatory label, and other components. 32 Chapter 5 Maintenance Replacing the service door Replace the service door after accessing the...
...an unresponsive system: Save your work and shut down the computer through the operating system. Then shut down the computer before adding or replacing a memory module or hard drive. With the battery bay toward you are not sure whether the computer is being used) (2), and then slide the ... is off or in Hibernation, turn the computer on page 30). 2. If you , slide the service door release latch (1) to access the memory module slot, hard drive, regulatory label, and other components. 32 Chapter 5 Maintenance Replacing the service door Replace the service door after accessing the...
Getting Started HP Notebook
Page 51
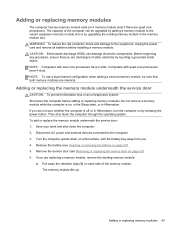
...). If you . 4. Pull away the retention clips (1) on , in the Sleep state, or in the memory module slot. Adding or replacing memory modules 43 To reduce the risk of the computer can damage electronic components. Remove the battery (see Removing or ... the battery on a flat surface, with quad core processors have 2 slots. Adding or replacing memory modules The computer has two memory module slots (or 4 memory module slots if there are replacing a memory module, remove the existing memory module: a. Disconnect AC power and external devices connected to the computer....
...). If you . 4. Pull away the retention clips (1) on , in the Sleep state, or in the memory module slot. Adding or replacing memory modules 43 To reduce the risk of the computer can damage electronic components. Remove the battery (see Removing or ... the battery on a flat surface, with quad core processors have 2 slots. Adding or replacing memory modules The computer has two memory module slots (or 4 memory module slots if there are replacing a memory module, remove the existing memory module: a. Disconnect AC power and external devices connected to the computer....
Getting Started HP Notebook
Page 52
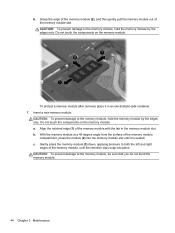
... at a 45-degree angle from the surface of the memory module, until it in the memory module slot. Align the notched edge (1) of the memory module slot. Grasp the edge of the memory module (2), and then gently pull the memory module out of the memory module with the tab in an electrostatic-safe container. 7. Do not touch the...
... at a 45-degree angle from the surface of the memory module, until it in the memory module slot. Align the notched edge (1) of the memory module slot. Grasp the edge of the memory module (2), and then gently pull the memory module out of the memory module with the tab in an electrostatic-safe container. 7. Do not touch the...

Getting Started HP Notebook
Page 55
... with the tab in the memory module slot. Do not touch the components on the memory module. 8. Do not touch the components on the memory module. CAUTION: To prevent damage to the memory module, hold the memory module by the edges only. Align the notched edge (1) of the memory module slot. With the memory module at a 45-degree angle...
... with the tab in the memory module slot. Do not touch the components on the memory module. 8. Do not touch the components on the memory module. CAUTION: To prevent damage to the memory module, hold the memory module by the edges only. Align the notched edge (1) of the memory module slot. With the memory module at a 45-degree angle...
Getting Started HP Notebook
Page 56
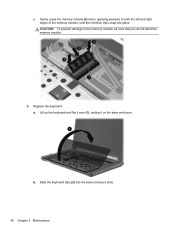
Slide the keyboard tabs (2) into place. CAUTION: To prevent damage to both the left and right edges of the memory module, until the retention clips snap into the base enclosure slots. 48 Chapter 5 Maintenance Replace the keyboard: a. Gently press the memory module (3) down, applying pressure to the memory module, be sure that you do not bend the memory module. 9. Lift up the keyboard and flip it over (1), resting it on the base enclosure. c. b.
Slide the keyboard tabs (2) into place. CAUTION: To prevent damage to both the left and right edges of the memory module, until the retention clips snap into the base enclosure slots. 48 Chapter 5 Maintenance Replace the keyboard: a. Gently press the memory module (3) down, applying pressure to the memory module, be sure that you do not bend the memory module. 9. Lift up the keyboard and flip it over (1), resting it on the base enclosure. c. b.


