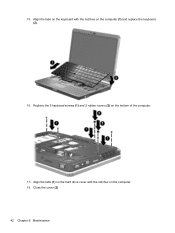
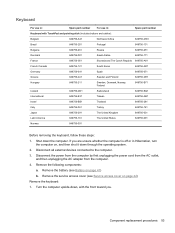
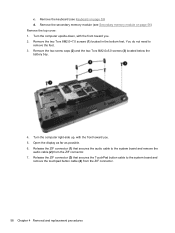
Getting Started HP Notebook - Windows 7
Page 10
... comes with several resources to http://www.hp.com/ergo. 2 Chapter 1 Welcome Select Start > All Programs > HP > HP Documentation. ● Power management features ● How to maximize battery life ● How to use the keyboard and pointing devices ● How to replace or upgrade the hard drive and memory... modules ● How to perform a backup and recovery ● How to http://www.hp.com/support, select your country or ● region, ...
Getting Started HP Notebook - Windows 7
Page 47
10. Pull away the retention clips (1) on each side of the memory module. Remove the keyboard from the computer (5). 11. The memory module tilts up. If you are replacing a memory module, remove the existing memory module: a. Adding or replacing memory modules 39
Getting Started HP Notebook - Windows 7
Page 49
Reconnect the pointing stick cable (3) by inserting the cable into the ZIF connector and pressing the connector down (2). 14. c. Gently press the memory module (3) down (4). Reconnect the keyboard cable (1) by inserting the cable into place. Adding or replacing memory modules 41 CAUTION: To prevent damage to both the left and right edges of the memory module, until the retention clips snap into the ZIF connector and pressing the connector down , applying pressure to the memory module, be sure that you do not bend the memory module. 13.
Getting Started HP Notebook - Windows 7
Page 50
Align the tabs on the keyboard with the notches on the computer. 18. Close the cover (2). 42 Chapter 6 Maintenance Replace the 5 keyboard screws (1) and 2 rubber covers (2) on the computer (1) and replace the keyboard (2). 16. Align the tabs (1) on the hard drive cover with the notches on the bottom of the computer. 17. 15.
Getting Started HP Notebook - Windows 7
Page 66
...(headphone) jack, identifying 10 B Backup and Restore 49 Backup and Restore Center 51, 52 battery bay 14, 56 battery light 6 battery release latch 14 battery, replacing 33 bluetooth compartment identifying 9 Bluetooth label 56 buttons left TouchPad 5 pointing stick 4 right TouchPad 5 volume down 7 volume mute 7 volume up 7 C caps lock...-in (microphone) 10 audio-out (headphone) 10 network 13 RJ-11 (modem) 10 RJ-45 (network) 13 jog dial, identifying 13 K keyboard hotkeys, identifying 19 Keyboard light button identifying 12 keypad, embedded numeric 8 keypad, external num lock 22 using 22 58 Index
HP EliteBook 2760p Tablet PC - Maintenance and Service Guide
Page 6
Component replacement procedures 38 Service tag ...38 Computer feet ...39 Pen ...40 Battery ...41 Service access cover ...42 Primary memory module ...43 SIM ...45 Hard drive ...46 WLAN module ...48 WWAN module ...51 Keyboard ...53 Secondary memory module 56 Top cover ...57 TouchPad board ...61 RTC battery ...62 Display assembly ...63 System board...
HP EliteBook 2760p Tablet PC - Maintenance and Service Guide
Page 40
...for use in Israel (includes buttons and cables) Keyboard with TouchPad and pointing stick for use in Switzerland (includes buttons and cables) Keyboard with TouchPad and pointing stick for use in Iceland (includes buttons and cables) Keyboard with TouchPad and pointing stick for use in Denmark,... for use in Greece (includes buttons and cables) Keyboard with TouchPad and pointing stick for use in Northwest Africa (includes buttons and cables) Base enclosure (includes latch) Cable Kit Fan/heat sink assembly (includes replacement thermal material) System board shield Audio connector board Plastics...
HP EliteBook 2760p Tablet PC - Maintenance and Service Guide
Page 61
... outlet, and then unplugging the AC adapter from the computer. 4. Remove the battery (see Service access cover on page 42) Remove the keyboard: 1. Disconnect all external devices connected to the computer. 3. Remove the following components: a. Turn the computer upside-down, with TouchPad and ...is off or in : Spare part number Keyboard with the front toward you. Keyboard For use in: Spare part number For use in Hibernation, turn the computer on, and then shut it down through the operating system. 2. Component replacement procedures 53 Remove ths service access cover ...
HP EliteBook 2760p Tablet PC - Maintenance and Service Guide
Page 62
Turn the computer right-side up, with the front toward you. 4. Open the display as far as possible. 5. Insert a flat tool under the back edge (1) of the keyboard (2) and disconnect the keyboard. 54 Chapter 4 Removal and replacement procedures 2. Remove the two screw caps (1) and loosen the five captive screws (2) that secure the keyboard to the computer. 3. Gently lift the rear edge of the keyboard near the display hinge.
HP EliteBook 2760p Tablet PC - Maintenance and Service Guide
Page 63
Holding the keyboard at an angle, lift the keyboard (1) far enough to gain access to the cables underneath and release the zero insertion force (ZIF) connector (2) to which the pointing stick cable is attached to the system board and remove the keyboard cable (3) from the connector. 7. Flip the keyboard over to the left and lay it flat (1), then release the ZIF connector that secures the keyboard cable (2) to the system board and remove the pointing stick ZIF cable (3) from the ZIF connector. Component replacement procedures 55 6.
HP EliteBook 2760p Tablet PC - Maintenance and Service Guide
Page 64
...down through the operating system. 2. 8. Remove the battery (see Service access cover on page 53) 56 Chapter 4 Removal and replacement procedures Remove the keyboard. Disconnect the power from the computer by first unplugging the power cord from the AC outlet, and then unplugging the AC adapter ... 621569-001 634091-001 Before removing the memory module, follow these steps: 1. Disconnect all external devices connected to install the keyboard. Reverse this procedure to the computer. 3. If you are unsure whether the computer is attached, and then disconnect the cable (4) from ...
HP EliteBook 2760p Tablet PC - Maintenance and Service Guide
Page 66
...and remove the touchpad button cable (4) from the ZIF connector. 7. Remove the two Torx 8M2.0×7.0 screws (1) located in the bottom feet. Remove the keyboard (see Secondary memory module on page 53) d. You do not need to the system board and remove the audio cable (2) from the ZIF connector. 58... Chapter 4 Removal and replacement procedures Remove the two screw caps (2) and the two Torx 8M2.0x5.0 screws (3) located below the battery bay. 4. Open the display as far as ...
HP EliteBook 2760p Tablet PC - Maintenance and Service Guide
Page 69
... computer on, and then shut it down the computer. Before removing the TouchPad board, follow these steps: 1. If you . 2. Remove the battery (see Keyboard on page 41) b. Component replacement procedures 61 Shut down through the operating system. 2. Remove the following components: a. Disconnect the TouchPad cable (2) from the TouchPad board ZIF connector and...
HP EliteBook 2760p Tablet PC - Maintenance and Service Guide
Page 70
... unplugging the power cord from the AC outlet, and then unplugging the AC adapter from the system board. 2. Remove the battery (see Keyboard on page 41) b. RTC battery Description RTC battery Spare part number 649769-001 Before removing the RTC battery, follow these steps: 1. ...Disconnect all external devices connected to install the RTC battery. 62 Chapter 4 Removal and replacement procedures Remove the following components: a. Gently pull the battery away from the double-sided tape that secures the battery (2) to the system ...
HP EliteBook 2760p Tablet PC - Maintenance and Service Guide
Page 71
... 57) Remove the display assembly: 1. Remove the two Torx 9 M2.0×5.0 screws that secure the hinge cover to the computer. 3. Component replacement procedures 63 Description 30.7 cm (12.1 in) WXGA, LED, AntiGlare touch screen display assembly 30.7 cm (12.1 in Hibernation, turn the ... 4. Position the computer upside down the computer. If you . 2. Remove the battery (see WWAN module on page 41) b. Remove the keyboard (see WLAN module on page 53) f. Remove the following components: a. Display assembly The display assemblies include two WLAN antenna transceivers and cables ...
HP EliteBook 2760p Tablet PC - Maintenance and Service Guide
Page 74
Remove the service access cover (see Service access cover on page 63) 66 Chapter 4 Removal and replacement procedures Remove the display assembly (see WWAN module on page 41) b. Remove the following components: a. Remove the WWAN module (see Display assembly on page 42) c....649760-001 Before removing the system board shield, follow these steps: 1. Remove the WLAN module (see Battery on page 51) e. Remove the top cover (see Keyboard on , and then shut it from the computer. 4. Reverse this procedure to the computer. 3. If you are unsure whether the computer is off or in...
HP EliteBook 2760p Tablet PC - Maintenance and Service Guide
Page 75
... all external devices connected to install the system board shield. Remove the four Phillips M2.5×3.0 screws (1) and (2) that the keyboard lies flat when replaced. WARNING! Position the computer right-side up, with the front toward you are unsure whether the computer is included in Hibernation, turn...part number information. Modem module NOTE: The modem module spare part kit does not include a modem module cable. NOTE: When installing a replacement system board shield, take care that the tab labeled "Watch Out" is inserted correctly under the heat sink so that secure the shield to...
HP EliteBook 2760p Tablet PC - Maintenance and Service Guide
Page 76
... Top cover on page 57) g. Remove the top cover (see Keyboard on page 42) c. Turn the computer right-side up . 3. Reverse this procedure to install the modem module. Remove the battery (see Service access cover on ... on page 48) d. Remove the display assembly (see WWAN module on page 24 for more Cable Kit spare part number information. 68 Chapter 4 Removal and replacement procedures 3. Disconnect the power from the computer by lifting it straight up , with the front toward you. 2.
HP EliteBook 2760p Tablet PC - Maintenance and Service Guide
Page 77
... a. Remove the service access cover (see Top cover on page 42) c. Remove the top cover (see Service access cover on page 57) g. Component replacement procedures 69 Remove the keyboard (see Battery on page 53) f. Lift the Bluetooth module (1) as far as the cable will allow. 3. If you . 2. Remove the battery (see... Keyboard on page 41) b. Remove the WWAN module (see Display assembly on page 51) e. Remove the display assembly (see WWAN module on page 63) ...
HP EliteBook 2760p Tablet PC - Maintenance and Service Guide
Page 78
...outlet, and then unplugging the AC adapter from the latch. 3. Remove the WWAN module (see Display assembly on page 41) b. Remove the keyboard (see Service access cover on , and then shut it down the computer. Shut down through the operating system. 2. Remove the service access cover (...see Keyboard on page 51) e. Note the location of the spring. Remove the two Phillips M2.0×4.0 screws (2) that secure the latch bracket to ...