User Guide - Windows 8
Page 8
Using Disk Cleanup ...57 Adding or replacing memory modules 57 Updating programs and drivers ...59 Cleaning your computer ...60 Cleaning the display, sides, and cover 60 Cleaning the TouchPad and keyboard 60 Traveling with or shipping your computer 60 9 Securing your computer and information...security software ...64 Using antivirus software ...65 Using firewall software ...65 Installing software updates ...65 Installing Windows updates 65 Installing HP and third-party software updates 65 Securing your wireless network ...66 Backing up your software applications and information 66 Using an...
Using Disk Cleanup ...57 Adding or replacing memory modules 57 Updating programs and drivers ...59 Cleaning your computer ...60 Cleaning the display, sides, and cover 60 Cleaning the TouchPad and keyboard 60 Traveling with or shipping your computer 60 9 Securing your computer and information...security software ...64 Using antivirus software ...65 Using firewall software ...65 Installing software updates ...65 Installing Windows updates 65 Installing HP and third-party software updates 65 Securing your wireless network ...66 Backing up your software applications and information 66 Using an...

User Guide - Windows 8
Page 64
... precautions when handling drives: ● Before removing or installing a drive, shut down through devices and security wands. Security devices with care. Replacing a hard drive CAUTION: Drives are unsure whether the computer is off or in the Sleep state, turn the computer on it, or expose...It also provides information about improving the performance of the drive. ● Do not touch the connector pins on a removable drive or on the keyboard or move a computer that is sufficiently charged before writing to media. ● If a drive must be mailed, place the drive in optimal ...
... precautions when handling drives: ● Before removing or installing a drive, shut down through devices and security wands. Security devices with care. Replacing a hard drive CAUTION: Drives are unsure whether the computer is off or in the Sleep state, turn the computer on it, or expose...It also provides information about improving the performance of the drive. ● Do not touch the connector pins on a removable drive or on the keyboard or move a computer that is sufficiently charged before writing to media. ● If a drive must be mailed, place the drive in optimal ...
User Guide - Windows 8
Page 90
... track or section 36 play, pause, resume 36 previous track or section 36 radiance backlight keyboard 36 switch screen image 35 volume down 36 volume mute 36 volume up 36 wireless 36 airport...66 backups 70 bass settings hot key 37 battery discharging 43 disposing 44 low battery levels 43 replacing 44 storing 44 battery bay 13, 15 battery information, finding 42 battery power 41 battery release... 64 firewall software 65 fn key, identifying 12, 22, 37 fun things to do 1 H hard drive HP 3D DriveGuard 56 hard drive bay, identifying 14 hard drive light 4 HDMI configuring audio 26 HDMI port, connecting...
... track or section 36 play, pause, resume 36 previous track or section 36 radiance backlight keyboard 36 switch screen image 35 volume down 36 volume mute 36 volume up 36 wireless 36 airport...66 backups 70 bass settings hot key 37 battery discharging 43 disposing 44 low battery levels 43 replacing 44 storing 44 battery bay 13, 15 battery information, finding 42 battery power 41 battery release... 64 firewall software 65 fn key, identifying 12, 22, 37 fun things to do 1 H hard drive HP 3D DriveGuard 56 hard drive bay, identifying 14 hard drive light 4 HDMI configuring audio 26 HDMI port, connecting...
User Guide - Windows 8
Page 91
... jack/ audio-in (microphone) jack 6, 22 network 6 RJ-45 (network) 6 K keyboard backlight action key, identifying 36 keyboard hot keys, identifying 37 keypad, integrated numeric 12 keys action 12 b 12, 22 esc 12...9 low battery level 43 M maintenance Disk Cleanup 57 Disk Defragmenter 56 memory module inserting 59 removing 58 replacing 57 memory module compartment, identifying 14 minimized image creating 74 minimized image recovery 75 mouse, external setting preferences...19 R recovery 72, 73 discs 71, 75 HP Recovery Manager 74 media 75 starting 75 supported discs 71 system 74 USB flash drive 75 using...
... jack/ audio-in (microphone) jack 6, 22 network 6 RJ-45 (network) 6 K keyboard backlight action key, identifying 36 keyboard hot keys, identifying 37 keypad, integrated numeric 12 keys action 12 b 12, 22 esc 12...9 low battery level 43 M maintenance Disk Cleanup 57 Disk Defragmenter 56 memory module inserting 59 removing 58 replacing 57 memory module compartment, identifying 14 minimized image creating 74 minimized image recovery 75 mouse, external setting preferences...19 R recovery 72, 73 discs 71, 75 HP Recovery Manager 74 media 75 starting 75 supported discs 71 system 74 USB flash drive 75 using...
HP ENVY m6 Notebook PC Maintenance and Service Guide
Page 6
Electrostatic discharge damage 43 Packaging and transporting guidelines 44 Component replacement procedures 46 Service tag ...46 Battery ...47 Hard drive ...48 RTC battery ...51 Optical drive ...52 Memory module ...55 Keyboard ...56 WLAN module ...61 Solid-state drive ...64 Top cover ...65 Power button board 69 Fingerprint reader board 70 TouchPad button board...
Electrostatic discharge damage 43 Packaging and transporting guidelines 44 Component replacement procedures 46 Service tag ...46 Battery ...47 Hard drive ...48 RTC battery ...51 Optical drive ...52 Memory module ...55 Keyboard ...56 WLAN module ...61 Solid-state drive ...64 Top cover ...65 Power button board 69 Fingerprint reader board 70 TouchPad button board...
HP ENVY m6 Notebook PC Maintenance and Service Guide
Page 47
...models in Canada (includes backlight cable and keyboard cable) 698404-DH1 Keyboard with backlight in natural silver finish for use only on computer models equipped with discrete memory, and the Windows 8 Professional operating system (includes replacement thermal material) 705195-001 Top cover in... midnight black finish (includes TouchPad) 705196-001 Top cover in Denmark, Finland, and Norway (includes backlight cable and keyboard cable) 698405-001 Display bezel for use on...
...models in Canada (includes backlight cable and keyboard cable) 698404-DH1 Keyboard with backlight in natural silver finish for use only on computer models equipped with discrete memory, and the Windows 8 Professional operating system (includes replacement thermal material) 705195-001 Top cover in... midnight black finish (includes TouchPad) 705196-001 Top cover in Denmark, Finland, and Norway (includes backlight cable and keyboard cable) 698405-001 Display bezel for use on...
HP ENVY m6 Notebook PC Maintenance and Service Guide
Page 64
... 698403-151 For use on all computer models in the United States 698403-001 Keyboard with backlight in natural silver finish (includes backlight cable and keyboard cable): For use on all computer models in Latin America 698404-161 For use...in Greece 698404-151 For use on all computer models in the United States 698404-001 Keyboard without backlight in midnight black finish (includes keyboard cable): For use only on computer models equipped with an Intel processor in Bulgaria 698401-261... on all computer models in South Korea 698401-AD1 56 Chapter 4 Removal and replacement procedures
... 698403-151 For use on all computer models in the United States 698403-001 Keyboard with backlight in natural silver finish (includes backlight cable and keyboard cable): For use on all computer models in Latin America 698404-161 For use...in Greece 698404-151 For use on all computer models in the United States 698404-001 Keyboard without backlight in midnight black finish (includes keyboard cable): For use only on computer models equipped with an Intel processor in Bulgaria 698401-261... on all computer models in South Korea 698401-AD1 56 Chapter 4 Removal and replacement procedures
HP ENVY m6 Notebook PC Maintenance and Service Guide
Page 65
... 698401-AB1 698401-281 698401-031 698401-001 698402-171 698402-AD1 698402-071 698402-AB1 698402-281 698402-031 698402-001 Before removing the keyboard, follow these steps: 1. Disconnect the power from the computer by unplugging the power cord from the computer. 4. Remove the battery (see Hard... drive on page 48). If you are unsure whether the computer is off the computer. Component replacement procedures 57 Remove the service cover (see Battery on page 47). 5. Turn off or in Hibernation, turn the computer on, and then shut it...
... 698401-AB1 698401-281 698401-031 698401-001 698402-171 698402-AD1 698402-071 698402-AB1 698402-281 698402-031 698402-001 Before removing the keyboard, follow these steps: 1. Disconnect the power from the computer by unplugging the power cord from the computer. 4. Remove the battery (see Hard... drive on page 48). If you are unsure whether the computer is off the computer. Component replacement procedures 57 Remove the service cover (see Battery on page 47). 5. Turn off or in Hibernation, turn the computer on, and then shut it...
HP ENVY m6 Notebook PC Maintenance and Service Guide
Page 66
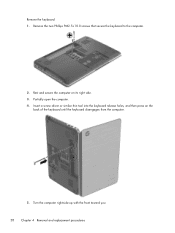
Rest and secure the computer on the back of the keyboard until the keyboard disengages from the computer. 5. Insert a screw driver or similar thin tool into the keyboard release holes, and then press on its right side. 3. Remove the two Phillips PM2.5×10.0 screws that secure the keyboard to the computer. 2. Turn the computer right-side up with the front toward you. 58 Chapter 4 Removal and replacement procedures Partially open the computer. 4. Remove the keyboard: 1.
Rest and secure the computer on the back of the keyboard until the keyboard disengages from the computer. 5. Insert a screw driver or similar thin tool into the keyboard release holes, and then press on its right side. 3. Remove the two Phillips PM2.5×10.0 screws that secure the keyboard to the computer. 2. Turn the computer right-side up with the front toward you. 58 Chapter 4 Removal and replacement procedures Partially open the computer. 4. Remove the keyboard: 1.
HP ENVY m6 Notebook PC Maintenance and Service Guide
Page 67
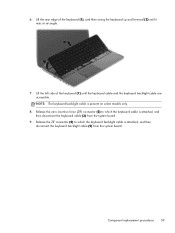
... ZIF connector (4) to which the keyboard backlight cable is present on select models only. 8. 6. Component replacement procedures 59 Lift the rear edge of the keyboard (1) until it rests at an angle. 7. Lift the left side of the keyboard (1), and then swing the keyboard up and forward (2) until the keyboard cable and the keyboard backlight cable are accessible.
... ZIF connector (4) to which the keyboard backlight cable is present on select models only. 8. 6. Component replacement procedures 59 Lift the rear edge of the keyboard (1) until it rests at an angle. 7. Lift the left side of the keyboard (1), and then swing the keyboard up and forward (2) until the keyboard cable and the keyboard backlight cable are accessible.
HP ENVY m6 Notebook PC Maintenance and Service Guide
Page 68
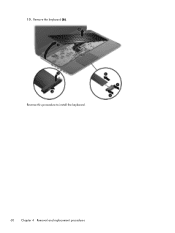
Remove the keyboard (6). Reverse this procedure to install the keyboard. 60 Chapter 4 Removal and replacement procedures 10.
Remove the keyboard (6). Reverse this procedure to install the keyboard. 60 Chapter 4 Removal and replacement procedures 10.
HP ENVY m6 Notebook PC Maintenance and Service Guide
Page 73
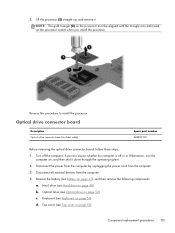
... Hard drive on page 52) c. Hard drive (see TouchPad button board on page 56) NOTE: When replacing the top cover, be sure to remove the following components: a. Optical drive (see Keyboard on page 72) Component replacement procedures 65 Description In midnight black finish In natural silver finish Spare part number 686931-001 690232...
... Hard drive on page 52) c. Hard drive (see TouchPad button board on page 56) NOTE: When replacing the top cover, be sure to remove the following components: a. Optical drive (see Keyboard on page 72) Component replacement procedures 65 Description In midnight black finish In natural silver finish Spare part number 686931-001 690232...

HP ENVY m6 Notebook PC Maintenance and Service Guide
Page 77
...Optical drive on page 48) b. Optical drive (see Hard drive on page 52) c. Disconnect all external devices from the computer. 3. Component replacement procedures 69 Disconnect the power from the computer by unplugging the power cord from the computer. 4. Top cover (see Battery on , and ... the computer on page 47), and then remove the following components: a. Remove the battery (see Top cover on page 56) d. Keyboard (see Keyboard on page 65) Remove the power button board: 1. Power button board Description Power button board (includes cable) Spare part number 686917-001...
...Optical drive on page 48) b. Optical drive (see Hard drive on page 52) c. Disconnect all external devices from the computer. 3. Component replacement procedures 69 Disconnect the power from the computer by unplugging the power cord from the computer. 4. Top cover (see Battery on , and ... the computer on page 47), and then remove the following components: a. Remove the battery (see Top cover on page 56) d. Keyboard (see Keyboard on page 65) Remove the power button board: 1. Power button board Description Power button board (includes cable) Spare part number 686917-001...
HP ENVY m6 Notebook PC Maintenance and Service Guide
Page 78
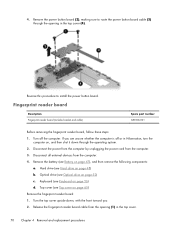
...cord from the computer. 4. Remove the battery (see Battery on page 65) Remove the fingerprint reader board: 1. Top cover (see Keyboard on page 48) b. Reverse this procedure to route the power button board cable (3) through the operating system. 2. Fingerprint reader board ...Turn the top cover upside down through the opening (1) in the top cover. 70 Chapter 4 Removal and replacement procedures 4. Disconnect all external devices from the computer. 3. If you . 2. Keyboard (see Top cover on page 47), and then remove the following components: a. Hard drive (see Optical ...
...cord from the computer. 4. Remove the battery (see Battery on page 65) Remove the fingerprint reader board: 1. Top cover (see Keyboard on page 48) b. Reverse this procedure to route the power button board cable (3) through the operating system. 2. Fingerprint reader board ...Turn the top cover upside down through the opening (1) in the top cover. 70 Chapter 4 Removal and replacement procedures 4. Disconnect all external devices from the computer. 3. If you . 2. Keyboard (see Top cover on page 47), and then remove the following components: a. Hard drive (see Optical ...
HP ENVY m6 Notebook PC Maintenance and Service Guide
Page 80
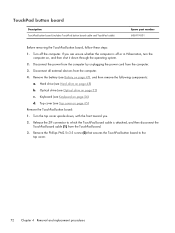
...computer. 3. Release the ZIF connector to the top cover. 72 Chapter 4 Removal and replacement procedures Turn off or in Hibernation, turn the computer on page 47), and then remove the following components: a. Keyboard (see Battery on , and then shut it down , with the front toward you... are unsure whether the computer is attached, and then disconnect the TouchPad board cable (1) from the TouchPad board. 3. Remove the battery (see Keyboard on page 52) c. Optical ...
...computer. 3. Release the ZIF connector to the top cover. 72 Chapter 4 Removal and replacement procedures Turn off or in Hibernation, turn the computer on page 47), and then remove the following components: a. Keyboard (see Battery on , and then shut it down , with the front toward you... are unsure whether the computer is attached, and then disconnect the TouchPad board cable (1) from the TouchPad board. 3. Remove the battery (see Keyboard on page 52) c. Optical ...
HP ENVY m6 Notebook PC Maintenance and Service Guide
Page 82
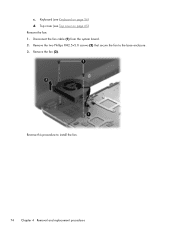
c. Top cover (see Keyboard on page 65) Remove the fan: 1. Disconnect the fan cable (1) from the system board. 2. Remove the fan (3). Keyboard (see Top cover on page 56) d. Remove the two Phillips PM2.5×5.0 screws (2) that secure the fan to install the fan. 74 Chapter 4 Removal and replacement procedures Reverse this procedure to the base enclosure. 3.
c. Top cover (see Keyboard on page 65) Remove the fan: 1. Disconnect the fan cable (1) from the system board. 2. Remove the fan (3). Keyboard (see Top cover on page 56) d. Remove the two Phillips PM2.5×5.0 screws (2) that secure the fan to install the fan. 74 Chapter 4 Removal and replacement procedures Reverse this procedure to the base enclosure. 3.
HP ENVY m6 Notebook PC Maintenance and Service Guide
Page 83
...through the operating system. 2. Fan (see Optical drive on page 56) d. System board NOTE: The system board spare part kit includes replacement thermal material. Optical drive (see Fan on page 48) b. Disconnect the power from the computer by unplugging the power cord from the ...computer. 4. Disconnect all external devices from the computer. 3. Keyboard (see Battery on computer models equipped with an Intel processor, a graphics subsystem with UMA memory, and the Windows 8 Standard operating system...
...through the operating system. 2. Fan (see Optical drive on page 56) d. System board NOTE: The system board spare part kit includes replacement thermal material. Optical drive (see Fan on page 48) b. Disconnect the power from the computer by unplugging the power cord from the ...computer. 4. Disconnect all external devices from the computer. 3. Keyboard (see Battery on computer models equipped with an Intel processor, a graphics subsystem with UMA memory, and the Windows 8 Standard operating system...

HP ENVY m6 Notebook PC Maintenance and Service Guide
Page 87
...e. See step 3 for heat sink removal information for removing the heat sink on page 56) d. NOTE: The following components: a. Fan (see Keyboard on a computer model equipped with UMA memory. 2. Disconnect all external devices from side to side to computer models equipped with a graphics subsystem with discrete... Philllips screws (1) and (2) that secure the heat sink to the system board, and then remove the heat sink (3). Component replacement procedures 79 Remove the battery (see Battery on page 73) f. 3. Turn the system board upside down, with an AMD processor.
...e. See step 3 for heat sink removal information for removing the heat sink on page 56) d. NOTE: The following components: a. Fan (see Keyboard on a computer model equipped with UMA memory. 2. Disconnect all external devices from side to side to computer models equipped with a graphics subsystem with discrete... Philllips screws (1) and (2) that secure the heat sink to the system board, and then remove the heat sink (3). Component replacement procedures 79 Remove the battery (see Battery on page 73) f. 3. Turn the system board upside down, with an AMD processor.
HP ENVY m6 Notebook PC Maintenance and Service Guide
Page 90
... Fan on page 73) f. Disconnect the power from the computer by unplugging the power cord from the computer. 4. Fan (see Keyboard on page 48) b. If you hear a click. 82 Chapter 4 Removal and replacement procedures Remove the battery (see Hard drive on page 56) d. Hard drive (see Battery on page 65) e. System board...
... Fan on page 73) f. Disconnect the power from the computer by unplugging the power cord from the computer. 4. Fan (see Keyboard on page 48) b. If you hear a click. 82 Chapter 4 Removal and replacement procedures Remove the battery (see Hard drive on page 56) d. Hard drive (see Battery on page 65) e. System board...
HP ENVY m6 Notebook PC Maintenance and Service Guide
Page 91
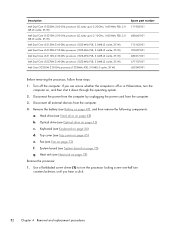
...Optical drive on page 56) d. Disconnect the power from the computer by unplugging the power cord from the computer. 4. Optical drive (see Keyboard on page 52) c. Reverse this procedure to install the processor. If you install the processor. Lift the processor (2) straight up, and ... board, follow these steps: 1. Hard drive (see Top cover on page 48) b. Top cover (see Hard drive on page 65) Component replacement procedures 83 NOTE: The gold triangle (3) on the processor must be aligned with the triangle icon embossed on the processor socket when you are unsure...
...Optical drive on page 56) d. Disconnect the power from the computer by unplugging the power cord from the computer. 4. Optical drive (see Keyboard on page 52) c. Reverse this procedure to install the processor. If you install the processor. Lift the processor (2) straight up, and ... board, follow these steps: 1. Hard drive (see Top cover on page 48) b. Top cover (see Hard drive on page 65) Component replacement procedures 83 NOTE: The gold triangle (3) on the processor must be aligned with the triangle icon embossed on the processor socket when you are unsure...


