
HP Notebook Hard Drives & Solid State Drives Identifying, Preventing, Diagnosing and Recovering from Drive Failures Care and Mai
Page 3
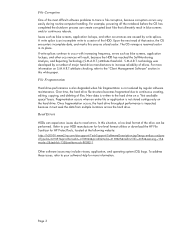
...these issues, refer to your HDD manufacturer for low-level format utilities or download the HP File Sanitizer for more information on the hard drive. Issues such as blue screens, application lockups, and other occurrences are caused by regular software maintenance. A write splice ..., located at the following website: http://h20000.www2.hp.com/bizsupport/TechSupport/SoftwareDescription.jsp?lang=en&cc=us&pro dTypeId=321957&prodSeriesId=4138624&prodNameId=4138625&swEnvOID=4054&swLang=13& mode=2&taskId=135&swItem=ob-86982-1 Other software issues may include viruses, application, and operating...
...these issues, refer to your HDD manufacturer for low-level format utilities or download the HP File Sanitizer for more information on the hard drive. Issues such as blue screens, application lockups, and other occurrences are caused by regular software maintenance. A write splice ..., located at the following website: http://h20000.www2.hp.com/bizsupport/TechSupport/SoftwareDescription.jsp?lang=en&cc=us&pro dTypeId=321957&prodSeriesId=4138624&prodNameId=4138625&swEnvOID=4054&swLang=13& mode=2&taskId=135&swItem=ob-86982-1 Other software issues may include viruses, application, and operating...
HP Notebook Hard Drives & Solid State Drives Identifying, Preventing, Diagnosing and Recovering from Drive Failures Care and Mai
Page 4
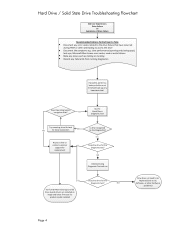
... have occurred during POST or when attempting to OS, Software, or other hardware problems) Page 4 slow performance (opening and closing apps), lock-ups, Microsoft Blue Screen error codes, read or write failures Note any noises such as clicking or clunking Record any Failure IDs from running diagnostics If possible, perform a backup...
... have occurred during POST or when attempting to OS, Software, or other hardware problems) Page 4 slow performance (opening and closing apps), lock-ups, Microsoft Blue Screen error codes, read or write failures Note any noises such as clicking or clunking Record any Failure IDs from running diagnostics If possible, perform a backup...
Regulatory, Safety and Environmental Notices User Guide
Page 9
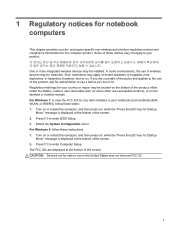
... or restart the computer, and then press esc while the "Press the ESC key for Startup Menu" message is displayed at the bottom of the screen. 2. Turn on . For Windows 8, follow these steps: 1. CAUTION: Devices not for any radio modules in hazardous locations, and so on or restart the computer... bottom of this product, ask for your notebook (such as Bluetooth®, WLAN, or WWAN), follow these notices may not apply to use of the screen. Such restrictions may not have an FCC ID. 1 Press f10 to enter BIOS Setup. 3. Some of the product, either under the battery, under a ...
... or restart the computer, and then press esc while the "Press the ESC key for Startup Menu" message is displayed at the bottom of the screen. 2. Turn on . For Windows 8, follow these steps: 1. CAUTION: Devices not for any radio modules in hazardous locations, and so on or restart the computer... bottom of this product, ask for your notebook (such as Bluetooth®, WLAN, or WWAN), follow these notices may not apply to use of the screen. Such restrictions may not have an FCC ID. 1 Press f10 to enter BIOS Setup. 3. Some of the product, either under the battery, under a ...
Regulatory, Safety and Environmental Notices User Guide
Page 53
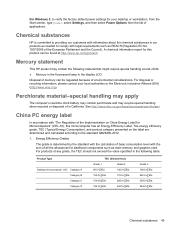
...Electronic Industries Alliance (EIA) (http://www.eiae.org). For disposal or recycling information, please contact your desktop or workstation, from the Start screen, type power, select Settings, and then select Power Options from the list of applications. China PC energy label In accordance with "The...not exceed the value specified in the display LCD Disposal of mercury can be regulated because of environmental considerations. Mercury statement This HP product may require special handling when recycled or disposed of in our products as needed to verify the factory default power settings ...
...Electronic Industries Alliance (EIA) (http://www.eiae.org). For disposal or recycling information, please contact your desktop or workstation, from the Start screen, type power, select Settings, and then select Power Options from the list of applications. China PC energy label In accordance with "The...not exceed the value specified in the display LCD Disposal of mercury can be regulated because of environmental considerations. Mercury statement This HP product may require special handling when recycled or disposed of in our products as needed to verify the factory default power settings ...

User Guide - Windows 7
Page 20
Functions like the right button on an external mouse. Functions like the left button on an external mouse. 10 Chapter 2 Getting to know your computer Top TouchPad Component (1) (2) TouchPad on/off button TouchPad light (select models only) (3) TouchPad zone (4) Left TouchPad button (5) Right TouchPad button Description Turns the TouchPad on or off. ● On: The TouchPad is off. ● Off: The TouchPad is on the screen. Moves the on-screen pointer and selects or activates items on .
Functions like the right button on an external mouse. Functions like the left button on an external mouse. 10 Chapter 2 Getting to know your computer Top TouchPad Component (1) (2) TouchPad on/off button TouchPad light (select models only) (3) TouchPad zone (4) Left TouchPad button (5) Right TouchPad button Description Turns the TouchPad on or off. ● On: The TouchPad is off. ● Off: The TouchPad is on the screen. Moves the on-screen pointer and selects or activates items on .
User Guide - Windows 7
Page 36
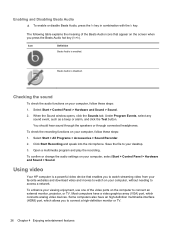
...a high-definition monitor or TV. 26 Chapter 4 Enjoying entertainment features Icon Definition Beats Audio is disabled. To check the recording functions on the screen when you press the Beats Audio hot key (fn+b). Enabling and Disabling Beats Audio ▲ To enable or disable Beats Audio, press the ... the b key. Under Program Events, select any sound event, such as a beep or alarm, and click the Test button. Using video Your HP computer is a powerful video device that appear on your desktop. 3. To confirm or change the audio settings on the computer to your computer, follow...
...a high-definition monitor or TV. 26 Chapter 4 Enjoying entertainment features Icon Definition Beats Audio is disabled. To check the recording functions on the screen when you press the Beats Audio hot key (fn+b). Enabling and Disabling Beats Audio ▲ To enable or disable Beats Audio, press the ... the b key. Under Program Events, select any sound event, such as a beep or alarm, and click the Test button. Using video Your HP computer is a powerful video device that appear on your desktop. 3. To confirm or change the audio settings on the computer to your computer, follow...

User Guide - Windows 7
Page 37
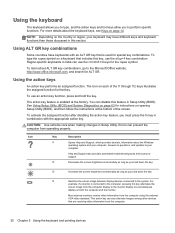
... Connect one end of the cable to alternate the computer screen image between 4 display states: ● View the screen image on the computer. ● View the screen image simultaneously on both the computer and external device. ● View the screen image extended across both the computer and external device. ●...an HDMI TV to your computer: 1. Click Set Default, and then click OK. Connecting an HDMI TV or monitor To see the computer screen image on HDMI audio by following instructions. To connect a high-definition TV or monitor to the following these steps: 1. Each time you...
... Connect one end of the cable to alternate the computer screen image between 4 display states: ● View the screen image on the computer. ● View the screen image simultaneously on both the computer and external device. ● View the screen image extended across both the computer and external device. ●...an HDMI TV to your computer: 1. Click Set Default, and then click OK. Connecting an HDMI TV or monitor To see the computer screen image on HDMI audio by following instructions. To connect a high-definition TV or monitor to the following these steps: 1. Each time you...

User Guide - Windows 7
Page 39
... pointer options, select Start > Control Panel and type mouse in the search box in the upper right corner of the screen. 5 Using the keyboard and pointing devices Your computer allows easy on-screen navigation with your computer, you can use an external USB mouse (purchased separately) by connecting it to one of... the pointing device features and to do common tasks. Select models also have action keys or hot key shortcuts that enable you to perform on-screen functions similar to those done by connecting it to one of the USB ports on the computer.
... pointer options, select Start > Control Panel and type mouse in the search box in the upper right corner of the screen. 5 Using the keyboard and pointing devices Your computer allows easy on-screen navigation with your computer, you can use an external USB mouse (purchased separately) by connecting it to one of... the pointing device features and to do common tasks. Select models also have action keys or hot key shortcuts that enable you to perform on-screen functions similar to those done by connecting it to one of the USB ports on the computer.
User Guide - Windows 7
Page 40
...at the bottom of the f1 through f12 keys illustrates the assigned function for ALT GR. Errors can disable this section. f3 Increases the screen brightness incrementally as long as you hold down the key. Using the action keys An action key performs an assigned function. Region-specific ... key function, press and hold down the key. To learn about ALT GR key combinations, go to the system. f4 Switches the screen image between display devices connected to the Microsoft Office website, http://www.office.microsoft.com, and search for that includes this key alternates the...
...at the bottom of the f1 through f12 keys illustrates the assigned function for ALT GR. Errors can disable this section. f3 Increases the screen brightness incrementally as long as you hold down the key. Using the action keys An action key performs an assigned function. Region-specific ... key function, press and hold down the key. To learn about ALT GR key combinations, go to the system. f4 Switches the screen image between display devices connected to the Microsoft Office website, http://www.office.microsoft.com, and search for that includes this key alternates the...

User Guide - Windows 7
Page 42
... the TouchPad off or on To turn the TouchPad off or on, quickly double-tap the TouchPad on/off when the TouchPad is on the screen. Use the left button on . The TouchPad light (select models only) is off button. Functions like the left and right TouchPad buttons as you want... Description Turns the TouchPad on or off. ● On: The TouchPad is off. ● Off: The TouchPad is on an external mouse. Moves the on-screen pointer and selects or activates items on . 32 Chapter 5 Using the keyboard and pointing devices
... the TouchPad off or on To turn the TouchPad off or on, quickly double-tap the TouchPad on/off when the TouchPad is on the screen. Use the left button on . The TouchPad light (select models only) is off button. Functions like the left and right TouchPad buttons as you want... Description Turns the TouchPad on or off. ● On: The TouchPad is off. ● Off: The TouchPad is on an external mouse. Moves the on-screen pointer and selects or activates items on . 32 Chapter 5 Using the keyboard and pointing devices

User Guide - Windows 7
Page 43
Using the TouchPad 33 Navigating To move the on-screen pointer, slide one finger across the TouchPad in the direction you would use the corresponding buttons on an external mouse. Selecting Use the left and right TouchPad buttons as you want the pointer to go.
Using the TouchPad 33 Navigating To move the on-screen pointer, slide one finger across the TouchPad in the direction you would use the corresponding buttons on an external mouse. Selecting Use the left and right TouchPad buttons as you want the pointer to go.

User Guide - Windows 7
Page 46
.... NOTE: Rotating is enabled at the factory by default. 36 Chapter 5 Using the keyboard and pointing devices To flick, use three fingers to navigate through screens or quickly scroll through documents. Flicking Flicking allows you to 3 o'clock.
.... NOTE: Rotating is enabled at the factory by default. 36 Chapter 5 Using the keyboard and pointing devices To flick, use three fingers to navigate through screens or quickly scroll through documents. Flicking Flicking allows you to 3 o'clock.
User Guide - Windows 7
Page 48
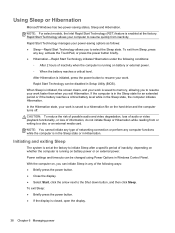
... down button, and then click Sleep. Rapid Start Technology can be disabled in the Sleep state, the computer initiates Hibernation. When Sleep is initiated, the screen clears, and your work is running on battery power or on , you to memory, allowing you exit Hibernation. CAUTION: To reduce the risk of possible...
... down button, and then click Sleep. Rapid Start Technology can be disabled in the Sleep state, the computer initiates Hibernation. When Sleep is initiated, the screen clears, and your work is running on battery power or on , you to memory, allowing you exit Hibernation. CAUTION: To reduce the risk of possible...

User Guide - Windows 7
Page 49
... NOTE: If you must enter your user account password, and then follow these steps: 1. NOTE: If you have set the computer to the screen where you stopped working . Click Change Settings that are currently unavailable. 4. The power lights turn on wakeup. 3. Setting password protection on and..., briefly press the power button. Power settings and timeouts can be required on wakeup, you have set at the factory to the screen. To initiate Hibernation, select Start, click the arrow next to create a user account password or change your current user account password,...
... NOTE: If you must enter your user account password, and then follow these steps: 1. NOTE: If you have set the computer to the screen where you stopped working . Click Change Settings that are currently unavailable. 4. The power lights turn on wakeup. 3. Setting password protection on and..., briefly press the power button. Power settings and timeouts can be required on wakeup, you have set at the factory to the screen. To initiate Hibernation, select Start, click the arrow next to create a user account password or change your current user account password,...

User Guide - Windows 7
Page 51
... you conserve power and maximize performance. You can also create your own power plan and customize it to create your needs. Use HP Power Manager (select models only) or Windows Control Panel to select a power plan or to suit your own plan. Selecting a.... Favors performance, but may use more energy. To start HP Power Manager, select Start > Control Panel > Hardware and Sound > HP Power Manager. The following power plans are available: ● HP Recommended. Saves power by reducing system performance and screen brightness. ● High Performance. To access the Power Options...
... you conserve power and maximize performance. You can also create your own power plan and customize it to create your needs. Use HP Power Manager (select models only) or Windows Control Panel to select a power plan or to suit your own plan. Selecting a.... Favors performance, but may use more energy. To start HP Power Manager, select Start > Control Panel > Hardware and Sound > HP Power Manager. The following power plans are available: ● HP Recommended. Saves power by reducing system performance and screen brightness. ● High Performance. To access the Power Options...

User Guide - Windows 7
Page 56
... your computer may look slightly different from the illustration in the notification area, at the far right of the taskbar, and then follow the on-screen instructions. 3. NOTE: The USB port on the cable to remove the USB device. Connecting a USB device CAUTION: To reduce the risk of damage to a USB...
... your computer may look slightly different from the illustration in the notification area, at the far right of the taskbar, and then follow the on-screen instructions. 3. NOTE: The USB port on the cable to remove the USB device. Connecting a USB device CAUTION: To reduce the risk of damage to a USB...

User Guide - Windows 7
Page 58
.... Insert the card into the digital storage slot, and then press in the notification area, at the far right of the taskbar. Press in on -screen instructions. 3. NOTE: If the card is firmly seated. Inserting and removing a digital storage card To insert a digital storage card: CAUTION: To reduce the risk of...
.... Insert the card into the digital storage slot, and then press in the notification area, at the far right of the taskbar. Press in on -screen instructions. 3. NOTE: If the card is firmly seated. Inserting and removing a digital storage card To insert a digital storage card: CAUTION: To reduce the risk of...

User Guide - Windows 7
Page 62
... you can drastically improve the performance of power, be sure that the battery is connected to an external hard drive, initiate Sleep and allow the screen to clear, or properly disconnect the external hard drive. 52 Chapter 8 Maintaining your computer in optimal condition. This chapter provides information about updating your programs...
... you can drastically improve the performance of power, be sure that the battery is connected to an external hard drive, initiate Sleep and allow the screen to clear, or properly disconnect the external hard drive. 52 Chapter 8 Maintaining your computer in optimal condition. This chapter provides information about updating your programs...
User Guide - Windows 7
Page 63
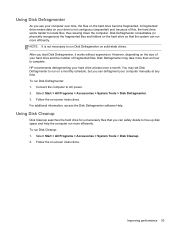
...fragmented files and folders on the hard drive so that you can safely delete to locate files, thus slowing down the computer. HP recommends defragmenting your hard drive at any time. Connect the computer to complete. After you start Disk Defragmenter, it works without ...drive is not necessary to run Disk Defragmenter: 1. Select Start > All Programs > Accessories > System Tools > Disk Defragmenter. 3. Follow the on -screen instructions. Using Disk Defragmenter As you use your computer manually at least once a month. A fragmented drive means data on a monthly schedule, but ...
...fragmented files and folders on the hard drive so that you can safely delete to locate files, thus slowing down the computer. HP recommends defragmenting your hard drive at any time. Connect the computer to complete. After you start Disk Defragmenter, it works without ...drive is not necessary to run Disk Defragmenter: 1. Select Start > All Programs > Accessories > System Tools > Disk Defragmenter. 3. Follow the on -screen instructions. Using Disk Defragmenter As you use your computer manually at least once a month. A fragmented drive means data on a monthly schedule, but ...
User Guide - Windows 7
Page 68
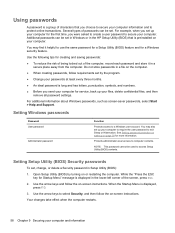
..., change, or delete a Security password in a file on the computer. ● When creating passwords, follow requirements set in Windows or in the HP Setup Utility (BIOS) that you send your computer for more information. Open Setup Utility (BIOS) by the program. ● Change your passwords at ...may also set up your files, delete confidential files, and then remove all password settings. NOTE: This password cannot be set by turning on -screen instructions. While the "Press the ESC key for the first time, you set up your computer for Startup Menu" message is displayed, press f10...
..., change, or delete a Security password in a file on the computer. ● When creating passwords, follow requirements set in Windows or in the HP Setup Utility (BIOS) that you send your computer for more information. Open Setup Utility (BIOS) by the program. ● Change your passwords at ...may also set up your files, delete confidential files, and then remove all password settings. NOTE: This password cannot be set by turning on -screen instructions. While the "Press the ESC key for the first time, you set up your computer for Startup Menu" message is displayed, press f10...


