
Getting Started
Page 17
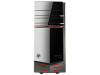
... one-time language setup on the computer.) Follow the onscreen instructions to register, sign up for updates, and get online. 5 When you see the Windows 7 desktop, the initial setup is complete.
... one-time language setup on the computer.) Follow the onscreen instructions to register, sign up for updates, and get online. 5 When you see the Windows 7 desktop, the initial setup is complete.
Getting Started
Page 19
... Internet Explorer: a Click the Start button. NOTE: Online Services provides a list of the following security measures: Enable WPA-Personal or WEP security encryption on the desktop, and then log in. 4 Open your Web browser and browse the Internet. most common security levels are Wi-Fi Protected Access Personal (WPA-Personal) and...
... Internet Explorer: a Click the Start button. NOTE: Online Services provides a list of the following security measures: Enable WPA-Personal or WEP security encryption on the desktop, and then log in. 4 Open your Web browser and browse the Internet. most common security levels are Wi-Fi Protected Access Personal (WPA-Personal) and...
Getting Started
Page 30
...folder contains special utilities for your computer status at a glance with the PC Dashboard. Using HP Advisor Software (Select models only) HP Advisor is a desktop tool you need to run your computer from HP and Partners. HP Advisor has four major areas: PC Dock - PC Discovery - Access all the items ...services that are no onscreen guides. To open the HP Advisor Dock, click the HP logo on the taskbar. 26 Getting Started (features vary by dragging and dropping items. PC Dashboard - NOTE: If there are installed on your desktop and customize your computer, and find onscreen guides ...
...folder contains special utilities for your computer status at a glance with the PC Dashboard. Using HP Advisor Software (Select models only) HP Advisor is a desktop tool you need to run your computer from HP and Partners. HP Advisor has four major areas: PC Dock - PC Discovery - Access all the items ...services that are no onscreen guides. To open the HP Advisor Dock, click the HP logo on the taskbar. 26 Getting Started (features vary by dragging and dropping items. PC Dashboard - NOTE: If there are installed on your desktop and customize your computer, and find onscreen guides ...
Getting Started
Page 56
..., to a removable disc, any data you want to keep . 1 Turn off the computer. If necessary, press and hold the On button until you see the desktop. 10 Turn off . 2 Disconnect all peripheral devices from the computer, except the monitor, keyboard, and mouse. 3 Press the On button to turn the computer back...
..., to a removable disc, any data you want to keep . 1 Turn off the computer. If necessary, press and hold the On button until you see the desktop. 10 Turn off . 2 Disconnect all peripheral devices from the computer, except the monitor, keyboard, and mouse. 3 Press the On button to turn the computer back...
Getting Started
Page 57
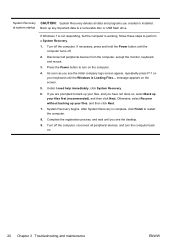
... deleted. Or If the computer is not responding, press and hold the On button for performing a system recovery from the recovery discs you see the desktop. 8 Turn off . 4 Disconnect all data and programs you want to choose between running System Recovery from disc or from hard drive, select Run program from...
... deleted. Or If the computer is not responding, press and hold the On button for performing a system recovery from the recovery discs you see the desktop. 8 Turn off . 4 Disconnect all data and programs you want to choose between running System Recovery from disc or from hard drive, select Run program from...
Getting Started Guide
Page 25
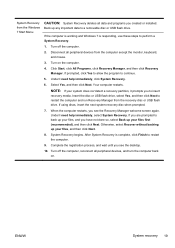
... Back up your files, and you are prompted to a removable disc or USB flash drive. Complete the registration process, and wait until you see the desktop. 10. If the computer is working and Windows 7 is complete, click Finish to continue. 5. Click Start, click All Programs, click Recovery Manager, and then click...
... Back up your files, and you are prompted to a removable disc or USB flash drive. Complete the registration process, and wait until you see the desktop. 10. If the computer is working and Windows 7 is complete, click Finish to continue. 5. Click Start, click All Programs, click Recovery Manager, and then click...
Getting Started Guide
Page 26
... Back up any important data to turn the computer back on the computer. 4. Otherwise, select Recover without backing up your files, and you see the desktop. 9. System Recovery begins. If Windows 7 is not responding, but the computer is complete, click Finish to perform a System Recovery. 1. Turn off the computer, reconnect all...
... Back up any important data to turn the computer back on the computer. 4. Otherwise, select Recover without backing up your files, and you see the desktop. 9. System Recovery begins. If Windows 7 is not responding, but the computer is complete, click Finish to perform a System Recovery. 1. Turn off the computer, reconnect all...
Getting Started Guide
Page 30
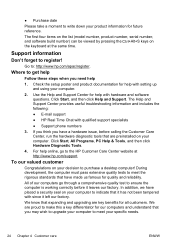
...you need help with hardware and software questions. Click Start, and then click Help and Support. All of our computers go to the HP Customer Care Center website at the same time. We are proud to make this a key differentiator for our computers and understand that it... and reliability. To our valued customer Congratulations on your computer. 2. During development, the computer must pass extensive quality tests to purchase a desktop computer! If you think you may wish to upgrade your computer to meet the rigorous standards that expanding and upgrading are preinstalled on the ...
...you need help with hardware and software questions. Click Start, and then click Help and Support. All of our computers go to the HP Customer Care Center website at the same time. We are proud to make this a key differentiator for our computers and understand that it... and reliability. To our valued customer Congratulations on your computer. 2. During development, the computer must pass extensive quality tests to purchase a desktop computer! If you think you may wish to upgrade your computer to meet the rigorous standards that expanding and upgrading are preinstalled on the ...
Getting Started Guide
Page 31
... the back of the computer, you are sent to your desktop from HP that are confirming that the computer was working properly before attempting to upgrade your Windows desktop (to access it, click Start, then click Help and Support). HP will help you get the most from information on the web..., by local law, covered under the terms and conditions listed in this computer. But it is covered for choosing this guide, and a HP Customer ...
... the back of the computer, you are sent to your desktop from HP that are confirming that the computer was working properly before attempting to upgrade your Windows desktop (to access it, click Start, then click Help and Support). HP will help you get the most from information on the web..., by local law, covered under the terms and conditions listed in this computer. But it is covered for choosing this guide, and a HP Customer ...
Quick Setup Guide
Page 13
... to close the window, and then continue with step 4. 4. Click Set Default. 6. Click OK to activate HDMI sound. Right click an empty area of the desktop, and then: ● If NVIDIA Control Panel is present, follow the steps under "NVIDIA graphics cards." ● If Catalyst Control Center is present, follow the...
... to close the window, and then continue with step 4. 4. Click Set Default. 6. Click OK to activate HDMI sound. Right click an empty area of the desktop, and then: ● If NVIDIA Control Panel is present, follow the steps under "NVIDIA graphics cards." ● If Catalyst Control Center is present, follow the...
Quick Setup Guide
Page 14
... a Task area on the top left corner of the desktop, and then click Screen resolution. 2. ATI graphics cards 1. Select Graphics and then Desktops & Displays on the left corner of the desktop, and then click NVIDIA Control Panel. If your HP computer is connected to a non-HP monitor, make sure that the Show only TV resolutions...
... a Task area on the top left corner of the desktop, and then click Screen resolution. 2. ATI graphics cards 1. Select Graphics and then Desktops & Displays on the left corner of the desktop, and then click NVIDIA Control Panel. If your HP computer is connected to a non-HP monitor, make sure that the Show only TV resolutions...
Quick Setup Guide
Page 15
...the power button on each display and then press the power button on the PC or monitor. 2. Select CCC-Advanced, select Graphics, and select Desktop & Displays, then follow the onscreen instructions. or three-monitor display. Verify that you want to change the display mode for a display, select ... setup (or for three monitors), and proceed to the bottom DVI connector. 3. When the setup is complete, you may see the extended desktop on the other displays until the setup is set up according to -VGA adapter is active; The monitor's connection type must match the connector...
...the power button on each display and then press the power button on the PC or monitor. 2. Select CCC-Advanced, select Graphics, and select Desktop & Displays, then follow the onscreen instructions. or three-monitor display. Verify that you want to change the display mode for a display, select ... setup (or for three monitors), and proceed to the bottom DVI connector. 3. When the setup is complete, you may see the extended desktop on the other displays until the setup is set up according to -VGA adapter is active; The monitor's connection type must match the connector...

Troubleshooting & Maintenance Guide
Page 15
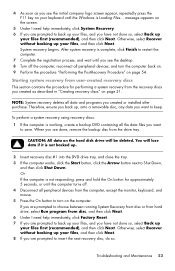
... on your files first (recommended), and then click Next. Turn off the computer. Turn off the computer, reconnect all data and programs you see the desktop. 10. As soon as you see the Recovery Manager welcome screen again. If you are prompted to back up your files, and you have not...
... on your files first (recommended), and then click Next. Turn off the computer. Turn off the computer, reconnect all data and programs you see the desktop. 10. As soon as you see the Recovery Manager welcome screen again. If you are prompted to back up your files, and you have not...

Troubleshooting & Maintenance Guide
Page 16
... the Arrow button next to step 7. 6. If you are prompted to insert the next recovery disc, do so. 11. To create recovery media, see the desktop. 9. If using a recovery DVD, the computer automatically runs Recovery Manager from the system. 12. Create recovery media from the recovery image stored on systems that...
... the Arrow button next to step 7. 6. If you are prompted to insert the next recovery disc, do so. 11. To create recovery media, see the desktop. 9. If using a recovery DVD, the computer automatically runs Recovery Manager from the system. 12. Create recovery media from the recovery image stored on systems that...

Quick Setup Guide - Windows 8
Page 11
...Beats Audio headphones into the Audio Out connector on the screen. 3 Setting up additional features Using Beats Audio™ (select models only) Your HP TouchSmart PC features audio connectors (headphone and Audio Out) that you connect analog speakers to the computer if you want to hear sound during ... this document for you may need to recover the computer operating system by using the Recovery Manager, you must be connected to view the Desktop. 2. Right-click the Volume icon (white speaker) in the notification area, at the far right of BEATS audio using HDMI to connect a ...
...Beats Audio headphones into the Audio Out connector on the screen. 3 Setting up additional features Using Beats Audio™ (select models only) Your HP TouchSmart PC features audio connectors (headphone and Audio Out) that you connect analog speakers to the computer if you want to hear sound during ... this document for you may need to recover the computer operating system by using the Recovery Manager, you must be connected to view the Desktop. 2. Right-click the Volume icon (white speaker) in the notification area, at the far right of BEATS audio using HDMI to connect a ...
Quick Setup Guide - Windows 8
Page 12
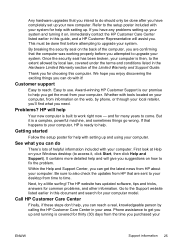
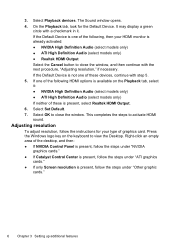
...steps to close the window, and then continue with the next procedure, "Adjusting resolution," if necessary. Right-click an empty area of the desktop, and then: ● If NVIDIA Control Panel is present, follow the steps under "NVIDIA graphics cards." ● If Catalyst Control Center...(select models only) ● ATI High Definition Audio (select models only) ● Realtek HDMI Output Select the Cancel button to view the Desktop. Select OK to activate HDMI sound. Adjusting resolution To adjust resolution, follow the steps under "Other graphic cards." 6 Chapter 3 Setting up ...
...steps to close the window, and then continue with the next procedure, "Adjusting resolution," if necessary. Right-click an empty area of the desktop, and then: ● If NVIDIA Control Panel is present, follow the steps under "NVIDIA graphics cards." ● If Catalyst Control Center...(select models only) ● ATI High Definition Audio (select models only) ● Realtek HDMI Output Select the Cancel button to view the Desktop. Select OK to activate HDMI sound. Adjusting resolution To adjust resolution, follow the steps under "Other graphic cards." 6 Chapter 3 Setting up ...
Quick Setup Guide - Windows 8
Page 13
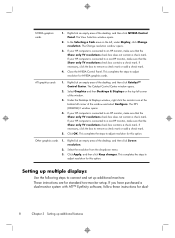
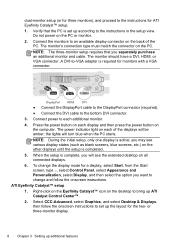
...select Configure. The Catalyst Control Center window opens. 2. Under the Desktops & Displays window, right click the monitor icon at the bottom left corner of the desktop, and then click Catalyst™ Control Center. If your HP computer is connected to connect and set up additional monitors: These ...instructions are for Setting up multiple displays Use the following steps to an HP monitor, make sure that the ...
...select Configure. The Catalyst Control Center window opens. 2. Under the Desktops & Displays window, right click the monitor icon at the bottom left corner of the desktop, and then click Catalyst™ Control Center. If your HP computer is connected to connect and set up additional monitors: These ...instructions are for Setting up multiple displays Use the following steps to an HP monitor, make sure that the ...
Quick Setup Guide - Windows 8
Page 14
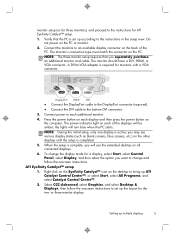
...you will be amber; Connect power to bring up the layout for monitors with a VGA connector. you may see the extended desktop on the computer. NOTE: During the initial setup, only one display is completed. 5. Right-click on the Eyefinity Catalyst™ icon...all connected displays. 6. Press the power button on the other displays until the setup is active; Select CCC-Advanced, select Graphics, and select Desktop & Displays, then follow the onscreen instructions. the lights will turn blue when the PC starts. ATI Eyefinity Catalyst™ setup 1. The ...
...you will be amber; Connect power to bring up the layout for monitors with a VGA connector. you may see the extended desktop on the computer. NOTE: During the initial setup, only one display is completed. 5. Right-click on the Eyefinity Catalyst™ icon...all connected displays. 6. Press the power button on the other displays until the setup is active; Select CCC-Advanced, select Graphics, and select Desktop & Displays, then follow the onscreen instructions. the lights will turn blue when the PC starts. ATI Eyefinity Catalyst™ setup 1. The ...

Troubleshooting and Maintenance Guide
Page 7
... Sleep mode. Use the mouse to turn off when the Power button is not lit. Power 3 Reconnect the power plug to the back of the desktop, and then click Screen resolution. 2. Press the Power button to resume from the drop-down automatically. Inspect the monitor video connector for bent pins: ●...
... Sleep mode. Use the mouse to turn off when the Power button is not lit. Power 3 Reconnect the power plug to the back of the desktop, and then click Screen resolution. 2. Press the Power button to resume from the drop-down automatically. Inspect the monitor video connector for bent pins: ●...

Regulatory, Safety and Environmental Notices User Guide
Page 3
... this manner provides important supplemental information. CAUTION: Text set off in this manner indicates that is compliant with U.S., Canadian, and international regulations for notebook computers, desktops, thin clients and personal workstations.
... this manner provides important supplemental information. CAUTION: Text set off in this manner indicates that is compliant with U.S., Canadian, and international regulations for notebook computers, desktops, thin clients and personal workstations.

