
Getting Started
Page 17
... to the computer until after you turn on the computer. To turn on the computer for updates, and get online. 5 When you see the Windows 7 desktop, the initial setup is complete. NOTE: If you skip some steps during the initial setup procedure or decline some options, you will be reminded to...
... to the computer until after you turn on the computer. To turn on the computer for updates, and get online. 5 When you see the Windows 7 desktop, the initial setup is complete. NOTE: If you skip some steps during the initial setup procedure or decline some options, you will be reminded to...
Getting Started
Page 19
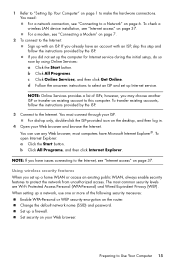
... may choose another ISP or transfer an existing account to this step and follow the instructions provided by the ISP. 3 Connect to a Network" on the desktop, and then log in. 4 Open your Web browser and browse the Internet. For dial-up only, double-click the ISP-provided icon on page 6. b Click...
... may choose another ISP or transfer an existing account to this step and follow the instructions provided by the ISP. 3 Connect to a Network" on the desktop, and then log in. 4 Open your Web browser and browse the Internet. For dial-up only, double-click the ISP-provided icon on page 6. b Click...
Getting Started
Page 30
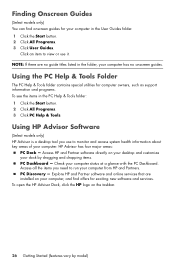
... PC Help & Tools folder: 1 Click the Start button. 2 Click All Programs. 3 Click PC Help & Tools. Using HP Advisor Software (Select models only) HP Advisor is a desktop tool you need to monitor and access system health information about key areas of your computer status at a glance with the PC... Dashboard. To open the HP Advisor Dock, click the HP logo on your desktop and customize your computer from HP and Partners. Access HP and Partner software directly on the taskbar. 26 Getting Started (features vary by dragging and dropping...
... PC Help & Tools folder: 1 Click the Start button. 2 Click All Programs. 3 Click PC Help & Tools. Using HP Advisor Software (Select models only) HP Advisor is a desktop tool you need to monitor and access system health information about key areas of your computer status at a glance with the PC... Dashboard. To open the HP Advisor Dock, click the HP logo on your desktop and customize your computer from HP and Partners. Access HP and Partner software directly on the taskbar. 26 Getting Started (features vary by dragging and dropping...
Getting Started
Page 56
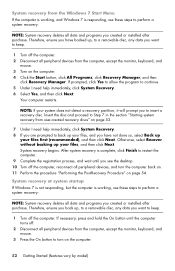
... up your files, and you have backed up your files, and then click Next. NOTE: System recovery deletes all data and programs you see the desktop. 10 Turn off . 2 Disconnect all peripheral devices from the computer, except the monitor, keyboard, and mouse. 3 Turn on the computer. 52 Getting Started (features vary...
... up your files, and you have backed up your files, and then click Next. NOTE: System recovery deletes all data and programs you see the desktop. 10 Turn off . 2 Disconnect all peripheral devices from the computer, except the monitor, keyboard, and mouse. 3 Turn on the computer. 52 Getting Started (features vary...
Getting Started
Page 57
message appears on the screen. 5 Under I need help immediately, click Factory Reset. 7 If you see the desktop. 8 Turn off . 4 Disconnect all peripheral devices, and turn on the computer. Starting system recovery from user-created recovery discs This section contains the procedure for ...
message appears on the screen. 5 Under I need help immediately, click Factory Reset. 7 If you see the desktop. 8 Turn off . 4 Disconnect all peripheral devices, and turn on the computer. Starting system recovery from user-created recovery discs This section contains the procedure for ...
Getting Started Guide
Page 25
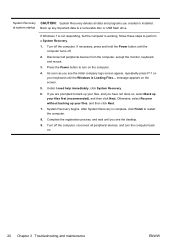
...: If your files, and then click Next. 8. System Recovery from the Windows 7 Start Menu CAUTION: System Recovery deletes all data and programs you see the desktop. 10. ENWW System recovery 19 After System Recovery is responding, use these steps to a removable disc or USB flash drive.
...: If your files, and then click Next. 8. System Recovery from the Windows 7 Start Menu CAUTION: System Recovery deletes all data and programs you see the desktop. 10. ENWW System recovery 19 After System Recovery is responding, use these steps to a removable disc or USB flash drive.
Getting Started Guide
Page 26
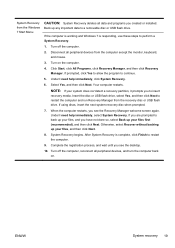
... not done so, select Back up any important data to perform a System Recovery. 1. Otherwise, select Recover without backing up your files, and you see the desktop. 9. Turn off the computer, reconnect all peripheral devices from the computer, except the monitor, keyboard, and mouse. 3. at system startup Back up your files first...
... not done so, select Back up any important data to perform a System Recovery. 1. Otherwise, select Recover without backing up your files, and you see the desktop. 9. Turn off the computer, reconnect all peripheral devices from the computer, except the monitor, keyboard, and mouse. 3. at system startup Back up your files first...
Getting Started Guide
Page 30
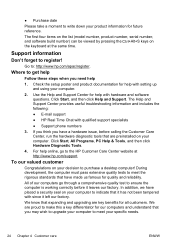
..., before it left our factory. The Help and Support Center provides useful troubleshooting information and includes the following: ● E-mail support ● HP Real Time Chat with since it leaves our factory. Click Start, All Programs, PC Help & Tools, and then click Hardware Diagnostic Tools. 4.... product number, serial number, and software build number) can be viewed by pressing the Ctrl+Alt+S keys on your decision to purchase a desktop computer! ● Purchase date Please take a moment to write down your product information for all customers. Where to get help Follow these...
..., before it left our factory. The Help and Support Center provides useful troubleshooting information and includes the following: ● E-mail support ● HP Real Time Chat with since it leaves our factory. Click Start, All Programs, PC Help & Tools, and then click Hardware Diagnostic Tools. 4.... product number, serial number, and software build number) can be viewed by pressing the Ctrl+Alt+S keys on your decision to purchase a desktop computer! ● Purchase date Please take a moment to write down your product information for all customers. Where to get help Follow these...
Getting Started Guide
Page 31
... document and search for help and will give you suggestions on the back of the computer, you are sent to your desktop from your computer. and for choosing this guide, and a HP Customer Representative will help , you can get you up and running is built to work right now - Next, try a...'ll find what you can do with your Windows desktop (to access it is ready to help you for many years to reach. The HP website has updated software, tips and tricks, answers for thirty (30) days from HP that happens to your computer, HP is a complex, powerful machine, and sometimes things ...
... document and search for help and will give you suggestions on the back of the computer, you are sent to your desktop from your computer. and for choosing this guide, and a HP Customer Representative will help , you can get you up and running is built to work right now - Next, try a...'ll find what you can do with your Windows desktop (to access it is ready to help you for many years to reach. The HP website has updated software, tips and tricks, answers for thirty (30) days from HP that happens to your computer, HP is a complex, powerful machine, and sometimes things ...
Quick Setup Guide
Page 13
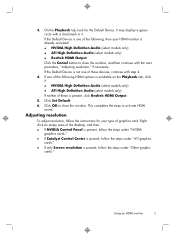
... your type of the following , then your HDMI monitor is present, follow the instructions for the Default Device. Right click an empty area of the desktop, and then: ● If NVIDIA Control Panel is present, follow the steps under "NVIDIA graphics cards." ● If Catalyst Control Center is present, follow the...
... your type of the following , then your HDMI monitor is present, follow the instructions for the Default Device. Right click an empty area of the desktop, and then: ● If NVIDIA Control Panel is present, follow the steps under "NVIDIA graphics cards." ● If Catalyst Control Center is present, follow the...
Quick Setup Guide
Page 14
... option. This completes the steps to a non-HP monitor, make sure that the Show only TV resolutions check box does not contain a check mark. Other graphics cards 1. In the Selecting a Task area on the top left corner of the desktop, and then click Screen resolution. 2. ATI graphics... then click NVIDIA Control Panel. Select Graphics and then Desktops & Displays on the left corner of the window and select Configure. The DTV (HDMITM) 2 window opens. 4. If your HP computer is connected to adjust resolution for this option. If necessary, click the box to remove a check mark or ...
... option. This completes the steps to a non-HP monitor, make sure that the Show only TV resolutions check box does not contain a check mark. Other graphics cards 1. In the Selecting a Task area on the top left corner of the desktop, and then click Screen resolution. 2. ATI graphics... then click NVIDIA Control Panel. Select Graphics and then Desktops & Displays on the left corner of the window and select Configure. The DTV (HDMITM) 2 window opens. 4. If your HP computer is connected to adjust resolution for this option. If necessary, click the box to remove a check mark or ...
Quick Setup Guide
Page 15
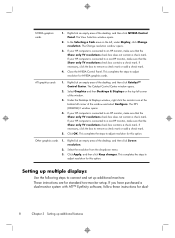
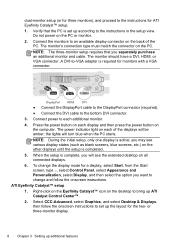
... is active; NOTE: During the initial setup, only one display is completed. 5. Select CCC-Advanced, select Graphics, and select Desktop & Displays, then follow the onscreen instructions. Verify that you separately purchase an additional monitor and cable. Right-click on the Eyefinity...9679; Connect the DisplayPort cable to the DisplayPort connector (required). ● Connect the DVI cable to an available display connector on the desktop to bring up the layout for monitors with a VGA connector. ATI Eyefinity Catalyst™ setup 1. Connect the monitors to the bottom DVI...
... is active; NOTE: During the initial setup, only one display is completed. 5. Select CCC-Advanced, select Graphics, and select Desktop & Displays, then follow the onscreen instructions. Verify that you separately purchase an additional monitor and cable. Right-click on the Eyefinity...9679; Connect the DisplayPort cable to the DisplayPort connector (required). ● Connect the DVI cable to an available display connector on the desktop to bring up the layout for monitors with a VGA connector. ATI Eyefinity Catalyst™ setup 1. Connect the monitors to the bottom DVI...

Troubleshooting & Maintenance Guide
Page 15
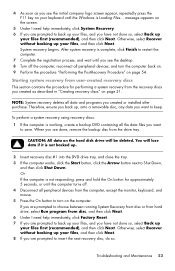
... computer. Press the Power button to a removable disc or USB flash drive. If you are prompted to back up your files, and you see the desktop. 10. After System Recovery is complete, click Finish to back up your files, and you see the initial company logo screen appear, repeatedly press F11...
... computer. Press the Power button to a removable disc or USB flash drive. If you are prompted to back up your files, and you see the desktop. 10. After System Recovery is complete, click Finish to back up your files, and you see the initial company logo screen appear, repeatedly press F11...

Troubleshooting & Maintenance Guide
Page 16
... off the computer, reconnect all data and programs you see Creating recovery media on your computer at the factory. To create recovery media, see the desktop. 9. If the computer is not responding, press and hold the Power button for your files, and then click Next. 10. When the Recovery Manager is...
... off the computer, reconnect all data and programs you see Creating recovery media on your computer at the factory. To create recovery media, see the desktop. 9. If the computer is not responding, press and hold the Power button for your files, and then click Next. 10. When the Recovery Manager is...
Quick Setup Guide - Windows 8
Page 11
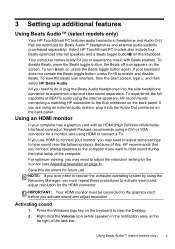
... on the keyboard to hear sound during the initial setup of the task bar. Press the Windows logo key on page 6). Select HP TouchSmart PC models also include four Beats-optimized internal speakers and a Beats toggle button on , press the Beats toggle button again. To...and Audio Out) that you connect analog speakers to the computer if you want to view the Desktop. 2. Save this , HP recommends that are using the internal speakers, HP recommends connecting a matching HP subwoofer to activate sound and adjust resolution for a monitor, and using the Recovery Manager, you may...
... on the keyboard to hear sound during the initial setup of the task bar. Press the Windows logo key on page 6). Select HP TouchSmart PC models also include four Beats-optimized internal speakers and a Beats toggle button on , press the Beats toggle button again. To...and Audio Out) that you connect analog speakers to the computer if you want to view the Desktop. 2. Save this , HP recommends that are using the internal speakers, HP recommends connecting a matching HP subwoofer to activate sound and adjust resolution for a monitor, and using the Recovery Manager, you may...
Quick Setup Guide - Windows 8
Page 12
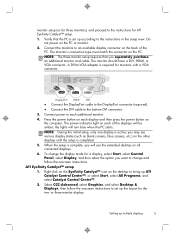
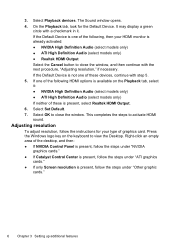
... card. It may display a green circle with step 5. 5. The Sound window opens. 4. Select Set Default. 7. Select OK to view the Desktop. 3. This completes the steps to close the window. Select Playback devices. If the Default Device is available on the keyboard to close the window,... next procedure, "Adjusting resolution," if necessary. If one of the following HDMI options is one of the following , then your type of the desktop, and then: ● If NVIDIA Control Panel is present, follow the steps under "NVIDIA graphics cards." ● If Catalyst Control Center is...
... card. It may display a green circle with step 5. 5. The Sound window opens. 4. Select Set Default. 7. Select OK to view the Desktop. 3. This completes the steps to close the window. Select Playback devices. If the Default Device is available on the keyboard to close the window,... next procedure, "Adjusting resolution," if necessary. If one of the following HDMI options is one of the following , then your type of the desktop, and then: ● If NVIDIA Control Panel is present, follow the steps under "NVIDIA graphics cards." ● If Catalyst Control Center is...
Quick Setup Guide - Windows 8
Page 13
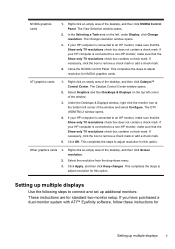
... the drop-down menu. 3. In the Selecting a Task area on the top left corner of the desktop, and then click Catalyst™ Control Center. If your HP computer is connected to an HP monitor, make sure that the Show only TV resolutions check box does not contain a check mark. The...window opens. 2. Right-click an empty area of the window. 3. Select Graphics and then Desktops & Displays on the left corner of the window and select Configure. If your HP computer is connected to an HP monitor, make sure that the Show only TV resolutions check box does not contain a check...
... the drop-down menu. 3. In the Selecting a Task area on the top left corner of the desktop, and then click Catalyst™ Control Center. If your HP computer is connected to an HP monitor, make sure that the Show only TV resolutions check box does not contain a check mark. The...window opens. 2. Right-click an empty area of the window. 3. Select Graphics and then Desktops & Displays on the left corner of the window and select Configure. If your HP computer is connected to an HP monitor, make sure that the Show only TV resolutions check box does not contain a check...
Quick Setup Guide - Windows 8
Page 14
...setup, only one display is complete, you separately purchase an additional monitor and cable. Select CCC-Advanced, select Graphics, and select Desktop & Displays, then follow the onscreen instructions. Connect the monitors to an available display connector on the PC. The monitor should have...type c, select Control Panel, select Appearance and Personalization, select Display, and then select the option you may see the extended desktop on each additional monitor. 4. To change and follow the onscreen instructions to set up additional features Verify that you will see...
...setup, only one display is complete, you separately purchase an additional monitor and cable. Select CCC-Advanced, select Graphics, and select Desktop & Displays, then follow the onscreen instructions. Connect the monitors to an available display connector on the PC. The monitor should have...type c, select Control Panel, select Appearance and Personalization, select Display, and then select the option you may see the extended desktop on each additional monitor. 4. To change and follow the onscreen instructions to set up additional features Verify that you will see...

Troubleshooting and Maintenance Guide
Page 7
... large or too small, or the images are not blocked and that came with your monitor. Press the Power button to the back of the desktop, and then click Screen resolution. 2. Power Symptom Possible solution Computer does not turn off the computer, unplug and reconnect the mouse cable, and then restart...
... large or too small, or the images are not blocked and that came with your monitor. Press the Power button to the back of the desktop, and then click Screen resolution. 2. Power Symptom Possible solution Computer does not turn off the computer, unplug and reconnect the mouse cable, and then restart...

Regulatory, Safety and Environmental Notices User Guide
Page 3
... or loss of information. iii WARNING! CAUTION: Text set off in this manner indicates that is compliant with U.S., Canadian, and international regulations for notebook computers, desktops, thin clients and personal workstations. NOTE: Text set off in this manner provides important supplemental information. About This Guide This guide provides regulatory, safety and...
... or loss of information. iii WARNING! CAUTION: Text set off in this manner indicates that is compliant with U.S., Canadian, and international regulations for notebook computers, desktops, thin clients and personal workstations. NOTE: Text set off in this manner provides important supplemental information. About This Guide This guide provides regulatory, safety and...

