Upgrading and Servicing Guide
Page 4
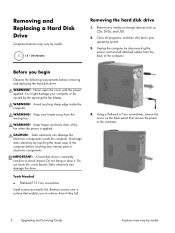
... Guide Features may vary by touching the metal cage of the computer. WARNING! Tools Needed ● Flathead/T15 Torx screwdriver Small screws are easily lost. Removing and Replacing a Hard Disk Drive Computer features may vary by the spinning the fan blades. Discharge static electricity by model. 15 - 20 minutes Removing the hard...
... Guide Features may vary by touching the metal cage of the computer. WARNING! Tools Needed ● Flathead/T15 Torx screwdriver Small screws are easily lost. Removing and Replacing a Hard Disk Drive Computer features may vary by the spinning the fan blades. Discharge static electricity by model. 15 - 20 minutes Removing the hard...
Upgrading and Servicing Guide
Page 5
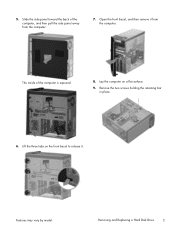
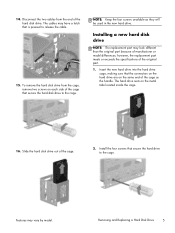
5. Lay the computer on the front bezel to release it from the computer. 7. Remove the two screws holding the retaining bar in place. 6. Features may vary by model. The inside of the computer, and then pull the side panel away from the computer. Open the front bezel, and then remove it . Removing and Replacing a Hard Disk Drive 3 Lift the three tabs on a flat surface. 9. Slide the side panel toward the back of the computer is exposed. 8.
5. Lay the computer on the front bezel to release it from the computer. 7. Remove the two screws holding the retaining bar in place. 6. Features may vary by model. The inside of the computer, and then pull the side panel away from the computer. Open the front bezel, and then remove it . Removing and Replacing a Hard Disk Drive 3 Lift the three tabs on a flat surface. 9. Slide the side panel toward the back of the computer is exposed. 8.
Upgrading and Servicing Guide
Page 6
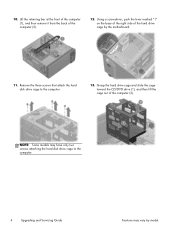
Remove the three screws that attach the hard disk drive cage to the computer. 4 Upgrading and Servicing Guide Features may vary by the motherboard. 11. Lift the retaining bar at the front of the computer (1), and then remove it from the back of the computer (2). Grasp the hard drive cage and slide...toward the CD/DVD drive (1), and then lift the cage out of the computer (2). 12. 10. Using a screwdriver, push the lever marked "1" on the base of the right side of the hard drive cage by model. NOTE: Some models may have only two screws attaching the hard disk drive cage to the ...
Remove the three screws that attach the hard disk drive cage to the computer. 4 Upgrading and Servicing Guide Features may vary by the motherboard. 11. Lift the retaining bar at the front of the computer (1), and then remove it from the back of the computer (2). Grasp the hard drive cage and slide...toward the CD/DVD drive (1), and then lift the cage out of the computer (2). 12. 10. Using a screwdriver, push the lever marked "1" on the base of the right side of the hard drive cage by model. NOTE: Some models may have only two screws attaching the hard disk drive cage to the ...
Upgrading and Servicing Guide
Page 7
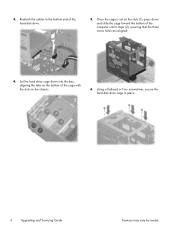
.... The cables may vary by model. To remove the hard disk drive from the end of the original part. 1. NOTE: Keep the four screws available as the handle. Install the four screws that is pressed to release the cable. 15. The hard drive rests on the same end of the cage that secure the... hard disk drive to the cage. Features may have a latch that secure the...
.... The cables may vary by model. To remove the hard disk drive from the end of the original part. 1. NOTE: Keep the four screws available as the handle. Install the four screws that is pressed to release the cable. 15. The hard drive rests on the same end of the cage that secure the... hard disk drive to the cage. Features may have a latch that secure the...
Upgrading and Servicing Guide
Page 8
Once the cage is set on the chassis. 6. Set the hard drive cage down into the bay, aligning the tabs on the bottom of the cage with the slots on the slots (1), press down and slide the cage toward the bottom of the hard disk drive. 5. Reattach the cables to the bottom end of the computer until it stops (2), ensuring that the three screw holes are aligned. 4. Using a flathead or Torx screwdriver, secure the hard disk drive cage in place. 6 Upgrading and Servicing Guide Features may vary by model. 3.
Once the cage is set on the chassis. 6. Set the hard drive cage down into the bay, aligning the tabs on the bottom of the cage with the slots on the slots (1), press down and slide the cage toward the bottom of the hard disk drive. 5. Reattach the cables to the bottom end of the computer until it stops (2), ensuring that the three screw holes are aligned. 4. Using a flathead or Torx screwdriver, secure the hard disk drive cage in place. 6 Upgrading and Servicing Guide Features may vary by model. 3.
Upgrading and Servicing Guide
Page 9
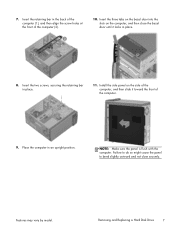
... screws, securing the retaining bar in an upright position. NOTE: Make sure the panel is flush with the computer. Failure to do so might cause the panel to bend slightly outward and not close the bezel door until it toward the front of the computer (2). 10. Removing and Replacing a Hard Disk Drive... door into the slots on the side of the computer, and then slide it locks in the back of the computer (1), and then align the screw holes at the front of the computer. 9. 7.
... screws, securing the retaining bar in an upright position. NOTE: Make sure the panel is flush with the computer. Failure to do so might cause the panel to bend slightly outward and not close the bezel door until it toward the front of the computer (2). 10. Removing and Replacing a Hard Disk Drive... door into the slots on the side of the computer, and then slide it locks in the back of the computer (1), and then align the screw holes at the front of the computer. 9. 7.
Upgrading and Servicing Guide
Page 10
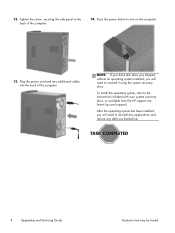
... back of the computer. 14. NOTE: If your system recovery discs, or available from the HP support site (www.hp.com/support). Tighten the screw, securing the side panel to the instructions included with your hard disk drive was shipped without an operating system installed, you will need to reinstall it using the system...
... back of the computer. 14. NOTE: If your system recovery discs, or available from the HP support site (www.hp.com/support). Tighten the screw, securing the side panel to the instructions included with your hard disk drive was shipped without an operating system installed, you will need to reinstall it using the system...
Upgrading and Servicing Guide
Page 11
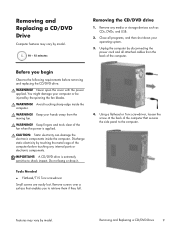
.... Avoid touching sharp edge inside the computer. Discharge static electricity by model. 10 - 15 minutes Removing the CD/DVD drive 1. Removing and Replacing a CD/DVD Drive 9 WARNING! Do not bang or drop it. 4. Remove screws over a surface that secures the side panel to the computer. WARNING! WARNING! Keep your operating system. 3. IMPORTANT: A CD...
.... Avoid touching sharp edge inside the computer. Discharge static electricity by model. 10 - 15 minutes Removing the CD/DVD drive 1. Removing and Replacing a CD/DVD Drive 9 WARNING! Do not bang or drop it. 4. Remove screws over a surface that secures the side panel to the computer. WARNING! WARNING! Keep your operating system. 3. IMPORTANT: A CD...
Upgrading and Servicing Guide
Page 15
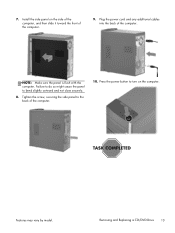
Tighten the screw, securing the side panel to turn on the side of the computer, and then slide it toward the front of the computer. 9. NOTE: Make sure the panel is flush with the computer. Press the power button to the back of the computer. Features may vary by model. Removing and Replacing a CD/DVD Drive 13 Failure to do so might cause the panel to bend slightly outward and not close securely. 8. 7. Install the side panel on the computer. Plug the power cord and any additional cables into the back of the computer. 10.
Tighten the screw, securing the side panel to turn on the side of the computer, and then slide it toward the front of the computer. 9. NOTE: Make sure the panel is flush with the computer. Press the power button to the back of the computer. Features may vary by model. Removing and Replacing a CD/DVD Drive 13 Failure to do so might cause the panel to bend slightly outward and not close securely. 8. 7. Install the side panel on the computer. Plug the power cord and any additional cables into the back of the computer. 10.


