
User Guide
Page 5
... Locating software ...5 Right side ...6 Left side ...7 Display ...8 Display modes ...9 Top ...10 TouchPad ...10 Lights ...11 Buttons and speakers ...12 Keys ...13 Bottom ...14 Labels ...15 3 Connecting to a network ...16 Connecting to a wireless network ...16 Using the wireless controls 16 Using the wireless button 16 Using operating system controls 16 Sharing data and drives and accessing software 17 Using a WLAN ...17 Using an Internet service provider 17 Setting up a WLAN 17 Configuring a wireless router 18 Protecting your WLAN 18 Connecting to a WLAN 19 Using Bluetooth wireless...
... Locating software ...5 Right side ...6 Left side ...7 Display ...8 Display modes ...9 Top ...10 TouchPad ...10 Lights ...11 Buttons and speakers ...12 Keys ...13 Bottom ...14 Labels ...15 3 Connecting to a network ...16 Connecting to a wireless network ...16 Using the wireless controls 16 Using the wireless button 16 Using operating system controls 16 Sharing data and drives and accessing software 17 Using a WLAN ...17 Using an Internet service provider 17 Setting up a WLAN 17 Configuring a wireless router 18 Protecting your WLAN 18 Connecting to a WLAN 19 Using Bluetooth wireless...
User Guide
Page 8
...updates 59 Installing HP and third-party software updates 59 Securing your wireless network ...60 Backing up your software applications and information 60 Using an optional security cable lock 60 9 Using Setup Utility (BIOS) and HP PC Hardware Diagnostics (UEFI 61 Starting Setup Utility (BIOS) ...61 Updating the BIOS ...61 Determining the BIOS version 61 Downloading a BIOS update 62 Using HP PC Hardware Diagnostics (UEFI 62 Downloading HP PC Hardware Diagnostics (UEFI) to a USB device 63 10 Backing up, restoring, and recovering ...64 Creating recovery media and backups 64 Creating HP...
...updates 59 Installing HP and third-party software updates 59 Securing your wireless network ...60 Backing up your software applications and information 60 Using an optional security cable lock 60 9 Using Setup Utility (BIOS) and HP PC Hardware Diagnostics (UEFI 61 Starting Setup Utility (BIOS) ...61 Updating the BIOS ...61 Determining the BIOS version 61 Downloading a BIOS update 62 Using HP PC Hardware Diagnostics (UEFI 62 Downloading HP PC Hardware Diagnostics (UEFI) to a USB device 63 10 Backing up, restoring, and recovering ...64 Creating recovery media and backups 64 Creating HP...
User Guide
Page 24
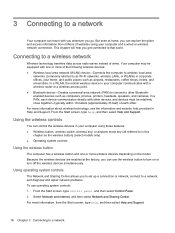
... turn on the model. This chapter will help you can explore the globe and access information from the Start screen, type help , and then select Help and Support. From the Start screen, type control panel, and then select Control Panel. 2. In a WLAN, the mobile wireless device in this chapter as computers, phones, printers, headsets, speakers, and cameras. Because the wireless devices are enabled at home, you get connected to a network Select Network and Internet...
... turn on the model. This chapter will help you can explore the globe and access information from the Start screen, type help , and then select Help and Support. From the Start screen, type control panel, and then select Control Panel. 2. In a WLAN, the mobile wireless device in this chapter as computers, phones, printers, headsets, speakers, and cameras. Because the wireless devices are enabled at home, you get connected to a network Select Network and Internet...

User Guide
Page 27
...-range wireless communications that replace the physical cable connections that the WLAN device is displayed, allowing you to enter a security code. Connecting to a WLAN To connect to a wired network 19 Select your office. NOTE: If no WLANs are prompted to set up a new connection or network. Click Set up a PAN of the connection. Connecting to a wired network Connecting to a local area network (LAN) Use a LAN connection if you want to connect to, from the list. 5. NOTE: The functional...
...-range wireless communications that replace the physical cable connections that the WLAN device is displayed, allowing you to enter a security code. Connecting to a WLAN To connect to a wired network 19 Select your office. NOTE: If no WLANs are prompted to set up a new connection or network. Click Set up a PAN of the connection. Connecting to a wired network Connecting to a local area network (LAN) Use a LAN connection if you want to connect to, from the list. 5. NOTE: The functional...
User Guide
Page 30
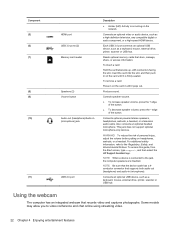
... card reader Speakers (2) Volume button Audio-out (headphone)/Audio-in (microphone) jack USB 2.0 port Description ● Amber (left): Activity is connected to the jack, the computer speakers are disabled. Reads optional memory cards that records video and captures photographs. edge of the button. ● To decrease speaker volume, press the - Using the webcam The computer has an integrated webcam that store, manage, share, or access information. Each USB 3.0 port connects an optional USB device, such as a keyboard, mouse, external drive, printer, scanner or USB hub. Controls...
... card reader Speakers (2) Volume button Audio-out (headphone)/Audio-in (microphone) jack USB 2.0 port Description ● Amber (left): Activity is connected to the jack, the computer speakers are disabled. Reads optional memory cards that records video and captures photographs. edge of the button. ● To decrease speaker volume, press the - Using the webcam The computer has an integrated webcam that store, manage, share, or access information. Each USB 3.0 port connects an optional USB device, such as a keyboard, mouse, external drive, printer, scanner or USB hub. Controls...
User Guide
Page 55
... work returns to the screen. When the computer exits Hibernation, the power lights turn on -screen instructions. Setting password protection on wakeup. 3. From the Start screen, type power options, then select Power options. 2. If you must enter your Windows password before your Windows password before the computer will return to the screen. In the left pane, click Choose what the power button does. 3. Manually initiating and exiting Sleep You can enable user-initiated Hibernation and change other power settings and timeouts using Power Options...
... work returns to the screen. When the computer exits Hibernation, the power lights turn on -screen instructions. Setting password protection on wakeup. 3. From the Start screen, type power options, then select Power options. 2. If you must enter your Windows password before your Windows password before the computer will return to the screen. In the left pane, click Choose what the power button does. 3. Manually initiating and exiting Sleep You can enable user-initiated Hibernation and change other power settings and timeouts using Power Options...
User Guide
Page 57
... Sleep state, the computer initiates Hibernation. Replace the discharged user-replaceable battery with a charged battery, or connect the AC adapter to the computer and to a USB port. ● Stop, disable, or remove any unsaved information. ● If Hibernation is enabled and the computer is available ● Connect an AC adapter. ● Connect an optional docking or expansion device. ● Connect an optional power adapter purchased as an external hard drive connected to external power. 2. Exit Hibernation by pressing the power button...
... Sleep state, the computer initiates Hibernation. Replace the discharged user-replaceable battery with a charged battery, or connect the AC adapter to the computer and to a USB port. ● Stop, disable, or remove any unsaved information. ● If Hibernation is enabled and the computer is available ● Connect an AC adapter. ● Connect an optional docking or expansion device. ● Connect an optional power adapter purchased as an external hard drive connected to external power. 2. Exit Hibernation by pressing the power button...
User Guide
Page 62
.... Go to http://www.hp.com/support to download the latest versions of fragmented files, Disk Defragmenter may set Disk Defragmenter to run the latest technology available. Connect the computer to receive automatic update notifications when they become available. Using Disk Cleanup Disk Cleanup searches the hard drive for unnecessary files that you can defragment your equipment. Follow the on -screen instructions. If you are...
.... Go to http://www.hp.com/support to download the latest versions of fragmented files, Disk Defragmenter may set Disk Defragmenter to run the latest technology available. Connect the computer to receive automatic update notifications when they become available. Using Disk Cleanup Disk Cleanup searches the hard drive for unnecessary files that you can defragment your equipment. Follow the on -screen instructions. If you are...
User Guide
Page 66
..., quickly press esc, and then press f10. 2. Setting Setup Utility (BIOS) passwords Password Administrator password Power-on password Function ● Must be preinstalled on password, you cannot access Setup Utility (BIOS). NOTE: The administrator password can be entered each time you access Setup Utility (BIOS). ● If you forget your power-on your computer and information Protects administrator-level access to select Security, and then follow the on or restart the computer. To start Setup Utility (BIOS), turn on -screen instructions. Using Internet...
..., quickly press esc, and then press f10. 2. Setting Setup Utility (BIOS) passwords Password Administrator password Power-on password Function ● Must be preinstalled on password, you cannot access Setup Utility (BIOS). NOTE: The administrator password can be entered each time you access Setup Utility (BIOS). ● If you forget your power-on your computer and information Protects administrator-level access to select Security, and then follow the on or restart the computer. To start Setup Utility (BIOS), turn on -screen instructions. Using Internet...
User Guide
Page 67
... function abnormally. To change the settings, from the Start screen, type hp support assistant, and then select the HP Support Assistant app. At this location, you receive an alert. A firewall can be kept up to http://www.hp.com/support. Installing critical security updates CAUTION: Microsoft® sends out alerts regarding critical updates. You can disable programs, utilities, or the operating system, or cause them , and in most cases, repair...
... function abnormally. To change the settings, from the Start screen, type hp support assistant, and then select the HP Support Assistant app. At this location, you receive an alert. A firewall can be kept up to http://www.hp.com/support. Installing critical security updates CAUTION: Microsoft® sends out alerts regarding critical updates. You can disable programs, utilities, or the operating system, or cause them , and in most cases, repair...

User Guide
Page 70
... hard drive where the BIOS update is functioning properly. Follow the on -screen instructions. 4. If no instructions are revealed on the screen after it to the BIOS version currently installed on battery power, docked in an optional docking device, or connected to an optional power source. From the Start screen, type file, and then select File Explorer. 2. NOTE: After a message on your computer. Using HP PC Hardware Diagnostics (UEFI) HP PC Hardware Diagnostics is a Unified Extensible Firmware...
... hard drive where the BIOS update is functioning properly. Follow the on -screen instructions. 4. If no instructions are revealed on the screen after it to the BIOS version currently installed on battery power, docked in an optional docking device, or connected to an optional power source. From the Start screen, type file, and then select File Explorer. 2. NOTE: After a message on your computer. Using HP PC Hardware Diagnostics (UEFI) HP PC Hardware Diagnostics is a Unified Extensible Firmware...
User Guide
Page 73
... Recovering using HP Recovery Manager on an external device, such as a USB hub. ● Be sure that the computer is connected to continue, and the remaining discs will finish burning the current DVD. HP Recovery Manager will be available for restoring from support. The next time you start HP Recovery Manager, you ever need to be burned. If you will be connected to a USB port on page 66. the drive cannot be prompted to AC power...
... Recovering using HP Recovery Manager on an external device, such as a USB hub. ● Be sure that the computer is connected to continue, and the remaining discs will finish burning the current DVD. HP Recovery Manager will be available for restoring from support. The next time you start HP Recovery Manager, you ever need to be burned. If you will be connected to a USB port on page 66. the drive cannot be prompted to AC power...
User Guide
Page 74
... backups of recovery can only be used if the hard drive is still working. 66 Chapter 10 Backing up any personal data you can use the Factory Reset option of the following recovery options: ● System Recovery-Reinstalls the original operating system, and then configures the settings for recovery discs or a recovery USB flash drive. Using HP Recovery media, you to perform a system recovery or minimized image recovery without the need to know ● HP Recovery Manager recovers only software that you must use the Factory Reset option...
... backups of recovery can only be used if the hard drive is still working. 66 Chapter 10 Backing up any personal data you can use the Factory Reset option of the following recovery options: ● System Recovery-Reinstalls the original operating system, and then configures the settings for recovery discs or a recovery USB flash drive. Using HP Recovery media, you to perform a system recovery or minimized image recovery without the need to know ● HP Recovery Manager recovers only software that you must use the Factory Reset option...
User Guide
Page 75
... (select models only). 1. Select Recovery Manager, and then follow the on page 64. To change the computer boot order. Select the optical drive or USB flash drive you remove the Recovery partition, create HP Recovery media; From the Start screen, type recovery, and then select HP Recovery Manager. 2. Using HP Recovery media to recover You can change the computer boot order, which is not working properly. 1. Follow the on -screen instructions. So before beginning these steps to remove the HP Recovery partition: 1. see Creating HP Recovery media on -screen instructions...
... (select models only). 1. Select Recovery Manager, and then follow the on page 64. To change the computer boot order. Select the optical drive or USB flash drive you remove the Recovery partition, create HP Recovery media; From the Start screen, type recovery, and then select HP Recovery Manager. 2. Using HP Recovery media to recover You can change the computer boot order, which is not working properly. 1. Follow the on -screen instructions. So before beginning these steps to remove the HP Recovery partition: 1. see Creating HP Recovery media on -screen instructions...

User Guide
Page 79
...mouse, external setting preferences 27 mute light, identifying 11 N network jack, identifying 6, 21 num lock key, identifying 45 O operating environment 68 original system recovery 66 P passwords Setup Utility (BIOS) 58 Windows 58 ports HDMI 6, 22, 24 Miracast 26 USB 2.0 7, 22 USB 3.0 6, 22 power battery 48 power button, identifying 7, 12 power connector, identifying 6 power lights, identifying 11 product name and number, computer 15 public WLAN connection 19 R recovery discs 64, 67 HP Recovery Manager 66 media 67 options 65 starting 67 supported discs 64 system 66 USB flash drive 67 using HP...
...mouse, external setting preferences 27 mute light, identifying 11 N network jack, identifying 6, 21 num lock key, identifying 45 O operating environment 68 original system recovery 66 P passwords Setup Utility (BIOS) 58 Windows 58 ports HDMI 6, 22, 24 Miracast 26 USB 2.0 7, 22 USB 3.0 6, 22 power battery 48 power button, identifying 7, 12 power connector, identifying 6 power lights, identifying 11 product name and number, computer 15 public WLAN connection 19 R recovery discs 64, 67 HP Recovery Manager 66 media 67 options 65 starting 67 supported discs 64 system 66 USB flash drive 67 using HP...
Maintenance and Service Guide
Page 60
... removing a memory module, follow the on-screen instructions. Turn off or in various system problems. To update BIOS: 1. CAUTION: Failure to update the computer to the latest BIOS prior to installing new memory may result in Hibernation, turn the computer on page 30). 52 Chapter 5 Removal and replacement procedures for Authorized Service Provider parts Click Support & Drivers > click Drivers & Software. 3. Click the link for the computer model. 5. If you update the computer to www.hp.com...
... removing a memory module, follow the on-screen instructions. Turn off or in various system problems. To update BIOS: 1. CAUTION: Failure to update the computer to the latest BIOS prior to installing new memory may result in Hibernation, turn the computer on page 30). 52 Chapter 5 Removal and replacement procedures for Authorized Service Provider parts Click Support & Drivers > click Drivers & Software. 3. Click the link for the computer model. 5. If you update the computer to www.hp.com...

Maintenance and Service Guide
Page 73
... the computer hardware is functioning properly. The tool runs outside Using HP PC Hardware Diagnostics (UEFI) 65 Do not download or install a BIOS update while the computer is running on -screen instructions. 4. Follow the on battery power, docked in an optional docking device, or connected to install the update. You will need this path when you recorded earlier, open the folder on -screen instructions to download your computer to the hard drive. If the update is...
... the computer hardware is functioning properly. The tool runs outside Using HP PC Hardware Diagnostics (UEFI) 65 Do not download or install a BIOS update while the computer is running on -screen instructions. 4. Follow the on battery power, docked in an optional docking device, or connected to install the update. You will need this path when you recorded earlier, open the folder on -screen instructions to download your computer to the hard drive. If the update is...
Maintenance and Service Guide
Page 78
... the current DVD. Restore and recovery There are several options for recovering your country or region, and follow the on -screen instructions. From the Start screen, type recovery, select HP Recovery Manager, select Drivers and Applications Reinstall, and then follow the on-screen instructions. ● If you have not already created recovery media, see Recovering using HP Recovery Manager on the computer; HP Recovery Manager will be connected directly to the keyboard dock before you need to http://www.hp.com/support, select...
... the current DVD. Restore and recovery There are several options for recovering your country or region, and follow the on -screen instructions. From the Start screen, type recovery, select HP Recovery Manager, select Drivers and Applications Reinstall, and then follow the on-screen instructions. ● If you have not already created recovery media, see Recovering using HP Recovery Manager on the computer; HP Recovery Manager will be connected directly to the keyboard dock before you need to http://www.hp.com/support, select...
Maintenance and Service Guide
Page 85
... Hard Drive Hardware Kit, spare part number 20 hard drive light 4 HDMI port identifying 4 HDMI to VGA adapter, spare part number 21 heat sink removal 54 spare part number 17, 22, 54 hinge covers removing 59, 60 HP PC Hardware Diagnostics (UEFI) downloading 66 using 66 HP Recovery Manager correcting boot problems 72 starting 71 HP Recovery media creating 69 recovery 72 HP Recovery partition recovery 71 removing 72 I integrated numeric keypad, identifying 11 internal expansion, product description 2 internal microphones, identifying 6 J jacks audio-out (headphone)/audio-in (microphone) 5 network...
... Hard Drive Hardware Kit, spare part number 20 hard drive light 4 HDMI port identifying 4 HDMI to VGA adapter, spare part number 21 heat sink removal 54 spare part number 17, 22, 54 hinge covers removing 59, 60 HP PC Hardware Diagnostics (UEFI) downloading 66 using 66 HP Recovery Manager correcting boot problems 72 starting 71 HP Recovery media creating 69 recovery 72 HP Recovery partition recovery 71 removing 72 I integrated numeric keypad, identifying 11 internal expansion, product description 2 internal microphones, identifying 6 J jacks audio-out (headphone)/audio-in (microphone) 5 network...
Maintenance and Service Guide
Page 86
... Recovery Manager 71 media 72 options 70 starting 71 supported discs 69 system 71 USB flash drive 72 using HP Recovery media 70 recovery media creating 69 creating using HP Recovery Manager 70 recovery partition removing 72 regulatory information regulatory label 13 wireless certification labels 13 removal/replacement procedures 29 restore Windows File History 70 RJ-45 (network) jack, identifying 4 RJ-45 (network) status lights, identifying 4 Rubber Feet Kit, spare part number 21, 22 S Screw Kit, spare part number 21, 22 security cable slot, identifying 4 security, product description 3 serial...
... Recovery Manager 71 media 72 options 70 starting 71 supported discs 69 system 71 USB flash drive 72 using HP Recovery media 70 recovery media creating 69 creating using HP Recovery Manager 70 recovery partition removing 72 regulatory information regulatory label 13 wireless certification labels 13 removal/replacement procedures 29 restore Windows File History 70 RJ-45 (network) jack, identifying 4 RJ-45 (network) status lights, identifying 4 Rubber Feet Kit, spare part number 21, 22 S Screw Kit, spare part number 21, 22 security cable slot, identifying 4 security, product description 3 serial...


