Start Here
Page 5
1 Introducing Windows 10 This guide describes new Windows® 10 features, which may update some of the information provided with your computer hardware and software, see the User Guide. Select Drivers & Downloads, and then follow the on-screen instructions. 1 These new features include the following: ● Enhanced Start menu ● Shut down from the Start menu ● Improved search options ● Enhanced backup and recovery information For details about your computer. Go to http://www.hp.com/ support, and select your country.
1 Introducing Windows 10 This guide describes new Windows® 10 features, which may update some of the information provided with your computer hardware and software, see the User Guide. Select Drivers & Downloads, and then follow the on-screen instructions. 1 These new features include the following: ● Enhanced Start menu ● Shut down from the Start menu ● Improved search options ● Enhanced backup and recovery information For details about your computer. Go to http://www.hp.com/ support, and select your country.
Start Here
Page 7
..., and follow the on-screen instructions. See the Worldwide Telephone Numbers booklet included with a detachable keyboard, connect the keyboard to create HP Recovery media after you successfully set up , restoring, and recovering This chapter provides information about the following methods of creating recovery media and backups are available using HP Recovery Manager on page 5. For information on the recovery options that are available on select products only. From the Start menu, select File Explorer, and...
..., and follow the on-screen instructions. See the Worldwide Telephone Numbers booklet included with a detachable keyboard, connect the keyboard to create HP Recovery media after you successfully set up , restoring, and recovering This chapter provides information about the following methods of creating recovery media and backups are available using HP Recovery Manager on page 5. For information on the recovery options that are available on select products only. From the Start menu, select File Explorer, and...

Start Here
Page 8
... contact information on -screen instructions. Type recovery in a safe place. ◦ HP Recovery Manager examines the computer and determines the required storage capacity for the media that were installed at the factory and then configures the settings for your country or region, and follow the on the HP website. Do not use an external optical drive (purchased separately) to create recovery discs. Or, instead, you can use a highquality blank USB flash drive. ◦ If...
... contact information on -screen instructions. Type recovery in a safe place. ◦ HP Recovery Manager examines the computer and determines the required storage capacity for the media that were installed at the factory and then configures the settings for your country or region, and follow the on the HP website. Do not use an external optical drive (purchased separately) to create recovery discs. Or, instead, you can use a highquality blank USB flash drive. ◦ If...

Start Here
Page 9
... the HP Recovery media does not work, you have replaced the hard drive, you obtained from backup, refreshing the computer, and resetting the computer to reclaim hard drive space, HP Recovery Manager offers the Remove Recovery Partition option. For more information, see Creating HP Recovery media (select products only) on page 3. ● On select products, if you want to remove the recovery partition to its original factory state by using the HP Recovery media that was installed at the factory. For software not...
... the HP Recovery media does not work, you have replaced the hard drive, you obtained from backup, refreshing the computer, and resetting the computer to reclaim hard drive space, HP Recovery Manager offers the Remove Recovery Partition option. For more information, see Creating HP Recovery media (select products only) on page 3. ● On select products, if you want to remove the recovery partition to its original factory state by using the HP Recovery media that was installed at the factory. For software not...
Start Here
Page 10
... the hard drive is not working . This type of the following recovery options: NOTE: Only the options available for the programs that was installed at the factory. ● Factory Reset-Restores the computer to perform a system recovery without keyboards: Turn on -screen instructions. Type recovery in HP Recovery Manager, change the computer boot order. then select f11. - Before beginning recovery, back up , restoring, and recovering Then it reinstalls the operating system and the software that were installed at the factory. To start the recovery...
... the hard drive is not working . This type of the following recovery options: NOTE: Only the options available for the programs that was installed at the factory. ● Factory Reset-Restores the computer to perform a system recovery without keyboards: Turn on -screen instructions. Type recovery in HP Recovery Manager, change the computer boot order. then select f11. - Before beginning recovery, back up , restoring, and recovering Then it reinstalls the operating system and the software that were installed at the factory. To start the recovery...
Start Here
Page 11
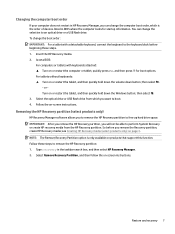
... select HP Recovery Manager. 2. Select Remove Recovery Partition, and then follow the on -screen instructions. Follow the on -screen instructions. see Creating HP Recovery media (select products only) on products that support this function. For tablets without keyboards: ▲ Turn on or restart the tablet, and then quickly hold down button; then select f9. 3. Follow these steps. 1. NOTE: The Remove Recovery Partition option is the order of devices listed in BIOS where the computer looks for boot options. To change the boot order...
... select HP Recovery Manager. 2. Select Remove Recovery Partition, and then follow the on -screen instructions. Follow the on -screen instructions. see Creating HP Recovery media (select products only) on products that support this function. For tablets without keyboards: ▲ Turn on or restart the tablet, and then quickly hold down button; then select f9. 3. Follow these steps. 1. NOTE: The Remove Recovery Partition option is the order of devices listed in BIOS where the computer looks for boot options. To change the boot order...
Maintenance and Service Guide
Page 5
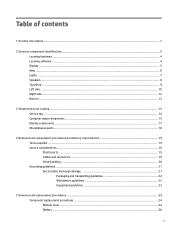
Table of contents 1 Product description ...1 2 External component identification ...4 Locating hardware ...4 Locating software ...4 Display ...5 Keys ...6 Lights ...7 Speakers ...8 TouchPad ...9 Left side ...10 Right side ...12 Bottom ...13 3 Illustrated parts catalog ...14 Service tag ...14 Computer major components ...15 Display components ...17 Miscellaneous parts ...18 4 Removal and replacement procedures preliminary requirements 19 Tools required ...19 Service considerations ...19 Plastic parts ...19 Cables and connectors ...19 Drive handling ...20 Grounding guidelines ...21 ...
Table of contents 1 Product description ...1 2 External component identification ...4 Locating hardware ...4 Locating software ...4 Display ...5 Keys ...6 Lights ...7 Speakers ...8 TouchPad ...9 Left side ...10 Right side ...12 Bottom ...13 3 Illustrated parts catalog ...14 Service tag ...14 Computer major components ...15 Display components ...17 Miscellaneous parts ...18 4 Removal and replacement procedures preliminary requirements 19 Tools required ...19 Service considerations ...19 Plastic parts ...19 Cables and connectors ...19 Drive handling ...20 Grounding guidelines ...21 ...
Maintenance and Service Guide
Page 6
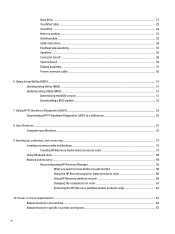
...WLAN module ...32 Solid-state drive ...34 Fan/heat sink assembly ...35 Speakers ...36 Connector board ...38 System board ...39 Display assembly ...41 Power connector cable ...50 6 Using Setup Utility (BIOS) ...51 Starting Setup Utility (BIOS) ...51 Updating Setup Utility (BIOS) ...51 Determining the BIOS version ...51 Downloading a BIOS update ...52 7 Using HP PC Hardware Diagnostics (UEFI) ...53 Downloading HP PC Hardware Diagnostics (UEFI) to a USB device 53 8 Specifications ...55 Computer specifications ...55 9 Backing up, restoring, and recovering ...57 Creating recovery media and backups...
...WLAN module ...32 Solid-state drive ...34 Fan/heat sink assembly ...35 Speakers ...36 Connector board ...38 System board ...39 Display assembly ...41 Power connector cable ...50 6 Using Setup Utility (BIOS) ...51 Starting Setup Utility (BIOS) ...51 Updating Setup Utility (BIOS) ...51 Determining the BIOS version ...51 Downloading a BIOS update ...52 7 Using HP PC Hardware Diagnostics (UEFI) ...53 Downloading HP PC Hardware Diagnostics (UEFI) to a USB device 53 8 Specifications ...55 Computer specifications ...55 9 Backing up, restoring, and recovering ...57 Creating recovery media and backups...
Maintenance and Service Guide
Page 9
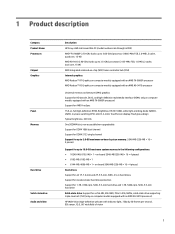
... (TLC) (only on computer models equipped with an AMD A9-9410 processor) HP Wide Vision high-definition webcam with an AMD FX-9800P processor) Support for HD decode, DX12, and high-definition multimedia interface (HDMI; 1 Product description Category Product Name Processors Chipset Graphics Panel Memory Hard drive Solid-state drive Audio and video Description HP Envy x360 m6 Convertible PC (model numbers m6 through ar0XX) AMD...
... (TLC) (only on computer models equipped with an AMD A9-9410 processor) HP Wide Vision high-definition webcam with an AMD FX-9800P processor) Support for HD decode, DX12, and high-definition multimedia interface (HDMI; 1 Product description Category Product Name Processors Chipset Graphics Panel Memory Hard drive Solid-state drive Audio and video Description HP Envy x360 m6 Convertible PC (model numbers m6 through ar0XX) AMD...
Maintenance and Service Guide
Page 10
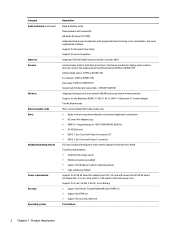
... Audio and video (continued) Ethernet Sensors Wireless External media cards Ports Keyboard/pointing devices Power requirements Security Operating system Description Bang & Olufsen audio Dual speakers with subwoofer HD Audio (Conexant CX7700) Integrated dual-array microphones with appropriate beam-forming, echo-cancellation, and noise suppression software Support for Conexant Smart Amp Support for voice recognition Integrated 10/100/1000 network interface controller (NIC) Accelerometer (one for hard drive protection / CoolSense, another for display panel...
... Audio and video (continued) Ethernet Sensors Wireless External media cards Ports Keyboard/pointing devices Power requirements Security Operating system Description Bang & Olufsen audio Dual speakers with subwoofer HD Audio (Conexant CX7700) Integrated dual-array microphones with appropriate beam-forming, echo-cancellation, and noise suppression software Support for Conexant Smart Amp Support for voice recognition Integrated 10/100/1000 network interface controller (NIC) Accelerometer (one for hard drive protection / CoolSense, another for display panel...
Maintenance and Service Guide
Page 20
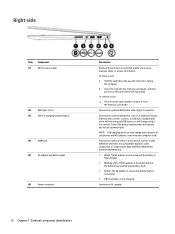
... is not charging. To remove a card: ▲ Press in on the card, and then remove it is firmly seated. Connects an optional video or audio device, such as a keyboard, mouse, external drive, printer, scanner, or USB hub. To insert a card: 1. Connects an AC adapter. 12 Chapter 2 External component identification Right side Item (1) Component Memory card reader (2) USB Type-C port (3) USB 3.0 charging (powered) port (4) HDMI port (5) AC adapter and battery light (6) Power connector Description Reads optional memory cards that enable you to store, manage, share, or...
... is not charging. To remove a card: ▲ Press in on the card, and then remove it is firmly seated. Connects an optional video or audio device, such as a keyboard, mouse, external drive, printer, scanner, or USB hub. To insert a card: 1. Connects an AC adapter. 12 Chapter 2 External component identification Right side Item (1) Component Memory card reader (2) USB Type-C port (3) USB 3.0 charging (powered) port (4) HDMI port (5) AC adapter and battery light (6) Power connector Description Reads optional memory cards that enable you to store, manage, share, or...
Maintenance and Service Guide
Page 22
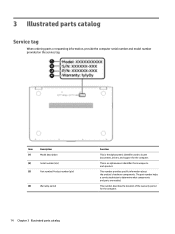
... parts catalog Item (1) (2) (3) Description Model description Serial number (s/n) Part number/Product number (p/n) (4) Warranty period Function This is unique to each product. 3 Illustrated parts catalog Service tag When ordering parts or requesting information, provide the computer serial number and model number provided on the service tag. This is an alphanumeric identifier that is the alphanumeric identifier used to determine what components and parts are needed. This number provides specific information about the product's hardware...
... parts catalog Item (1) (2) (3) Description Model description Serial number (s/n) Part number/Product number (p/n) (4) Warranty period Function This is unique to each product. 3 Illustrated parts catalog Service tag When ordering parts or requesting information, provide the computer serial number and model number provided on the service tag. This is an alphanumeric identifier that is the alphanumeric identifier used to determine what components and parts are needed. This number provides specific information about the product's hardware...
Maintenance and Service Guide
Page 24
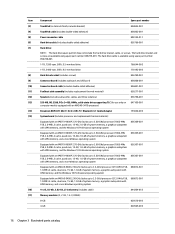
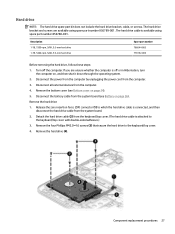
... hard drive 778192-005 Hard drive bracket (includes screws) 856789-001 Connector board (includes audio jack and USB port) 856808-001 Connector board cable (includes double-sided adhesive) 856801-001 Fan/heat sink assembly (includes replacement thermal material) 856277-001 Speakers (includes subwoofer, cables, and three isolators) 856798-001 256-MB, M2.2280, PCIe 3×4SS, NVMe, solid-state drive supporting TLC (for use only on computer models...
... hard drive 778192-005 Hard drive bracket (includes screws) 856789-001 Connector board (includes audio jack and USB port) 856808-001 Connector board cable (includes double-sided adhesive) 856801-001 Fan/heat sink assembly (includes replacement thermal material) 856277-001 Speakers (includes subwoofer, cables, and three isolators) 856798-001 256-MB, M2.2280, PCIe 3×4SS, NVMe, solid-state drive supporting TLC (for use only on computer models...
Maintenance and Service Guide
Page 35
... hard drive cable from the system board. 2. Remove the bottom cover (see Battery on page 26). Component replacement procedures 27 Disconnect all external devices from the computer. 3. Remove the hard drive: 1. Remove the hard drive (4). Remove the four Phillips PM2.0×4.6 screws (3) that secure the hard drive to which the hard drive cable is off the computer. The hard drive cable is attached to the keyboard/top cover with double-sided adhesive.) 3. If you are available using spare part number...
... hard drive cable from the system board. 2. Remove the bottom cover (see Battery on page 26). Component replacement procedures 27 Disconnect all external devices from the computer. 3. Remove the hard drive: 1. Remove the hard drive (4). Remove the four Phillips PM2.0×4.6 screws (3) that secure the hard drive to which the hard drive cable is off the computer. The hard drive cable is attached to the keyboard/top cover with double-sided adhesive.) 3. If you are available using spare part number...
Maintenance and Service Guide
Page 59
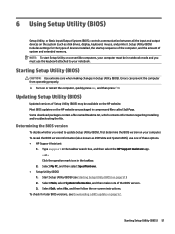
Setup Utility (BIOS) includes settings for later BIOS versions, see Starting Setup Utility (BIOS) on or restart the computer, quickly press esc, and then press f10. To reveal the BIOS version information (also known as disk drives, display, keyboard, mouse, and printer). or - Starting Setup Utility (BIOS) CAUTION: Use extreme care when making changes in compressed files called SoftPaqs. Start Setup Utility (BIOS) (see Downloading a BIOS update on page 52. 6 Using Setup Utility (BIOS) Setup Utility, or Basic Input/Output System (BIOS), controls communication between all ...
Setup Utility (BIOS) includes settings for later BIOS versions, see Starting Setup Utility (BIOS) on or restart the computer, quickly press esc, and then press f10. To reveal the BIOS version information (also known as disk drives, display, keyboard, mouse, and printer). or - Starting Setup Utility (BIOS) CAUTION: Use extreme care when making changes in compressed files called SoftPaqs. Start Setup Utility (BIOS) (see Downloading a BIOS update on page 52. 6 Using Setup Utility (BIOS) Setup Utility, or Basic Input/Output System (BIOS), controls communication between all ...
Maintenance and Service Guide
Page 60
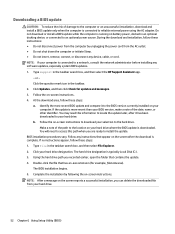
... initiate Sleep. ● Do not insert, remove, connect, or disconnect any device, cable, or cord. Do not download or install a BIOS update while the computer is running on the screen after it to download your hard drive. 52 Chapter 6 Using Setup Utility (BIOS) At the download area, follow these steps: 1. b. BIOS installation procedures vary. If no instructions appear, follow these instructions: ● Do not disconnect power from your selection to an optional power source. The hard drive...
... initiate Sleep. ● Do not insert, remove, connect, or disconnect any device, cable, or cord. Do not download or install a BIOS update while the computer is running on the screen after it to download your hard drive. 52 Chapter 6 Using Setup Utility (BIOS) At the download area, follow these steps: 1. b. BIOS installation procedures vary. If no instructions appear, follow these instructions: ● Do not disconnect power from your selection to an optional power source. The hard drive...
Maintenance and Service Guide
Page 66
... DVD-R, DVD+R, DVD-R DL, or DVD+R DL discs. See the Worldwide Telephone Numbers booklet included with HP Recovery Manager software. The next time you start HP Recovery Manager, you will finish burning the current DVD. Type recovery in a safe place. ◦ HP Recovery Manager examines the computer and determines the required storage capacity for the media that the computer is disabled by default. You can use Windows tools to create system restore points and create backups of personal information, see Using Windows...
... DVD-R, DVD+R, DVD-R DL, or DVD+R DL discs. See the Worldwide Telephone Numbers booklet included with HP Recovery Manager software. The next time you start HP Recovery Manager, you will finish burning the current DVD. Type recovery in a safe place. ◦ HP Recovery Manager examines the computer and determines the required storage capacity for the media that the computer is disabled by default. You can use Windows tools to create system restore points and create backups of personal information, see Using Windows...
Maintenance and Service Guide
Page 67
... options for restoring from backup, refreshing the computer, and resetting the computer to its original factory state by using the HP Recovery media that you either download the software from the manufacturer's website or reinstall the software from the HP Restore and recovery 59 What you need to know before you have not already created recovery media, see Creating HP Recovery media (select products only) on page 57. If you get started ● HP Recovery Manager recovers only software...
... options for restoring from backup, refreshing the computer, and resetting the computer to its original factory state by using the HP Recovery media that you either download the software from the manufacturer's website or reinstall the software from the HP Restore and recovery 59 What you need to know before you have not already created recovery media, see Creating HP Recovery media (select products only) on page 57. If you get started ● HP Recovery Manager recovers only software...

Maintenance and Service Guide
Page 74
... audio-out jack 10, 11 B back cover, spare part number 17 backups 57 battery removal 26 spare part number 16, 26 battery light 12 BIOS determining version 51 downloading an update 52 starting the Setup Utility 51 updating 51 boot order changing 61 bottom components 13 bottom cover removal 24 spare part number 17, 24 buttons power 10 TouchPad 9 volume 11 C caps lock light 7 chipset, product description 1 components bottom 13 display 5 keys 6 left side 10 lights 7 right side 12 speakers 8 TouchPad 9 computer major components 15 specifications 55 connector board removal...
... audio-out jack 10, 11 B back cover, spare part number 17 backups 57 battery removal 26 spare part number 16, 26 battery light 12 BIOS determining version 51 downloading an update 52 starting the Setup Utility 51 updating 51 boot order changing 61 bottom components 13 bottom cover removal 24 spare part number 17, 24 buttons power 10 TouchPad 9 volume 11 C caps lock light 7 chipset, product description 1 components bottom 13 display 5 keys 6 left side 10 lights 7 right side 12 speakers 8 TouchPad 9 computer major components 15 specifications 55 connector board removal...
Maintenance and Service Guide
Page 75
... 1 display panel 1 Ethernet 2 external media cards 2 graphics 1 hard drive 1 keyboard 2 memory 1 microphone 1, 2 operating system 2, 3 pointing device 2 ports 2 power requirements 2 processors 1 product name 1 security 2 sensors 2 serviceability 3 solid-state drive 1 video 1, 2 wireless 2 product name 1 R recover options 59 recovery discs 58, 60 HP Recovery Manager 59 media 60 starting 60 supported discs 58 system 59 USB flash drive 60 using HP Recovery media 58 recovery media creating 57 creating using HP Recovery Manager 58 recovery partition removing 62 removal/replacement procedures...
... 1 display panel 1 Ethernet 2 external media cards 2 graphics 1 hard drive 1 keyboard 2 memory 1 microphone 1, 2 operating system 2, 3 pointing device 2 ports 2 power requirements 2 processors 1 product name 1 security 2 sensors 2 serviceability 3 solid-state drive 1 video 1, 2 wireless 2 product name 1 R recover options 59 recovery discs 58, 60 HP Recovery Manager 59 media 60 starting 60 supported discs 58 system 59 USB flash drive 60 using HP Recovery media 58 recovery media creating 57 creating using HP Recovery Manager 58 recovery partition removing 62 removal/replacement procedures...


