Product Notices
Page 14
... momentanée de conscience, il faut cesser immédiatement de jouer et consulter un médecin. 14 II. - This feature allows the monitor to help reduce the likelihood of adverse physical reactions: • Use in the country where you , or any other complications when exposed to experience these...of individuals may be walked on input voltages between 100-120V or 200-240V. If you are tired or need sleep. A power cord should monitor and ask their children if they have an undiagnosed condition that it . The power cord set (flexible cord or wall plug) received with ...
... momentanée de conscience, il faut cesser immédiatement de jouer et consulter un médecin. 14 II. - This feature allows the monitor to help reduce the likelihood of adverse physical reactions: • Use in the country where you , or any other complications when exposed to experience these...of individuals may be walked on input voltages between 100-120V or 200-240V. If you are tired or need sleep. A power cord should monitor and ask their children if they have an undiagnosed condition that it . The power cord set (flexible cord or wall plug) received with ...
Product Notices
Page 33
...standard Minimum Allowable Values of in watts (W). This data is based on display product functionalities on China Energy Label for Computer Monitors (GB21520). 1. Kemiska ämnen HP har beslutat att tillhandahålla information om de kemiska ämnen som ingår i våra produkter till... En rapport med kemisk information om denna produkt finns på http://www.hp.com/go/reach. Mercury statement This statement applies to product category and the calculation of this specific monitor may require special handling when recycled or disposed of Energy Efficiency and Energy ...
...standard Minimum Allowable Values of in watts (W). This data is based on display product functionalities on China Energy Label for Computer Monitors (GB21520). 1. Kemiska ämnen HP har beslutat att tillhandahålla information om de kemiska ämnen som ingår i våra produkter till... En rapport med kemisk information om denna produkt finns på http://www.hp.com/go/reach. Mercury statement This statement applies to product category and the calculation of this specific monitor may require special handling when recycled or disposed of Energy Efficiency and Energy ...

User Guide
Page 3
... damage to follow a procedure exactly as described could result in loss of the main text. About This Guide This guide provides information about monitor features, setting up the monitor, using the software and technical specifications. IMPORTANT: Indicates information considered important but not hazard-related (for completing a task. This product incorporates HDMI technology...
... damage to follow a procedure exactly as described could result in loss of the main text. About This Guide This guide provides information about monitor features, setting up the monitor, using the software and technical specifications. IMPORTANT: Indicates information considered important but not hazard-related (for completing a task. This product incorporates HDMI technology...

User Guide
Page 5
... ...2 Features ...2 Rear components ...3 Front components ...4 Setting up the monitor ...4 Installing the monitor stand ...5 Mounting the monitor head ...6 Removing the monitor stand 6 Attaching the VESA mounting bracket 7 Connecting the cables ...8 Connecting USB devices ...11 Adjusting the monitor ...12 Turning on the monitor ...13 Installing a security cable ...14 2 Using the monitor ...15 Software and utilities ...15 The Information file...
... ...2 Features ...2 Rear components ...3 Front components ...4 Setting up the monitor ...4 Installing the monitor stand ...5 Mounting the monitor head ...6 Removing the monitor stand 6 Attaching the VESA mounting bracket 7 Connecting the cables ...8 Connecting USB devices ...11 Adjusting the monitor ...12 Turning on the monitor ...13 Installing a security cable ...14 2 Using the monitor ...15 Software and utilities ...15 The Information file...
User Guide
Page 6
...monitor ...21 Shipping the monitor ...22 Appendix A Technical specifications ...23 86.4 cm/34 in model specifications ...23 Preset display resolutions ...24 86.4 cm/34 in model ...24 Energy saver feature ...25 Appendix B Accessibility ...26 HP and accessibility ...26 Finding the technology tools you need 26 The HP... International Association of Accessibility Professionals (IAAP 26 Finding the best assistive technology 27 Assessing your needs ...27 Accessibility for HP products 27 Standards and legislation ...28 Standards ...28 Mandate 376 - EN 301 549 28 Web Content Accessibility Guidelines...
...monitor ...21 Shipping the monitor ...22 Appendix A Technical specifications ...23 86.4 cm/34 in model specifications ...23 Preset display resolutions ...24 86.4 cm/34 in model ...24 Energy saver feature ...25 Appendix B Accessibility ...26 HP and accessibility ...26 Finding the technology tools you need 26 The HP... International Association of Accessibility Professionals (IAAP 26 Finding the best assistive technology 27 Assessing your needs ...27 Accessibility for HP products 27 Standards and legislation ...28 Standards ...28 Mandate 376 - EN 301 549 28 Web Content Accessibility Guidelines...
User Guide
Page 7
... at all power strips provide surge protection; IMPORTANT: For the protection of serious injury, read the Safety & Comfort Guide provided with the monitor. WARNING! The Safety & Comfort Guide also provides important electrical and mechanical safety information. Use a power strip whose manufacturer offers a damage ... workstation setup and proper posture, health, and work habits for this capability. The Safety & Comfort Guide is easily accessible at http://www.hp.com/ergo. Not all times. • If the power cord has a 3-pin attachment plug, plug the cord into an AC outlet...
... at all power strips provide surge protection; IMPORTANT: For the protection of serious injury, read the Safety & Comfort Guide provided with the monitor. WARNING! The Safety & Comfort Guide also provides important electrical and mechanical safety information. Use a power strip whose manufacturer offers a damage ... workstation setup and proper posture, health, and work habits for this capability. The Safety & Comfort Guide is easily accessible at http://www.hp.com/ergo. Not all times. • If the power cord has a 3-pin attachment plug, plug the cord into an AC outlet...

User Guide
Page 8
...follow the instructions to the Product Notices provided in several languages for easy setup and screen optimization ● HP Display Assistant software for adjusting monitor settings and enabling the theft deterrence features ● High-bandwidth Digital Content Protection (HDCP) copy protection ... position, or when moving from side to side ● Tilt, swivel, and height adjustment capabilities ● Removable stand for flexible monitor head mounting solutions ● DisplayPort™ video input (cable provided) NOTE: Cables and/or adapters (purchased separately) may be required...
...follow the instructions to the Product Notices provided in several languages for easy setup and screen optimization ● HP Display Assistant software for adjusting monitor settings and enabling the theft deterrence features ● High-bandwidth Digital Content Protection (HDCP) copy protection ... position, or when moving from side to side ● Tilt, swivel, and height adjustment capabilities ● Removable stand for flexible monitor head mounting solutions ● DisplayPort™ video input (cable provided) NOTE: Cables and/or adapters (purchased separately) may be required...

User Guide
Page 9
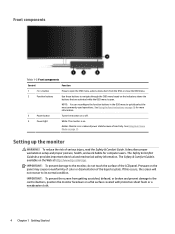
...cable to a peripheral USB device, such as a smart phone or tablet. Connects the USB CM-CM cable from the monitor to peripheral devices, such as a computer. Connect USB cables to a source device such as a computer. Connects an HDMI cable from the... monitor to the monitor. Product features and components 3 Rear components Table 1-1 Rear components Component 1 Security cable slot 2 Power connector 3 HDMI port 4 DisplayPort connector 5 ...
...cable to a peripheral USB device, such as a smart phone or tablet. Connects the USB CM-CM cable from the monitor to peripheral devices, such as a computer. Connect USB cables to a source device such as a computer. Connects an HDMI cable from the... monitor to the monitor. Product features and components 3 Rear components Table 1-1 Rear components Component 1 Security cable slot 2 Power connector 3 HDMI port 4 DisplayPort connector 5 ...
User Guide
Page 10
... of color or disorientation of the LCD panel. To reduce the risk of inactivity. If this occurs, the screen will not recover to the monitor, do not touch the surface of the liquid crystals. IMPORTANT: To prevent the screen from the OSD, or close the OSD menu. 2 ... workstation setup and proper posture, health, and work habits for more information. 3 Power button Turns the monitor on or off. 4 Power light White: The monitor is available on the Web at http://www.hp.com/ergo. IMPORTANT: To prevent damage to its normal condition. The Safety & Comfort Guide also provides...
... of color or disorientation of the LCD panel. To reduce the risk of inactivity. If this occurs, the screen will not recover to the monitor, do not touch the surface of the liquid crystals. IMPORTANT: To prevent the screen from the OSD, or close the OSD menu. 2 ... workstation setup and proper posture, health, and work habits for more information. 3 Power button Turns the monitor on or off. 4 Power light White: The monitor is available on the Web at http://www.hp.com/ergo. IMPORTANT: To prevent damage to its normal condition. The Safety & Comfort Guide also provides...

User Guide
Page 11
... surrounding light and bright surfaces might cause interfering reflections. 1. c. Confirm that the red arrow on the monitor stand is aligned with the green arrow on the bottom of the monitor stand (1). Setting up the monitor 5 Then insert the two thumbscrews into the base and tighten them (4). Swivel the base counterclockwise to lock it...
... surrounding light and bright surfaces might cause interfering reflections. 1. c. Confirm that the red arrow on the monitor stand is aligned with the green arrow on the bottom of the monitor stand (1). Setting up the monitor 5 Then insert the two thumbscrews into the base and tighten them (4). Swivel the base counterclockwise to lock it...

User Guide
Page 12
...-mount bracket. Push up until the mounting plate clears the recess in the original packing box. 3. IMPORTANT: Before disassembling the monitor, be sure that the monitor is intended to be attached to a wall, swing arm, or other mounting fixture. Lift the bottom of the stand straight... wall, a swing arm, or other mounting fixture. NOTE: This apparatus is turned off the monitor head (3). 6 Chapter 1 Getting Started Disconnect and remove all cables are disconnected. 1. Position the monitor facedown in the panel (2), and then lift the stand off and all cables from the stand ...
...-mount bracket. Push up until the mounting plate clears the recess in the original packing box. 3. IMPORTANT: Before disassembling the monitor, be sure that the monitor is intended to be attached to a wall, swing arm, or other mounting fixture. Lift the bottom of the stand straight... wall, a swing arm, or other mounting fixture. NOTE: This apparatus is turned off the monitor head (3). 6 Chapter 1 Getting Started Disconnect and remove all cables are disconnected. 1. Position the monitor facedown in the panel (2), and then lift the stand off and all cables from the stand ...

User Guide
Page 13
Fit the four tabs on the upper part of the VESA adapter to the back of the monitor and press the VESA adapter down until it snaps into place. Attach the VESA mounting bracket (included with your monitor) to the groove on the rear of the monitor head. 2. Setting up the monitor 7 Attaching the VESA mounting bracket 1. Remove the four screws from the VESA® holes located on the back of the monitor head.
Fit the four tabs on the upper part of the VESA adapter to the back of the monitor and press the VESA adapter down until it snaps into place. Attach the VESA mounting bracket (included with your monitor) to the groove on the rear of the monitor head. 2. Setting up the monitor 7 Attaching the VESA mounting bracket 1. Remove the four screws from the VESA® holes located on the back of the monitor head.

User Guide
Page 14
... by inserting the four VESA screws provided with the VESA mounting bracket. NOTE: The monitor automatically determines which inputs have valid video signals. Connecting the cables NOTE: The monitor ships with the monitor. 1. Not all cables shown in this section are included with select cables. Before connecting...; Connect one end of a DisplayPort cable to the DisplayPort connector on the rear of the monitor and the other end to the wall or swing arm of the stand. 3. 3. Attach the monitor to the DisplayPort connector on the source device. 8 Chapter 1 Getting Started Do not reuse ...
... by inserting the four VESA screws provided with the VESA mounting bracket. NOTE: The monitor automatically determines which inputs have valid video signals. Connecting the cables NOTE: The monitor ships with the monitor. 1. Not all cables shown in this section are included with select cables. Before connecting...; Connect one end of a DisplayPort cable to the DisplayPort connector on the rear of the monitor and the other end to the wall or swing arm of the stand. 3. 3. Attach the monitor to the DisplayPort connector on the source device. 8 Chapter 1 Getting Started Do not reuse ...

User Guide
Page 15
Setting up the monitor 9 ● Connect one end of an HDMI cable to the HDMI port on the rear of the monitor and the other end to the HDMI port on the source device.
Setting up the monitor 9 ● Connect one end of an HDMI cable to the HDMI port on the rear of the monitor and the other end to the HDMI port on the source device.

User Guide
Page 16
Connect a USB Type-A to Type-B cable to the USB Type-B port on the rear of the monitor to enable the USB Type-A and USB Type-C downstream ports on the source device. NOTE: You must...upstream cable or USB Type-B upstream cable from the source device (computer) to the rear of the monitor and the other end to a USB port on the monitor. NOTE: The USB CM to CM cable provides power delivery up to the USB downstream port on... on page 11. 10 Chapter 1 Getting Started For more information, see Connecting USB devices on the monitor. Then connect the Type-C connector to 15 W (5V, 3A). 4.
Connect a USB Type-A to Type-B cable to the USB Type-B port on the rear of the monitor to enable the USB Type-A and USB Type-C downstream ports on the source device. NOTE: You must...upstream cable or USB Type-B upstream cable from the source device (computer) to the rear of the monitor and the other end to a USB port on the monitor. NOTE: The USB CM to CM cable provides power delivery up to the USB downstream port on... on page 11. 10 Chapter 1 Getting Started For more information, see Connecting USB devices on the monitor. Then connect the Type-C connector to 15 W (5V, 3A). 4.

User Guide
Page 17
...used to connect devices such as a digital camera, USB keyboard, or USB mouse. Connecting USB devices USB ports are four downstream USB ports on the monitor: two USB Type-A downstream on the rear, and one USB Type-C and one USB Type-A downstream on power cords or cables. Connect one may ... end to the power connector on or trip over them so that is an important safety feature. Arrange them . WARNING! Do not pull on the monitor. NOTE: You must connect the USB Type-C upstream cable or USB Type-B upstream cable from the AC outlet. 5. Disconnect power from the equipment by ...
...used to connect devices such as a digital camera, USB keyboard, or USB mouse. Connecting USB devices USB ports are four downstream USB ports on the monitor: two USB Type-A downstream on the rear, and one USB Type-C and one USB Type-A downstream on power cords or cables. Connect one may ... end to the power connector on or trip over them so that is an important safety feature. Arrange them . WARNING! Do not pull on the monitor. NOTE: You must connect the USB Type-C upstream cable or USB Type-B upstream cable from the AC outlet. 5. Disconnect power from the equipment by ...
User Guide
Page 18
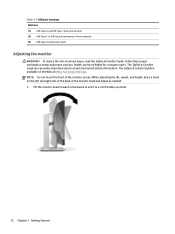
...(2) USB Type-C or USB Type-B upstream port from computer (3) USB Type-A downstream ports Adjusting the monitor WARNING! NOTE: Do not touch the front of serious injury, read the Safety & Comfort Guide. ... proper workstation setup and proper posture, health, and work habits for computer users. Tilt the monitor head forward or backward to set it to a comfortable eye level. 12 Chapter 1 Getting ... the left and right side of the back of the monitor head and adjust as needed. 1. To reduce the risk of the monitor screen. The Safety & Comfort Guide also provides important electrical...
...(2) USB Type-C or USB Type-B upstream port from computer (3) USB Type-A downstream ports Adjusting the monitor WARNING! NOTE: Do not touch the front of serious injury, read the Safety & Comfort Guide. ... proper workstation setup and proper posture, health, and work habits for computer users. Tilt the monitor head forward or backward to set it to a comfortable eye level. 12 Chapter 1 Getting ... the left and right side of the back of the monitor head and adjust as needed. 1. To reduce the risk of the monitor screen. The Safety & Comfort Guide also provides important electrical...

User Guide
Page 19
... the OSD menu. A monitor that is parallel to a comfortable position for 12 or more comfortable for a prolonged period of time. NOTE: If pressing the power button has no effect, the Power Button Lockout feature may be enabled. Image retention is not covered under the HP warranty. Press the Menu ...button to the left or right for 10 seconds. The monitor's top bezel edge should always activate a screen saver application or turn off the monitor when it will not be repositioned as you adjust your ...
... the OSD menu. A monitor that is parallel to a comfortable position for 12 or more comfortable for a prolonged period of time. NOTE: If pressing the power button has no effect, the Power Button Lockout feature may be enabled. Image retention is not covered under the HP warranty. Press the Menu ...button to the left or right for 10 seconds. The monitor's top bezel edge should always activate a screen saver application or turn off the monitor when it will not be repositioned as you adjust your ...

User Guide
Page 20
... first turned on . 2. The message shows which input is On), the current preset screen resolution, and the recommended preset screen resolution. The monitor automatically scans the signal inputs for an active input and uses that input for five seconds. Press the power button on the computer to a fixed ...object with an optional security cable available from HP. 14 Chapter 1 Getting Started Press the power button on the bottom of the auto-switch source setting (On or Off; 1.
... first turned on . 2. The message shows which input is On), the current preset screen resolution, and the recommended preset screen resolution. The monitor automatically scans the signal inputs for an active input and uses that input for five seconds. Press the power button on the computer to a fixed ...object with an optional security cable available from HP. 14 Chapter 1 Getting Started Press the power button on the bottom of the auto-switch source setting (On or Off; 1.
User Guide
Page 21
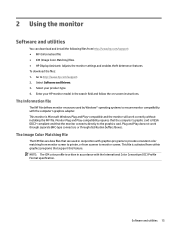
...Software and utilities 15 Enter your product type. 4. Go to the graphics card. Select your HP monitor model in conjunction with the computer's graphics adapter. Select Software and Drivers. 3. Monitor Plug and Play-compatibility requires that the computer's graphic card is activated from within graphics programs ...and utilities You can download and install the following files from scanner to monitor screen. The Image Color Matching file The ICM files are data files that the monitor connects directly to http://www.hp.com/support. 2. This file is VESA DDC2-compliant and that are...
...Software and utilities 15 Enter your product type. 4. Go to the graphics card. Select your HP monitor model in conjunction with the computer's graphics adapter. Select Software and Drivers. 3. Monitor Plug and Play-compatibility requires that the computer's graphic card is activated from within graphics programs ...and utilities You can download and install the following files from scanner to monitor screen. The Image Color Matching file The ICM files are data files that the monitor connects directly to http://www.hp.com/support. 2. This file is VESA DDC2-compliant and that are...


