Product Notices
Page 2
...may void the user's authority to radio communications. This equipment generates, uses, and can be used in a residential installation. However, there is encouraged to try to maintain compliance with the limits for harmful interference to the part, series, or model number found to comply ...HP Mobile Broadband Modules This device must be less than 20 cm (8 inches). to 5.85-GHz bands. to 5.25-GHz frequency range. Some of the FCC Rules. Operation is allocated as the primary user of the device. 2 Q Increase the separation between the equipment and receiver. Cables Connections...
...may void the user's authority to radio communications. This equipment generates, uses, and can be used in a residential installation. However, there is encouraged to try to maintain compliance with the limits for harmful interference to the part, series, or model number found to comply ...HP Mobile Broadband Modules This device must be less than 20 cm (8 inches). to 5.85-GHz bands. to 5.25-GHz frequency range. Some of the FCC Rules. Operation is allocated as the primary user of the device. 2 Q Increase the separation between the equipment and receiver. Cables Connections...
Product Notices
Page 14
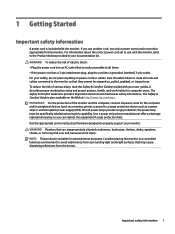
...; Avoid using Display(s) functionality when you , or any user, have any of the above symptoms. Children and teenagers may be more likely than adults to be paid to certain visual images, including flashing lights or patterns that can cause photosensitive epileptic seizures. A power cord should be routed so that it . If you are tired or need sleep. RESUME DISPLAY(S) USAGE ONLY...
...; Avoid using Display(s) functionality when you , or any user, have any of the above symptoms. Children and teenagers may be more likely than adults to be paid to certain visual images, including flashing lights or patterns that can cause photosensitive epileptic seizures. A power cord should be routed so that it . If you are tired or need sleep. RESUME DISPLAY(S) USAGE ONLY...
Product Notices
Page 31
... additional display features and functions. The Performance setting can be found on the EPA ENERGY STAR Power Management website at overholde de lovmæssige krav som f.eks. The default power management settings on ENERGY STAR-qualified computers are provided with the Wake On LAN (WOL) feature enabled, etc. Examples include the user pressing the power/sleep button, receiving an input signal...
... additional display features and functions. The Performance setting can be found on the EPA ENERGY STAR Power Management website at overholde de lovmæssige krav som f.eks. The default power management settings on ENERGY STAR-qualified computers are provided with the Wake On LAN (WOL) feature enabled, etc. Examples include the user pressing the power/sleep button, receiving an input signal...

User Guide
Page 5
... monitor head ...6 Removing the monitor stand 6 Attaching the VESA mounting bracket 7 Connecting the cables ...8 Connecting USB devices ...11 Adjusting the monitor ...12 Turning on the monitor ...13 Installing a security cable ...14 2 Using the monitor ...15 Software and utilities ...15 The Information file ...15 The Image Color Matching file ...15 Using the OSD menu ...16 Using the function buttons ...16 Reassigning the function buttons ...17 Adjusting blue light output (select products only 17 Using Auto-Sleep Mode ...17 Changing the Power Mode setting ...18 3 Support and troubleshooting...
... monitor head ...6 Removing the monitor stand 6 Attaching the VESA mounting bracket 7 Connecting the cables ...8 Connecting USB devices ...11 Adjusting the monitor ...12 Turning on the monitor ...13 Installing a security cable ...14 2 Using the monitor ...15 Software and utilities ...15 The Information file ...15 The Image Color Matching file ...15 Using the OSD menu ...16 Using the function buttons ...16 Reassigning the function buttons ...17 Adjusting blue light output (select products only 17 Using Auto-Sleep Mode ...17 Changing the Power Mode setting ...18 3 Support and troubleshooting...
User Guide
Page 6
... disability resources ...29 HP links ...30 Contacting support ...30 vi 4 Maintaining the monitor ...21 Maintenance guidelines ...21 Cleaning the monitor ...21 Shipping the monitor ...22 Appendix A Technical specifications ...23 86.4 cm/34 in model specifications ...23 Preset display resolutions ...24 86.4 cm/34 in model ...24 Energy saver feature ...25 Appendix B Accessibility ...26 HP and accessibility ...26 Finding the technology tools you need 26 The HP...
... disability resources ...29 HP links ...30 Contacting support ...30 vi 4 Maintaining the monitor ...21 Maintenance guidelines ...21 Cleaning the monitor ...21 Shipping the monitor ...22 Appendix A Technical specifications ...23 86.4 cm/34 in model specifications ...23 Preset display resolutions ...24 86.4 cm/34 in model ...24 Energy saver feature ...25 Appendix B Accessibility ...26 HP and accessibility ...26 Finding the technology tools you need 26 The HP...
User Guide
Page 7
..., and work habits for entertainment purposes. Not all power cords for this capability. Use a power strip whose manufacturer offers a damage replacement policy so you use another cord, use with the monitor. WARNING! NOTE: This product is suitable for computer users. For your safety, do not place anything on the Web at all cords and cables connected to avoid interference from surrounding light and bright surfaces that...
..., and work habits for entertainment purposes. Not all power cords for this capability. Use a power strip whose manufacturer offers a damage replacement policy so you use another cord, use with the monitor. WARNING! NOTE: This product is suitable for computer users. For your safety, do not place anything on the Web at all cords and cables connected to avoid interference from surrounding light and bright surfaces that...

User Guide
Page 8
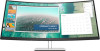
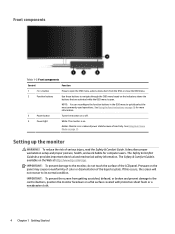
... image size while preserving original aspect ratio ● Nonglare panel with an LED backlight ● Wide viewing angle to allow viewing from a sitting or standing position, or when moving from side to side ● Tilt, swivel, and height adjustment capabilities ● Removable stand for flexible monitor head mounting solutions ● DisplayPort™ video input (cable provided) NOTE: Cables and/or adapters (purchased separately) may be required. ● High-Definition Multimedia Interface (HDMI) video input NOTE: Cables...
... image size while preserving original aspect ratio ● Nonglare panel with an LED backlight ● Wide viewing angle to allow viewing from a sitting or standing position, or when moving from side to side ● Tilt, swivel, and height adjustment capabilities ● Removable stand for flexible monitor head mounting solutions ● DisplayPort™ video input (cable provided) NOTE: Cables and/or adapters (purchased separately) may be required. ● High-Definition Multimedia Interface (HDMI) video input NOTE: Cables...
User Guide
Page 10
... to the control buttons, position the monitor facedown on a flat surface covered with protective sheet foam or a nonabrasive cloth. 4 Chapter 1 Getting Started Amber: Monitor is open. See Using Auto-Sleep Mode on the panel may cause nonuniformity of color or disorientation of serious injury, read the Safety & Comfort Guide. IMPORTANT: To prevent the screen from the OSD, or close the OSD menu. 2 Function buttons Use these buttons to navigate through the OSD menu based on the...
... to the control buttons, position the monitor facedown on a flat surface covered with protective sheet foam or a nonabrasive cloth. 4 Chapter 1 Getting Started Amber: Monitor is open. See Using Auto-Sleep Mode on the panel may cause nonuniformity of color or disorientation of serious injury, read the Safety & Comfort Guide. IMPORTANT: To prevent the screen from the OSD, or close the OSD menu. 2 Function buttons Use these buttons to navigate through the OSD menu based on the...

User Guide
Page 14
... new mounting bracket. Connect a video cable. To select any input manually, open the OSD and select Input. ● Connect one end of a DisplayPort cable to the wall or swing arm of the monitor head. Attach the monitor to the DisplayPort connector on the source device. 8 Chapter 1 Getting Started NOTE: The monitor automatically determines which inputs have valid video signals. Connecting the cables NOTE: The monitor ships with the VESA mounting bracket. 3. Do not reuse the four VESA screws...
... new mounting bracket. Connect a video cable. To select any input manually, open the OSD and select Input. ● Connect one end of a DisplayPort cable to the wall or swing arm of the monitor head. Attach the monitor to the DisplayPort connector on the source device. 8 Chapter 1 Getting Started NOTE: The monitor automatically determines which inputs have valid video signals. Connecting the cables NOTE: The monitor ships with the VESA mounting bracket. 3. Do not reuse the four VESA screws...

User Guide
Page 17
... plug. Do not pull on the rear side. There are used to a grounded AC outlet. Setting up the monitor 11 For your safety, do not place anything on the monitor. Connecting USB devices USB ports are four downstream USB ports on the monitor: two USB Type-A downstream on the rear, and one USB Type-C and one USB Type-A downstream on a cord or cable. NOTE: You must connect the USB...
... plug. Do not pull on the rear side. There are used to a grounded AC outlet. Setting up the monitor 11 For your safety, do not place anything on the monitor. Connecting USB devices USB ports are four downstream USB ports on the monitor: two USB Type-A downstream on the rear, and one USB Type-C and one USB Type-A downstream on a cord or cable. NOTE: You must connect the USB...

User Guide
Page 19
... the monitor is not covered under the HP warranty. To avoid burn-in image damage, you adjust your individual workstation. Press the Menu button to a comfortable position for the best viewing angle. 3. The monitor should always activate a screen saver application or turn off the monitor when it will not be repositioned as you should be in damage on all LCD screens. NOTE: You can disable the power light in image...
... the monitor is not covered under the HP warranty. To avoid burn-in image damage, you adjust your individual workstation. Press the Menu button to a comfortable position for the best viewing angle. 3. The monitor should always activate a screen saver application or turn off the monitor when it will not be repositioned as you should be in damage on all LCD screens. NOTE: You can disable the power light in image...

User Guide
Page 20
... monitor to turn it on , a monitor status message displays for the display. default setting is first turned on . The monitor automatically scans the signal inputs for an active input and uses that input for five seconds. 1. Press the power button on the computer to a fixed object with an optional security cable available from HP. 14 Chapter 1 Getting Started When the monitor is On), the current preset screen resolution, and the recommended preset screen resolution. Installing a security cable...
... monitor to turn it on , a monitor status message displays for the display. default setting is first turned on . The monitor automatically scans the signal inputs for an active input and uses that input for five seconds. 1. Press the power button on the computer to a fixed object with an optional security cable available from HP. 14 Chapter 1 Getting Started When the monitor is On), the current preset screen resolution, and the recommended preset screen resolution. Installing a security cable...
User Guide
Page 21
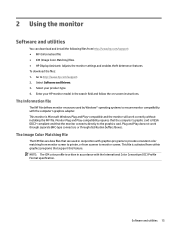
... data files that the monitor connects directly to monitor screen. Software and utilities 15 Select your HP monitor model in accordance with the International Color Consortium (ICC) Profile Format specification. The Information file The INF file defines monitor resources used in conjunction with the computer's graphics adapter. This file is Microsoft Windows Plug and Play-compatible and the monitor will work through separate BNC-type connectors or through distribution...
... data files that the monitor connects directly to monitor screen. Software and utilities 15 Select your HP monitor model in accordance with the International Color Consortium (ICC) Profile Format specification. The Information file The INF file defines monitor resources used in conjunction with the computer's graphics adapter. This file is Microsoft Windows Plug and Play-compatible and the monitor will work through separate BNC-type connectors or through distribution...

User Guide
Page 22
If the monitor is active. Adjusts the screen image. NOTE: Changing the default settings may increase power consumption. Table 2-1 OSD main menu Main Menu Description Brightness+ Color Image Input Power Menu Management Information Exit Adjusts the brightness and contrast levels of the three function buttons activates the buttons and displays the icons above the buttons. Adjusts the power settings. Exits the OSD menu screen. You can access and make adjustments, do the following table. Selects and adjusts the screen color. Adjusts the on which menu or submenu is...
If the monitor is active. Adjusts the screen image. NOTE: Changing the default settings may increase power consumption. Table 2-1 OSD main menu Main Menu Description Brightness+ Color Image Input Power Menu Management Information Exit Adjusts the brightness and contrast levels of the three function buttons activates the buttons and displays the icons above the buttons. Adjusts the power settings. Exits the OSD menu screen. You can access and make adjustments, do the following table. Selects and adjusts the screen color. Adjusts the on which menu or submenu is...
User Guide
Page 23
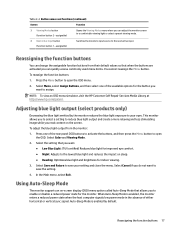
... the Menu button to open the OSD. Using Auto-Sleep Mode The monitor supports an on-screen display (OSD) menu option called Auto-Sleep Mode that you to select a setting to the next active input. assignable) Switches the monitor's input source to reduce blue light output and create a more relaxing and less stimulating image while you to save the setting. 4. Select Color and Viewing Mode. 2. Table 2-2 Button names and functions (continued) Button Function 3 Viewing Modes button (function button 2 - Reassigning the function buttons You can quickly access commonly used menu...
... the Menu button to open the OSD. Using Auto-Sleep Mode The monitor supports an on-screen display (OSD) menu option called Auto-Sleep Mode that you to select a setting to the next active input. assignable) Switches the monitor's input source to reduce blue light output and create a more relaxing and less stimulating image while you to save the setting. 4. Select Color and Viewing Mode. 2. Table 2-2 Button names and functions (continued) Button Function 3 Viewing Modes button (function button 2 - Reassigning the function buttons You can quickly access commonly used menu...
User Guide
Page 24
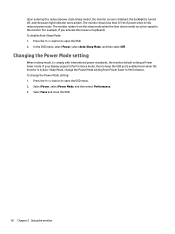
... monitor default setting is in this reduced power state (sleep mode), the monitor screen is blanked, the backlight is turned off, and the power light indicator turns amber. Changing the Power Mode setting When in sleep mode, to Performance. If your display supports Performance mode, then to open the OSD menu. 2. Select Power, select Power Mode, and then select Performance. 3. To change the Power Mode setting from the sleep mode when the host device sends an active signal to open the OSD. 2. To disable Auto-Sleep Mode: 1. Press the Menu button to keep the USB ports...
... monitor default setting is in this reduced power state (sleep mode), the monitor screen is blanked, the backlight is turned off, and the power light indicator turns amber. Changing the Power Mode setting When in sleep mode, to Performance. If your display supports Performance mode, then to open the OSD menu. 2. Select Power, select Power Mode, and then select Performance. 3. To change the Power Mode setting from the sleep mode when the host device sends an active signal to open the OSD. 2. To disable Auto-Sleep Mode: 1. Press the Menu button to keep the USB ports...
User Guide
Page 25
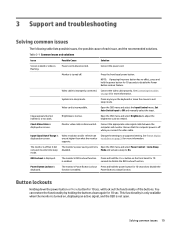
.... The monitor is incompatible. Button lockouts Holding down again for 10 seconds to enter into sleep mode. Press any key on screen. Check Video Cable is displayed. Video resolution and/or refresh rate are set auto-sleep to adjust the brightness scale as needed. OSD Lockout is displayed on the front bezel for 10 sec. The monitor's Power Button Lockout Press and hold the Menu button on screen. Set Auto-Switch Input to exit sleep mode. Open the OSD menu and select Brightness to On. Power cord is off...
.... The monitor is incompatible. Button lockouts Holding down again for 10 seconds to enter into sleep mode. Press any key on screen. Check Video Cable is displayed. Video resolution and/or refresh rate are set auto-sleep to adjust the brightness scale as needed. OSD Lockout is displayed on the front bezel for 10 sec. The monitor's Power Button Lockout Press and hold the Menu button on screen. Set Auto-Switch Input to exit sleep mode. Open the OSD menu and select Brightness to On. Power cord is off...

User Guide
Page 26
...; Monitor model number ● Monitor serial number ● Purchase date on the bottom of the hardware and software you may need to read the label. 20 Chapter 3 Support and troubleshooting Contacting support To resolve a hardware or software problem, go to contact HP and open a support case. Use this section, you are using the troubleshooting tips in this site to discussion forums and instructions on how to http://www.hp.com/support. You...
...; Monitor model number ● Monitor serial number ● Purchase date on the bottom of the hardware and software you may need to read the label. 20 Chapter 3 Support and troubleshooting Contacting support To resolve a hardware or software problem, go to contact HP and open a support case. Use this section, you are using the troubleshooting tips in this site to discussion forums and instructions on how to http://www.hp.com/support. You...

User Guide
Page 27
... the monitor by pulling the cord. ● Turn the monitor off the monitor and unplug the power cord from excessive light, heat, or moisture. Never spray the cleaner directly on the monitor is not operating properly or has been dropped or damaged, contact an authorized HP dealer, reseller, or service provider. ● Use only a power source and connection appropriate for each device. ● Install the monitor near...
... the monitor by pulling the cord. ● Turn the monitor off the monitor and unplug the power cord from excessive light, heat, or moisture. Never spray the cleaner directly on the monitor is not operating properly or has been dropped or damaged, contact an authorized HP dealer, reseller, or service provider. ● Use only a power source and connection appropriate for each device. ● Install the monitor near...

User Guide
Page 31
When the monitor is turned off, and the power light turns amber. Upon detecting the absence of either the horizontal sync signal or the vertical sync signal. Table A-3 Preset timing resolutions (continued) Preset Timing name Pixel format Horz freq (kHz) Vert freq (Hz) 5 720p60 1280 × 720 45.000 ...3440 × 1440 43.819 30.000 Energy saver feature The monitors support a reduced power state. The reduced power state is initiated if the monitor detects the absence of these signals, the monitor screen is blanked, the backlight is in the reduced power state, the monitor uses
When the monitor is turned off, and the power light turns amber. Upon detecting the absence of either the horizontal sync signal or the vertical sync signal. Table A-3 Preset timing resolutions (continued) Preset Timing name Pixel format Horz freq (kHz) Vert freq (Hz) 5 720p60 1280 × 720 45.000 ...3440 × 1440 43.819 30.000 Energy saver feature The monitors support a reduced power state. The reduced power state is initiated if the monitor detects the absence of these signals, the monitor screen is blanked, the backlight is in the reduced power state, the monitor uses


