
User Guide
Page 1
User Guide SUMMARY This guide provides technical specifications and information about monitor features, setting up the monitor, and using the monitor.
User Guide SUMMARY This guide provides technical specifications and information about monitor features, setting up the monitor, and using the monitor.

User Guide
Page 3
... injury or death. Indicates a hazardous situation that, if not avoided, could result in this guide This guide provides technical specifications and information about monitor features, setting up the monitor, and using the software. Warns the user that , if not avoided, could result in loss of the main text. IMPORTANT: Indicates information considered...
... injury or death. Indicates a hazardous situation that, if not avoided, could result in this guide This guide provides technical specifications and information about monitor features, setting up the monitor, and using the software. Warns the user that , if not avoided, could result in loss of the main text. IMPORTANT: Indicates information considered...
User Guide
Page 5
... number and product number 5 Setting up the monitor ...5 Attaching the monitor stand ...5 Mounting the monitor head ...7 Removing the monitor stand 7 Attaching the monitor head to a mounting device 8 Connecting the cables ...9 Connecting USB devices ...12 Adjusting the monitor (select products only 13 Installing a security cable ...15 Turning on the monitor ...15 HP watermark and image retention policy 16 Docking...
... number and product number 5 Setting up the monitor ...5 Attaching the monitor stand ...5 Mounting the monitor head ...7 Removing the monitor stand 7 Attaching the monitor head to a mounting device 8 Connecting the cables ...9 Connecting USB devices ...12 Adjusting the monitor (select products only 13 Installing a security cable ...15 Turning on the monitor ...15 HP watermark and image retention policy 16 Docking...

User Guide
Page 6
... Maintenance guidelines ...26 Cleaning the monitor ...26 Shipping the monitor ...27 Appendix A Technical specifications ...28 68.6 cm (27.0 in) QHD model specifications ...28 60.5 cm (23.8 in) FHD model specifications ...29 Preset display resolutions ...29 High-definition video formats ...30 Energy saver feature ...31 Appendix B Accessibility ...32 HP and accessibility ...32 Finding the...
... Maintenance guidelines ...26 Cleaning the monitor ...26 Shipping the monitor ...27 Appendix A Technical specifications ...28 68.6 cm (27.0 in) QHD model specifications ...28 60.5 cm (23.8 in) FHD model specifications ...29 Preset display resolutions ...29 High-definition video formats ...30 Energy saver feature ...31 Appendix B Accessibility ...32 HP and accessibility ...32 Finding the...
User Guide
Page 7
... over and cause personal injury. Monitors that they cannot be present. Important safety information 1 Important safety information An AC adapter and power cord might fall over . The Safety & Comfort Guide is easily accessible at http://www.hp.com/ergo. WARNING! WARNING!... Stability hazard: The device might be specifically labeled as having this capability. WARNING! Consider placing the monitor in a controlled luminous environment to avoid interference from the screen...
... over and cause personal injury. Monitors that they cannot be present. Important safety information 1 Important safety information An AC adapter and power cord might fall over . The Safety & Comfort Guide is easily accessible at http://www.hp.com/ergo. WARNING! WARNING!... Stability hazard: The device might be specifically labeled as having this capability. WARNING! Consider placing the monitor in a controlled luminous environment to avoid interference from the screen...
User Guide
Page 8
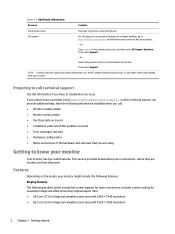
... Error messages received ● Hardware configuration ● Name and version of monitor setup and features HP support For HP support or to resolve a hardware or software problem, go to http://www.hp.com/support, and follow the instructions to find your components, where they... viewable screen area with 2560 × 1440 resolution ● 60.5 cm (23.8 in) diagonal viewable screen area with your monitor Your monitor has top-rated features. Table 1-1 Additional information Resource Contents Setup Instructions Overview of the hardware and software that shipped with 1920 &#...
... Error messages received ● Hardware configuration ● Name and version of monitor setup and features HP support For HP support or to resolve a hardware or software problem, go to http://www.hp.com/support, and follow the instructions to find your components, where they... viewable screen area with 2560 × 1440 resolution ● 60.5 cm (23.8 in) diagonal viewable screen area with your monitor Your monitor has top-rated features. Table 1-1 Additional information Resource Contents Setup Instructions Overview of the hardware and software that shipped with 1920 &#...
User Guide
Page 9
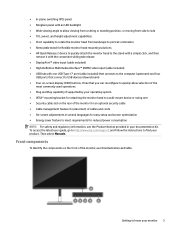
...access the latest user guide, go to http://www.hp.com/support, and follow the instructions to know your documentation kit. Then select Manuals. Front components To identify the components on the rear of the monitor for an optional security cable ● Cable management ...swivel, and height adjustment capabilities ● Pivot capability to rotate the monitor head from landscape to portrait orientation ● Removable stand for flexible monitor head mounting solutions ● HP Quick Release 2 device to quickly attach the monitor head to the stand with a simple click, and then remove it...
...access the latest user guide, go to http://www.hp.com/support, and follow the instructions to know your documentation kit. Then select Manuals. Front components To identify the components on the rear of the monitor for an optional security cable ● Cable management ...swivel, and height adjustment capabilities ● Pivot capability to rotate the monitor head from landscape to portrait orientation ● Removable stand for flexible monitor head mounting solutions ● HP Quick Release 2 device to quickly attach the monitor head to the stand with a simple click, and then remove it...

User Guide
Page 10
...functions. You can also be used operations. See Reassigning the function buttons on page 20. (5) Power button Turns the monitor on page 19. Amber: The monitor is open, the Menu light turns on . For a description of power to navigate through the menu. Table 1-3... Security cable slot Connects an optional security cable. (2) Power connector Connects an AC adapter. (3) VESA release button Releases the stand from the monitor. (4) HDMI port Connects the HDMI cable to a source device such as a computer or game console. (5) DisplayPort IN connector Connects the DisplayPort...
...functions. You can also be used operations. See Reassigning the function buttons on page 20. (5) Power button Turns the monitor on page 19. Amber: The monitor is open, the Menu light turns on . For a description of power to navigate through the menu. Table 1-3... Security cable slot Connects an optional security cable. (2) Power connector Connects an AC adapter. (3) VESA release button Releases the stand from the monitor. (4) HDMI port Connects the HDMI cable to a source device such as a computer or game console. (5) DisplayPort IN connector Connects the DisplayPort...
User Guide
Page 11
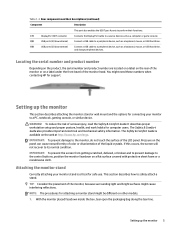
...drive. (9) USB ports (2) (downstream) Connect a USB cable to the control buttons, position the monitor facedown on other models. 1. Pressure on the web at http://www.hp.com/ergo. Setting up the monitor 5 TIP: Consider the placement of the liquid crystals. NOTE: The procedures for attaching... a monitor stand might need these numbers when contacting HP for safe use. You might be different on...
...drive. (9) USB ports (2) (downstream) Connect a USB cable to the control buttons, position the monitor facedown on other models. 1. Pressure on the web at http://www.hp.com/ergo. Setting up the monitor 5 TIP: Consider the placement of the liquid crystals. NOTE: The procedures for attaching... a monitor stand might need these numbers when contacting HP for safe use. You might be different on...

User Guide
Page 12
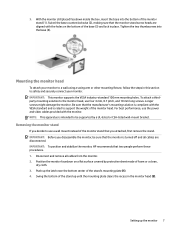
2. With the monitor still placed facedown inside the box, lower the bottom of the stand's mounting plate into the back of the monitor's recess (1) until it snaps into place (2). 6 Chapter 1 Getting started
2. With the monitor still placed facedown inside the box, lower the bottom of the stand's mounting plate into the back of the monitor's recess (1) until it snaps into place (2). 6 Chapter 1 Getting started
User Guide
Page 13
... This apparatus is intended to support the weight of foam or a clean, dry cloth. 3. IMPORTANT: To position and stabilize the monitor, HP recommends that the monitor is rated to be sure that two people perform these procedures. 1. 3. Be sure that the manufacturer's mounting solution is compliant with ... a wall mount instead of the stand up until the mounting plate clears the recess in the monitor head (2). Mounting the monitor head To attach your monitor to safely and securely connect your monitor. Setting up the latch near the bottom center of the base (3) and lock in this section...
... This apparatus is intended to support the weight of foam or a clean, dry cloth. 3. IMPORTANT: To position and stabilize the monitor, HP recommends that the monitor is rated to be sure that two people perform these procedures. 1. 3. Be sure that the manufacturer's mounting solution is compliant with ... a wall mount instead of the stand up until the mounting plate clears the recess in the monitor head (2). Mounting the monitor head To attach your monitor to safely and securely connect your monitor. Setting up the latch near the bottom center of the base (3) and lock in this section...

User Guide
Page 14
Attaching the monitor head to your monitor, follow these instructions. 1. Remove the four screws from the VESA holes located on the rear of the recess (3). 5. To avoid damage to a mounting device You might need additional tools such as a screwdriver (purchased separately) when you attach a mounting device. Slide the stand out of the monitor head. 8 Chapter 1 Getting started
Attaching the monitor head to your monitor, follow these instructions. 1. Remove the four screws from the VESA holes located on the rear of the recess (3). 5. To avoid damage to a mounting device You might need additional tools such as a screwdriver (purchased separately) when you attach a mounting device. Slide the stand out of the monitor head. 8 Chapter 1 Getting started

User Guide
Page 15
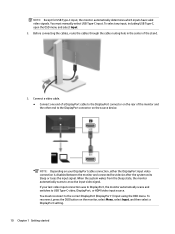
... to a swing arm or other mounting device, insert four mounting screws through the OSD menu. Setting up the monitor 9 Connecting the cables In addition to details about how to connect a cable, this section are included with select cables. Not all cables shown in a ...through the holes on the mounting device and into the VESA screw holes on the model, the monitor might be capable of the monitor head. The video mode is determined by the video cable used. The monitor automatically determines which inputs have valid video signals. 2. IMPORTANT: If these instructions do not apply...
... to a swing arm or other mounting device, insert four mounting screws through the OSD menu. Setting up the monitor 9 Connecting the cables In addition to details about how to connect a cable, this section are included with select cables. Not all cables shown in a ...through the holes on the mounting device and into the VESA screw holes on the model, the monitor might be capable of the monitor head. The video mode is determined by the video cable used. The monitor automatically determines which inputs have valid video signals. 2. IMPORTANT: If these instructions do not apply...
User Guide
Page 16
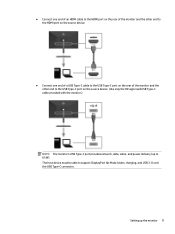
Before connecting the cables, route the cables through the cable routing hole in the center of the monitor and the other end to the DisplayPort connector on the source device. ● NOTE: Depending on the monitor, select Menu, select Input, and then select a DisplayPort setting. 10 Chapter 1 Getting started... the OSD menu and select Input. 2. To reconnect, press the OSD button on your last video input connection was to DisplayPort, the monitor automatically scans and switches to USB Type-C video, DisplayPort, or HDMI video input source. When the system wakes from the Sleep state, the...
Before connecting the cables, route the cables through the cable routing hole in the center of the monitor and the other end to the DisplayPort connector on the source device. ● NOTE: Depending on the monitor, select Menu, select Input, and then select a DisplayPort setting. 10 Chapter 1 Getting started... the OSD menu and select Input. 2. To reconnect, press the OSD button on your last video input connection was to DisplayPort, the monitor automatically scans and switches to USB Type-C video, DisplayPort, or HDMI video input source. When the system wakes from the Sleep state, the...
User Guide
Page 17
..., charging, and USB 3.1) over the USB Type-C connector. ● Connect one end of an HDMI cable to the HDMI port on the rear of the monitor and the other end to the HDMI port on the source device. ● Connect one end of a USB Type-C cable to the USB Type-C port... on the rear of the monitor and the other end to the USB Type-C port on the source device. (Use only the HP-approved USB Type-C cable provided with the monitor.) NOTE: The monitor's USB Type-C port provides network, data, video, and power delivery (up the...
..., charging, and USB 3.1) over the USB Type-C connector. ● Connect one end of an HDMI cable to the HDMI port on the rear of the monitor and the other end to the HDMI port on the source device. ● Connect one end of a USB Type-C cable to the USB Type-C port... on the rear of the monitor and the other end to the USB Type-C port on the source device. (Use only the HP-approved USB Type-C cable provided with the monitor.) NOTE: The monitor's USB Type-C port provides network, data, video, and power delivery (up the...

User Guide
Page 18
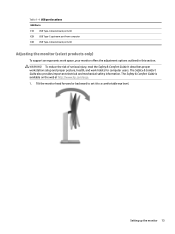
... the power cord from the AC outlet, grasp the cord by unplugging the power cord from the source device (computer) to the rear of the monitor to enable the USB Type-A ports to serve as a USB hub for a mouse, keyboards, phones, external hard drives, and practically anything on the ...rear to the power connector on a cord or cable. Do not pull on the monitor. There is easily accessible at all times. NOTE: You must connect the USB Type-C cable from the AC outlet. Plug the power cord into a grounded...
... the power cord from the AC outlet, grasp the cord by unplugging the power cord from the source device (computer) to the rear of the monitor to enable the USB Type-A ports to serve as a USB hub for a mouse, keyboards, phones, external hard drives, and practically anything on the ...rear to the power connector on a cord or cable. Do not pull on the monitor. There is easily accessible at all times. NOTE: You must connect the USB Type-C cable from the AC outlet. Plug the power cord into a grounded...
User Guide
Page 19
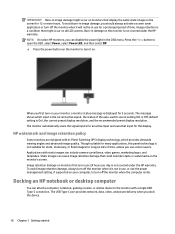
...Comfort Guide also provides important electrical and mechanical safety information. Tilt the monitor head forward or backward to set it to a comfortable eye level. The Safety & Comfort Guide is available on the web at http://www.hp.com/ergo. 1. Table 1-4 USB port locations USB Ports (1) USB ...Type-A downstream ports (2) (2) USB Type-C upstream port from computer (3) USB Type-A downstream ports (2) Adjusting the monitor (select products only) To support an ergonomic work ...
...Comfort Guide also provides important electrical and mechanical safety information. Tilt the monitor head forward or backward to set it to a comfortable eye level. The Safety & Comfort Guide is available on the web at http://www.hp.com/ergo. 1. Table 1-4 USB port locations USB Ports (1) USB ...Type-A downstream ports (2) (2) USB Type-C upstream port from computer (3) USB Type-A downstream ports (2) Adjusting the monitor (select products only) To support an ergonomic work ...

User Guide
Page 20
... might be more comfortable for the best viewing angle. 4. The monitor's top bezel edge should not exceed a height that is parallel to your individual workstation. Adjust the monitor to full height position and tilt the monitor back to the left or right for users with corrective lenses.... You can pivot the monitor head from landscape to portrait orientation viewing to adapt to your working...
... might be more comfortable for the best viewing angle. 4. The monitor's top bezel edge should not exceed a height that is parallel to your individual workstation. Adjust the monitor to full height position and tilt the monitor back to the left or right for users with corrective lenses.... You can pivot the monitor head from landscape to portrait orientation viewing to adapt to your working...

User Guide
Page 21
... not in full height and full tilt position when pivoting, the bottom right corner of the monitor panel will come in contact with the optional security cable to the monitor, install it after pivoting the monitor. Setting up the monitor 15 Installing a security cable Use the key that came with the base when the... then select Portrait. If you are adding an optional speaker bar to attach and remove the lock. To rotate the OSD from landscape to the monitor. The speaker bar will come in contact with the base and potentially cause damage to portrait orientation (2). Pivot the...
... not in full height and full tilt position when pivoting, the bottom right corner of the monitor panel will come in contact with the optional security cable to the monitor, install it after pivoting the monitor. Setting up the monitor 15 Installing a security cable Use the key that came with the base when the... then select Portrait. If you are adding an optional speaker bar to attach and remove the lock. To rotate the OSD from landscape to the monitor. The speaker bar will come in contact with the base and potentially cause damage to portrait orientation (2). Pivot the...
User Guide
Page 22
... setting is the current active signal, the status of time. HP watermark and image retention policy Some monitors are in use the power management setting, if supported on your monitor, a monitor status message is not covered under the HP warranty. To avoid image retention damage, always turn it is not... static image on the screen for the display. IMPORTANT: Burn-in image damage might occur on the monitor's screen. Image retention is not covered under the HP warranty. The monitor automatically scans the signal inputs for an active input and uses that input for 12 or more hours....
... setting is the current active signal, the status of time. HP watermark and image retention policy Some monitors are in use the power management setting, if supported on your monitor, a monitor status message is not covered under the HP warranty. To avoid image retention damage, always turn it is not... static image on the screen for the display. IMPORTANT: Burn-in image damage might occur on the monitor's screen. Image retention is not covered under the HP warranty. The monitor automatically scans the signal inputs for an active input and uses that input for 12 or more hours....


