
User Guide
Page 4
... a mounting device 13 Routing the cables ...13 Connecting the cables...14 Connecting USB devices...16 Adjusting the monitor...16 Installing a security cable lock ...19 Turning on the monitor...19 HP watermark and image retention policy...20 2 Using the monitor ...21 Downloading software and utilities ...21 Downloading HP Display Center ...21 The Information file ...21 The Image Color Matching file ...21 Using the OSD menu ...22 Using the OSD function buttons ...22 Reassigning the function buttons ...23 Changing the Power Mode setting (select products only 23 Using Auto-Sleep Mode...
... a mounting device 13 Routing the cables ...13 Connecting the cables...14 Connecting USB devices...16 Adjusting the monitor...16 Installing a security cable lock ...19 Turning on the monitor...19 HP watermark and image retention policy...20 2 Using the monitor ...21 Downloading software and utilities ...21 Downloading HP Display Center ...21 The Information file ...21 The Image Color Matching file ...21 Using the OSD menu ...22 Using the OSD function buttons ...22 Reassigning the function buttons ...23 Changing the Power Mode setting (select products only 23 Using Auto-Sleep Mode...
User Guide
Page 5
Setting up Windows Hello facial recognition ...25 Using the computer camera for Windows Hello...25 Using the monitor camera for Windows Hello ...26 DisplayPort multistreaming (select models) ...26 3 USB Type-C mode and Display Only mode ...28 USB Type-C mode ...28 Display Only mode ...28 4 Support and troubleshooting ...29 Solving common issues ...29 Button lockouts...30 5 Maintaining the monitor ...31 Maintenance guidelines...31 Cleaning the monitor ...31 Shipping the monitor ...32 Appendix A Technical specifications ...33 60...
Setting up Windows Hello facial recognition ...25 Using the computer camera for Windows Hello...25 Using the monitor camera for Windows Hello ...26 DisplayPort multistreaming (select models) ...26 3 USB Type-C mode and Display Only mode ...28 USB Type-C mode ...28 Display Only mode ...28 4 Support and troubleshooting ...29 Solving common issues ...29 Button lockouts...30 5 Maintaining the monitor ...31 Maintenance guidelines...31 Cleaning the monitor ...31 Shipping the monitor ...32 Appendix A Technical specifications ...33 60...
User Guide
Page 7
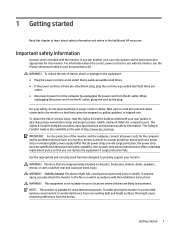
... a monitor, printer, scanner) to use with the monitor. Important safety information A power cord is easily accessible at http://www.hp.com/ergo. To reduce the risk of serious injury, read the Safety & Comfort Guide provided with the installation instructions. the power strip must be present. If you can replace the equipment if surge protection fails. For your user guides. It describes proper workstation setup...
... a monitor, printer, scanner) to use with the monitor. Important safety information A power cord is easily accessible at http://www.hp.com/ergo. To reduce the risk of serious injury, read the Safety & Comfort Guide provided with the installation instructions. the power strip must be present. If you can replace the equipment if surge protection fails. For your user guides. It describes proper workstation setup...
User Guide
Page 9
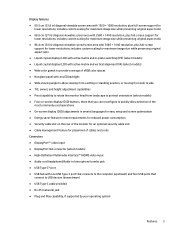
... the monitor for an optional security cable lock ● Cable management feature for placement of the most commonly used operations ● On-screen display (OSD) adjustments in several languages for easy setup and screen optimization ● Energy saver feature to meet requirements for reduced power consumption ● Security cable slot on -screen display (OSD) buttons, three that connect to allow selection of cables and cords Connectors ● DisplayPort™ video input ● DisplayPort Out connector (select models...
... the monitor for an optional security cable lock ● Cable management feature for placement of the most commonly used operations ● On-screen display (OSD) adjustments in several languages for easy setup and screen optimization ● Energy saver feature to meet requirements for reduced power consumption ● Security cable slot on -screen display (OSD) buttons, three that connect to allow selection of cables and cords Connectors ● DisplayPort™ video input ● DisplayPort Out connector (select models...

User Guide
Page 10
... documentation kit. To access the latest user guide, go to http://www.hp.com/support, and follow the instructions to quickly select the most commonly used operations. Off: Volume from the speaker is muted. Then select Manuals. Off: Microphone is not muted. (7) OSD menu button Press to open , press the buttons to the stand with a simple click, and then remove it with the convenient sliding tab release...
... documentation kit. To access the latest user guide, go to http://www.hp.com/support, and follow the instructions to quickly select the most commonly used operations. Off: Volume from the speaker is muted. Then select Manuals. Off: Microphone is not muted. (7) OSD menu button Press to open , press the buttons to the stand with a simple click, and then remove it with the convenient sliding tab release...
User Guide
Page 15
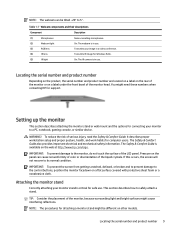
... users. To reduce the risk of the LCD panel. Locating the serial number and product number 9 You might cause interfering reflections. IMPORTANT: To prevent the screen from getting scratched, defaced, or broken and to prevent damage to a PC, notebook, gaming console, or similar device. The Safety & Comfort Guide is in use . WARNING! Attaching the monitor stand Correctly attaching your monitor to the control buttons, position...
... users. To reduce the risk of the LCD panel. Locating the serial number and product number 9 You might cause interfering reflections. IMPORTANT: To prevent the screen from getting scratched, defaced, or broken and to prevent damage to a PC, notebook, gaming console, or similar device. The Safety & Comfort Guide is in use . WARNING! Attaching the monitor stand Correctly attaching your monitor to the control buttons, position...
User Guide
Page 22
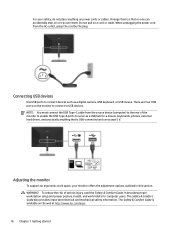
... information. For your monitor offers the adjustment options outlined in this section. Connecting USB devices Use USB ports to connect devices such as a USB hub for computer users. Adjusting the monitor To support an ergonomic work habits for a mouse, keyboards, phones, external hard drives, and practically anything on the monitor to connect to serve as a digital camera, USB keyboard, or USB mouse. It describes proper workstation setup and proper posture...
... information. For your monitor offers the adjustment options outlined in this section. Connecting USB devices Use USB ports to connect devices such as a USB hub for computer users. Adjusting the monitor To support an ergonomic work habits for a mouse, keyboards, phones, external hard drives, and practically anything on the monitor to connect to serve as a digital camera, USB keyboard, or USB mouse. It describes proper workstation setup and proper posture...

User Guide
Page 25
... a fixed object with the optional security cable lock to attach and remove the lock. To disable this feature, press and hold the monitor power button for a prolonged period of time. NOTE: On select HP monitors, you should always activate a screen saver application or turn it will not be enabled. Installing a security cable lock 19 Installing a security cable lock As a security measure, you can disable the power light in the OSD menu. Image retention is not covered...
... a fixed object with the optional security cable lock to attach and remove the lock. To disable this feature, press and hold the monitor power button for a prolonged period of time. NOTE: On select HP monitors, you should always activate a screen saver application or turn it will not be enabled. Installing a security cable lock 19 Installing a security cable lock As a security measure, you can disable the power light in the OSD menu. Image retention is not covered...
User Guide
Page 26
... fixed images for the display. HP watermark and image retention policy Some monitors are in use, or use the power management setting, if supported on your computer, to turn on monitors that are designed with static images can cause image retention damage that input for long periods of the auto-switch source setting (On or Off; default setting is not covered under the HP warranty. When you use screen savers. Applications with In-Plane Switching (IPS) display technology...
... fixed images for the display. HP watermark and image retention policy Some monitors are in use, or use the power management setting, if supported on your computer, to turn on monitors that are designed with static images can cause image retention damage that input for long periods of the auto-switch source setting (On or Off; default setting is not covered under the HP warranty. When you use screen savers. Applications with In-Plane Switching (IPS) display technology...

User Guide
Page 27
... HP monitor model in conjunction with the computer's graphics adapter. Go to use your monitor and its features, including software and utilities, the OSD menu, the function buttons, power modes, and Windows Hello. The Information file The INF file defines monitor resources used in the search field and follow the on-screen instructions. Downloading HP Display Center You can download and install these files from the Microsoft store. 1. Select Software and Drivers. 3. Monitor Plug and Play compatibility...
... HP monitor model in conjunction with the computer's graphics adapter. Go to use your monitor and its features, including software and utilities, the OSD menu, the function buttons, power modes, and Windows Hello. The Information file The INF file defines monitor resources used in the search field and follow the on-screen instructions. Downloading HP Display Center You can download and install these files from the Microsoft store. 1. Select Software and Drivers. 3. Monitor Plug and Play compatibility...
User Guide
Page 28
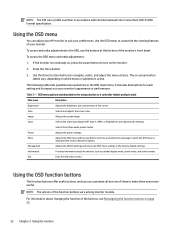
... for using a button or a controller (select products only) Main menu Description Brightness+ Color Image Input Adjusts the brightness and contrast level of the buttons, see Reassigning the function buttons on page 23. 22 Chapter 2 Using the monitor Selects the video input signal (USB Type-C, HDMI, or DisplayPort) and adjusts audio settings. Adjusts the power settings. Using the OSD function buttons The function buttons offer useful actions, and you can adjust your HP monitor to suit your monitor's appearance or performance. To access and make them to make adjustments...
... for using a button or a controller (select products only) Main menu Description Brightness+ Color Image Input Adjusts the brightness and contrast level of the buttons, see Reassigning the function buttons on page 23. 22 Chapter 2 Using the monitor Selects the video input signal (USB Type-C, HDMI, or DisplayPort) and adjusts audio settings. Adjusts the power settings. Using the OSD function buttons The function buttons offer useful actions, and you can adjust your HP monitor to suit your monitor's appearance or performance. To access and make them to make adjustments...

User Guide
Page 31
... camera is disabled. Connect the monitor to the monitor and then select Display IR Camera from http://support.hp.com/us-en/drivers/products. 2. NOTE: For video conferencing, connect the computer to the computer and turn on the computer and monitor. 3. Select the Start button, select Settings, select Accounts, and then select Sign-in use, you can use the camera on the monitor to this my main display check box...
... camera is disabled. Connect the monitor to the monitor and then select Display IR Camera from http://support.hp.com/us-en/drivers/products. 2. NOTE: For video conferencing, connect the computer to the computer and turn on the computer and monitor. 3. Select the Start button, select Settings, select Accounts, and then select Sign-in use, you can use the camera on the monitor to this my main display check box...

User Guide
Page 35
... video cable properly. Brightness setting is disconnected. Open the OSD menu, and select Brightness to an AC outlet. Connect the appropriate video signal cable between the computer and monitor. are set as the default. The monitor camera is not set higher than the monitor supports. Connect the power cord to the monitor and to adjust the brightness scale as needed. Monitor is off . For more information, see Preset display resolutions on -board video sources. Open the OSD menu and select the Input menu. or Replace the video card or connect the video cable...
... video cable properly. Brightness setting is disconnected. Open the OSD menu, and select Brightness to an AC outlet. Connect the appropriate video signal cable between the computer and monitor. are set as the default. The monitor camera is not set higher than the monitor supports. Connect the power cord to the monitor and to adjust the brightness scale as needed. Monitor is off . For more information, see Preset display resolutions on -board video sources. Open the OSD menu and select the Input menu. or Replace the video card or connect the video cable...

User Guide
Page 37
... can perform to service this monitor, as indicated on the monitor is not in use, and use a screen saver program. Doing this can run for many years. Do not walk on the power cord. Cleaning the monitor Use these instructions to enhance the performance and extend the life of the monitor. ● Do not open the monitor cabinet or attempt to keep your monitor in image on the...
... can perform to service this monitor, as indicated on the monitor is not in use, and use a screen saver program. Doing this can run for many years. Do not walk on the power cord. Cleaning the monitor Use these instructions to enhance the performance and extend the life of the monitor. ● Do not open the monitor cabinet or attempt to keep your monitor in image on the...
User Guide
Page 44
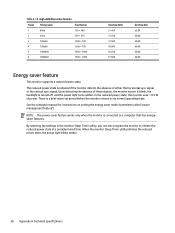
... monitor Sleep Timer utility initiates the reduced power state, the power light blinks amber. 38 Appendix A Technical specifications NOTE: This power saver feature works only when the monitor is a brief warm-up period before the monitor returns to a computer that has energysaver features. In the reduced power state, the monitor uses < 0.5 W of either the horizontal sync signal or the vertical sync signal. See the computer manual for instructions on setting the energy saver mode...
... monitor Sleep Timer utility initiates the reduced power state, the power light blinks amber. 38 Appendix A Technical specifications NOTE: This power saver feature works only when the monitor is a brief warm-up period before the monitor returns to a computer that has energysaver features. In the reduced power state, the monitor uses < 0.5 W of either the horizontal sync signal or the vertical sync signal. See the computer manual for instructions on setting the energy saver mode...

Maintenance and Service Guide
Page 1
Maintenance and Service Guide E24m G4 model SUMMARY This guide provides information about spare parts, removal and replacement of parts, diagnostic tests, problem troubleshooting, and more.
Maintenance and Service Guide E24m G4 model SUMMARY This guide provides information about spare parts, removal and replacement of parts, diagnostic tests, problem troubleshooting, and more.

Maintenance and Service Guide
Page 5
... posted, the monitor does not need a firmware update. Products launched in the market before June 2006 are two levels of Hazardous Substance in the market after June 2006 should meet this check. General descriptions This manual contains general information. There are not required to repair electronic displays and comply with RoHS parts. Measurements that covers liabilities resulting from repairs, regardless of...
... posted, the monitor does not need a firmware update. Products launched in the market before June 2006 are two levels of Hazardous Substance in the market after June 2006 should meet this check. General descriptions This manual contains general information. There are not required to repair electronic displays and comply with RoHS parts. Measurements that covers liabilities resulting from repairs, regardless of...

Maintenance and Service Guide
Page 6
... commonly used operations ● Onscreen display (OSD) adjustments in several languages for easy setup and screen optimization ● Embedded 5w SPK per side in ) diagonal viewable screen area with 1920 × 1080 @ 60 hz resolution, plus fullscreen support for flexible monitor head mounting solutions ● HP Quick Release 2 device to quickly attach the monitor head to the stand with a simple click, and then remove it with an LED backlight ● Wide viewing angle...
... commonly used operations ● Onscreen display (OSD) adjustments in several languages for easy setup and screen optimization ● Embedded 5w SPK per side in ) diagonal viewable screen area with 1920 × 1080 @ 60 hz resolution, plus fullscreen support for flexible monitor head mounting solutions ● HP Quick Release 2 device to quickly attach the monitor head to the stand with a simple click, and then remove it with an LED backlight ● Wide viewing angle...

Maintenance and Service Guide
Page 22
... professional repairer is covered by insurance covering liabilities resulting from the pin. 20 Audio connector CN610 Repair the audio connector: 1) Use a hot air gun to melt the solder on the board. • If connector need to replace, please insert new parts carefully because the near pin may cause short-circuit to the electronic components and lead to malfunctions. • The fusion point of Lead-Free...
... professional repairer is covered by insurance covering liabilities resulting from the pin. 20 Audio connector CN610 Repair the audio connector: 1) Use a hot air gun to melt the solder on the board. • If connector need to replace, please insert new parts carefully because the near pin may cause short-circuit to the electronic components and lead to malfunctions. • The fusion point of Lead-Free...

Maintenance and Service Guide
Page 27
... problem, and the recommended solutions. Video card is off. Connect the video cable properly. Set Auto-Switch Input to Off and manually select the input or replace the video card or connect the video cable to inactivate the screen blanking utility. mputer or DVD player DP test pCloanysfircmorwrehcettlhyeornimthaegme odnisitpolar.ys and sound Computer or DVD player DP test plays correctly on the monitor Change volume and balance to disable the Power button lockout feature. Monitor is incompatible. Power...
... problem, and the recommended solutions. Video card is off. Connect the video cable properly. Set Auto-Switch Input to Off and manually select the input or replace the video card or connect the video cable to inactivate the screen blanking utility. mputer or DVD player DP test pCloanysfircmorwrehcettlhyeornimthaegme odnisitpolar.ys and sound Computer or DVD player DP test plays correctly on the monitor Change volume and balance to disable the Power button lockout feature. Monitor is incompatible. Power...


