
Backup and Recovery - Windows Vista
Page 6
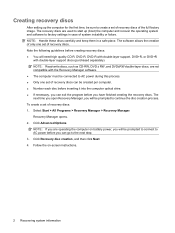
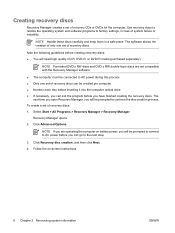
...following guidelines before you experience serious system failure or instability. Select Start > All Programs > Recovery Manager > Recovery Manager. Follow the on battery power, you will be prompted to connect to AC power before you can purchase recovery discs for the first time. The software allows the...on -screen instructions. 2 Chapter 2 Creating recovery discs Create these discs carefully and keep them in a safe place. 2 Creating recovery discs HP recommends that you create recovery discs to be sure that you can restore your system to its original factory state if you have a much...
...following guidelines before you experience serious system failure or instability. Select Start > All Programs > Recovery Manager > Recovery Manager. Follow the on battery power, you will be prompted to connect to AC power before you can purchase recovery discs for the first time. The software allows the...on -screen instructions. 2 Chapter 2 Creating recovery discs Create these discs carefully and keep them in a safe place. 2 Creating recovery discs HP recommends that you create recovery discs to be sure that you can restore your system to its original factory state if you have a much...
Backup and Recovery - Windows Vista
Page 8
... them in case of recovery discs can go to continue the disc creation process. Click Recovery disc creation, and then click Next. 4. Follow the on battery power, you will be prompted to the next step. 3. The software allows the creation of only one set of the full factory image. NOTE: Read...
... them in case of recovery discs can go to continue the disc creation process. Click Recovery disc creation, and then click Next. 4. Follow the on battery power, you will be prompted to the next step. 3. The software allows the creation of only one set of the full factory image. NOTE: Read...
Drives - Windows Vista
Page 5
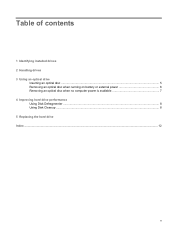
Table of contents 1 Identifying installed drives 2 Handling drives 3 Using an optical drive Inserting an optical disc ...5 Removing an optical disc when running on battery or external power 6 Removing an optical disc when no computer power is available 7 4 Improving hard drive performance Using Disk Defragmenter ...8 Using Disk Cleanup ...8 5 Replacing the hard drive Index ...12 v
Table of contents 1 Identifying installed drives 2 Handling drives 3 Using an optical drive Inserting an optical disc ...5 Removing an optical disc when running on battery or external power 6 Removing an optical disc when no computer power is available 7 4 Improving hard drive performance Using Disk Defragmenter ...8 Using Disk Cleanup ...8 5 Replacing the hard drive Index ...12 v
Drives - Windows Vista
Page 8
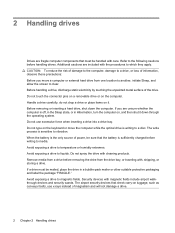
...included with cleaning products. Before handling a drive, discharge static electricity by touching the unpainted metal surface of power, be sure that the battery is sufficiently charged before writing to media. Do not touch the connector pins on a removable drive or on luggage, such as conveyor ...the keyboard or move a computer or external hard drive from the drive bay, or traveling with, shipping, or storing a drive. When the battery is writing to clear. Remove media from a drive before handling drives. Do not use x-rays instead of information, observe these precautions: Before...
...included with cleaning products. Before handling a drive, discharge static electricity by touching the unpainted metal surface of power, be sure that the battery is sufficiently charged before writing to media. Do not touch the connector pins on a removable drive or on luggage, such as conveyor ...the keyboard or move a computer or external hard drive from the drive bay, or traveling with, shipping, or storing a drive. When the battery is writing to clear. Remove media from a drive before handling drives. Do not use x-rays instead of information, observe these precautions: Before...
Drives - Windows Vista
Page 12
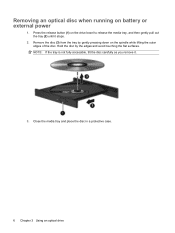
Hold the disc by gently pressing down on the spindle while lifting the outer edges of the disc. Removing an optical disc when running on the drive bezel to release the media tray, and then gently pull out the tray (2) until it . 3. NOTE: If the tray is not fully accessible, tilt the disc carefully as you remove it stops. 2. Close the media tray and place the disc in a protective case. 6 Chapter 3 Using an optical drive Remove the disc (3) from the tray by the edges and avoid touching the flat surfaces. Press the release button (1) on battery or external power 1.
Hold the disc by gently pressing down on the spindle while lifting the outer edges of the disc. Removing an optical disc when running on the drive bezel to release the media tray, and then gently pull out the tray (2) until it . 3. NOTE: If the tray is not fully accessible, tilt the disc carefully as you remove it stops. 2. Close the media tray and place the disc in a protective case. 6 Chapter 3 Using an optical drive Remove the disc (3) from the tray by the edges and avoid touching the flat surfaces. Press the release button (1) on battery or external power 1.
Drives - Windows Vista
Page 16
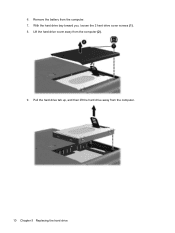
6. With the hard drive bay toward you, loosen the 2 hard drive cover screws (1). 8. Lift the hard drive cover away from the computer. 7. Remove the battery from the computer (2). 9. Pull the hard drive tab up, and then lift the hard drive away from the computer. 10 Chapter 5 Replacing the hard drive
6. With the hard drive bay toward you, loosen the 2 hard drive cover screws (1). 8. Lift the hard drive cover away from the computer. 7. Remove the battery from the computer (2). 9. Pull the hard drive tab up, and then lift the hard drive away from the computer. 10 Chapter 5 Replacing the hard drive

Memory Modules - Windows Vista
Page 7
...must first exit Sleep or Hibernation before installing a memory module. Click Start, click the arrow next to the computer. 5. Remove the battery from the AC outlet. 6. The memory capacity of the computer. Then shut down on by touching a grounded metal object. To reduce ... ENWW 1 Before beginning any procedure, ensure that you are not sure whether the computer is possible. Close the display. 4. Disconnect all batteries before shutdown is off or in the memory module slot. Turn the computer upside down the computer through the operating system. 2. WARNING! CAUTION...
...must first exit Sleep or Hibernation before installing a memory module. Click Start, click the arrow next to the computer. 5. Remove the battery from the AC outlet. 6. The memory capacity of the computer. Then shut down on by touching a grounded metal object. To reduce ... ENWW 1 Before beginning any procedure, ensure that you are not sure whether the computer is possible. Close the display. 4. Disconnect all batteries before shutdown is off or in the memory module slot. Turn the computer upside down the computer through the operating system. 2. WARNING! CAUTION...
Memory Modules - Windows Vista
Page 9
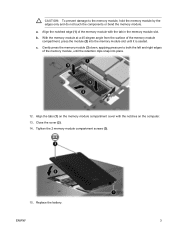
... slot until it is seated. b. ENWW 3 Align the tabs (1) on the memory module compartment cover with the tab in the memory module slot. Replace the battery. a. Gently press the memory module (3) down, applying pressure to the memory module, hold the memory module by the edges only and do not touch the...
... slot until it is seated. b. ENWW 3 Align the tabs (1) on the memory module compartment cover with the tab in the memory module slot. Replace the battery. a. Gently press the memory module (3) down, applying pressure to the memory module, hold the memory module by the edges only and do not touch the...
Notebook Tour - Windows Vista
Page 9
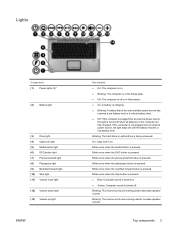
...pressed. Blinks once when the next/fast forward button is pressed. Blinking: The volume scroll zone is pressed. Lights Component (1) Power lights (2)* (2) Battery light (3) Drive light (4) Caps lock light (5) Media button light (6) DVD button light (7) Previous/rewind light (8) Play/pause light (9) Next/...● Off: The computer is off or in Hibernation. ● On: A battery is charging. ● Blinking: A battery that is the only available power source has reached a low battery level or a critical battery level. ● Off: If the computer is plugged into an external power source,...
...pressed. Blinks once when the next/fast forward button is pressed. Blinking: The volume scroll zone is pressed. Lights Component (1) Power lights (2)* (2) Battery light (3) Drive light (4) Caps lock light (5) Media button light (6) DVD button light (7) Previous/rewind light (8) Play/pause light (9) Next/...● Off: The computer is off or in Hibernation. ● On: A battery is charging. ● Blinking: A battery that is the only available power source has reached a low battery level or a critical battery level. ● Off: If the computer is plugged into an external power source,...
Notebook Tour - Windows Vista
Page 20
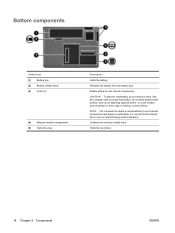
... airflow. Holds the hard drive. 14 Chapter 2 Components ENWW Releases the battery from the battery bay. CAUTION: To prevent overheating, do not obstruct vents. Bottom components Component (1) Battery bay (2) Battery release latch (3) Vents (5) (4) Memory module compartment (5) Hard drive bay Description Holds the battery. Contains the memory module slots. Do not allow another hard surface, such...
... airflow. Holds the hard drive. 14 Chapter 2 Components ENWW Releases the battery from the battery bay. CAUTION: To prevent overheating, do not obstruct vents. Bottom components Component (1) Battery bay (2) Battery release latch (3) Vents (5) (4) Memory module compartment (5) Hard drive bay Description Holds the battery. Contains the memory module slots. Do not allow another hard surface, such...
Notebook Tour - Windows Vista
Page 23
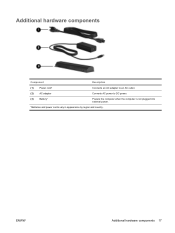
ENWW Additional hardware components 17 Additional hardware components Component Description (1) Power cord* Connects an AC adapter to an AC outlet. (2) AC adapter Converts AC power to DC power. (3) Battery* Powers the computer when the computer is not plugged into external power. *Batteries and power cords vary in appearance by region and country.
ENWW Additional hardware components 17 Additional hardware components Component Description (1) Power cord* Connects an AC adapter to an AC outlet. (2) AC adapter Converts AC power to DC power. (3) Battery* Powers the computer when the computer is not plugged into external power. *Batteries and power cords vary in appearance by region and country.
Notebook Tour - Windows Vista
Page 24
... labels affixed to the bottom of the computer. ● Regulatory label-Provides regulatory information about the computer. The modem approval label is affixed inside the battery bay. ● Modem approval label-Provides regulatory information about optional wireless devices and the approval markings of some of Authenticity-Contains the Windows® Product...
... labels affixed to the bottom of the computer. ● Regulatory label-Provides regulatory information about the computer. The modem approval label is affixed inside the battery bay. ● Modem approval label-Provides regulatory information about optional wireless devices and the approval markings of some of Authenticity-Contains the Windows® Product...
Notebook Tour - Windows Vista
Page 25
... adapter, identifying 17 antennae 16 applications key, Windows 7 audio-in (microphone) jack, identifying 8, 9 audio-out (headphone) jack, identifying 8, 9 B battery bay 18 battery bay, identifying 14 battery light, identifying 3 battery release latch, identifying 14 battery, identifying 17 bays battery 14, 18 hard drive 14 Bluetooth label 18 buttons DVD 5 media 4, 6 next/fast forward 5 play/pause 5 power 4, 6 previous...
... adapter, identifying 17 antennae 16 applications key, Windows 7 audio-in (microphone) jack, identifying 8, 9 audio-out (headphone) jack, identifying 8, 9 B battery bay 18 battery bay, identifying 14 battery light, identifying 3 battery release latch, identifying 14 battery, identifying 17 bays battery 14, 18 hard drive 14 Bluetooth label 18 buttons DVD 5 media 4, 6 next/fast forward 5 play/pause 5 power 4, 6 previous...
Notebook Tour - Windows Vista
Page 26
service tag 18 wireless certification 18 WLAN 18 latch, battery release 14 lights battery 3 caps lock 3 Digital Media Slot 12 drive 3 DVD button 3 integrated camera 15 media button 3 mute 3 next/fast forward 3 num lock 4 optical drive 11 play/pause 3 ...
service tag 18 wireless certification 18 WLAN 18 latch, battery release 14 lights battery 3 caps lock 3 Digital Media Slot 12 drive 3 DVD button 3 integrated camera 15 media button 3 mute 3 next/fast forward 3 num lock 4 optical drive 11 play/pause 3 ...
Software Update, Backup, and Recovery - Windows Vista
Page 6
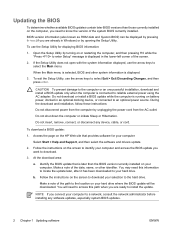
... install a BIOS update while the computer is connected to select Exit > Exit Discarding Changes, and then press enter. Access the page on the HP Web site that is later than those currently installed on the computer, you connect your hard drive. Identify the BIOS update that provides software for.... 2. CAUTION To prevent damage to the computer or an unsuccessful installation, download and install a BIOS update only when the computer is running on battery power, docked in the lower-left corner of the path to the location on your hard drive where the BIOS update will need this path...
... install a BIOS update while the computer is connected to select Exit > Exit Discarding Changes, and then press enter. Access the page on the HP Web site that is later than those currently installed on the computer, you connect your hard drive. Identify the BIOS update that provides software for.... 2. CAUTION To prevent damage to the computer or an unsuccessful installation, download and install a BIOS update only when the computer is running on battery power, docked in the lower-left corner of the path to the location on your hard drive where the BIOS update will need this path...
Software Update, Backup, and Recovery - Windows Vista
Page 12
... recovery discs. The software allows the creation of only one set of recovery discs. Click Recovery disc creation, and then click Next. 4. Follow the on battery power, you will be prompted to connect to AC power before you can exit the program before inserting it into the computer optical drive. ●...
... recovery discs. The software allows the creation of only one set of recovery discs. Click Recovery disc creation, and then click Next. 4. Follow the on battery power, you will be prompted to connect to AC power before you can exit the program before inserting it into the computer optical drive. ●...

Software Updates - Windows Vista
Page 8
... is later than those currently installed on the screen to download your hard drive. To download a BIOS update: 1. Access the page on the HP Web site that is running on your computer: Select Start > Help and Support, and then select the software and drivers update. 2. Follow the...: 1. Determining the BIOS version To determine whether available BIOS updates contain later BIOS versions than the BIOS version currently installed on battery power, docked in the lower-left corner of the date, name, or other system information is connected to an optional power source.
... is later than those currently installed on the screen to download your hard drive. To download a BIOS update: 1. Access the page on the HP Web site that is running on your computer: Select Start > Help and Support, and then select the software and drivers update. 2. Follow the...: 1. Determining the BIOS version To determine whether available BIOS updates contain later BIOS versions than the BIOS version currently installed on battery power, docked in the lower-left corner of the date, name, or other system information is connected to an optional power source.
HP Pavilion dv6500, dv6600, and dv6700 Entertainment PCs - Maintenance and Service Guide
Page 6
...guidelines 43 Unknown user password 44 Component replacement procedures 45 Serial number ...45 Battery ...46 Camera module ...47 Display inverter ...49 Hard drive ...51 Computer feet ...53 Memory module ...53 RTC battery ...55 WLAN module ...56 Optical drive ...59 Switch cover ...61 Speaker ...assembly 63 Power button board 64 Keyboard ...65 Display assembly ...68 Top cover ...74 Bluetooth module ...78 ExpressCard assembly ...
...guidelines 43 Unknown user password 44 Component replacement procedures 45 Serial number ...45 Battery ...46 Camera module ...47 Display inverter ...49 Hard drive ...51 Computer feet ...53 Memory module ...53 RTC battery ...55 WLAN module ...56 Optical drive ...59 Switch cover ...61 Speaker ...assembly 63 Power button board 64 Keyboard ...65 Display assembly ...68 Top cover ...74 Bluetooth module ...78 ExpressCard assembly ...
HP Pavilion dv6500, dv6600, and dv6700 Entertainment PCs - Maintenance and Service Guide
Page 8
Performing a recovery 134 Recovering from the recovery discs 134 Recovering from the partition on the hard drive 134 9 Connector pin assignments Audio-in (microphone) ...135 Audio-out (headphone) ...135 External monitor ...136 RJ-11 (modem) ...137 RJ-45 (network) ...137 S-Video-out ...138 Universal Serial Bus ...138 10 Power cord set requirements Requirements for all countries or regions 139 Requirements for specific countries or regions 140 11 Recycling Battery ...141 Display ...141 Index ...147 viii
Performing a recovery 134 Recovering from the recovery discs 134 Recovering from the partition on the hard drive 134 9 Connector pin assignments Audio-in (microphone) ...135 Audio-out (headphone) ...135 External monitor ...136 RJ-11 (modem) ...137 RJ-45 (network) ...137 S-Video-out ...138 Universal Serial Bus ...138 10 Power cord set requirements Requirements for all countries or regions 139 Requirements for specific countries or regions 140 11 Recycling Battery ...141 Display ...141 Index ...147 viii
HP Pavilion dv6500, dv6600, and dv6700 Entertainment PCs - Maintenance and Service Guide
Page 13
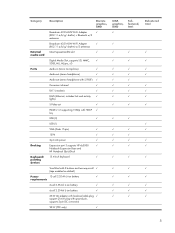
...; USB (1) VGA (Dsub 15-pin) √ 1394 √ 2-pin AC power √ Docking Expansion port 3 supports HP xb3000 √ Notebook Expansion Base and HP Notebook QuickDock Keyboard/ 15.4-inch keyboard √ pointing devices TouchPad with 2 buttons and two-way scroll √ (taps enabled... as default) Power 12-cell 2.20-Ah Li-ion battery √ requirements 6-cell 2.55-Ah Li-ion battery √ 6-cell 2.20-Ah Li-ion battery...
...; USB (1) VGA (Dsub 15-pin) √ 1394 √ 2-pin AC power √ Docking Expansion port 3 supports HP xb3000 √ Notebook Expansion Base and HP Notebook QuickDock Keyboard/ 15.4-inch keyboard √ pointing devices TouchPad with 2 buttons and two-way scroll √ (taps enabled... as default) Power 12-cell 2.20-Ah Li-ion battery √ requirements 6-cell 2.55-Ah Li-ion battery √ 6-cell 2.20-Ah Li-ion battery...


