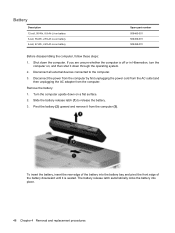
Memory Modules - Windows Vista
Page 5
...Disconnect all batteries before installing a memory module. Remove the battery from the AC outlet. 5. To reduce the risk of the computer. Loosen the memory module compartment screws (1). 1 Before beginning any procedure, ensure that both memory modules are the same size. To add or replace a memory... by adding a memory module to the computer. 4. The memory capacity of static electricity by pressing the power button. Adding or replacing a memory module The computer has one memory module compartment, which is off or in the primary memory module slot. WARNING! Save...
Memory Modules - Windows Vista
Page 7
... computer. 12. CAUTION: To prevent damage to the memory module, hold the memory module by the edges only. Tighten the memory module compartment screws (3). 14. Replace the battery. 3 Align the tabs (1) on the memory module. CAUTION: To prevent damage to the memory module, be sure that you do not bend the memory...
HP Media Remote Control (Select Models Only) - Windows Vista and Windows 7
Page 3
Table of contents 1 Component functions 2 Button quick reference 3 Inserting or replacing the battery 4 Troubleshooting Index ...9 iii
HP Media Remote Control (Select Models Only) - Windows Vista and Windows 7
Page 10
... the remote control, follow these instructions: 1. Dispose of used batteries according to remove it (2). 2. On the back of the remote control, slide the battery compartment cover in the direction of the battery facing up, insert the battery into the compartment (1). 6 Chapter 3 Inserting or replacing the battery To insert or replace the battery in Help and Support. 3 Inserting or...
HP Media Remote Control (Select Models Only) - Windows Vista and Windows 7
Page 12
Replace the battery if necessary. ● Be sure that the battery is properly installed and has a charge. 4 Troubleshooting Try the following solutions if your remote control does not function properly: ● Be sure that you have a clear line of sight from the remote control to the infrared port on the computer or optional docking device. ● Be sure that you are within range of the infrared port on the computer or optional docking device. ● Be sure that you are using the remote control with a supported computer or optional docking device. 8 Chapter 4 Troubleshooting
HP Mobile Remote Control (Select Models Only) - Windows Vista and Windows 7
Page 3
Table of contents 1 Component functions 2 Button quick reference 3 Inserting or replacing the battery 4 Troubleshooting Index ...8 iii
HP Mobile Remote Control (Select Models Only) - Windows Vista and Windows 7
Page 9
On the back of the battery facing up, insert the battery into the compartment (1). 5 3 Inserting or replacing the battery WARNING! With the positive side of the remote control, lift the battery compartment cover (1) and remove it (2). 2. To access the notices, select Start > Help and Support > User Guides. To insert or replace the battery in Help and Support. Dispose of used batteries according to the instructions in the Regulatory, Safety and Environmental Notices located on a user guide disc or in the remote control, follow these instructions: 1.
HP Mobile Remote Control (Select Models Only) - Windows Vista and Windows 7
Page 10
3. Align the battery compartment cover (2) with the battery compartment and press down to close the cover (3). 6 Chapter 3 Inserting or replacing the battery
HP Mobile Remote Control (Select Models Only) - Windows Vista and Windows 7
Page 11
Replace the battery if necessary. ● Be sure that the battery is properly installed and has a charge. 4 Troubleshooting Try the following solutions if your remote control does not function properly: ● Be sure that you have a clear line of sight from the remote control to the infrared port on the computer or optional docking device. ● Be sure that you are within range of the infrared port on the computer or optional docking device. ● Be sure that you are using the remote control with a supported computer or optional docking device. 7
Wireless (Select Models Only) - Windows Vista
Page 19
... gently push the SIM into the slot until it is not replaced. 9. NOTE: HP Mobile Broadband will be disabled if the battery is firmly seated. 8. Inserting a SIM 13 Then shut down on a flat surface, with the battery bay toward you are not sure whether the computer is off ...11. Reconnect external power. 10. If you . 6. Close the display. 3. Turn on by pressing the power button. To insert a SIM: 1. Replace the battery. Disconnect all external devices connected to the connectors, use minimal force when inserting a SIM. Inserting a SIM CAUTION: To prevent damage to the computer. ...
Wireless (Select Models Only) - Windows Vista
Page 20
...operating system. 2. Disconnect all external devices connected to the computer. 4. Reconnect external devices. 11. Unplug the power cord from the slot (2). 8. Replace the battery. 9. Close the display. 3. Reconnect external power. 10. Removing a SIM To remove a SIM: 1. Turn the computer upside down on the computer. ...14 Chapter 3 Using HP Mobile Broadband (select models only) Turn on a flat surface, with the battery bay toward you are not sure whether the computer is off or in on by pressing the power button...
Drives - Windows Vista
Page 24
... 5. Do not remove the hard drive while the computer is off or in Hibernation. Unplug the power cord from the hard drive bay. Remove the battery from the computer (2). 9. With the hard drive bay toward you are not sure whether the computer is on, in the Sleep state, or in ...the operating system. If you , loosen the 2 hard drive cover screws (1). 8. Disconnect all external devices connected to disconnect it from the system board. 20 Chapter 5 Replacing the hard drive To remove the hard drive: 1. Turn the computer upside down on the hard drive cable to the computer. 4.
Notebook Tour - Windows Vista
Page 17
NOTE: The computer fan starts up automatically to restore computer functionality, and then contact technical support through Help and Support. Holds the battery. CAUTION: To prevent an unresponsive system, replace the wireless module only with a wireless module authorized for the internal fan to cool internal components. Bottom components 11 Bottom components Component (1) Hard...
HP Pavilion dv6 Entertainment PC - Maintenance and Service Guide
Page 6
... 43 Packaging and transporting guidelines 44 Workstation guidelines 44 Equipment guidelines 45 Component replacement procedures 46 Service tag ...46 Computer feet ...47 Battery ...48 Webcam/microphone module 49 Optical drive ...51 Memory module ...53 TV tuner module ...55 RTC battery ...56 Hard drive ...57 WLAN module ...60 Switch cover and keyboard 63 Power...
HP Pavilion dv6 Entertainment PC - Maintenance and Service Guide
Page 23
... restore computer functionality, and then contact technical support through Help and Support. If you replace the module and then receive a warning message, remove the module to cool internal components. Holds the battery. CAUTION: To prevent an unresponsive system, replace the wireless module only with a wireless module authorized for the internal fan to cool...
HP Pavilion dv6 Entertainment PC - Maintenance and Service Guide
Page 42
... 517860-001 Description System board for use with computers equipped with discrete graphics subsystem memory and 1 GB of dedicated memory (includes replacement thermal material) System board for use with computers equipped with discrete graphics subsystem memory and 512 MB of dedicated memory (includes... replacement thermal material) 6-cell, 47-Wh, 2.20-Ah Li-ion battery 6-cell, 55-Wh, 2.55-Ah Li-ion battery 12-cell, 95-Wh, 8.8-Ah Li-ion battery Modem module for use in all countries and regions except Australia and...
HP Pavilion dv6 Entertainment PC - Maintenance and Service Guide
Page 56
... Before disassembling the computer, follow these steps: 1. Turn the computer upside down through the operating system. 2. To insert the battery, insert the rear edge of the battery into place. 48 Chapter 4 Removal and replacement procedures Disconnect the power from the computer by first unplugging the power cord from the AC outlet and then...
HP Pavilion dv6 Entertainment PC - Maintenance and Service Guide
Page 57
For information on replacing the display assembly and other display assembly internal components, see Battery on page 68. Disconnect all external devices connected to computers equipped with AntiGlare display assemblies. Remove the battery (see Display assembly on page 48). Flex the inside ...BrightView display assemblies (includes cable) Spare part number 512827-001 Before removing the webcam/microphone module, follow these steps: 1. Component replacement procedures 49 NOTE: If it down the computer. Shut down through the operating system. 2. Open the computer as far as...
HP Pavilion dv6 Entertainment PC - Maintenance and Service Guide
Page 59
.... 2. Remove the optical drive: 1. Position the computer with the front toward you. Disconnect all external devices connected to replace the optical drive bracket, position the optical drive with LightScribe DVD±R/RW SuperMulti Double-Layer Drive DVD±RW and CD...48). Shut down through the operating system. 2. Use the disc tray frame to the computer. 3. Remove the optical drive. 6. Component replacement procedures 51 Remove the battery (see Battery on , and then shut it is partially ejected from the computer. 4. Insert a thin tool, such as a paper clip, into ...
HP Pavilion dv6 Entertainment PC - Maintenance and Service Guide
Page 61
...from the computer by first unplugging the power cord from the AC outlet and then unplugging the AC adapter from the computer.) Component replacement procedures 53 The memory module compartment cover is off or in the Plastics Kit, spare part number 511890-001. 4. Loosen the three... away from the computer. 4. Spread the retaining tabs (1) on page 48). Disconnect all external devices connected to the computer. 3. Remove the battery (see Battery on each side of the memory module slot to the front, and remove the cover (3). Memory module Description 4 GB memory module (DDR2, ...