
User Guide
Page 5
... cables ...8 Identifying front panel controls ...12 Adjusting the monitor ...13 Turning on the monitor ...15 Connecting USB devices ...16 Removing the monitor stand ...17 Mounting the monitor ...17 Locating the serial number and product number 19 Installing a cable lock ...19 4 Operating the monitor ...20 Software and utilities ...20 The Information file ...20 The Image Color Matching file ...20 Installing the .INF and .ICM files ...20 Installing from the disc ...20 Downloading from the Web ...21 Using the On-Screen Display (OSD) menu...
... cables ...8 Identifying front panel controls ...12 Adjusting the monitor ...13 Turning on the monitor ...15 Connecting USB devices ...16 Removing the monitor stand ...17 Mounting the monitor ...17 Locating the serial number and product number 19 Installing a cable lock ...19 4 Operating the monitor ...20 Software and utilities ...20 The Information file ...20 The Image Color Matching file ...20 Installing the .INF and .ICM files ...20 Installing from the disc ...20 Downloading from the Web ...21 Using the On-Screen Display (OSD) menu...

User Guide
Page 6
User ...25 Appendix A Technical specifications ...27 31.5"/80 cm model ...27 Recognizing preset display resolutions ...28 Entering user modes ...29 Appendix B Support and troubleshooting ...30 Solving common problems ...30 Button lockouts ...30 Product support ...31 Preparing to call technical support ...31 Appendix C LCD monitor quality and pixel policy 32 Appendix D Accessibility ...33 Supported assistive technologies ...33 Contacting support ...33 vi Color calibration - factory ...25 Color calibration -
User ...25 Appendix A Technical specifications ...27 31.5"/80 cm model ...27 Recognizing preset display resolutions ...28 Entering user modes ...29 Appendix B Support and troubleshooting ...30 Solving common problems ...30 Button lockouts ...30 Product support ...31 Preparing to call technical support ...31 Appendix C LCD monitor quality and pixel policy 32 Appendix D Accessibility ...33 Supported assistive technologies ...33 Contacting support ...33 vi Color calibration - factory ...25 Color calibration -
User Guide
Page 7
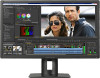
...; User adjustable color settings for customers who do not have calibration equipment ● Non-glare panel with an LED backlight ● Wide viewing angle to allow viewing from a sitting or standing position, or moving from side-to-side ● Tilt capability ● Pivot capability to rotate the display from landscape to portrait ● Swivel and height adjustment capabilities ● Removable stand for flexible monitor panel mounting solutions ● HP Quick Release 2 device to quickly install the monitor panel...
...; User adjustable color settings for customers who do not have calibration equipment ● Non-glare panel with an LED backlight ● Wide viewing angle to allow viewing from a sitting or standing position, or moving from side-to-side ● Tilt capability ● Pivot capability to rotate the display from landscape to portrait ● Swivel and height adjustment capabilities ● Removable stand for flexible monitor panel mounting solutions ● HP Quick Release 2 device to quickly install the monitor panel...
User Guide
Page 8
... languages for easy setup and screen optimization ● HP Display Assistant software for adjusting monitor settings and enabling theft deterrence features (refer to http://www.hp.com/support, and select your documentation kit. To locate updates to the user guide for reduced power consumption NOTE: For safety and regulatory information, refer to the Product Notices provided on all digital inputs ● Software and documentation disc that are reconfigurable to quickly...
... languages for easy setup and screen optimization ● HP Display Assistant software for adjusting monitor settings and enabling theft deterrence features (refer to http://www.hp.com/support, and select your documentation kit. To locate updates to the user guide for reduced power consumption NOTE: For safety and regulatory information, refer to the Product Notices provided on all digital inputs ● Software and documentation disc that are reconfigurable to quickly...
User Guide
Page 9
... well as the computer, connect all times. • Disconnect power from the monitor by the plug. Not all cords and cables connected to rest on the cord. Use the appropriate and correctly sized furniture designed to avoid interference from surrounding light and bright surfaces that may fall over them so that they cannot be specifically labeled as a power strip or Uninterruptible Power Supply (UPS). Do not...
... well as the computer, connect all times. • Disconnect power from the monitor by the plug. Not all cords and cables connected to rest on the cord. Use the appropriate and correctly sized furniture designed to avoid interference from surrounding light and bright surfaces that may fall over them so that they cannot be specifically labeled as a power strip or Uninterruptible Power Supply (UPS). Do not...

User Guide
Page 10
... need it from excessive light, heat or moisture. ● When removing the monitor stand, you move or ship the monitor. 4 Chapter 2 Safety and maintenance guidelines CAUTION: Do not use a 50/50 mix of the unit. 2. If the monitor is not operating properly or has been dropped or damaged, contact an authorized HP dealer, reseller, or service provider. ● Use only a power source and connection...
... need it from excessive light, heat or moisture. ● When removing the monitor stand, you move or ship the monitor. 4 Chapter 2 Safety and maintenance guidelines CAUTION: Do not use a 50/50 mix of the unit. 2. If the monitor is not operating properly or has been dropped or damaged, contact an authorized HP dealer, reseller, or service provider. ● Use only a power source and connection...

User Guide
Page 11
... the instructions below. If this illustration. This prevents the screen from the monitor in the off all power to the monitor. The master power switch turns off position. Use caution when setting up the monitor 5 Use caution when setting up the monitor To prevent damage to the monitor, do not touch the surface of the liquid crystals. Pressure on a flat surface covered with a protective sheet foam or nonabrasive cloth. If installing a stand...
... the instructions below. If this illustration. This prevents the screen from the monitor in the off all power to the monitor. The master power switch turns off position. Use caution when setting up the monitor 5 Use caution when setting up the monitor To prevent damage to the monitor, do not touch the surface of the liquid crystals. Pressure on a flat surface covered with a protective sheet foam or nonabrasive cloth. If installing a stand...

User Guide
Page 14
Connecting the cables NOTE: The monitor ships with the monitor. 1. Before connecting the cables, route the cables through the On-Screen Display (OSD) by pressing the Menu button and selecting Input Control. ● Connect a DisplayPort cable to the DisplayPort connector on the rear of the stand. 3. Connect a video cable. Not all cables shown in a convenient, well-ventilated location near the computer or source device. 2. NOTE: The monitor will automatically determine which inputs have valid video signals. The inputs can...
Connecting the cables NOTE: The monitor ships with the monitor. 1. Before connecting the cables, route the cables through the On-Screen Display (OSD) by pressing the Menu button and selecting Input Control. ● Connect a DisplayPort cable to the DisplayPort connector on the rear of the stand. 3. Connect a video cable. Not all cables shown in a convenient, well-ventilated location near the computer or source device. 2. NOTE: The monitor will automatically determine which inputs have valid video signals. The inputs can...

User Guide
Page 20
... height. A monitor that is not in full height and full tilt position when pivoting, the bottom right corner of the OSD menu can pivot the monitor from landscape to portrait orientation viewing to adapt to portrait mode. Adjust the monitor's height to a comfortable position for users with the base when pivoting and potentially cause damage to your individual workstation. If you can install the HP Display Assistant software included on the screen...
... height. A monitor that is not in full height and full tilt position when pivoting, the bottom right corner of the OSD menu can pivot the monitor from landscape to portrait orientation viewing to adapt to portrait mode. Adjust the monitor's height to a comfortable position for users with the base when pivoting and potentially cause damage to your individual workstation. If you can install the HP Display Assistant software included on the screen...

User Guide
Page 21
... is displayed for five seconds. Image retention is not in the OSD menu. The message shows which input is the current active signal, the current preset display resolution, and the recommended preset display resolution. Press the power button on screen for 10 seconds. The monitor automatically scans the signal inputs for an active input and uses that display the same static image on the front of the monitor, and then select Power Control > Power LED...
... is displayed for five seconds. Image retention is not in the OSD menu. The message shows which input is the current active signal, the current preset display resolution, and the recommended preset display resolution. Press the power button on screen for 10 seconds. The monitor automatically scans the signal inputs for an active input and uses that display the same static image on the front of the monitor, and then select Power Control > Power LED...

User Guide
Page 23
... a flat surface covered by UL or CSA Listed wall mount bracket. Swing the bottom of the monitor to the monitor, four 4 mm, 0.7 pitch, and 10 mm long screws are disconnected. 1. Remove the monitor from the monitor. 2. Slide the stand out of the monitor display panel. CAUTION: This monitor supports the VESA industry standard 100 mm mounting holes. To attach a thirdparty mounting solution to unlock the HP Quick Release 2 (1). 4. Removing the monitor stand 17 Longer screws must...
... a flat surface covered by UL or CSA Listed wall mount bracket. Swing the bottom of the monitor to the monitor, four 4 mm, 0.7 pitch, and 10 mm long screws are disconnected. 1. Remove the monitor from the monitor. 2. Slide the stand out of the monitor display panel. CAUTION: This monitor supports the VESA industry standard 100 mm mounting holes. To attach a thirdparty mounting solution to unlock the HP Quick Release 2 (1). 4. Removing the monitor stand 17 Longer screws must...
User Guide
Page 26
... to monitor screen. This monitor is displayed. 2. View the HP Monitor Software Information file. 3. The disc menu is Microsoft Windows Plug and Play compatible and the monitor will work through separate BNC type connectors or through distribution buffers/boxes. Ensure that the proper resolution and refresh rates appear in the event of an installation error. Insert the disc in accordance with graphics programs to provide consistent color matching from monitor screen to printer...
... to monitor screen. This monitor is displayed. 2. View the HP Monitor Software Information file. 3. The disc menu is Microsoft Windows Plug and Play compatible and the monitor will work through separate BNC type connectors or through distribution buffers/boxes. Ensure that the proper resolution and refresh rates appear in the event of an installation error. Insert the disc in accordance with graphics programs to provide consistent color matching from monitor screen to printer...
User Guide
Page 27
Click Driver - Display/Monitor to http://www.hp.com/support and select the appropriate country and language. 2. Select Drivers & Downloads, type your operating system, and then click Next. 5. Select your monitor model in the Find my product search field, and click Go. 3. Installing the .INF and .ICM files 21 Click on -screen instructions to download the software. If necessary, select your system meets the program minimum...
Click Driver - Display/Monitor to http://www.hp.com/support and select the appropriate country and language. 2. Select Drivers & Downloads, type your operating system, and then click Next. 5. Select your monitor model in the Find my product search field, and click Go. 3. Installing the .INF and .ICM files 21 Click on -screen instructions to download the software. If necessary, select your system meets the program minimum...

User Guide
Page 28
... Menu button to open the OSD. 3. Selects and adjusts the screen color. Selects the video input signal. Adjusts the screen image. Adjusts the on your preferences. Selects the language in which the OSD menu is English. You can access and make adjustments, do the following table lists the menu selections in the OSD using the buttons on the monitor's front panel. Use the four Function buttons to the factory default settings. Enables/disables DDC/CI support and returns all OSD menu settings to navigate, select, and adjust...
... Menu button to open the OSD. 3. Selects and adjusts the screen color. Selects the video input signal. Adjusts the screen image. Adjusts the on your preferences. Selects the language in which the OSD menu is English. You can access and make adjustments, do the following table lists the menu selections in the OSD using the buttons on the monitor's front panel. Use the four Function buttons to the factory default settings. Enables/disables DDC/CI support and returns all OSD menu settings to navigate, select, and adjust...

User Guide
Page 29
Button 1 Menu 2 Information (Function button 1) 3 Next Active Input (Function button 2) 4 Color Control (Function button 3) 5 Luminance (Function button 4) 6 Power Function Opens the OSD (On-Screen Display) main menu. Press one of the five front bezel buttons activates the buttons and displays the icons above the buttons. Reconfiguring the Function buttons 23 Reconfiguring the Function buttons Pressing one of the five front bezel buttons to activate the buttons, and then press the Menu button to open the OSD. 2. Turns the monitor on...
Button 1 Menu 2 Information (Function button 1) 3 Next Active Input (Function button 2) 4 Color Control (Function button 3) 5 Luminance (Function button 4) 6 Power Function Opens the OSD (On-Screen Display) main menu. Press one of the five front bezel buttons activates the buttons and displays the icons above the buttons. Reconfiguring the Function buttons 23 Reconfiguring the Function buttons Pressing one of the five front bezel buttons to activate the buttons, and then press the Menu button to open the OSD. 2. Turns the monitor on...

User Guide
Page 30
... OSD then select the desired size. 6. Using Auto-Sleep Mode The display supports an OSD (On-Screen Display) option called Auto-Sleep Mode that input for the display. In the OSD press Power Control > Auto-Sleep Mode > Disable. 24 Chapter 4 Operating the monitor Connect a secondary input source to enable or disable a reduced power state for the PIP/PBP picture. In the OSD, select PIP Control > PIP On/Off and then select either horizontal or vertical sync signal). When Auto-Sleep Mode is enabled (enabled by default), the monitor will enter a reduced power...
... OSD then select the desired size. 6. Using Auto-Sleep Mode The display supports an OSD (On-Screen Display) option called Auto-Sleep Mode that input for the display. In the OSD press Power Control > Auto-Sleep Mode > Disable. 24 Chapter 4 Operating the monitor Connect a secondary input source to enable or disable a reduced power state for the PIP/PBP picture. In the OSD, select PIP Control > PIP On/Off and then select either horizontal or vertical sync signal). When Auto-Sleep Mode is enabled (enabled by default), the monitor will enter a reduced power...

User Guide
Page 31
... computer. 3. Calibration includes control of customer uses. The user calibration software is possible for red, green, and blue) Color calibration - One color space can be calibrated by the end user when the HP DreamColor Calibration Solution kit is included in the DreamColor Calibration Solution option kit, sold separately). The RGB Adjust color selections are calibrated at a time. Most color spaces are saved in monitor memory and can be re-applied at the factory and can be calibrated and...
... computer. 3. Calibration includes control of customer uses. The user calibration software is possible for red, green, and blue) Color calibration - One color space can be calibrated by the end user when the HP DreamColor Calibration Solution kit is included in the DreamColor Calibration Solution option kit, sold separately). The RGB Adjust color selections are calibrated at a time. Most color spaces are saved in monitor memory and can be re-applied at the factory and can be calibrated and...

User Guide
Page 33
... product, go to http://www.hp.com/go/ quickspecs/ and search for your specific display model to find the model-specific QuickSpecs. 31.5"/80 cm model Display Type Viewable Image Size Maximum Weight (Unpacked) Dimensions (include base) Height (highest position) Height (lowest position) Depth Width Tilt Swivel Maximum Graphic Resolution Optimum Graphic Resolution Environmental Requirements Temperature Operating Temperature Storage Temperature Power Source Input Terminal 80 cm wide screen LCD 80 cm diagonal 10.7 kg...
... product, go to http://www.hp.com/go/ quickspecs/ and search for your specific display model to find the model-specific QuickSpecs. 31.5"/80 cm model Display Type Viewable Image Size Maximum Weight (Unpacked) Dimensions (include base) Height (highest position) Height (lowest position) Depth Width Tilt Swivel Maximum Graphic Resolution Optimum Graphic Resolution Environmental Requirements Temperature Operating Temperature Storage Temperature Power Source Input Terminal 80 cm wide screen LCD 80 cm diagonal 10.7 kg...

User Guide
Page 34
Preset Pixel Format Horz Freq (kHz) Vert Freq (Hz) 1 640 × 480 31.469 59.940 2 720 × 400 31.469 70.087 3 720 × 480 31....; 2160 135.000 60.000 NOTE: The video card must be capable of supporting 3840 × 2160 - 60Hz to drive the monitor at the Preferred Mode. 28 Appendix A Technical specifications Recognizing preset display resolutions The display resolutions listed below are the most commonly used modes and are set as factory defaults. This monitor automatically recognizes these preset modes and they will appear properly sized and centered on the screen.
Preset Pixel Format Horz Freq (kHz) Vert Freq (Hz) 1 640 × 480 31.469 59.940 2 720 × 400 31.469 70.087 3 720 × 480 31....; 2160 135.000 60.000 NOTE: The video card must be capable of supporting 3840 × 2160 - 60Hz to drive the monitor at the Preferred Mode. 28 Appendix A Technical specifications Recognizing preset display resolutions The display resolutions listed below are the most commonly used modes and are set as factory defaults. This monitor automatically recognizes these preset modes and they will appear properly sized and centered on the screen.
User Guide
Page 36
... master power switch on page 28). Input Signal Out of the monitor to inactivate the screen blanking utility. Video resolution and/or refresh rate are set auto-sleep to a supported setting (see Recognizing preset display resolutions on the rear of Range is not active. 30 Appendix B Support and troubleshooting Power Button Lockout is blank. Problem Possible Cause Solution Screen is displayed. Set Auto-Switch Input to disable the OSD Lockout function. Open the OSD menu and select Luminance to enter into a lowpower sleep mode. Be sure that button. Change...
... master power switch on page 28). Input Signal Out of the monitor to inactivate the screen blanking utility. Video resolution and/or refresh rate are set auto-sleep to a supported setting (see Recognizing preset display resolutions on the rear of Range is not active. 30 Appendix B Support and troubleshooting Power Button Lockout is blank. Problem Possible Cause Solution Screen is displayed. Set Auto-Switch Input to disable the OSD Lockout function. Open the OSD menu and select Luminance to enter into a lowpower sleep mode. Be sure that button. Change...


