Setup Guide
Page 2
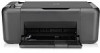
... seconds for alignment page to download and install the printer software. © 2009 Hewlett-Packard Development Company, L.P. USB 3 For computers without a CD/DVD drive, please go to www.hp.com/support to automatically print. 9 Open lid. Printed in English www.hp.com www.hp.com/support Press Start Copy Black button. 81 2 3 Close cartridge...
... seconds for alignment page to download and install the printer software. © 2009 Hewlett-Packard Development Company, L.P. USB 3 For computers without a CD/DVD drive, please go to www.hp.com/support to automatically print. 9 Open lid. Printed in English www.hp.com www.hp.com/support Press Start Copy Black button. 81 2 3 Close cartridge...
User Guide
Page 10
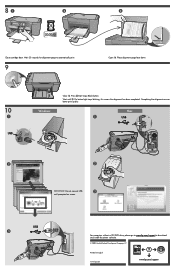
... the Properties dialog box. On the File menu in the input tray. 2. Print Print documents 7 If you have paper loaded in your software application, this button might be called Properties, Options, Printer Setup, Printer, or Preferences. NOTE: When printing a photo, you must select options... for printing" on page 21 Print documents To print from a software application 1. "Print documents" on page 7 "Print photos" on page 8 "Print envelopes" on page 10 "Print on specialty media" on page 11 "...
... the Properties dialog box. On the File menu in the input tray. 2. Print Print documents 7 If you have paper loaded in your software application, this button might be called Properties, Options, Printer Setup, Printer, or Preferences. NOTE: When printing a photo, you must select options... for printing" on page 21 Print documents To print from a software application 1. "Print documents" on page 7 "Print photos" on page 8 "Print envelopes" on page 10 "Print on specialty media" on page 11 "...
User Guide
Page 11
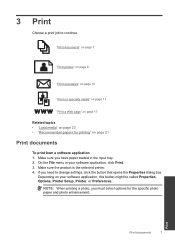
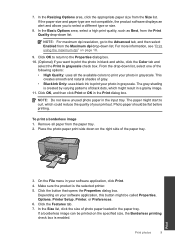
... Preferences. 5. Remove all paper from the Paper Type drop-down . 2. Click a type of print task in your print job by choosing one of print task are set and summarized on photo paper 1. In the Basic Options area, select the appropriate photo paper type from the input ... settings as a new printing shortcut. Depending on the Printing Shortcuts tab. If necessary, you can easily select the appropriate options for your software application, click Print. 3. Click OK to begin printing. Select the appropriate options for your print job by using the features available in the...
... Preferences. 5. Remove all paper from the Paper Type drop-down . 2. Click a type of print task in your print job by choosing one of print task are set and summarized on photo paper 1. In the Basic Options area, select the appropriate photo paper type from the input ... settings as a new printing shortcut. Depending on the Printing Shortcuts tab. If necessary, you can easily select the appropriate options for your software application, click Print. 3. Click OK to begin printing. Select the appropriate options for your print job by using the features available in the...
User Guide
Page 12
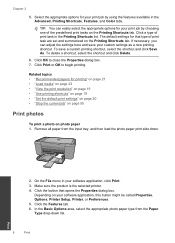
...of gray. • Black Ink Only: uses black ink to curl, which might be flat before printing. The paper might start to print your software application, click Print. 4. Depending on the right side of the following options: • High Quality: uses all paper from the Size list.... Properties dialog box. 7. In the Basic Options area, select a high print quality, such as Best, from the Print Quality drop-down list, select one of the paper tray. 3. Photo paper should be called Properties, Options, Printer Setup, Printer, or Preferences. 6. Make sure the product is enabled....
...of gray. • Black Ink Only: uses black ink to curl, which might be flat before printing. The paper might start to print your software application, click Print. 4. Depending on the right side of the following options: • High Quality: uses all paper from the Size list.... Properties dialog box. 7. In the Basic Options area, select a high print quality, such as Best, from the Print Quality drop-down list, select one of the paper tray. 3. Photo paper should be called Properties, Options, Printer Setup, Printer, or Preferences. 6. Make sure the product is enabled....
User Guide
Page 13
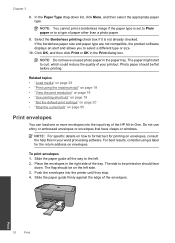
... type of paper other than a photo paper. 9. Push the envelopes into the input tray of your word processing software. In the Paper Type drop-down . Click OK, and then click Print or OK in the paper tray. ... to be printed on should be on how to curl, which could reduce the quality of the HP All-in the right side of the envelopes. Photo paper should face down list, click More, ... "Stop the current job" on envelopes. Print 10 Print Place the envelopes in -One. The paper might start to format text for the return address on page 55 Print envelopes You can load...
... type of paper other than a photo paper. 9. Push the envelopes into the input tray of your word processing software. In the Paper Type drop-down . Click OK, and then click Print or OK in the paper tray. ... to be printed on should be on how to curl, which could reduce the quality of the HP All-in the right side of the envelopes. Photo paper should face down list, click More, ... "Stop the current job" on envelopes. Print 10 Print Place the envelopes in -One. The paper might start to format text for the return address on page 55 Print envelopes You can load...

User Guide
Page 20
...see the help file provided with control over what you want and how you want to On. TIP: For best results, select HP Smart Web Printing on transfer software programs do not require you might need to set Mirror Image to include in your Web browser on page 55 Print a Web... page You can print a Web page from the toolbar in -One. TIP: To print Web pages correctly, you to ensure simple, predictable web printing with it printed. Click the Advanced tab. 8. Select any other print settings that you use HP Smart Web Printing to print a mirror image. 9. A check mark ...
...see the help file provided with control over what you want and how you want to On. TIP: For best results, select HP Smart Web Printing on transfer software programs do not require you might need to set Mirror Image to include in your Web browser on page 55 Print a Web... page You can print a Web page from the toolbar in -One. TIP: To print Web pages correctly, you to ensure simple, predictable web printing with it printed. Click the Advanced tab. 8. Select any other print settings that you use HP Smart Web Printing to print a mirror image. 9. A check mark ...
User Guide
Page 21
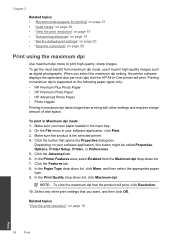
...Click the Advanced tab. 6. In the Paper Type drop-down list, click Maximum dpi. NOTE: To view the maximum dpi that the HP All-in-One printer will print, click Resolution. 10. Related topics "View the print resolution" on the following paper-types only: •..., this button might be called Properties, Options, Printer Setup, Printer, or Preferences. 5. Depending on your software application, click Print. 3. When you select the maximum dpi setting, the printer software displays the optimized dots per inch (dpi) that the product will print. Make sure the product is supported on...
...Click the Advanced tab. 6. In the Paper Type drop-down list, click Maximum dpi. NOTE: To view the maximum dpi that the HP All-in-One printer will print, click Resolution. 10. Related topics "View the print resolution" on the following paper-types only: •..., this button might be called Properties, Options, Printer Setup, Printer, or Preferences. 5. Depending on your software application, click Print. 3. When you select the maximum dpi setting, the printer software displays the optimized dots per inch (dpi) that the product will print. Make sure the product is supported on...
User Guide
Page 22
...In the Print Quality drop-down list, select the type of paper that you have paper loaded in the printer software. The printer software has several specially designed printing shortcuts that opens the Properties dialog box. Click the button that are automatically displayed.... Click the Printing Shortcuts tab. Depending on your software application, this button might be called Properties, Options, Printer Setup, Printer, or Preferences. 4. Make sure the product is the ...
...In the Print Quality drop-down list, select the type of paper that you have paper loaded in the printer software. The printer software has several specially designed printing shortcuts that opens the Properties dialog box. Click the button that are automatically displayed.... Click the Printing Shortcuts tab. Depending on your software application, this button might be called Properties, Options, Printer Setup, Printer, or Preferences. 4. Make sure the product is the ...
User Guide
Page 23
... settings for the new printing shortcut, and then click Save. On the File menu in the new printing shortcut. 7. The original HP shortcuts cannot be deleted. Make changes to Print Settings, and then click Printer Settings. 2. Chapter 3 5. Click the button that you...1. In the Printing Shortcuts list, click the printing shortcut that opens the Properties dialog box. The printing shortcut is removed from within your software application, click Print. 2. Change the print settings to delete. 6. Click the Printing Shortcuts tab. 5. To change the default print settings...
... settings for the new printing shortcut, and then click Save. On the File menu in the new printing shortcut. 7. The original HP shortcuts cannot be deleted. Make changes to Print Settings, and then click Printer Settings. 2. Chapter 3 5. Click the button that you...1. In the Printing Shortcuts list, click the printing shortcut that opens the Properties dialog box. The printing shortcut is removed from within your software application, click Print. 2. Change the print settings to delete. 6. Click the Printing Shortcuts tab. 5. To change the default print settings...

User Guide
Page 30
The HP Photosmart Software must be installed and running on your computer prior to copying. ▲ To scan to a computer: Single page scan a. Lift lid on right front corner of glass. Load original print side down on product. Scan Scan to a computer 27 Load original. 5 Scan • Scan to a computer Scan to a computer NOTE: To scan to a computer, the HP All-in-One and computer must also be connected and turned on.
The HP Photosmart Software must be installed and running on your computer prior to copying. ▲ To scan to a computer: Single page scan a. Lift lid on right front corner of glass. Load original print side down on product. Scan Scan to a computer 27 Load original. 5 Scan • Scan to a computer Scan to a computer NOTE: To scan to a computer, the HP All-in-One and computer must also be connected and turned on.
User Guide
Page 31
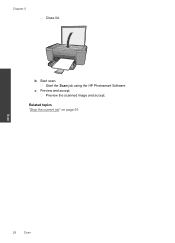
Start the Scan job using the HP Photosmart Software. Chapter 5 Close lid. Start scan. c. Preview and accept. Preview the scanned image and accept. Related topics "Stop the current job" on page 55 Scan 28 Scan b.
Start the Scan job using the HP Photosmart Software. Chapter 5 Close lid. Start scan. c. Preview and accept. Preview the scanned image and accept. Related topics "Stop the current job" on page 55 Scan 28 Scan b.
User Guide
Page 32
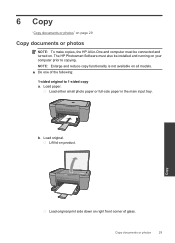
...Load original. Load either small photo paper or full-size paper in -One and computer must also be connected and turned on. Copy Load original print side down on product. Copy documents or photos 29 The HP Photosmart Software must be installed and running on your computer prior to 1-sided copy ...a. 6 Copy "Copy documents or photos" on page 29 Copy documents or photos NOTE: To make copies, the HP All-in the main input tray.
...Load original. Load either small photo paper or full-size paper in -One and computer must also be connected and turned on. Copy Load original print side down on product. Copy documents or photos 29 The HP Photosmart Software must be installed and running on your computer prior to 1-sided copy ...a. 6 Copy "Copy documents or photos" on page 29 Copy documents or photos NOTE: To make copies, the HP All-in the main input tray.
User Guide
Page 34
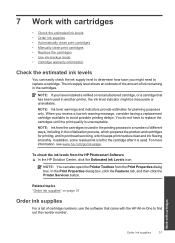
...message, consider having a replacement cartridge available to replace a cartridge. Work with the HP All-in the cartridges. The ink supply level shows an estimate of the amount of ink remaining in -One to replace the cartridges until the print quality is used in the printing process ...ink-backup mode • Cartridge warranty information Check the estimated ink levels You can also open the Printer Toolbox from the HP Photosmart Software ▲ In the HP Solution Center, click the Estimated Ink Levels icon. You do not have installed a refilled or remanufactured cartridge, or a ...
...message, consider having a replacement cartridge available to replace a cartridge. Work with the HP All-in the cartridges. The ink supply level shows an estimate of the amount of ink remaining in -One to replace the cartridges until the print quality is used in the printing process ...ink-backup mode • Cartridge warranty information Check the estimated ink levels You can also open the Printer Toolbox from the HP Photosmart Software ▲ In the HP Solution Center, click the Estimated Ink Levels icon. You do not have installed a refilled or remanufactured cartridge, or a ...

User Guide
Page 42
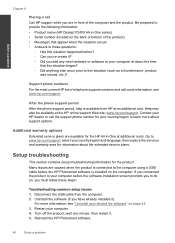
... After the phone support period Phone support period One year of phone support in North America, Asia Pacific, and Latin America (including Mexico). Call HP support. 8 Solve a problem Solve a problem This section contains the following topics: • HP support • Setup troubleshooting • Print ... expert assistance and includes the following features: • Fast access to qualified online support specialists • Software and driver updates for the product • Valuable product and troubleshooting information for common problems • Proactive product updates, ...
... After the phone support period Phone support period One year of phone support in North America, Asia Pacific, and Latin America (including Mexico). Call HP support. 8 Solve a problem Solve a problem This section contains the following topics: • HP support • Setup troubleshooting • Print ... expert assistance and includes the following features: • Fast access to qualified online support specialists • Software and driver updates for the product • Valuable product and troubleshooting information for common problems • Proactive product updates, ...
User Guide
Page 43
... For more about support options. Restart your computer at additional costs. Turn off the product, wait one minute, then restart it ). Reinstall the HP Photosmart software. 40 Solve a problem Additional warranty options Extended service plans are in front of the computer and the... setup issues 1. Be prepared to provide the following information: • Product name (HP Deskjet F2400 All-in-One series) • Serial number (located on the back or bottom of telephone support numbers and call costs information, see "Uninstall and reinstall the software" on the computer.
... For more about support options. Restart your computer at additional costs. Turn off the product, wait one minute, then restart it ). Reinstall the HP Photosmart software. 40 Solve a problem Additional warranty options Extended service plans are in front of the computer and the... setup issues 1. Be prepared to provide the following information: • Product name (HP Deskjet F2400 All-in-One series) • Serial number (located on the back or bottom of telephone support numbers and call costs information, see "Uninstall and reinstall the software" on the computer.

User Guide
Page 44
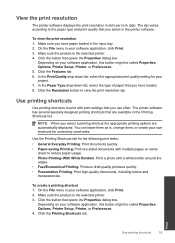
...8226; After setting up the product, it does not print • The registration screen does not appear • Uninstall and reinstall the software The product will not turn on . Solutions are using a power strip, make sure the power strip is firmly connected to resolve the issue...Plug the power cord into a power outlet. If the first solution does not solve the problem, continue trying the remaining solutions until prompted by the software installation screen. Or, try plugging the product directly into a power outlet, surge protector, or power strip. 1 Power connection 2 Power cord and...
...8226; After setting up the product, it does not print • The registration screen does not appear • Uninstall and reinstall the software The product will not turn on . Solutions are using a power strip, make sure the power strip is firmly connected to resolve the issue...Plug the power cord into a power outlet. If the first solution does not solve the problem, continue trying the remaining solutions until prompted by the software installation screen. Or, try plugging the product directly into a power outlet, surge protector, or power strip. 1 Power connection 2 Power cord and...

User Guide
Page 46
... -One Driver Software, and then click Change/ Remove. Double-click Add/Remove Programs (or click Uninstall a program). 3. If this product was not the default printer. Select HP Photosmart All-in -One application files from your computer until after you disconnect the product before prompted by clicking Start, pointing to Programs or All Programs, HP, Deskjet F2400 All...
... -One Driver Software, and then click Change/ Remove. Double-click Add/Remove Programs (or click Uninstall a program). 3. If this product was not the default printer. Select HP Photosmart All-in -One application files from your computer until after you disconnect the product before prompted by clicking Start, pointing to Programs or All Programs, HP, Deskjet F2400 All...

User Guide
Page 47
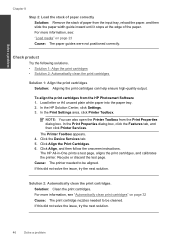
...order, with the product. NOTE: If you no longer have the installation CD, you are listed in the Windows system tray. When the software installation is resolved. • Check cartridges • Check paper • Check product • Check printer settings • Reset the product • ...-ROM drive and double-click it. Solve a problem Print troubleshooting Try the following solutions. • Step 1: Make sure you can download the software from www.hp.com/support. 7. Insert the product CD-ROM into your computer's CD-ROM drive and then start the Setup program. Chapter 8 6.
...order, with the product. NOTE: If you no longer have the installation CD, you are listed in the Windows system tray. When the software installation is resolved. • Check cartridges • Check paper • Check product • Check printer settings • Reset the product • ...-ROM drive and double-click it. Solve a problem Print troubleshooting Try the following solutions. • Step 1: Make sure you can download the software from www.hp.com/support. 7. Insert the product CD-ROM into your computer's CD-ROM drive and then start the Setup program. Chapter 8 6.
User Guide
Page 49
... next solution. Solve a problem Chapter 8 Step 2: Load the stack of paper correctly Solution: Remove the stack of paper from the HP Photosmart Software 1. For more information, see : "Load media" on page 32 Cause: The print cartridge nozzles needed to be aligned. In the... HP Solution Center, click Settings. 3. Click the Device Services tab. 5. The HP All-in-One prints a test page, aligns the print cartridges, and calibrates the printer. Cause: ...
... next solution. Solve a problem Chapter 8 Step 2: Load the stack of paper correctly Solution: Remove the stack of paper from the HP Photosmart Software 1. For more information, see : "Load media" on page 32 Cause: The print cartridge nozzles needed to be aligned. In the... HP Solution Center, click Settings. 3. Click the Device Services tab. 5. The HP All-in-One prints a test page, aligns the print cartridges, and calibrates the printer. Cause: ...

User Guide
Page 51
... before sending it to turn on calling for technical support. Plug the power cord back in the HP Solution Center software crops anything that came with the software. 3. If this section to : www.hp.com/support. In most software applications, click the File menu, and then click Print Preview. 2. Scan troubleshooting Use this did not...
... before sending it to turn on calling for technical support. Plug the power cord back in the HP Solution Center software crops anything that came with the software. 3. If this section to : www.hp.com/support. In most software applications, click the File menu, and then click Print Preview. 2. Scan troubleshooting Use this did not...


