Setup Guide
Page 1
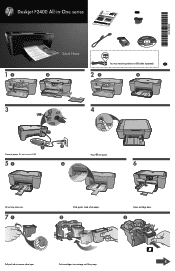
*CB730-90028* *CB730-90028* CB730-90028 Deskjet F2400 All-in-One series 11 Start Here You may need to remove clear tape. EN 2 21 2 3 USB 2 1 3 Connect power. Do not connect USB. 51 2 4 Press On button. 6 Lift out tray extension. 71 Slide guide. Load white paper. 2 Open cartridge door. 3 8 Pull pink tab to purchase a USB cable separately. Push cartridges into carriage until they snap.
*CB730-90028* *CB730-90028* CB730-90028 Deskjet F2400 All-in-One series 11 Start Here You may need to remove clear tape. EN 2 21 2 3 USB 2 1 3 Connect power. Do not connect USB. 51 2 4 Press On button. 6 Lift out tray extension. 71 Slide guide. Load white paper. 2 Open cartridge door. 3 8 Pull pink tab to purchase a USB cable separately. Push cartridges into carriage until they snap.
Setup Guide
Page 2
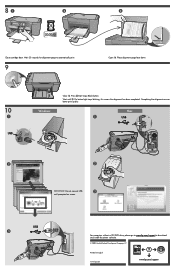
.../support Wait until prompted on screen. Completing the alignment ensures better print quality. USB 3 For computers without a CD/DVD drive, please go to www.hp.com/support to automatically print. 9 Open lid. Place alignment page face down. 10 1 USB Windows: Close lid. Mac: 1 USB 2 2 IMPORTANT: Do not connect USB 3 until ... alignment has been completed. Wait 30 seconds for alignment page to download and install the printer software. © 2009 Hewlett-Packard Development Company, L.P. 81 2 3 Close cartridge door. Press Start Copy Black button.
.../support Wait until prompted on screen. Completing the alignment ensures better print quality. USB 3 For computers without a CD/DVD drive, please go to www.hp.com/support to automatically print. 9 Open lid. Place alignment page face down. 10 1 USB Windows: Close lid. Mac: 1 USB 2 2 IMPORTANT: Do not connect USB 3 until ... alignment has been completed. Wait 30 seconds for alignment page to download and install the printer software. © 2009 Hewlett-Packard Development Company, L.P. 81 2 3 Close cartridge door. Press Start Copy Black button.

User Guide
Page 4
... know the HP All-in-One Printer parts...5 Control panel features...6 3 Print Print documents...7 Print photos...8 Print envelopes...10 Print on specialty media...11 Print a Web page...17 5 Scan Scan to a computer...27 6 Copy Copy documents or photos...29 7 Work with cartridges Check the... ink levels 31 Order ink supplies...31 Automatically clean print cartridges 32 Manually clean print cartridges 33 Replace the cartridges...34 Use ink-backup mode...36 Cartridge warranty information 36 8 Solve a problem HP support...39 Setup troubleshooting...40 Print troubleshooting...44 Scan troubleshooting...
... know the HP All-in-One Printer parts...5 Control panel features...6 3 Print Print documents...7 Print photos...8 Print envelopes...10 Print on specialty media...11 Print a Web page...17 5 Scan Scan to a computer...27 6 Copy Copy documents or photos...29 7 Work with cartridges Check the... ink levels 31 Order ink supplies...31 Automatically clean print cartridges 32 Manually clean print cartridges 33 Replace the cartridges...34 Use ink-backup mode...36 Cartridge warranty information 36 8 Solve a problem HP support...39 Setup troubleshooting...40 Print troubleshooting...44 Scan troubleshooting...
User Guide
Page 6
1 How Do I ? 3 How Do I ? Learn how to use your HP All-in-One • "Copy documents or photos" on page 29 • "Load media" on page 23 • "Replace the cartridges" on page 34 How Do I?
1 How Do I ? 3 How Do I ? Learn how to use your HP All-in-One • "Copy documents or photos" on page 29 • "Load media" on page 23 • "Replace the cartridges" on page 34 How Do I?

User Guide
Page 8
2 Get to know the HP All-in-One • Printer parts • Control panel features Printer parts Get to know the HP All-in-One 1 Control panel 2 Attention light 3 Check cartridge lights 4 Front access door 5 Paper-width guide for the main input tray 6 Input tray 7 Paper tray extender (also referred to as the tray extender) 8 Cartridges 9 Glass 10 Lid backing 11 Rear access door 12 Rear USB port 13 Power connection (Use only with the power adapter supplied by HP.) 14 Lid Printer parts 5
2 Get to know the HP All-in-One • Printer parts • Control panel features Printer parts Get to know the HP All-in-One 1 Control panel 2 Attention light 3 Check cartridge lights 4 Front access door 5 Paper-width guide for the main input tray 6 Input tray 7 Paper tray extender (also referred to as the tray extender) 8 Cartridges 9 Glass 10 Lid backing 11 Rear access door 12 Rear USB port 13 Power connection (Use only with the power adapter supplied by HP.) 14 Lid Printer parts 5

User Guide
Page 9
To completely remove power, turn off the product, then unplug the power cord. 2 Cancel: Stops the current operation. 3 Start Copy Black: Starts a black-and-white copy job. 4 Start Copy Color: Starts a color copy job. 5 Attention light: Shows attention event, such as paper jam or out of power is off . When the product is still used. Chapter 2 Control panel features Get to know the HP All-in -One 1 On: Turns the product on or off , a minimal amount of paper. 6 Ink attention light: Indicates low ink or a print cartridge problem. 6 Get to know the HP All-in -One
To completely remove power, turn off the product, then unplug the power cord. 2 Cancel: Stops the current operation. 3 Start Copy Black: Starts a black-and-white copy job. 4 Start Copy Color: Starts a color copy job. 5 Attention light: Shows attention event, such as paper jam or out of power is off . When the product is still used. Chapter 2 Control panel features Get to know the HP All-in -One 1 On: Turns the product on or off , a minimal amount of paper. 6 Ink attention light: Indicates low ink or a print cartridge problem. 6 Get to know the HP All-in -One
User Guide
Page 25
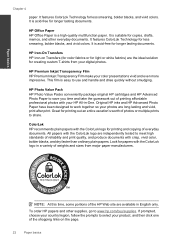
... HP papers and other everyday documents. HP Photo Value Pack HP Photo Value Packs conveniently package original HP cartridges and HP Advanced Photo Paper to work together so your HP All-in a variety of the HP Web site are independently tested to www.hp.com/buy/supplies. Original HP inks and HP ...colors. It is easy to select your color presentations vivid and even more impressive. HP Premium Inkjet Transparency Film HP Premium Inkjet Transparency Film make your product, and then click one of everyday documents. This film is suitable for printing and copying of the shopping ...
... HP papers and other everyday documents. HP Photo Value Pack HP Photo Value Packs conveniently package original HP cartridges and HP Advanced Photo Paper to work together so your HP All-in a variety of the HP Web site are independently tested to www.hp.com/buy/supplies. Original HP inks and HP ...colors. It is easy to select your color presentations vivid and even more impressive. HP Premium Inkjet Transparency Film HP Premium Inkjet Transparency Film make your product, and then click one of everyday documents. This film is suitable for printing and copying of the shopping ...
User Guide
Page 34
... the initialization process, which keeps print nozzles clear and ink flowing smoothly. You do not have installed a refilled or remanufactured cartridge, or a cartridge that came with the HP All-in-One to replace the cartridges until the print quality is used. Related topics "Order ink supplies" on page 31 Order ink supplies For a list of...
... the initialization process, which keeps print nozzles clear and ink flowing smoothly. You do not have installed a refilled or remanufactured cartridge, or a cartridge that came with the HP All-in-One to replace the cartridges until the print quality is used. Related topics "Order ink supplies" on page 31 Order ink supplies For a list of...
User Guide
Page 35
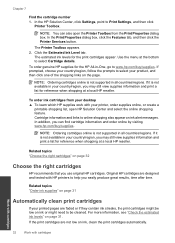
... cartridges HP recommends that you can also open HP Solution Center and select the online shopping feature. Related topics "Choose the right cartridges" on ink alert messages. Work with cartridges 32 Work with your country/region, you may still view supplies information and print a list for the HP All-in-One, go to select Cartridge details. NOTE: Ordering cartridges...
... cartridges HP recommends that you can also open HP Solution Center and select the online shopping feature. Related topics "Choose the right cartridges" on ink alert messages. Work with cartridges 32 Work with your country/region, you may still view supplies information and print a list for the HP All-in-One, go to select Cartridge details. NOTE: Ordering cartridges...

User Guide
Page 36
..., filtered, or bottled water (tap water might contain contaminants that will not come apart or leave fibers. Do not leave a print cartridge outside the HP All-in-One for ink and debris buildup. 5. Inspect the print cartridge contacts for more than 30 minutes. 4. Clean only the copper-colored contacts. These can damage the print...
..., filtered, or bottled water (tap water might contain contaminants that will not come apart or leave fibers. Do not leave a print cartridge outside the HP All-in-One for ink and debris buildup. 5. Inspect the print cartridge contacts for more than 30 minutes. 4. Clean only the copper-colored contacts. These can damage the print...
User Guide
Page 37
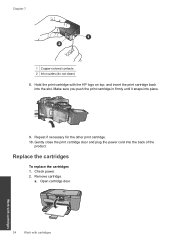
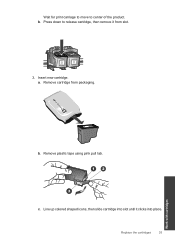
Hold the print cartridge with cartridges Remove cartridge. Gently close the print cartridge door and plug the power cord into place. 9. Check power. 2. Open cartridge door. 34 Work with cartridges Work with the HP logo on top, and insert the print cartridge back into the slot. Replace the cartridges To replace the cartridges 1. a. Make sure you push the print cartridge in firmly until it snaps into the back of the product. Repeat if necessary for the other print cartridge. 10. Chapter 7 1 Copper-colored contacts 2 Ink nozzles (do not clean) 8.
Hold the print cartridge with cartridges Remove cartridge. Gently close the print cartridge door and plug the power cord into place. 9. Check power. 2. Open cartridge door. 34 Work with cartridges Work with the HP logo on top, and insert the print cartridge back into the slot. Replace the cartridges To replace the cartridges 1. a. Make sure you push the print cartridge in firmly until it snaps into the back of the product. Repeat if necessary for the other print cartridge. 10. Chapter 7 1 Copper-colored contacts 2 Ink nozzles (do not clean) 8.
User Guide
Page 38
Wait for print carriage to move to release cartridge, then remove it clicks into slot until it from packaging. Remove cartridge from slot. 3. Replace the cartridges 35 Work with cartridges a. Remove plastic tape using pink pull tab. b. c. Press down to center of the product. b. Insert new cartridge. Line up colored shaped icons, then slide cartridge into place.
Wait for print carriage to move to release cartridge, then remove it clicks into slot until it from packaging. Remove cartridge from slot. 3. Replace the cartridges 35 Work with cartridges a. Remove plastic tape using pink pull tab. b. c. Press down to center of the product. b. Insert new cartridge. Line up colored shaped icons, then slide cartridge into place.
User Guide
Page 39
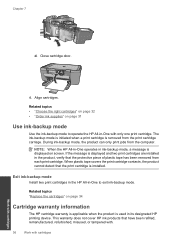
... been refilled, remanufactured, refurbished, misused, or tampered with. 36 Work with cartridges Work with only one print cartridge. Close cartridge door. 4. NOTE: When the HP All-in-One operates in its designated HP printing device. Related topics "Replace the cartridges" on page 34 Cartridge warranty information The HP cartridge warranty is applicable when the product is used in ink-backup mode...
... been refilled, remanufactured, refurbished, misused, or tampered with. 36 Work with cartridges Work with only one print cartridge. Close cartridge door. 4. NOTE: When the HP All-in-One operates in its designated HP printing device. Related topics "Replace the cartridges" on page 34 Cartridge warranty information The HP cartridge warranty is applicable when the product is used in ink-backup mode...

User Guide
Page 40
During the warranty period the product is not depleted and the end of the HP Limited Warranty Statement, see the printed documentation that came with cartridges Cartridge warranty information 37 The end of warranty date, in YYYY/ MM/DD format, may be found on the product as the HP ink is covered as long as indicated: For a copy of warranty date has not been reached. Work with the product.
During the warranty period the product is not depleted and the end of the HP Limited Warranty Statement, see the printed documentation that came with cartridges Cartridge warranty information 37 The end of warranty date, in YYYY/ MM/DD format, may be found on the product as the HP ink is covered as long as indicated: For a copy of warranty date has not been reached. Work with the product.

User Guide
Page 41
Chapter 7 Work with cartridges 38 Work with cartridges
Chapter 7 Work with cartridges 38 Work with cartridges

User Guide
Page 47
...continue trying the remaining solutions until the issue is complete, the HP Digital Imaging Monitor icon appears in the printed documentation that came with the most likely solution first. Solutions are using genuine HP ink cartridges 44 Solve a problem Solve a problem Print troubleshooting Try the ...following solutions. • Step 1: Make sure you can download the software from www.hp.com/support. 7. NOTE: If the Setup program ...
...continue trying the remaining solutions until the issue is complete, the HP Digital Imaging Monitor icon appears in the printed documentation that came with the most likely solution first. Solutions are using genuine HP ink cartridges 44 Solve a problem Solve a problem Print troubleshooting Try the ...following solutions. • Step 1: Make sure you can download the software from www.hp.com/support. 7. NOTE: If the Setup program ...
User Guide
Page 48
... repairs required as a result of non-HP supplies. Cause: More than one type of paper was loaded in the cartridges. When you purchased genuine HP ink cartridges, go to avoid possible printing delays. You do not need to help you are designed and tested with HP printers to replace the cartridges until print quality becomes unacceptable. If...
... repairs required as a result of non-HP supplies. Cause: More than one type of paper was loaded in the cartridges. When you purchased genuine HP ink cartridges, go to avoid possible printing delays. You do not need to help you are designed and tested with HP printers to replace the cartridges until print quality becomes unacceptable. If...
User Guide
Page 49
...HP All-in-One prints a test page, aligns the print cartridges, and calibrates the printer. Solution 2: Automatically clean the print cartridges. If this did not solve the issue, try the next solution. Check product Try the following solutions. • Solution 1: Align the print cartridges • Solution 2: Automatically clean the print cartridges... tab. 5. Cause: The printer needed to be cleaned. Solution: Clean the print cartridges. Click Align the Print Cartridges. 6. In the HP Solution Center, click Settings. 3. Load letter or A4 unused plain white paper into ...
...HP All-in-One prints a test page, aligns the print cartridges, and calibrates the printer. Solution 2: Automatically clean the print cartridges. If this did not solve the issue, try the next solution. Check product Try the following solutions. • Solution 1: Align the print cartridges • Solution 2: Automatically clean the print cartridges... tab. 5. Cause: The printer needed to be cleaned. Solution: Clean the print cartridges. Click Align the Print Cartridges. 6. In the HP Solution Center, click Settings. 3. Load letter or A4 unused plain white paper into ...

User Guide
Page 50
... tray. You might appear differently than they do when printed on paper. No further troubleshooting is nothing wrong with the product, print settings, or ink cartridges. Cause: The paper size setting might not have been set incorrectly. Make sure that you are printing a high-quality photo, and then make sure it.... Or, choose a higher setting if you have loaded the correct paper size in grayscale. For example, check to see if advanced color settings such as HP Advanced Photo Paper, is set to print in the input tray.
... tray. You might appear differently than they do when printed on paper. No further troubleshooting is nothing wrong with the product, print settings, or ink cartridges. Cause: The paper size setting might not have been set incorrectly. Make sure that you are printing a high-quality photo, and then make sure it.... Or, choose a higher setting if you have loaded the correct paper size in grayscale. For example, check to see if advanced color settings such as HP Advanced Photo Paper, is set to print in the input tray.

User Guide
Page 51
...settings 1. Check the margins. Cause: The margins were not set in , and then press the On button to : www.hp.com/support. Contact HP support Solution: Contact HP support for the document do not exceed the printable area of the main image. Solve a problem Chapter 8 Make sure the ... application. Preview your software application. If this did not solve the issue, try the next solution. If this product. Cause: The ink cartridges were not intended for technical support. For more information about setting margins in this did not solve the issue, try the next solution. To...
...settings 1. Check the margins. Cause: The margins were not set in , and then press the On button to : www.hp.com/support. Contact HP support Solution: Contact HP support for the document do not exceed the printable area of the main image. Solve a problem Chapter 8 Make sure the ... application. Preview your software application. If this did not solve the issue, try the next solution. If this product. Cause: The ink cartridges were not intended for technical support. For more information about setting margins in this did not solve the issue, try the next solution. To...


