User Guide
Page 3
Contents Contents 1 How Do I?...3 2 Get to know the HP Deskjet 3510 series Printer parts...5 Control panel features...6 Wireless settings...6 Status lights...7 Auto Power-Off ...8 3 Print Print photos...9 Print documents...10 Print Quick Forms...11 Print envelopes.........34 Tips for setting up and using a networked printer...34 Advanced printer management tools (for networked printers 34 9 Solve a problem Improve print quality...37 Clear a paper jam...39 Unable to a computer...24 Tips for copy success...25 Tips for printing...17 Load media...18 6 Copy and scan Copy...23 Scan to print...
Contents Contents 1 How Do I?...3 2 Get to know the HP Deskjet 3510 series Printer parts...5 Control panel features...6 Wireless settings...6 Status lights...7 Auto Power-Off ...8 3 Print Print photos...9 Print documents...10 Print Quick Forms...11 Print envelopes.........34 Tips for setting up and using a networked printer...34 Advanced printer management tools (for networked printers 34 9 Solve a problem Improve print quality...37 Clear a paper jam...39 Unable to a computer...24 Tips for copy success...25 Tips for printing...17 Load media...18 6 Copy and scan Copy...23 Scan to print...
User Guide
Page 14
...also access the Printer Software by clicking the Advanced button on the Layout or Paper/Quality tab. • To change defaualt print settings, double-click the HP Deskjet 3510 series desktop icon to open the Printer Software. Paper loading tips • Load a stack of the print driver, select the ...not bent or torn. • Adjust the paper-width guides in the paper tray to fit snugly against all paper. All of the paper in the stack should be the same size and type to avoid a paper jam. • Load paper with sufficient ink, the paper should have the appropriate settings. Chapter 3 ...
...also access the Printer Software by clicking the Advanced button on the Layout or Paper/Quality tab. • To change defaualt print settings, double-click the HP Deskjet 3510 series desktop icon to open the Printer Software. Paper loading tips • Load a stack of the print driver, select the ...not bent or torn. • Adjust the paper-width guides in the paper tray to fit snugly against all paper. All of the paper in the stack should be the same size and type to avoid a paper jam. • Load paper with sufficient ink, the paper should have the appropriate settings. Chapter 3 ...
User Guide
Page 39
...cartridges. Check the estimated ink levels to print • Networking • HP support Improve print quality 1. b. c. 9 Solve a problem This section contains the following topics: • Improve print quality • Clear a paper jam • Unable to determine if the cartridges are low on ink. Make... sure you install a new cartridge. Align the cartridges. The HP All-in -One will not prompt you do not need to align the ...
...cartridges. Check the estimated ink levels to print • Networking • HP support Improve print quality 1. b. c. 9 Solve a problem This section contains the following topics: • Improve print quality • Clear a paper jam • Unable to determine if the cartridges are low on ink. Make... sure you install a new cartridge. Align the cartridges. The HP All-in -One will not prompt you do not need to align the ...
User Guide
Page 41
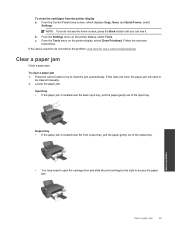
..., select Tools. From the Control Panel home screen, which displays Copy, Scan, and Quick Forms, select Settings. Clear a paper jam Clear a paper jam. Press the cancel button to try to be cleared manually. 2. Locate the paper jam. From the Settings menu on the printer display, select Clean Printhead. If the above solutions do not see the...
..., select Tools. From the Control Panel home screen, which displays Copy, Scan, and Quick Forms, select Settings. Clear a paper jam Clear a paper jam. Press the cancel button to try to be cleared manually. 2. Locate the paper jam. From the Settings menu on the printer display, select Clean Printhead. If the above solutions do not see the...

User Guide
Page 42
...input tray lays flat and the edges are not bent or torn. • Do not combine different paper types and paper sizes in the input tray. Chapter 9 Inside of printer • If the paper jam is located inside the printer, open the cleanout door located on both latches snap into place. 3.... door. Press tabs on the bottom of the cleanout door. • Remove jammed paper. Press the OK button on the control panel to print If you're having trouble printing, you can download the HP Printing Diagnostic Utility, which can troubleshoot this issue for more online troubleshooting. To get...
...input tray lays flat and the edges are not bent or torn. • Do not combine different paper types and paper sizes in the input tray. Chapter 9 Inside of printer • If the paper jam is located inside the printer, open the cleanout door located on both latches snap into place. 3.... door. Press tabs on the bottom of the cleanout door. • Remove jammed paper. Press the OK button on the control panel to print If you're having trouble printing, you can download the HP Printing Diagnostic Utility, which can troubleshoot this issue for more online troubleshooting. To get...
User Guide
Page 44
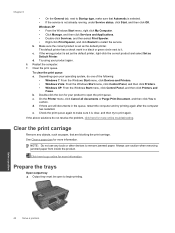
...then click Printers. • Windows XP: From the Windows Start menu, click Control Panel, and then click Printers and Faxes. See Clear a paper jam for more information. Solve a problem 42 Solve a problem Make sure the correct product is set as the default printer, right-click the correct ... printing again after the computer has restarted. To clear the print queue a. Clear the print carriage Remove any tools or other devices to remove jammed paper. If there are blocking the print carriage. Try using your product again. 6. Chapter 9 • On the General tab, next to Startup...
...then click Printers. • Windows XP: From the Windows Start menu, click Control Panel, and then click Printers and Faxes. See Clear a paper jam for more information. Solve a problem 42 Solve a problem Make sure the correct product is set as the default printer, right-click the correct ... printing again after the computer has restarted. To clear the print queue a. Clear the print carriage Remove any tools or other devices to remove jammed paper. If there are blocking the print carriage. Try using your product again. 6. Chapter 9 • On the General tab, next to Startup...


