

Setup Guide
Page 16
Printed in English Printed in Spanish Printed in Portuguese © Copyright 2016 HP Development Company, L.P. *L9U63-90048* *L9U63-90048* L9U63-90048 Mac is either a registered trademark or trademark of Apple Inc., registered in the U.S. and other countries. Windows is a trademark of Microsoft Corporation in the United States and/or other countries.
Printed in English Printed in Spanish Printed in Portuguese © Copyright 2016 HP Development Company, L.P. *L9U63-90048* *L9U63-90048* L9U63-90048 Mac is either a registered trademark or trademark of Apple Inc., registered in the U.S. and other countries. Windows is a trademark of Microsoft Corporation in the United States and/or other countries.

User Guide
Page 3
...of contents 1 HP DeskJet GT 5810 series Help ...1 2 Get started ...2 Printer parts ...3 Get to know the ink tank system ...5 Control panel features ...6 Control panel lights and display icons status ...8 Load media ...13 Load an original on the scanner glass ...17 Paper basics ...18 Open the HP printer software (...Windows) ...20 Sleep mode ...21 Quiet Mode ...22 Auto-Off ...23 3 Print ...24 Print from your computer ...25 Tips for print success ...30 4 Copy and scan ...33 Copy documents ...34 Scan using...
...of contents 1 HP DeskJet GT 5810 series Help ...1 2 Get started ...2 Printer parts ...3 Get to know the ink tank system ...5 Control panel features ...6 Control panel lights and display icons status ...8 Load media ...13 Load an original on the scanner glass ...17 Paper basics ...18 Open the HP printer software (...Windows) ...20 Sleep mode ...21 Quiet Mode ...22 Auto-Off ...23 3 Print ...24 Print from your computer ...25 Tips for print success ...30 4 Copy and scan ...33 Copy documents ...34 Scan using...

User Guide
Page 4
6 Connect your printer ...48 Connect your printer to your computer with a USB cable (non-network connection 49 7 Solve a problem ...50 Jams and paper-feed issues ...51 Printhead issues ...59 Printing issues ...65 Copy issues ...74 Scan issues ...75 Printer hardware issues ...76 Control panel error codes ...77 HP support ...78 Appendix A Technical information ...80 HP Company notices ...81 Specifications ...82 Environmental product stewardship program ...84 Regulatory notices ...91 Index ...95 iv ENWW
6 Connect your printer ...48 Connect your printer to your computer with a USB cable (non-network connection 49 7 Solve a problem ...50 Jams and paper-feed issues ...51 Printhead issues ...59 Printing issues ...65 Copy issues ...74 Scan issues ...75 Printer hardware issues ...76 Control panel error codes ...77 HP support ...78 Appendix A Technical information ...80 HP Company notices ...81 Specifications ...82 Environmental product stewardship program ...84 Regulatory notices ...91 Index ...95 iv ENWW

User Guide
Page 5
1 HP DeskJet GT 5810 series Help Learn how to use your HP DeskJet GT 5810 series . ● Get started on page 2 ● Print on page 24 ● Copy and scan on page 33 ● Manage ink and printhead on page 39 ● Connect your printer on page 48 ● Solve a problem on page 50 ● Technical information on page 80 ENWW 1
1 HP DeskJet GT 5810 series Help Learn how to use your HP DeskJet GT 5810 series . ● Get started on page 2 ● Print on page 24 ● Copy and scan on page 33 ● Manage ink and printhead on page 39 ● Connect your printer on page 48 ● Solve a problem on page 50 ● Technical information on page 80 ENWW 1
User Guide
Page 9
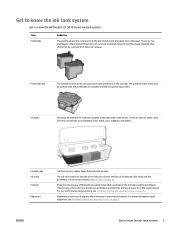
...page 9. ENWW Get to an individual color: black, cyan, magenta, and yellow. Get to know the ink tank system Get to improve print quality. There are rubber plugs that run between the tanks and the printheads. The ink valve switch on page 9. Alignment is the process of... ink reservoirs located at the right side of aligning the printheads to know the HP DeskJet GT 5810 series ink tank system. This process occurs when you install new printheads and start the priming process from the print carriage. For more information, see Printhead priming and alignment icons on page 40...
...page 9. ENWW Get to an individual color: black, cyan, magenta, and yellow. Get to know the ink tank system Get to improve print quality. There are rubber plugs that run between the tanks and the printheads. The ink valve switch on page 9. Alignment is the process of... ink reservoirs located at the right side of aligning the printheads to know the HP DeskJet GT 5810 series ink tank system. This process occurs when you install new printheads and start the priming process from the print carriage. For more information, see Printhead priming and alignment icons on page 40...

User Guide
Page 10
... increase the number of black-and-white copies, press the button multiple times. Start Copy Color button: Starts a color copy job. NOTE: You can generate a print quality diagnostics report by pressing and holding the Start Copy Color button for example, after the last button press. Power button: Turns the printer on...
... increase the number of black-and-white copies, press the button multiple times. Start Copy Color button: Starts a color copy job. NOTE: You can generate a print quality diagnostics report by pressing and holding the Start Copy Color button for example, after the last button press. Power button: Turns the printer on...

User Guide
Page 12
... is closed and the light is fast blinking, the printer is in an error state that you do not see any on-screen messages, try printing a document to a wireless network. Indicates the printer is in Sleep mode. The printer automatically enters Sleep mode after 5 minutes of the Printhead icons, and the...
... is closed and the light is fast blinking, the printer is in an error state that you do not see any on-screen messages, try printing a document to a wireless network. Indicates the printer is in Sleep mode. The printer automatically enters Sleep mode after 5 minutes of the Printhead icons, and the...

User Guide
Page 14
... the Resume light are installed and the ink system is ready for 3 seconds to align. Solution Load paper, and then press the Resume button ( printing. ) to continue For information about how to solid "A". Alignment is complete. At the same time, the Resume light is blinking, and the Power ... will occur in the input tray. Cause During initial setup, the printer detects that there is no paper in the background and will not block printing or copying. Alignment status icon ● The Number of the priming process during initial printer setup, the solid "A" changes to scan. NOTE:...
... the Resume light are installed and the ink system is ready for 3 seconds to align. Solution Load paper, and then press the Resume button ( printing. ) to continue For information about how to solid "A". Alignment is complete. At the same time, the Resume light is blinking, and the Power ... will occur in the input tray. Cause During initial setup, the printer detects that there is no paper in the background and will not block printing or copying. Alignment status icon ● The Number of the priming process during initial printer setup, the solid "A" changes to scan. NOTE:...

User Guide
Page 15
...carriage is a paper jam. Move the carriage to the right, close the printhead access door, and then press the Resume button ( ) to continue printing. Opening the latch can cause permanent damage to the printheads. ● The Number of copies icon is not working . ● The Number of... copies icon is alternating between the letter E and the number 5. If the problem persists, contact HP. CAUTION: You must not open the printhead latch during this process if printheads have been primed with ink. ENWW Control panel lights and display ...
...carriage is a paper jam. Move the carriage to the right, close the printhead access door, and then press the Resume button ( ) to continue printing. Opening the latch can cause permanent damage to the printheads. ● The Number of copies icon is not working . ● The Number of... copies icon is alternating between the letter E and the number 5. If the problem persists, contact HP. CAUTION: You must not open the printhead latch during this process if printheads have been primed with ink. ENWW Control panel lights and display ...

User Guide
Page 16
... this process; Wait a minute, and then plug the power cord back in an error state. If the problem persists, contact HP. This process helps remove ink buildup and maintains the best print quality throughout the life of copies icon is required. Cause The printer detects that ink system maintenance is alternating between...
... this process; Wait a minute, and then plug the power cord back in an error state. If the problem persists, contact HP. This process helps remove ink buildup and maintains the best print quality throughout the life of copies icon is required. Cause The printer detects that ink system maintenance is alternating between...

User Guide
Page 17
To load full-size paper 1. Slide the paper-width guide to continue. Load media Select a paper size to the left. 3. Insert a stack of paper into the input tray with the short edge down and the print side up, and slide the stack of paper down until it stops. ENWW Load media 13 Raise the input tray. 2.
To load full-size paper 1. Slide the paper-width guide to continue. Load media Select a paper size to the left. 3. Insert a stack of paper into the input tray with the short edge down and the print side up, and slide the stack of paper down until it stops. ENWW Load media 13 Raise the input tray. 2.

User Guide
Page 19
To load envelopes 1. Pull out the output tray and the tray extender. Insert a stack of small-size paper (like photo paper) into the far-right side of the input tray with the short edge down and the print side up, and slide the stack of paper down until it stops. 4. Slide the paper-width guide to the right until it stops at the edge of the paper. 5. ENWW Load media 15 3. Raise the input tray.
To load envelopes 1. Pull out the output tray and the tray extender. Insert a stack of small-size paper (like photo paper) into the far-right side of the input tray with the short edge down and the print side up, and slide the stack of paper down until it stops. 4. Slide the paper-width guide to the right until it stops at the edge of the paper. 5. ENWW Load media 15 3. Raise the input tray.

User Guide
Page 20
... vertically with the flap on the left . 3. The side to the right against the stack of envelopes down . 4. Slide the paper-width guide to be printed on the top and facing down until it stops. For envelope with flap on the long edge, insert the envelope vertically with the flap on...
... vertically with the flap on the left . 3. The side to the right against the stack of envelopes down . 4. Slide the paper-width guide to be printed on the top and facing down until it stops. For envelope with flap on the long edge, insert the envelope vertically with the flap on...

User Guide
Page 21
ENWW Load an original on the right corner of the scanner glass. 3. Lift the scanner lid. 2. Load the original print-side down on the scanner glass 17 Load an original on the scanner glass To load an original on the scanner glass 1. Close the scanner lid.
ENWW Load an original on the right corner of the scanner glass. 3. Lift the scanner lid. 2. Load the original print-side down on the scanner glass 17 Load an original on the scanner glass To load an original on the scanner glass 1. Close the scanner lid.

User Guide
Page 22
... these papers might not be available. Get sharp, crisp images when you time and take the guesswork out of printing affordable, lab-quality photos with the ColorLok logo for more information about HP paper. HP recommends plain papers with your best photos and special photo projects. This section contains the following topics: ●...
... these papers might not be available. Get sharp, crisp images when you time and take the guesswork out of printing affordable, lab-quality photos with the ColorLok logo for more information about HP paper. HP recommends plain papers with your best photos and special photo projects. This section contains the following topics: ●...

User Guide
Page 23
... it ideal for an impressive look and feel . ● HP Brochure Paper 180g Glossy or HP Professional Paper 180 Glossy These papers are long lasting and vivid, print after print. ENWW Paper basics 19 It is heavyweight for newsletters, reports, and flyers. ● HP Printing Paper HP Printing Paper is a high-quality multifunction paper made with crisp, vivid...
... it ideal for an impressive look and feel . ● HP Brochure Paper 180g Glossy or HP Professional Paper 180 Glossy These papers are long lasting and vivid, print after print. ENWW Paper basics 19 It is heavyweight for newsletters, reports, and flyers. ● HP Printing Paper HP Printing Paper is a high-quality multifunction paper made with crisp, vivid...

User Guide
Page 25
ENWW Sleep mode 21 Sleep mode ● Power usage is reduced while in Sleep mode. ● After initial setup of printer, the printer will enter Sleep mode after 5 minutes of inactivity. ● The Power button light is dimmed and the printer control panel display is off in Sleep mode. ● Pressing any button on the control panel, or sending a print or scan job can wake up the printer from sleep mode.
ENWW Sleep mode 21 Sleep mode ● Power usage is reduced while in Sleep mode. ● After initial setup of printer, the printer will enter Sleep mode after 5 minutes of inactivity. ● The Power button light is dimmed and the printer control panel display is off in Sleep mode. ● Pressing any button on the control panel, or sending a print or scan job can wake up the printer from sleep mode.

User Guide
Page 26
Quiet Mode Quiet Mode slows down printing to reduce overall noise without affecting print quality. To print at normal speed, turn Quiet Mode on plain paper. Open the HP printer software. Click the Quiet Mode tab. 3. Click Save Settings. 22 Chapter 2 Get started ENWW To turn Quiet Mode off by default. For... more information, see Open the HP printer software (Windows) on Quiet Mode. Click On or Off. 4. NOTE: In Quiet Mode, if you print photos or envelopes, the printer works in the same way as when Quiet Mode is off ....
Quiet Mode Quiet Mode slows down printing to reduce overall noise without affecting print quality. To print at normal speed, turn Quiet Mode on plain paper. Open the HP printer software. Click the Quiet Mode tab. 3. Click Save Settings. 22 Chapter 2 Get started ENWW To turn Quiet Mode off by default. For... more information, see Open the HP printer software (Windows) on Quiet Mode. Click On or Off. 4. NOTE: In Quiet Mode, if you print photos or envelopes, the printer works in the same way as when Quiet Mode is off ....

User Guide
Page 29
... Paper/Quality tab, select the appropriate paper type from the Media drop-down list in the Tray Selection area, select the appropriate print quality in the Quality Settings area, and then select the appropriate color in the Color area. ● Click Advanced to select ...size from your computer 25 From the File menu in your software, select Print. 2. Click Print. Print from your computer ● Print documents ● Print photos ● Print envelopes ● Print using the maximum dpi Print documents Before printing documents, make sure you have paper loaded in the input tray and the...
... Paper/Quality tab, select the appropriate paper type from the Media drop-down list in the Tray Selection area, select the appropriate print quality in the Quality Settings area, and then select the appropriate color in the Color area. ● Click Advanced to select ...size from your computer 25 From the File menu in your software, select Print. 2. Click Print. Print from your computer ● Print documents ● Print photos ● Print envelopes ● Print using the maximum dpi Print documents Before printing documents, make sure you have paper loaded in the input tray and the...

User Guide
Page 30
... Properties dialog box. On the Layout tab, select an appropriate option from the Media drop-down list. 5. Click Print. From your software, select Print. 2. To print on both sides of the page (OS X) 1. Depending on Both Sides Manually drop-down , and then click ...) 1. Make sure your software application, this button might be called Properties, Options, Printer Setup, Printer Properties, Printer, or Preferences. 4. To print a photo on page 13. Click OK to Normal. 3. Select the appropriate options. ● On the Layout tab, select Portrait or Landscape...
... Properties dialog box. On the Layout tab, select an appropriate option from the Media drop-down list. 5. Click Print. From your software, select Print. 2. To print on both sides of the page (OS X) 1. Depending on Both Sides Manually drop-down , and then click ...) 1. Make sure your software application, this button might be called Properties, Options, Printer Setup, Printer Properties, Printer, or Preferences. 4. To print a photo on page 13. Click OK to Normal. 3. Select the appropriate options. ● On the Layout tab, select Portrait or Landscape...


