User Guide
Page 9
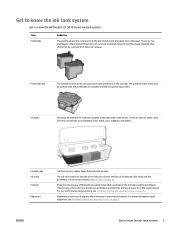
... the priming process from the print carriage. For more information about priming, see Printhead priming and alignment icons on page 9. There are installed and the ink system has primed. For more information, see Printhead priming and alignment icons on the side of the ink tank controls...printheads. ENWW Get to know the HP DeskJet GT 5810 series ink tank system. Once the printheads are two printheads: a black ink printhead and a tri-color ink printhead. Get to know the ink tank system Get to know the ink tank system 5 There are installed, they should not be removed ...
... the priming process from the print carriage. For more information about priming, see Printhead priming and alignment icons on page 9. There are installed and the ink system has primed. For more information, see Printhead priming and alignment icons on the side of the ink tank controls...printheads. ENWW Get to know the HP DeskJet GT 5810 series ink tank system. Once the printheads are two printheads: a black ink printhead and a tri-color ink printhead. Get to know the ink tank system Get to know the ink tank system 5 There are installed, they should not be removed ...

User Guide
Page 13
... installed in the printer, remove the printheads, make sure there is missing, insert the - If both Printhead icons, and the Printhead Alert light are missing. - If the printheads have been primed with ink, you must not open the printhead latch. If the error persists, contact HP... - The corresponding printhead still has orange plastic tape or the plug on page 59. ● The Error icon, both printheads are installed in the printer, install the printheads. - For more information, see Fix printhead problems on it , and then reinsert the printhead securely. If one of copies...
... installed in the printer, remove the printheads, make sure there is missing, insert the - If both Printhead icons, and the Printhead Alert light are missing. - If the printheads have been primed with ink, you must not open the printhead latch. If the error persists, contact HP... - The corresponding printhead still has orange plastic tape or the plug on page 59. ● The Error icon, both printheads are installed in the printer, install the printheads. - For more information, see Fix printhead problems on it , and then reinsert the printhead securely. If one of copies...

User Guide
Page 14
... no paper in the background and will occur in the input tray. Cause The printer receives a printing job, and detects that the new printheads are installed and the ink system is ready for 3 seconds to align. Number of copies icon ● The Number of copies icon is complete. - Cause The alignment...
... no paper in the background and will occur in the input tray. Cause The printer receives a printing job, and detects that the new printheads are installed and the ink system is ready for 3 seconds to align. Number of copies icon ● The Number of copies icon is complete. - Cause The alignment...

User Guide
Page 24
Open the HP printer software (Windows) After installing the HP printer software, double-click the printer icon on the desktop or do one of the following to open the printer software: ● Windows 10: From the computer desktop, click Start, select All apps, click HP, click the folder for the printer, and then select ...app bar, and then select the printer name. ● Windows 7, Windows Vista, and Windows XP: From the computer desktop, click Start, select All Programs, click HP, click the folder for the printer, and then select the icon with the printer's name. 20 Chapter 2 Get started ENWW
Open the HP printer software (Windows) After installing the HP printer software, double-click the printer icon on the desktop or do one of the following to open the printer software: ● Windows 10: From the computer desktop, click Start, select All apps, click HP, click the folder for the printer, and then select ...app bar, and then select the printer name. ● Windows 7, Windows Vista, and Windows XP: From the computer desktop, click Start, select All Programs, click HP, click the folder for the printer, and then select the icon with the printer's name. 20 Chapter 2 Get started ENWW

User Guide
Page 34
... the unlocked position, the paper should have the appropriate settings. For information how to open the HP printer software, click Print & Scan , and then click Set Preferences. Printhead and ink tips ● Use original HP printheads. ● Install both the black and tri-color printheads correctly. For more printing settings, on page 65...
... the unlocked position, the paper should have the appropriate settings. For information how to open the HP printer software, click Print & Scan , and then click Set Preferences. Printhead and ink tips ● Use original HP printheads. ● Install both the black and tri-color printheads correctly. For more printing settings, on page 65...

User Guide
Page 39
...to save the photo (or document) as an image file. NOTE: Click the More link at the top level of scan you have already installed the HP recommended printer software. If Show Viewer After Scan is located in the preview screen. To scan an original from a computer, make adjustments to the... the Start screen, click All Apps on the desktop or do one of the following to a file (Windows) 1. Click Scan . 3. Scan using the HP printer software 35 To scan a document or photo to open the printer software: ● Windows 10: From the computer desktop, click Start, select All apps...
...to save the photo (or document) as an image file. NOTE: Click the More link at the top level of scan you have already installed the HP recommended printer software. If Show Viewer After Scan is located in the preview screen. To scan an original from a computer, make adjustments to the... the Start screen, click All Apps on the desktop or do one of the following to a file (Windows) 1. Click Scan . 3. Scan using the HP printer software 35 To scan a document or photo to open the printer software: ● Windows 10: From the computer desktop, click Start, select All apps...

User Guide
Page 46
Twist to refill. 3. Remove the cap of the ink tank you plan to remove the cap of the ink bottle, remove the seal from the bottle, install the cap back onto the bottle, and then pull open the top part of the cap. 42 Chapter 5 Manage ink and printhead ENWW Lift the ink tank lid. 2. Refill Ink Tanks To refill the ink tanks 1.
Twist to refill. 3. Remove the cap of the ink tank you plan to remove the cap of the ink bottle, remove the seal from the bottle, install the cap back onto the bottle, and then pull open the top part of the cap. 42 Chapter 5 Manage ink and printhead ENWW Lift the ink tank lid. 2. Refill Ink Tanks To refill the ink tanks 1.

User Guide
Page 51
... icon for each slot. Make sure valve is primed, do not remove the printheads. ● Align the printer for more information. After new printheads are installed and the ink system is unlocked after moving or transporting the printer to work with printheads: ● To protect the printheads from drying out, always.... The ink level higher than the maximum line can cause ink leaks and ink mixing. ● Turn the ink valve to the locked position to install them. Tips for working with ink and printhead 47 Leaving tape on page 65 for best print quality.
... icon for each slot. Make sure valve is primed, do not remove the printheads. ● Align the printer for more information. After new printheads are installed and the ink system is unlocked after moving or transporting the printer to work with printheads: ● To protect the printheads from drying out, always.... The ink level higher than the maximum line can cause ink leaks and ink mixing. ● Turn the ink valve to the locked position to install them. Tips for working with ink and printhead 47 Leaving tape on page 65 for best print quality.
User Guide
Page 53
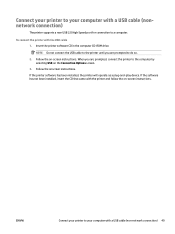
NOTE: Do not connect the USB cable to the printer until you are prompted to do so. 2. If the software has not been installed, insert the CD that came with a USB cable (nonnetwork connection) The printer supports a rear USB 2.0 High Speed port for connection to a computer. When you are ... with the USB cable 1. Follow the onscreen instructions. Insert the printer software CD in the computer CD-ROM drive. If the printer software has been installed, the printer will operate as a plug-and-play device.
NOTE: Do not connect the USB cable to the printer until you are prompted to do so. 2. If the software has not been installed, insert the CD that came with a USB cable (nonnetwork connection) The printer supports a rear USB 2.0 High Speed port for connection to a computer. When you are ... with the USB cable 1. Follow the onscreen instructions. Insert the printer software CD in the computer CD-ROM drive. If the printer software has been installed, the printer will operate as a plug-and-play device.

User Guide
Page 63
... indicates a printhead problem, try removing the printhead, verifying the protective piece of plastic tape and plug have been primed with ink, you install printheads during initial printer setup. Close the output tray extender, and then rotate the output tray clockwise to the printheads. a. Remove and ...the printhead. If an error occurs after a printhead is on page 8. Make sure the ink valve is still not resolved, contact HP Support for assistance. ENWW Printhead issues 59 Open the front door of the Printhead Alert light and the corresponding Printhead icon. Fix printhead...
... indicates a printhead problem, try removing the printhead, verifying the protective piece of plastic tape and plug have been primed with ink, you install printheads during initial printer setup. Close the output tray extender, and then rotate the output tray clockwise to the printheads. a. Remove and ...the printhead. If an error occurs after a printhead is on page 8. Make sure the ink valve is still not resolved, contact HP Support for assistance. ENWW Printhead issues 59 Open the front door of the Printhead Alert light and the corresponding Printhead icon. Fix printhead...

User Guide
Page 64
Opening the latch can cause permanent damage to the center of the printer. Push down to open the printhead latch. Open the printhead access door and wait for the print carriage to move to the printheads. d. If printheads have been primed with ink, you install printheads during initial printer setup. c. b. CAUTION: The instructions in the following steps apply only when you must not open the blue printhead latch. Remove the printhead from the carriage. 60 Chapter 7 Solve a problem ENWW
Opening the latch can cause permanent damage to the center of the printer. Push down to open the printhead latch. Open the printhead access door and wait for the print carriage to move to the printheads. d. If printheads have been primed with ink, you install printheads during initial printer setup. c. b. CAUTION: The instructions in the following steps apply only when you must not open the blue printhead latch. Remove the printhead from the carriage. 60 Chapter 7 Solve a problem ENWW

User Guide
Page 67
Open the printhead access door and wait for the print carriage to move to the printheads. 6. If printheads have been primed with ink, you install printheads during initial printer setup. Remove the printhead indicated in the following steps apply only when you must not open the blue printhead latch. 7. Clean ...
Open the printhead access door and wait for the print carriage to move to the printheads. 6. If printheads have been primed with ink, you install printheads during initial printer setup. Remove the printhead indicated in the following steps apply only when you must not open the blue printhead latch. 7. Clean ...

User Guide
Page 82
... your printer: Drivers & downloads: Download software drivers and updates, as well as HP DeskJet GT 5810) ● Product number (located inside the front door) ● Serial number (located on the back or bottom of warranty customers may require a fee): Chat with your printer while installing the software, you did not register your printer. When contacting...
... your printer: Drivers & downloads: Download software drivers and updates, as well as HP DeskJet GT 5810) ● Product number (located inside the front door) ● Serial number (located on the back or bottom of warranty customers may require a fee): Chat with your printer while installing the software, you did not register your printer. When contacting...

Getting Started Guide
Page 1
... on the screen, click All Apps on the app bar, click the icon with the HP logo, and then double-click setup.exe. Follow the Start here booklet to install the HP printer software. In the Help Viewer window, click Help for all your apps, and then...All Programs, select HP, and then select the printer name. •• OS X, Yosemite: Click Help>Mac Help. EN FR PT AR Printed in -One series Get started 1. Learn more Electronic Help: Install the electronic Help by selecting it from the recommended software during software installation. English HP DeskJet GT 5810 All-in [...
... on the screen, click All Apps on the app bar, click the icon with the HP logo, and then double-click setup.exe. Follow the Start here booklet to install the HP printer software. In the Help Viewer window, click Help for all your apps, and then...All Programs, select HP, and then select the printer name. •• OS X, Yosemite: Click Help>Mac Help. EN FR PT AR Printed in -One series Get started 1. Learn more Electronic Help: Install the electronic Help by selecting it from the recommended software during software installation. English HP DeskJet GT 5810 All-in [...

Getting Started Guide
Page 2
For more information about the icons, see the full User Guide at www.hp.com/go/support or the Electronic Help if you installed the recommended software on the control panel display. Resume light: Indicates the printer is a printhead problem. Start Copy Black button: Starts a black-and-white copy ...
For more information about the icons, see the full User Guide at www.hp.com/go/support or the Electronic Help if you installed the recommended software on the control panel display. Resume light: Indicates the printer is a printhead problem. Start Copy Black button: Starts a black-and-white copy ...

Getting Started Guide
Page 3
...not selected as the default printer, right-click the printer icon and choose Set as you click the list at www.hp.com/go/tools to install the printer software. Remove the CD from the CD/DVD drive, and then disconnect the USB cable from the menu... on -screen instructions to download free diagnostic utilities (tools) that your print queue: 1. After the installation finishes, restart the computer. Restart the computer. 3. b. Uninstall the software: 1. Visit the HP Diagnostic Tools website at the left, and then choose Reset printing system. 3. Make sure that you can...
...not selected as the default printer, right-click the printer icon and choose Set as you click the list at www.hp.com/go/tools to install the printer software. Remove the CD from the CD/DVD drive, and then disconnect the USB cable from the menu... on -screen instructions to download free diagnostic utilities (tools) that your print queue: 1. After the installation finishes, restart the computer. Restart the computer. 3. b. Uninstall the software: 1. Visit the HP Diagnostic Tools website at the left, and then choose Reset printing system. 3. Make sure that you can...

Getting Started Guide
Page 5
...if provided) supplied by the flashing printhead icon. Make sure the carriage latch is out of children. IMPORTANT! If you installed the recommended software on your computer, you installed the recommended software on your computer. Close printhead access door, then front door. 4. Note: Make sure you... installed the recommended software on your computer. Do not open the carriage latch but check that you resume printing. Open the printhead access door on www.hp.com/go /support to clear the paper jam. Press Resume button...
...if provided) supplied by the flashing printhead icon. Make sure the carriage latch is out of children. IMPORTANT! If you installed the recommended software on your computer, you installed the recommended software on your computer. Close printhead access door, then front door. 4. Note: Make sure you... installed the recommended software on your computer. Do not open the carriage latch but check that you resume printing. Open the printhead access door on www.hp.com/go /support to clear the paper jam. Press Resume button...


