Service Manual
Page 6
...Media Bin (Optional 3Ć6 Installing the Plotter/Printer 3Ć10 Using the Plotter 3Ć10 DesignJet 750C/750C Plus/755CM Front Panel 3Ć10 DesignJet 700 Front Panel 3Ć11 ThirdĆParty Inks and OffĆAxis Ink Systems 3Ć11 ...3Ć13 4 Preventive Maintenance Moisture on the Plotter/Printer 4Ć2 Noisy Carriage Bushing 4Ć2 Belt Swelling 4Ć2 Cleaning the Plotter 4Ć2 General Cleaning 4Ć2 Cleaning the Drive Roller 4Ć3 Scheduled Maintenance 4Ć4 Level of Plotter Usage 4Ć4 Implementation 4Ć4 Usage Information...
...Media Bin (Optional 3Ć6 Installing the Plotter/Printer 3Ć10 Using the Plotter 3Ć10 DesignJet 750C/750C Plus/755CM Front Panel 3Ć10 DesignJet 700 Front Panel 3Ć11 ThirdĆParty Inks and OffĆAxis Ink Systems 3Ć11 ...3Ć13 4 Preventive Maintenance Moisture on the Plotter/Printer 4Ć2 Noisy Carriage Bushing 4Ć2 Belt Swelling 4Ć2 Cleaning the Plotter 4Ć2 General Cleaning 4Ć2 Cleaning the Drive Roller 4Ć3 Scheduled Maintenance 4Ć4 Level of Plotter Usage 4Ć4 Implementation 4Ć4 Usage Information...
Service Manual
Page 8
...;Tensioner Housing 6Ć31 Removing the YĆAxis Motor Holder 6Ć32 Removing the Cutter 6Ć33 Removing the Cartridge Carriage and Drive Belt 6Ć34 Removing the Trailing Cable 6Ć36 Reinstalling the Trailing Cable 6Ć39 Removing the Starguard Assembly 6Ć40 Removing the...45 Removing the Bail Stepper Motor 6Ć46 Removing the Cable Assembly 6Ć47 Removing the Overdrive Assembly 6Ć48 Removing the Drive Roller Assembly 6Ć49 Removing the Rollfeed Cover Assembly 6Ć51 Removing the Rollfeed Module Assemblies (Left and Right 6Ć52 ...
...;Tensioner Housing 6Ć31 Removing the YĆAxis Motor Holder 6Ć32 Removing the Cutter 6Ć33 Removing the Cartridge Carriage and Drive Belt 6Ć34 Removing the Trailing Cable 6Ć36 Reinstalling the Trailing Cable 6Ć39 Removing the Starguard Assembly 6Ć40 Removing the...45 Removing the Bail Stepper Motor 6Ć46 Removing the Cable Assembly 6Ć47 Removing the Overdrive Assembly 6Ć48 Removing the Drive Roller Assembly 6Ć49 Removing the Rollfeed Cover Assembly 6Ć51 Removing the Rollfeed Module Assemblies (Left and Right 6Ć52 ...
Service Manual
Page 47
... 208Ćbit shift register (one bit per cartridge nozzle), which contains a carriageĆmotor driver. D Circuitry for width measurement). Its drive shaft is docked in the correct sequence and at the correct time. It also provides a media edgeĆsensing capability to the plotter (for...of the cartridge while printing (brilliant pulse warming). During cartridge testing, when the carriage is mechanically connected to the carriage via a drive belt. WarmĆup When Idle" mode. D Timing and sequencing circuitry to ensure that cartridge nozzles are generated when in the ...
... 208Ćbit shift register (one bit per cartridge nozzle), which contains a carriageĆmotor driver. D Circuitry for width measurement). Its drive shaft is docked in the correct sequence and at the correct time. It also provides a media edgeĆsensing capability to the plotter (for...of the cartridge while printing (brilliant pulse warming). During cartridge testing, when the carriage is mechanically connected to the carriage via a drive belt. WarmĆup When Idle" mode. D Timing and sequencing circuitry to ensure that cartridge nozzles are generated when in the ...
Service Manual
Page 54
...;Tensioner Housing 6Ć31 Removing the YĆAxis Motor Holder 6Ć32 Removing the Cutter 6Ć33 Removing the Cartridge Carriage and Drive Belt 6Ć34 Removing the Trailing Cable 6Ć36 Reinstalling the Trailing Cable 6Ć39 Removing the Starguard Assembly 6Ć40 Removing the...45 Removing the Bail Stepper Motor 6Ć46 Removing the Cable Assembly 6Ć47 Removing the Overdrive Assembly 6Ć48 Removing the Drive Roller Assembly 6Ć49 Removing the Rollfeed Cover Assembly 6Ć51 Removing the Rollfeed Module Assemblies (Left and Right 6Ć52 ...
...;Tensioner Housing 6Ć31 Removing the YĆAxis Motor Holder 6Ć32 Removing the Cutter 6Ć33 Removing the Cartridge Carriage and Drive Belt 6Ć34 Removing the Trailing Cable 6Ć36 Reinstalling the Trailing Cable 6Ć39 Removing the Starguard Assembly 6Ć40 Removing the...45 Removing the Bail Stepper Motor 6Ć46 Removing the Cable Assembly 6Ć47 Removing the Overdrive Assembly 6Ć48 Removing the Drive Roller Assembly 6Ć49 Removing the Rollfeed Cover Assembly 6Ć51 Removing the Rollfeed Module Assemblies (Left and Right 6Ć52 ...
Service Manual
Page 76
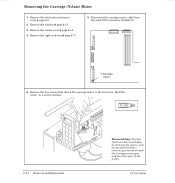
Hold the motor in a secure position. Tx 15 6-24 Removal and Replacement Reassembling: Position the YĆaxis drive belt before positioning the screws, and ensure that attach the carriageĆmotor to the structure. C4705-90000 Removing the Carriage (YĆAxis) Motor 1 Remove the ... right endcover ' page 6Ć17. 5 Disconnect the carriageĆmotor cable from the main PCA (connector labelled Y). Y-Carriage motor 6 Remove the two screws that the belt is correctly positioned around the carriageĆmotor gear and the lower part of the pulley.
Hold the motor in a secure position. Tx 15 6-24 Removal and Replacement Reassembling: Position the YĆaxis drive belt before positioning the screws, and ensure that attach the carriageĆmotor to the structure. C4705-90000 Removing the Carriage (YĆAxis) Motor 1 Remove the ... right endcover ' page 6Ć17. 5 Disconnect the carriageĆmotor cable from the main PCA (connector labelled Y). Y-Carriage motor 6 Remove the two screws that the belt is correctly positioned around the carriageĆmotor gear and the lower part of the pulley.
Service Manual
Page 86
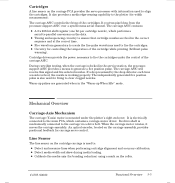
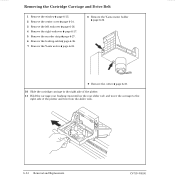
Removing the Cartridge Carriage and Drive Belt 1 Remove the window ' page 6Ć13. 2 Remove the center cover ' page 6Ć14. 3 Remove the left endcover ' page 6Ć16. 4 Remove the right endcover ' page 6&#...
Removing the Cartridge Carriage and Drive Belt 1 Remove the window ' page 6Ć13. 2 Remove the center cover ' page 6Ć14. 3 Remove the left endcover ' page 6Ć16. 4 Remove the right endcover ' page 6&#...

Service Manual
Page 87
C4705-90000 Removal and Replacement 6-35 D DropĆdetect calibration ' page 7Ć4. Calibration: After reassembling the plotter, perform: D Pen alignment test ' page 8Ć40. D LineĆsensor calibration ' page 7Ć5. D Accuracy calibration ' page 7Ć6. 12 Separate the rear bushing and spring from the carriage assembly and carefully remove the carriage assembly and main drive belt from the plotter. 13 Remove the drive belt from the carriage assembly.
C4705-90000 Removal and Replacement 6-35 D DropĆdetect calibration ' page 7Ć4. Calibration: After reassembling the plotter, perform: D Pen alignment test ' page 8Ć40. D LineĆsensor calibration ' page 7Ć5. D Accuracy calibration ' page 7Ć6. 12 Separate the rear bushing and spring from the carriage assembly and carefully remove the carriage assembly and main drive belt from the plotter. 13 Remove the drive belt from the carriage assembly.
Service Manual
Page 173
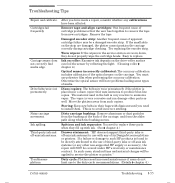
...limit use of thirdĆparty inks or offĆaxis ink systems (or any calibrations have problems loading some types of its DesignJet series plotters or printers. Noisy carriage movement. Remove tape and align cartridges: One frequent cause of the optical sensor on the strip...or printer." Drive belts wear out prematurely. Worn wipers: If the wipers in their bags with ink. (See ' chapter 4.) Drawer statement: HP does not support thirdĆparty inks or off Ćaxis ink systems. Troublesome plotters. Ink on roller: Excessive ink deposits on the driveĆroller surface...
...limit use of thirdĆparty inks or offĆaxis ink systems (or any calibrations have problems loading some types of its DesignJet series plotters or printers. Noisy carriage movement. Remove tape and align cartridges: One frequent cause of the optical sensor on the strip...or printer." Drive belts wear out prematurely. Worn wipers: If the wipers in their bags with ink. (See ' chapter 4.) Drawer statement: HP does not support thirdĆparty inks or off Ćaxis ink systems. Troublesome plotters. Ink on roller: Excessive ink deposits on the driveĆroller surface...
Service Manual
Page 213
...Recommended Standards: 1 Hour Labor Action Category: On Failure Location Category: OnĆSite Service Inventory: N/A Used Parts: Returned to SME/HP Grenoble HP Responsible Until: 15 Dec 1997 Author Entity: HV/F900 C4705-90000 Product History and Service Notes 10-15 8 Separate the rear bushing... and preload spring from the carriage and carefully remove the carriage and main drive belt from the plotter. 9 Remove the drive belt from the ...
...Recommended Standards: 1 Hour Labor Action Category: On Failure Location Category: OnĆSite Service Inventory: N/A Used Parts: Returned to SME/HP Grenoble HP Responsible Until: 15 Dec 1997 Author Entity: HV/F900 C4705-90000 Product History and Service Notes 10-15 8 Separate the rear bushing... and preload spring from the carriage and carefully remove the carriage and main drive belt from the plotter. 9 Remove the drive belt from the ...
Service Manual
Page 219
...the slider rods. 8 Separate the rear bushing and preload spring from the carriage and carefully remove the carriage and main drive belt from the plotter. 9 Remove the drive belt from the carriage. 10 Install the new pen carriage following the above instructions in the reverse order. 7 Grasp the... carriage rear preload bushing and move the carriage to SME/HP Grenoble HP Responsible Until: 15 December 1997 Author Entity: HV/F900 C4705...
...the slider rods. 8 Separate the rear bushing and preload spring from the carriage and carefully remove the carriage and main drive belt from the plotter. 9 Remove the drive belt from the carriage. 10 Install the new pen carriage following the above instructions in the reverse order. 7 Grasp the... carriage rear preload bushing and move the carriage to SME/HP Grenoble HP Responsible Until: 15 December 1997 Author Entity: HV/F900 C4705...

Service Manual
Page 278
..., 2Ć3 action keys, 3Ć10, 3Ć11 addressable dpi, GlossaryĆ2 adjustments, 7Ć2 align cartridges, 8Ć55 ammonia, causing belt damage, 8Ć55 Apple LocalTalk, 1Ć3 application notes, part number, 11Ć35 applications of plotter, 1Ć2 area fill PQ plot, service... service test, 8Ć49 bail stepper motor, removing, 6Ć46 Index-2 Banding, 9Ć20 baud rate, GlossaryĆ2 belt premature wearing, 8Ć55 removing main drive, 6Ć34 swelling, 4Ć2 staguard assembly, 6Ć40 BiĆTronics, GlossaryĆ2 bidirectional, error, 9Ć14 ...
..., 2Ć3 action keys, 3Ć10, 3Ć11 addressable dpi, GlossaryĆ2 adjustments, 7Ć2 align cartridges, 8Ć55 ammonia, causing belt damage, 8Ć55 Apple LocalTalk, 1Ć3 application notes, part number, 11Ć35 applications of plotter, 1Ć2 area fill PQ plot, service... service test, 8Ć49 bail stepper motor, removing, 6Ć46 Index-2 Banding, 9Ć20 baud rate, GlossaryĆ2 belt premature wearing, 8Ć55 removing main drive, 6Ć34 swelling, 4Ć2 staguard assembly, 6Ć40 BiĆTronics, GlossaryĆ2 bidirectional, error, 9Ć14 ...
Service Manual
Page 279
...11Ć35 dots per inch, 1Ć4 DRAM, 5Ć8, GlossaryĆ2 controller, 5Ć4 DRAM SIMM, 11Ć36 Drive Belt, 6Ć34 drive belt, premature wearing, 8Ć55 drive roller, GlossaryĆ3 Driver, motor, Y-axis, 5Ć4 driver, GlossaryĆ3 Drivers, Pen, 5Ć5 drivers, software, 1&#...Centronics, GlossaryĆ2 centronics interface cables, 11Ć37 Channel, Serial, 5Ć5 character sets, 1Ć2 cleaning carriage bushing, 8Ć55 drive roller, 4Ć3 plotter, 4Ć2 Coalescence, 9Ć18 cockle, 9Ć18 code, firmware revision, 10Ć3 color PQ plot, service ...
...11Ć35 dots per inch, 1Ć4 DRAM, 5Ć8, GlossaryĆ2 controller, 5Ć4 DRAM SIMM, 11Ć36 Drive Belt, 6Ć34 drive belt, premature wearing, 8Ć55 drive roller, GlossaryĆ3 Driver, motor, Y-axis, 5Ć4 driver, GlossaryĆ3 Drivers, Pen, 5Ć5 drivers, software, 1&#...Centronics, GlossaryĆ2 centronics interface cables, 11Ć37 Channel, Serial, 5Ć5 character sets, 1Ć2 cleaning carriage bushing, 8Ć55 drive roller, 4Ć3 plotter, 4Ć2 Coalescence, 9Ć18 cockle, 9Ć18 code, firmware revision, 10Ć3 color PQ plot, service ...
Service Manual
Page 281
HP external controller, 1Ć3 HP JetDirect EX, 1Ć3 HPĆGL, 1Ć2 HPĆGL/2, 1Ć2, GlossaryĆ3 HPĆRTL, 1Ć2, GlossaryĆ3 humidity, 2Ć3 I IC, GlossaryĆ3 IEEE, GlossaryĆ3 Indicators, LED, 5Ć10 Initialization ...front panel, 3Ć10, 3Ć11 line sensor, 5Ć5, GlossaryĆ4 calibration, 7Ć5 description, 5Ć9 Linear Encoder, 5Ć4 liquids, 6Ć3 M main drive belt, removing, 6Ć34 main PCA description, 5Ć8 removing, 6Ć9 service test, 8Ć25 mainĆcarriage com, service test, 8Ć26 mains, 6Ć3...
HP external controller, 1Ć3 HP JetDirect EX, 1Ć3 HPĆGL, 1Ć2 HPĆGL/2, 1Ć2, GlossaryĆ3 HPĆRTL, 1Ć2, GlossaryĆ3 humidity, 2Ć3 I IC, GlossaryĆ3 IEEE, GlossaryĆ3 Indicators, LED, 5Ć10 Initialization ...front panel, 3Ć10, 3Ć11 line sensor, 5Ć5, GlossaryĆ4 calibration, 7Ć5 description, 5Ć9 Linear Encoder, 5Ć4 liquids, 6Ć3 M main drive belt, removing, 6Ć34 main PCA description, 5Ć8 removing, 6Ć9 service test, 8Ć25 mainĆcarriage com, service test, 8Ć26 mains, 6Ć3...
Service Manual
Page 284
...;enclosure cover, 6Ć5 encoder strip, 6Ć27 entry platen, 6Ć53 fan, 6Ć12 frontĆpanel assembly, 6Ć18 left endcover, 6Ć16 main drive belt, 6Ć34 main PCA, 6Ć9 media diverter, 6Ć56 media motor (XĆAxis), 6Ć25 media sensor, 6Ć22 memory module (DRAM SIMM), 6Ć7 overdrive...
...;enclosure cover, 6Ć5 encoder strip, 6Ć27 entry platen, 6Ć53 fan, 6Ć12 frontĆpanel assembly, 6Ć18 left endcover, 6Ć16 main drive belt, 6Ć34 main PCA, 6Ć9 media diverter, 6Ć56 media motor (XĆAxis), 6Ć25 media sensor, 6Ć22 memory module (DRAM SIMM), 6Ć7 overdrive...


