
Service Manual
Page 6
...User's Guide 3Ć12 Using the Plotter (more ' Quick Reference Guide 3Ć12 DesignJet 230 Front Panel 3Ć12 DesignJet 250C Front Panel 3Ć12 DesignJet 330 Front Panel 3Ć13 DesignJet 350C Front Panel 3Ć13 ThirdĆParty Inks and OffĆAxis Ink Systems ...14 Example of Setup Sheet (DesignJet 250C 3Ć15 Example of Setup Sheet (DesignJet 350C 3Ć16 4 Preventive Maintenance Moisture on Plotter 4Ć2 Level of Plotter Usage 4Ć2 Friction on Slider Rod 4Ć2 Noisy Carriage Wheel 4Ć2 Ink Spilling 4Ć3 Belt Swelling 4Ć3 Cleaning the...
...User's Guide 3Ć12 Using the Plotter (more ' Quick Reference Guide 3Ć12 DesignJet 230 Front Panel 3Ć12 DesignJet 250C Front Panel 3Ć12 DesignJet 330 Front Panel 3Ć13 DesignJet 350C Front Panel 3Ć13 ThirdĆParty Inks and OffĆAxis Ink Systems ...14 Example of Setup Sheet (DesignJet 250C 3Ć15 Example of Setup Sheet (DesignJet 350C 3Ć16 4 Preventive Maintenance Moisture on Plotter 4Ć2 Level of Plotter Usage 4Ć2 Friction on Slider Rod 4Ć2 Noisy Carriage Wheel 4Ć2 Ink Spilling 4Ć3 Belt Swelling 4Ć3 Cleaning the...
Service Manual
Page 7
5 Functional Overview (more ' HP DesignJet 200/220 Service Manual) Introduction 5Ć2 Loading Sheet Media 5Ć2 Loading Roll Media on the DesignJet 330 and 350C 5Ć4 Roll Media 5Ć5 Removing Static Charge from the Media 5Ć5 Gripping ...the Media 5Ć5 PinchĆArm Sensor 5Ć5 Providing a Force on Top of the Media 5Ć6 Bail 5Ć6 BailĆLift Mechanism 5Ć6 Moving the Carriage 5Ć6 CarriageĆDrive Mechanics 5Ć6 Motor, Belt...
5 Functional Overview (more ' HP DesignJet 200/220 Service Manual) Introduction 5Ć2 Loading Sheet Media 5Ć2 Loading Roll Media on the DesignJet 330 and 350C 5Ć4 Roll Media 5Ć5 Removing Static Charge from the Media 5Ć5 Gripping ...the Media 5Ć5 PinchĆArm Sensor 5Ć5 Providing a Force on Top of the Media 5Ć6 Bail 5Ć6 BailĆLift Mechanism 5Ć6 Moving the Carriage 5Ć6 CarriageĆDrive Mechanics 5Ć6 Motor, Belt...
Service Manual
Page 8
... 6Ć16 Removing the Encoder Strip 6Ć17 Reinstalling the Encoder Strip 6Ć19 Removing the Right Bracket 6Ć21 Removing the Carriage Motor 6Ć21 Removing the Spittoon 6Ć23 Removing the Spittoon 6Ć24 Removing the PinchĆArm Sensor 6Ć25 Removing ... Repositioning the Trailing Cable 6Ć35 Removing the TrailingĆCable Guide 6Ć36 Removing the Cartridge Carriage 6Ć37 Removing the Drive Belt 6Ć39 Removing the DriveĆBelt Pulley 6Ć40 Removing the Drive Roller 6Ć41 Reinstalling the Drive Roller 6Ć42 Removing the...
... 6Ć16 Removing the Encoder Strip 6Ć17 Reinstalling the Encoder Strip 6Ć19 Removing the Right Bracket 6Ć21 Removing the Carriage Motor 6Ć21 Removing the Spittoon 6Ć23 Removing the Spittoon 6Ć24 Removing the PinchĆArm Sensor 6Ć25 Removing ... Repositioning the Trailing Cable 6Ć35 Removing the TrailingĆCable Guide 6Ć36 Removing the Cartridge Carriage 6Ć37 Removing the Drive Belt 6Ć39 Removing the DriveĆBelt Pulley 6Ć40 Removing the Drive Roller 6Ć41 Reinstalling the Drive Roller 6Ć42 Removing the...
Service Manual
Page 48
... directly driving a single belt and the carriage. D You can remove the belt without having to cut yourself on the encoder strip inside the plotter. 5Ć6 Functional Overview C4699Ć90000 Carriage Guidance The carriage moves along on the DesignJet 230 and 250C and DesignJet 330 and 350C. Take... care not to remove the pulley on the left end of the DesignJet 220. The new mechanism is no separate belt clamps. D The interface between...
... directly driving a single belt and the carriage. D You can remove the belt without having to cut yourself on the encoder strip inside the plotter. 5Ć6 Functional Overview C4699Ć90000 Carriage Guidance The carriage moves along on the DesignJet 230 and 250C and DesignJet 330 and 350C. Take... care not to remove the pulley on the left end of the DesignJet 220. The new mechanism is no separate belt clamps. D The interface between...
Service Manual
Page 79
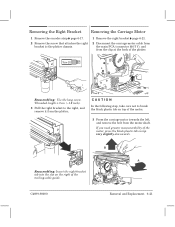
... it from the plotter, CAUTION In the following step, take care not to the plotter chassis. 1 Remove the right bracket ' page 6Ć21. 2 Disconnect the carriageĆmotor cable from the main PCA (connector MOT Y), and from the motor shaft. Removing the Right Bracket Removing the.... 2 Remove the screw that attaches the right bracket to break the black plastic tab on top of the motor. 3 Press the carriage motor towards the left, and remove the belt from the clip at the back of the trailingĆcable guide. If you need greater maneuverability of the motor, press the...
... it from the plotter, CAUTION In the following step, take care not to the plotter chassis. 1 Remove the right bracket ' page 6Ć21. 2 Disconnect the carriageĆmotor cable from the main PCA (connector MOT Y), and from the motor shaft. Removing the Right Bracket Removing the.... 2 Remove the screw that attaches the right bracket to break the black plastic tab on top of the motor. 3 Press the carriage motor towards the left, and remove the belt from the clip at the back of the trailingĆcable guide. If you need greater maneuverability of the motor, press the...

Service Manual
Page 95
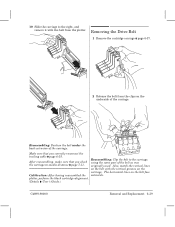
... out towards the back of the plotter. 3 Press the carriage motor towards the left of the motor, press the black plastic tab on top very slightly downwards. 5 Release the belt from the motor shaft. Reassembling: Make sure the belt is correctly positioned on the grooves of the pulley. B ...37 CAUTION In the following steps, take care not to cut yourself on the left , and remove the belt from the pulley on the encoder strip, nor to damage the strip. Removing the Cartridge Carriage 1 Remove the encoder strip ' page 6Ć17. 2 Remove the right bracket ' 6Ć21.
... out towards the back of the plotter. 3 Press the carriage motor towards the left of the motor, press the black plastic tab on top very slightly downwards. 5 Release the belt from the motor shaft. Reassembling: Make sure the belt is correctly positioned on the grooves of the pulley. B ...37 CAUTION In the following steps, take care not to cut yourself on the left , and remove the belt from the pulley on the encoder strip, nor to damage the strip. Removing the Cartridge Carriage 1 Remove the encoder strip ' page 6Ć17. 2 Remove the right bracket ' 6Ć21.
Service Manual
Page 97
...used. Also, match the vertical lines on the belt with the belt from the clips on the underside of the carriage. Reassembling: Clip the belt to the carriage, After reassembling, make sure that you check using the same part of the carriage. plotter, perform the black cartridgeĆalignment. ...User's Guide.) C4699Ć90000 Removal and Replacement 6Ć39 10 Slide the carriage to the right, and remove it with the vertical grooves on the carriage. The horizontal lines on the belt face Calibration: After having reassembled the outwards. Make sure that you correctly reconnect...
...used. Also, match the vertical lines on the belt with the belt from the clips on the underside of the carriage. Reassembling: Clip the belt to the carriage, After reassembling, make sure that you check using the same part of the carriage. plotter, perform the black cartridgeĆalignment. ...User's Guide.) C4699Ć90000 Removal and Replacement 6Ć39 10 Slide the carriage to the right, and remove it with the vertical grooves on the carriage. The horizontal lines on the belt face Calibration: After having reassembled the outwards. Make sure that you correctly reconnect...
Service Manual
Page 98
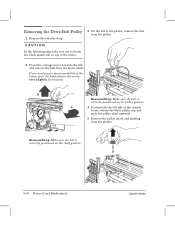
... positioned on top of the motor. 3 On the left of the plotter, remove the belt from the motor shaft. A 4 Underneath the left , and remove the belt from the pulley. 2 Press the carriage motor towards the left side of the motor, press the black plastic tab on the pulley... grooves. Reassembling: Make sure the belt is correctly positioned on top very slightly downwards. Removing the DriveĆBelt Pulley 1 Remove the encoder ...
... positioned on top of the motor. 3 On the left of the plotter, remove the belt from the motor shaft. A 4 Underneath the left , and remove the belt from the pulley. 2 Press the carriage motor towards the left side of the motor, press the black plastic tab on the pulley... grooves. Reassembling: Make sure the belt is correctly positioned on top very slightly downwards. Removing the DriveĆBelt Pulley 1 Remove the encoder ...
Service Manual
Page 144
.... Error + Film + Load Media: Servo error in host computer. Try one . D Remove dirt from the pulley that could cause the belt to your HP Response Center. For more precise troubleshooting ' page 8Ć23, w System Errors. Possible causes are in communications speed/protocol. D Ensure that...Steady 346 Steady 349 Paper + Error + Ready: RSĆ232ĆC data overflow. D If no service note deals with the carriage motor, encoder strip, and electronics module. Note conditions and actions before another was not correctly inserted. Ensure the loopback connector is not ...
.... Error + Film + Load Media: Servo error in host computer. Try one . D Remove dirt from the pulley that could cause the belt to your HP Response Center. For more precise troubleshooting ' page 8Ć23, w System Errors. Possible causes are in communications speed/protocol. D Ensure that...Steady 346 Steady 349 Paper + Error + Ready: RSĆ232ĆC data overflow. D If no service note deals with the carriage motor, encoder strip, and electronics module. Note conditions and actions before another was not correctly inserted. Ensure the loopback connector is not ...
Service Manual
Page 150
...;C data overflow. Data byte was entered into the UART. D Error in the YĆaxis (carriage axis). Apply oil (Anderol 4068, HP part number: 6040Ć0858) to your HP Response Center. D Reconnect or replace the trailing cable. D Did you load media in XĆ... RSĆ232ĆC loopback test. Check for a possible solution. D Replace the carriage. Include setup sheet and service configuration plot in communications speed/protocol. D Ensure that the belt and belt pulley are : D Incorrect configuration in report. Note conditions and actions before another was not...
...;C data overflow. Data byte was entered into the UART. D Error in the YĆaxis (carriage axis). Apply oil (Anderol 4068, HP part number: 6040Ć0858) to your HP Response Center. D Reconnect or replace the trailing cable. D Did you load media in XĆ... RSĆ232ĆC loopback test. Check for a possible solution. D Replace the carriage. Include setup sheet and service configuration plot in communications speed/protocol. D Ensure that the belt and belt pulley are : D Incorrect configuration in report. Note conditions and actions before another was not...
Service Manual
Page 165
...the trailing cable is positioned under Ćrotated. Perform a bail cycle test. Spittoon and ink separator: You need to the carriage angle. Carriage cannot park in the belt is very reactive to avoid incorrect swelling. Move the plotters away from the up position. Any problems with ink. (See ...not to jeopardize the print quality, which the wheel moves. Make sure that the bail cable has broken. Noisy carriage movement. Ink spilling. Storing: Keep new belts in their bags with the left bail bracket, is actuating the engaging lever. Wearing of the overdrive roller, ...
...the trailing cable is positioned under Ćrotated. Perform a bail cycle test. Spittoon and ink separator: You need to the carriage angle. Carriage cannot park in the belt is very reactive to avoid incorrect swelling. Move the plotters away from the up position. Any problems with ink. (See ...not to jeopardize the print quality, which the wheel moves. Make sure that the bail cable has broken. Noisy carriage movement. Ink spilling. Storing: Keep new belts in their bags with the left bail bracket, is actuating the engaging lever. Wearing of the overdrive roller, ...

Service Manual
Page 169
...Input/output test, Servo/encoder test, Sensors test, Bail cycle test, Front-panel test, Media-axis test, Carriage test, Carriage-axis test, Bench run, Modular test Carriage-axis test, Servo/encoder test, Modular test, Bench run Front-panel test, Modular test Servo/encoder test, Media...Service Tests Which Service Test to Perform Use the following table as a rough guide: Assembly/Feature Bail system Carriage Carriage motor and drive system (including belt, pulley and slider rod) Cartridge identification Cartridge nozzles Communication between computer and plotter Cover sensor DRAM SIMM EEROM ...
...Input/output test, Servo/encoder test, Sensors test, Bail cycle test, Front-panel test, Media-axis test, Carriage test, Carriage-axis test, Bench run, Modular test Carriage-axis test, Servo/encoder test, Modular test, Bench run Front-panel test, Modular test Servo/encoder test, Media...Service Tests Which Service Test to Perform Use the following table as a rough guide: Assembly/Feature Bail system Carriage Carriage motor and drive system (including belt, pulley and slider rod) Cartridge identification Cartridge nozzles Communication between computer and plotter Cover sensor DRAM SIMM EEROM ...

Service Manual
Page 172
... a fault in the center of the plotter. Test The carriage moves towards the rightĆhand side of the drive roller. Maximum PWM: For each carriage cycle. The bench run is parked in the report to your HP Response Center, if the problem cannot be able to run ... (Viewing Output ' 8-36) Error code: If an error has occurred, this information in the service station. ALT CarriageĆAxis Test This tests the operation of the carriage motor, belt, tensioner, and encoder strip. 1 Ensure that each plotter performs before it will fail. Include this code specifies more ...
... a fault in the center of the plotter. Test The carriage moves towards the rightĆhand side of the drive roller. Maximum PWM: For each carriage cycle. The bench run is parked in the report to your HP Response Center, if the problem cannot be able to run ... (Viewing Output ' 8-36) Error code: If an error has occurred, this information in the service station. ALT CarriageĆAxis Test This tests the operation of the carriage motor, belt, tensioner, and encoder strip. 1 Ensure that each plotter performs before it will fail. Include this code specifies more ...
Service Manual
Page 193
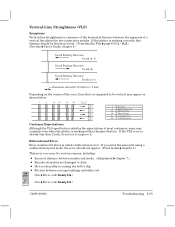
...a vertical line plotted in two consecutive swaths. Swath Swath Swath Swath Width Width Width Width Depending on the pulley is causing the belt to improve it. If you print the same plot using a unidirectional print mode, the error should be vertical may appear as shown...page 8Ć56 3. - VerticalĆLine Straightness (VLS) Symptoms VerticalĆline straightness is a measure of the horizontal distance between carriage bushings and slider rod: 230 250C (See ' Error code Steady 346.) 330 350C (See ' Error code Steady 234.) C4699Ć90000 Troubleshooting 8Ć59 D...
...a vertical line plotted in two consecutive swaths. Swath Swath Swath Swath Width Width Width Width Depending on the pulley is causing the belt to improve it. If you print the same plot using a unidirectional print mode, the error should be vertical may appear as shown...page 8Ć56 3. - VerticalĆLine Straightness (VLS) Symptoms VerticalĆline straightness is a measure of the horizontal distance between carriage bushings and slider rod: 230 250C (See ' Error code Steady 346.) 330 350C (See ' Error code Steady 234.) C4699Ć90000 Troubleshooting 8Ć59 D...

Service Manual
Page 212
...;size) Encoder Strip (E/A0Ćsize) Screw 6Ć19 .375 Plas T15 Washer Carriage Belt (D/A1Ćsize) Carriage Belt (E/A0Ćsize) Carriage assembly Carriage assembly (250C) Carriage assembly (230) Pulley Assembly (Incl. Reference on Drawing CarriageĆAxis (Left End) HP Part Number Quantity DesignJet 330/350C DesignJet 230/250C Description 1 C3190Ć40040 C3190Ć40040 1 2 C3190Ć00012 C3190...
...;size) Encoder Strip (E/A0Ćsize) Screw 6Ć19 .375 Plas T15 Washer Carriage Belt (D/A1Ćsize) Carriage Belt (E/A0Ćsize) Carriage assembly Carriage assembly (250C) Carriage assembly (230) Pulley Assembly (Incl. Reference on Drawing CarriageĆAxis (Left End) HP Part Number Quantity DesignJet 330/350C DesignJet 230/250C Description 1 C3190Ć40040 C3190Ć40040 1 2 C3190Ć00012 C3190...
Service Manual
Page 214
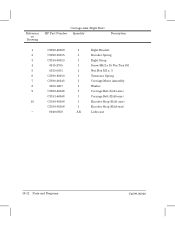
...CarriageĆAxis (Right End) HP Part Number Quantity Description 1 C3190Ć40039 1 Right Bracket 2 C3190Ć00015 1 Encoder Spring 3 C3190Ć00013 1 Right Strap 4 0515Ć2765 1 Screw M4.2 x 35 Pan Torx Stl 5 0535Ć0031 1 Nut Hex M3 x .5 6 C3190Ć80010 1 Tensioner Spring 7 C3190Ć60145 1 Carriage...ĆMotor Assembly 8 3050Ć1267 1 Washer 9 C3190Ć40048 1 Carriage Belt (D/A1Ćsize) C3191Ć40048 1 Carriage Belt (E/A0Ćsize) 10 C3190Ć60106 1 ...
...CarriageĆAxis (Right End) HP Part Number Quantity Description 1 C3190Ć40039 1 Right Bracket 2 C3190Ć00015 1 Encoder Spring 3 C3190Ć00013 1 Right Strap 4 0515Ć2765 1 Screw M4.2 x 35 Pan Torx Stl 5 0535Ć0031 1 Nut Hex M3 x .5 6 C3190Ć80010 1 Tensioner Spring 7 C3190Ć60145 1 Carriage...ĆMotor Assembly 8 3050Ć1267 1 Washer 9 C3190Ć40048 1 Carriage Belt (D/A1Ćsize) C3191Ć40048 1 Carriage Belt (E/A0Ćsize) 10 C3190Ć60106 1 ...
Service Manual
Page 250
... testing, 8Ć37 banding, 7Ć2, 8Ć57 baud rate, 3Ć14, GlossaryĆ2 and parity, 5Ć14 error DesignJet 230/250C, 8Ć8 DesignJet 330/350C, 8Ć14 setup sheet, 3Ć15, 3Ć16 bellows, primer, 5Ć11 belt, 8Ć35 carriageĆaxis test, 8Ć38 error DesignJet 230/250C, 8Ć10 IndexĆ2 C4699Ć90000
... testing, 8Ć37 banding, 7Ć2, 8Ć57 baud rate, 3Ć14, GlossaryĆ2 and parity, 5Ć14 error DesignJet 230/250C, 8Ć8 DesignJet 330/350C, 8Ć14 setup sheet, 3Ć15, 3Ć16 bellows, primer, 5Ć11 belt, 8Ć35 carriageĆaxis test, 8Ć38 error DesignJet 230/250C, 8Ć10 IndexĆ2 C4699Ć90000

Service Manual
Page 253
...262;59 disconnecting frontĆpanel assembly, 6Ć12 display data, 8Ć52, GlossaryĆ2 display list, 5Ć15, GlossaryĆ2 distance, carriageĆtoĆmedia, 5Ć7 diverter, media, 1Ć4 documentation, 10Ć27 DOS, GlossaryĆ2 dot gain, 8Ć57 dpi, 1Ć... 10Ć28 drive belt premature wearing, 8Ć31 removing, 6Ć39 drive roller, 7Ć8, 8Ć35, 8Ć57, GlossaryĆ3 bearings, 8Ć57 correction factor, DesignJet 230/250C, 8Ć49 faulty, 8Ć57 gear, GlossaryĆ3 problem DesignJet 230/250C, 8Ć11 DesignJet 330/350C, 8Ć...
...262;59 disconnecting frontĆpanel assembly, 6Ć12 display data, 8Ć52, GlossaryĆ2 display list, 5Ć15, GlossaryĆ2 distance, carriageĆtoĆmedia, 5Ć7 diverter, media, 1Ć4 documentation, 10Ć27 DOS, GlossaryĆ2 dot gain, 8Ć57 dpi, 1Ć... 10Ć28 drive belt premature wearing, 8Ć31 removing, 6Ć39 drive roller, 7Ć8, 8Ć35, 8Ć57, GlossaryĆ3 bearings, 8Ć57 correction factor, DesignJet 230/250C, 8Ć49 faulty, 8Ć57 gear, GlossaryĆ3 problem DesignJet 230/250C, 8Ć11 DesignJet 330/350C, 8Ć...
Service Manual
Page 261
...;16, 8Ć35 removing, 6Ć40 PWM, 8Ć38, 8Ć53, GlossaryĆ5 carriage axis, service configuration plot DesignJet 230/250C, 8Ć49 DesignJet 330/350C, 8Ć50 media axis, service configuration plot DesignJet 230/250C, 8Ć49 DesignJet 330/350C, 8Ć50 mediaĆaxis, 8Ć44 R radius of drive roller, 8Ć... 8Ć32 release, firmware, 8Ć49, 8Ć50 removing back cover, 6Ć33 bail, 6Ć5 bailĆlift mechanism, 6Ć29 belt, 6Ć39 carriage motor, 6Ć21 cartridge caps, 6Ć6 cartridge carriage, 6Ć37 C4699Ć90000 IndexĆ13
...;16, 8Ć35 removing, 6Ć40 PWM, 8Ć38, 8Ć53, GlossaryĆ5 carriage axis, service configuration plot DesignJet 230/250C, 8Ć49 DesignJet 330/350C, 8Ć50 media axis, service configuration plot DesignJet 230/250C, 8Ć49 DesignJet 330/350C, 8Ć50 mediaĆaxis, 8Ć44 R radius of drive roller, 8Ć... 8Ć32 release, firmware, 8Ć49, 8Ć50 removing back cover, 6Ć33 bail, 6Ć5 bailĆlift mechanism, 6Ć29 belt, 6Ć39 carriage motor, 6Ć21 cartridge caps, 6Ć6 cartridge carriage, 6Ć37 C4699Ć90000 IndexĆ13
Service Manual
Page 264
..., 1Ć4 speed of carriage, 5Ć8, 5Ć9, 5Ć10, 8Ć38 spilling of ink, 4Ć3 spittoon, 4Ć3, 5Ć11, 8Ć31 factory, service configuration plot DesignJet 230/250C, 8Ć49 DesignJet 330/350C, 8Ć50 removing DesignJet 230/250C, 6Ć23 DesignJet 330/350C, 6Ć24... incorrect, 8Ć57 RAM, plotter architecture, 5Ć12 swelling of belt, 4Ć3 system errors DesignJet 230/250C, 8Ć19 DesignJet 330/350C, 8Ć23 number of, service configuration plot DesignJet 230/250C, 8Ć49 DesignJet 330/350C, 8Ć50 T tape on cartridges, 8Ć30 TCP...
..., 1Ć4 speed of carriage, 5Ć8, 5Ć9, 5Ć10, 8Ć38 spilling of ink, 4Ć3 spittoon, 4Ć3, 5Ć11, 8Ć31 factory, service configuration plot DesignJet 230/250C, 8Ć49 DesignJet 330/350C, 8Ć50 removing DesignJet 230/250C, 6Ć23 DesignJet 330/350C, 6Ć24... incorrect, 8Ć57 RAM, plotter architecture, 5Ć12 swelling of belt, 4Ć3 system errors DesignJet 230/250C, 8Ć19 DesignJet 330/350C, 8Ć23 number of, service configuration plot DesignJet 230/250C, 8Ć49 DesignJet 330/350C, 8Ć50 T tape on cartridges, 8Ć30 TCP...


