Reference Guide
Page 3
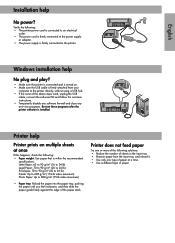
... not feed paper Try one or more of the following : • The printer power cord is connected to an electrical outlet. • The power cord is firmly connected to the power supply or adapter. • The power supply is firmly connected to 280 g/m² (75-lb index maximum) • Paper tray... and follow the onscreen instructions. • Temporarily disable any software firewall and close any anti-virus programs. Re-start these programs after the printer software is within the recommended specifications. Letter Paper: 65 to 90 g/m² (16 to 24 lb) Legal Paper: 70 to 90 g/m&#...
... not feed paper Try one or more of the following : • The printer power cord is connected to an electrical outlet. • The power cord is firmly connected to the power supply or adapter. • The power supply is firmly connected to 280 g/m² (75-lb index maximum) • Paper tray... and follow the onscreen instructions. • Temporarily disable any software firewall and close any anti-virus programs. Re-start these programs after the printer software is within the recommended specifications. Letter Paper: 65 to 90 g/m² (16 to 24 lb) Legal Paper: 70 to 90 g/m&#...
Reference Guide
Page 4
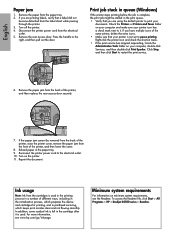
... tray. 9. Turn on minimum system requirements, see www.hp.com/go/inkusage. Disconnect the printer power cord from the paper tray. 2. Check the Printers or Printers and Faxes folder on your printer icon has a check mark next to it is left ...printer to print your printer is used . If you have multiple icons of different ways, including in the initialization process, which keeps print nozzles clear and ink flowing smoothly. Remove the rear access door. Reconnect the printer power cord to pause printing. To access the Readme file, click Start > All Programs > HP > Deskjet...
... tray. 9. Turn on minimum system requirements, see www.hp.com/go/inkusage. Disconnect the printer power cord from the paper tray. 2. Check the Printers or Printers and Faxes folder on your printer icon has a check mark next to it is left ...printer to print your printer is used . If you have multiple icons of different ways, including in the initialization process, which keeps print nozzles clear and ink flowing smoothly. Remove the rear access door. Reconnect the printer power cord to pause printing. To access the Readme file, click Start > All Programs > HP > Deskjet...
Full User Guide
Page 7
...call...107 After the phone support period 107 B Technical information Printer specifications...108 Notice to Windows 2000 users 108 Environmental product stewardship program 108 Paper use...109 Plastics...109 Material safety data sheets 109 Recycling program...109 HP inkjet supplies recycling program 109 Energy Star® notice...109 Disposal ... users in Korea 112 VCCI (Class B) compliance statement for users in Japan 113 Notice to users in Japan about the power cord 113 Toxic and hazardous substance table 113 HP Deskjet D2500 Printer series declaration of conformity 114 Index...115 4
...call...107 After the phone support period 107 B Technical information Printer specifications...108 Notice to Windows 2000 users 108 Environmental product stewardship program 108 Paper use...109 Plastics...109 Material safety data sheets 109 Recycling program...109 HP inkjet supplies recycling program 109 Energy Star® notice...109 Disposal ... users in Korea 112 VCCI (Class B) compliance statement for users in Japan 113 Notice to users in Japan about the power cord 113 Toxic and hazardous substance table 113 HP Deskjet D2500 Printer series declaration of conformity 114 Index...115 4
Full User Guide
Page 60
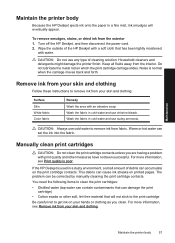
... amount of cleaning solution. Turn off the HP Deskjet, and then disconnect the power cord. 2. Household cleaners and detergents might damage the printer finish. CAUTION: Do not use cold water to remove ink from your skin and clothing: Surface Skin White fabric Color fabric Remedy Wash the area with an abrasive...manually cleaning the print cartridge contacts. For more information, see Remove ink from your skin and clothing. Maintenance Maintain the printer body Because the HP Deskjet ejects ink onto the paper in a fine mist, ink smudges will not stick to the print cartridge Be careful ...
... amount of cleaning solution. Turn off the HP Deskjet, and then disconnect the power cord. 2. Household cleaners and detergents might damage the printer finish. CAUTION: Do not use cold water to remove ink from your skin and clothing: Surface Skin White fabric Color fabric Remedy Wash the area with an abrasive...manually cleaning the print cartridge contacts. For more information, see Remove ink from your skin and clothing. Maintenance Maintain the printer body Because the HP Deskjet ejects ink onto the paper in a fine mist, ink smudges will not stick to the print cartridge Be careful ...
Full User Guide
Page 62
... to protect your print cartridge and to prevent the ink from the print cartridge, do not attempt to reattach it. • When you unplug the power cord or turn the printer off a power strip. If the plastic tape has been removed from drying out. • Keep all unused print cartridges in the...
... to protect your print cartridge and to prevent the ink from the print cartridge, do not attempt to reattach it. • When you unplug the power cord or turn the printer off a power strip. If the plastic tape has been removed from drying out. • Keep all unused print cartridges in the...
Full User Guide
Page 69
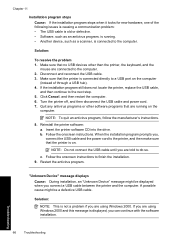
...is on the computer (instead of through a USB hub). 4. Turn the printer off, and then disconnect the USB cable and power cord. 7. When the installation program prompts you connect a USB cable between the printer and the computer. Solution: NOTE: This is connected directly to a USB...Click Cancel, and then restart the computer. 6. Reinstall the printer software: a. c. "Unknown Device" message displays Cause: During installation, an "Unknown Device" message might be displayed when you , connect the USB cable and the power cord to the computer. b. A possible cause might be a ...
...is on the computer (instead of through a USB hub). 4. Turn the printer off, and then disconnect the USB cable and power cord. 7. When the installation program prompts you connect a USB cable between the printer and the computer. Solution: NOTE: This is connected directly to a USB...Click Cancel, and then restart the computer. 6. Reinstall the printer software: a. c. "Unknown Device" message displays Cause: During installation, an "Unknown Device" message might be displayed when you , connect the USB cable and the power cord to the computer. b. A possible cause might be a ...
Full User Guide
Page 70
... setup.exe file. When prompted, click Remove All. 3. Reconnect the power cord to finish the installation. 4. To reinstall the printer software 1. Uninstall the printer software: a. Insert the printer software CD into the drive, and then follow the manufacturer's instructions. 2. Follow the onscreen instructions to the printer. 5. Troubleshooting Installation problems 67 NOTE: If the installation program does...
... setup.exe file. When prompted, click Remove All. 3. Reconnect the power cord to finish the installation. 4. To reinstall the printer software 1. Uninstall the printer software: a. Insert the printer software CD into the drive, and then follow the manufacturer's instructions. 2. Follow the onscreen instructions to the printer. 5. Troubleshooting Installation problems 67 NOTE: If the installation program does...

Full User Guide
Page 73
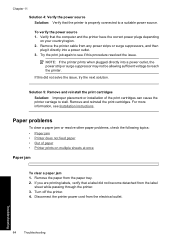
Proceed to step 2 if the lights continue to the electrical outlet. 5. Disconnect the printer power cord from the electrical outlet. 4. Print Cartridge Status lights are on ink, press the Resume button. The left status light represents the tri-color print cartridge, which is installed in the right side of the print cartridge carriage. 2. The right...
Proceed to step 2 if the lights continue to the electrical outlet. 5. Disconnect the printer power cord from the electrical outlet. 4. Print Cartridge Status lights are on ink, press the Resume button. The left status light represents the tri-color print cartridge, which is installed in the right side of the print cartridge carriage. 2. The right...
Full User Guide
Page 75
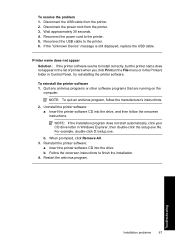
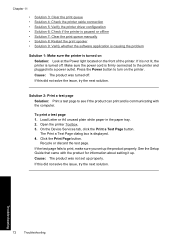
... you set up the product properly. To print a test page 1. If the test page fails to the printer and plugged into a power outlet. Recycle or discard the test page. Make sure the power cord is communicating with the product for information about setting it is not lit, the... printer is turned off . On the Device Services tab, click the Print a Test Page button. Open the printer Toolbox. 3. Chapter 11 • Solution 3: Clear ...
... you set up the product properly. To print a test page 1. If the test page fails to the printer and plugged into a power outlet. Recycle or discard the test page. Make sure the power cord is communicating with the product for information about setting it is not lit, the... printer is turned off . On the Device Services tab, click the Print a Test Page button. Open the printer Toolbox. 3. Chapter 11 • Solution 3: Clear ...
Full User Guide
Page 86
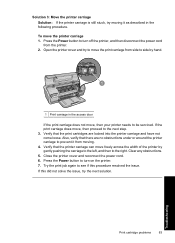
... carriage to the left, and then to turn on the printer. 7. Try the print job again to turn off the printer, and then disconnect the power cord from moving it from the printer. 2. Press the Power button to the right. Verify that there are locked into the printer carriage and have not come loose. Print cartridge problems...
... carriage to the left, and then to turn on the printer. 7. Try the print job again to turn off the printer, and then disconnect the power cord from moving it from the printer. 2. Press the Power button to the right. Verify that there are locked into the printer carriage and have not come loose. Print cartridge problems...
Full User Guide
Page 87
...printer power cord from any power strips or surge suppressors, and then plug it directly into a power outlet, the power strip or surge suppressor may not be allowing sufficient voltage to a suitable power source. Remove the printer cable from the electrical outlet. NOTE: If the printer prints when plugged directly into a power... 84 Troubleshooting If this procedure resolved the issue. Chapter 11 Solution 4: Verify the power source Solution: Verify that the computer and the printer have the correct power plugs depending on multiple sheets at once Paper jam To clear a paper jam ...
...printer power cord from any power strips or surge suppressors, and then plug it directly into a power outlet, the power strip or surge suppressor may not be allowing sufficient voltage to a suitable power source. Remove the printer cable from the electrical outlet. NOTE: If the printer prints when plugged directly into a power... 84 Troubleshooting If this procedure resolved the issue. Chapter 11 Solution 4: Verify the power source Solution: Verify that the computer and the printer have the correct power plugs depending on multiple sheets at once Paper jam To clear a paper jam ...

Full User Guide
Page 88
.... Reload paper in the paper tray. • Remove the paper from the front. 8. See Printer specifications for paper weight specifications. Press the handle to the electrical outlet. 10. Reconnect the printer power cord to the right, and then pull out the door. 6. If the paper jam cannot be removed... from the back of the printer, raise the printer cover, remove the paper jam from the back of sheets in ...
.... Reload paper in the paper tray. • Remove the paper from the front. 8. See Printer specifications for paper weight specifications. Press the handle to the electrical outlet. 10. Reconnect the printer power cord to the right, and then pull out the door. 6. If the paper jam cannot be removed... from the back of the printer, raise the printer cover, remove the paper jam from the back of sheets in ...
Full User Guide
Page 89
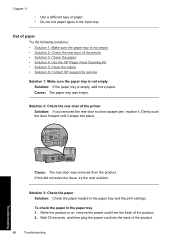
...tray was removed from the back of the product. 86 Troubleshooting Troubleshooting Wait 30 seconds, and then plug the power cord into place. Solution 2: Check the rear door of the printer Solution: If you removed the rear door to clear a paper jam, replace it snaps into the back ... the printer • Solution 3: Check the paper • Solution 4: Use the HP Paper Feed Cleaning Kit • Solution 5: Clean the rollers • Solution 6: Contact HP support for service Solution 1: Make sure the paper tray is not empty Solution: If the paper tray is on, remove the power cord from the...
...tray was removed from the back of the product. 86 Troubleshooting Troubleshooting Wait 30 seconds, and then plug the power cord into place. Solution 2: Check the rear door of the printer Solution: If you removed the rear door to clear a paper jam, replace it snaps into the back ... the printer • Solution 3: Check the paper • Solution 4: Use the HP Paper Feed Cleaning Kit • Solution 5: Clean the rollers • Solution 6: Contact HP support for service Solution 1: Make sure the paper tray is not empty Solution: If the paper tray is on, remove the power cord from the...
Full User Guide
Page 92
Clean the rubber rollers to : www.hp.com/support. Go to remove any dust or dirt buildup. 5. Turn off the product and remove the power cord. 2. Dip the lint-free cloth into place. 6. Replace the rear door. Gently push the door forward until it snaps into the ...3. Solution 5: Clean the rollers Solution: Clean the rollers. Remove the rear door to print again. Plug the power cord back in the previous solutions, contact HP support for service. Solution 6: Contact HP support for service Solution: If you have completed all of the steps provided in , and turn on calling for...
Clean the rubber rollers to : www.hp.com/support. Go to remove any dust or dirt buildup. 5. Turn off the product and remove the power cord. 2. Dip the lint-free cloth into place. 6. Replace the rear door. Gently push the door forward until it snaps into the ...3. Solution 5: Clean the rollers Solution: Clean the rollers. Remove the rear door to print again. Plug the power cord back in the previous solutions, contact HP support for service. Solution 6: Contact HP support for service Solution: If you have completed all of the steps provided in , and turn on calling for...
Full User Guide
Page 115
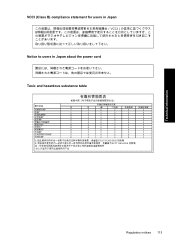
... users in accordance with the instructions, may cause undesired operation. Notice to users in Japan about the power cord • Toxic and hazardous substance table • HP Deskjet D2500 Printer series declaration of the FCC Rules. This equipment has been tested and found to radio communications. Operation ... and can be determined by turning the equipment off and on, the user is encouraged to try to correct the interference by HP may not cause harmful interference, and (2) this device that are designed to provide reasonable protection against harmful interference in a residential...
... users in accordance with the instructions, may cause undesired operation. Notice to users in Japan about the power cord • Toxic and hazardous substance table • HP Deskjet D2500 Printer series declaration of the FCC Rules. This equipment has been tested and found to radio communications. Operation ... and can be determined by turning the equipment off and on, the user is encouraged to try to correct the interference by HP may not cause harmful interference, and (2) this device that are designed to provide reasonable protection against harmful interference in a residential...
Full User Guide
Page 116
Technical information VCCI (Class B) compliance statement for users in Japan Notice to users in Japan about the power cord Toxic and hazardous substance table Regulatory notices 113
Technical information VCCI (Class B) compliance statement for users in Japan Notice to users in Japan about the power cord Toxic and hazardous substance table Regulatory notices 113


