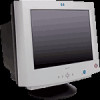
hp P930 19'' crt P9009w, user's guide
Page 3
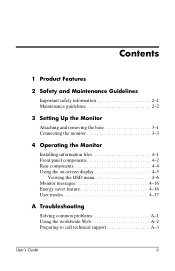
Contents 1 Product Features 2 Safety and Maintenance Guidelines Important safety information 2-1 Maintenance guidelines 2-2 3 Setting Up the Monitor Attaching and removing the base 3-1 Connecting the monitor 3-3 4 Operating the Monitor Installing information files 4-1 Front panel components 4-2 Rear components 4-4 Using the on-screen display 4-5 Viewing the OSD menu 4-6 Monitor messages 4-16 Energy saver feature 4-16 User modes 4-17 A Troubleshooting Solving common problems A-1 Using the worldwide Web A-2 Preparing to call technical support A-3 User's Guide iii
Contents 1 Product Features 2 Safety and Maintenance Guidelines Important safety information 2-1 Maintenance guidelines 2-2 3 Setting Up the Monitor Attaching and removing the base 3-1 Connecting the monitor 3-3 4 Operating the Monitor Installing information files 4-1 Front panel components 4-2 Rear components 4-4 Using the on-screen display 4-5 Viewing the OSD menu 4-6 Monitor messages 4-16 Energy saver feature 4-16 User modes 4-17 A Troubleshooting Solving common problems A-1 Using the worldwide Web A-2 Preparing to call technical support A-3 User's Guide iii
hp P930 19'' crt P9009w, user's guide
Page 4
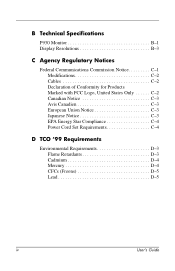
B Technical Specifications P930 Monitor B-1 Display Resolutions B-3 C Agency Regulatory Notices Federal Communications Commission Notice C-1 Modifications C-2 Cables C-2 Declaration of Conformity for Products Marked with FCC Logo, United States Only C-2 Canadian Notice C-3 Avis Canadien C-3 European Union Notice C-3 Japanese Notice C-3 EPA Energy Star Compliance C-4 Power Cord Set Requirements C-4 D TCO '99 Requirements Environmental Requirements D-3 Flame Retardants D-3 Cadmium D-4 Mercury D-4 CFCs (Freons D-5 Lead D-5 iv User's Guide
B Technical Specifications P930 Monitor B-1 Display Resolutions B-3 C Agency Regulatory Notices Federal Communications Commission Notice C-1 Modifications C-2 Cables C-2 Declaration of Conformity for Products Marked with FCC Logo, United States Only C-2 Canadian Notice C-3 Avis Canadien C-3 European Union Notice C-3 Japanese Notice C-3 EPA Energy Star Compliance C-4 Power Cord Set Requirements C-4 D TCO '99 Requirements Environmental Requirements D-3 Flame Retardants D-3 Cadmium D-4 Mercury D-4 CFCs (Freons D-5 Lead D-5 iv User's Guide
hp P930 19'' crt P9009w, user's guide
Page 5
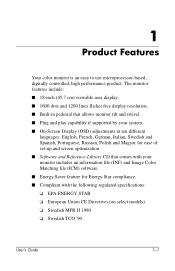
... that allows monitor tilt and swivel. ■ Plug and play capability if supported by your system. ■ On-Screen Display (OSD) adjustments in ten different languages: English, French, German, Italian, Swedish and Spanish, Portuguese, Russian, Polish and Magyar for ease of set-up and screen optimization. ■ Software and Reference Library CD that comes with your monitor includes an information file (INF) and Image Color Matching file...
... that allows monitor tilt and swivel. ■ Plug and play capability if supported by your system. ■ On-Screen Display (OSD) adjustments in ten different languages: English, French, German, Italian, Swedish and Spanish, Portuguese, Russian, Polish and Magyar for ease of set-up and screen optimization. ■ Software and Reference Library CD that comes with your monitor includes an information file (INF) and Image Color Matching file...
hp P930 19'' crt P9009w, user's guide
Page 7
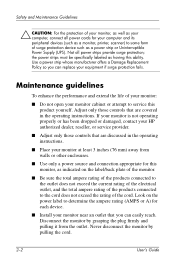
... walls or other enclosures. ■ Use only a power source and connection appropriate for each device. ■ Install your HP authorized dealer, reseller, or service provider. ■ Adjust only those controls that you can easily reach. Use a power strip whose manufacturer offers a Damage Replacement Policy so you can replace your monitor cabinet or attempt to service this ability. the power strips must be specifically labeled as indicated on the power...
... walls or other enclosures. ■ Use only a power source and connection appropriate for each device. ■ Install your HP authorized dealer, reseller, or service provider. ■ Adjust only those controls that you can easily reach. Use a power strip whose manufacturer offers a Damage Replacement Policy so you can replace your monitor cabinet or attempt to service this ability. the power strips must be specifically labeled as indicated on the power...

hp P930 19'' crt P9009w, user's guide
Page 8
... the front panel controls or the monitor screen. You can substantially increase the life expectancy of your monitor. These openings must not be blocked or covered. Safety and Maintenance Guidelines ■ Turn your monitor off the monitor when not in use. ■ Unplug your monitor from the wall outlet before cleaning. Do not walk on top of your monitor by using a screen saver program and turning off when...
... the front panel controls or the monitor screen. You can substantially increase the life expectancy of your monitor. These openings must not be blocked or covered. Safety and Maintenance Guidelines ■ Turn your monitor off the monitor when not in use. ■ Unplug your monitor from the wall outlet before cleaning. Do not walk on top of your monitor by using a screen saver program and turning off when...

hp P930 19'' crt P9009w, user's guide
Page 9
... setting up on the bottom of the monitor until the tabs are fully engaged in the slots. 4. Align the tabs on the base with the corresponding slots on a flat work surface. 2. Press the base onto the monitor until the release latch clicks into the locked position. Ä CAUTION: Do not bend the snap. To attach the base: 1. User's Guide 3-1 Attaching and removing the base...
... setting up on the bottom of the monitor until the tabs are fully engaged in the slots. 4. Align the tabs on the base with the corresponding slots on a flat work surface. 2. Press the base onto the monitor until the release latch clicks into the locked position. Ä CAUTION: Do not bend the snap. To attach the base: 1. User's Guide 3-1 Attaching and removing the base...

hp P930 19'' crt P9009w, user's guide
Page 11
Setting Up the Monitor Connecting the monitor To connect the monitor to your computer's video port, video board, video card or graphics card. 4. If you monitor displays an image, installation is complete. Plug the power cord for your computer. 2. Connect the monitor signal cable to the computer system: 1. Place the monitor in a convenient, well ventilated location near your monitor to an electrical outlet. 5. Connect the computer's power cord to the power port on your computer and monitor. Turn on the back of the monitor. Connect the...
Setting Up the Monitor Connecting the monitor To connect the monitor to your computer's video port, video board, video card or graphics card. 4. If you monitor displays an image, installation is complete. Plug the power cord for your computer. 2. Connect the monitor signal cable to the computer system: 1. Place the monitor in a convenient, well ventilated location near your monitor to an electrical outlet. 5. Connect the computer's power cord to the power port on your computer and monitor. Turn on the back of the monitor. Connect the...

hp P930 19'' crt P9009w, user's guide
Page 12
... them so that is not in chapter 4 to install the software contained on -screen instructions to adjust the picture quality of your equipment: ■ Do not disable the power cord grounding plug. Use the on the CD that is included with your monitor. Arrange them . Always activate a screen saver program or turn on a cord or cable. Setting Up the Monitor Å WARNING: To reduce the risk of electric...
... them so that is not in chapter 4 to install the software contained on -screen instructions to adjust the picture quality of your equipment: ■ Do not disable the power cord grounding plug. Use the on the CD that is included with your monitor. Arrange them . Always activate a screen saver program or turn on a cord or cable. Setting Up the Monitor Å WARNING: To reduce the risk of electric...

hp P930 19'' crt P9009w, user's guide
Page 13
... adapter. When the CD-ROM menu launches, select Install INF and ICM Files and follow the on-screen instructions. ✎ To get the latest .INF and .ICM files, download them from the HP Web site at www.hp.com/go /support and selecting your monitor model to download the appropriate files. User's Guide 4-1 an .INF file and an .ICM file. The .ICM file provides color...
... adapter. When the CD-ROM menu launches, select Install INF and ICM Files and follow the on-screen instructions. ✎ To get the latest .INF and .ICM files, download them from the HP Web site at www.hp.com/go /support and selecting your monitor model to download the appropriate files. User's Guide 4-1 an .INF file and an .ICM file. The .ICM file provides color...
hp P930 19'' crt P9009w, user's guide
Page 15
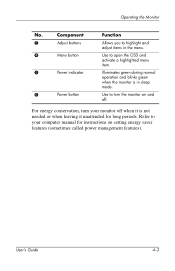
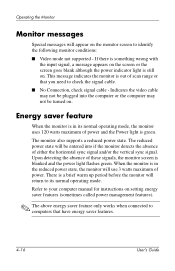
.... User's Guide 4-3 Use to turn your computer manual for long periods. For energy conservation, turn the monitor on setting energy saver features (sometimes called power management features). Illuminates green during normal operation and blinks green when the monitor is not needed or when leaving it unattended for instructions on and off when it is in the menu. Refer to your monitor off . Operating the Monitor No. 3 4 Component Adjust buttons Menu button 5 Power indicator 6 Power button...
.... User's Guide 4-3 Use to turn your computer manual for long periods. For energy conservation, turn the monitor on setting energy saver features (sometimes called power management features). Illuminates green during normal operation and blinks green when the monitor is not needed or when leaving it unattended for instructions on and off when it is in the menu. Refer to your monitor off . Operating the Monitor No. 3 4 Component Adjust buttons Menu button 5 Power indicator 6 Power button...

hp P930 19'' crt P9009w, user's guide
Page 16
Operating the Monitor Rear components No. 1 2 3 Component Function Power port connector Connects the monitor power cord. Signal cable Connects to the computer's video video port, video board, video card or graphics card. Tilt/Swivel Base Can be removed from the monitor. 4-4 User's Guide
Operating the Monitor Rear components No. 1 2 3 Component Function Power port connector Connects the monitor power cord. Signal cable Connects to the computer's video video port, video board, video card or graphics card. Tilt/Swivel Base Can be removed from the monitor. 4-4 User's Guide

hp P930 19'' crt P9009w, user's guide
Page 18
To move to open the On-Screen Display menu. 3. To access the OSD: 1. Press the Menu button to a menu screen, press the Adjust buttons until the menu is highlighted. 4. Press the Exit button to turn on the monitor, if the monitor is displayed, press the Adjust buttons - Press the Power button to close the active menu or OSD. 4-6 User's Guide When your preferred OSD setting. 5. Operating the Monitor The On-Screen Display (OSD) adjusts the screen image based on . 2. to adjust or change your menu screen is not already on...
To move to open the On-Screen Display menu. 3. To access the OSD: 1. Press the Menu button to a menu screen, press the Adjust buttons until the menu is highlighted. 4. Press the Exit button to turn on the monitor, if the monitor is displayed, press the Adjust buttons - Press the Power button to close the active menu or OSD. 4-6 User's Guide When your preferred OSD setting. 5. Operating the Monitor The On-Screen Display (OSD) adjusts the screen image based on . 2. to adjust or change your menu screen is not already on...
hp P930 19'' crt P9009w, user's guide
Page 19
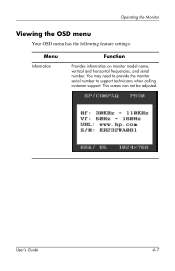
User's Guide 4-7 This screen can not be adjusted. Operating the Monitor Viewing the OSD menu Your OSD menu has the following feature settings: Menu Information Function Provides information on monitor model name, vertical and horizontal frequencies, and serial number. You may need to provide the monitor serial number to support technicians when calling customer support.
User's Guide 4-7 This screen can not be adjusted. Operating the Monitor Viewing the OSD menu Your OSD menu has the following feature settings: Menu Information Function Provides information on monitor model name, vertical and horizontal frequencies, and serial number. You may need to provide the monitor serial number to support technicians when calling customer support.

hp P930 19'' crt P9009w, user's guide
Page 26
... minute period. ✎ After using the degauss feature, the monitor may buzz momentarily, the image colors may change and the image will jiggle for video cards that use video signals higher than 1.0 V, which causes the display to be reset. These effects are normal. • Select Recall to reset the monitor settings to their original levels. ✎ If you press Yes to reset the monitor, the position, size, pincushion, trapezoid, parallelogram...
... minute period. ✎ After using the degauss feature, the monitor may buzz momentarily, the image colors may change and the image will jiggle for video cards that use video signals higher than 1.0 V, which causes the display to be reset. These effects are normal. • Select Recall to reset the monitor settings to their original levels. ✎ If you press Yes to reset the monitor, the position, size, pincushion, trapezoid, parallelogram...

hp P930 19'' crt P9009w, user's guide
Page 27
... ten languages: English, German, French, Italian, Portuguese, Spanish, Swedish, Russian, Polish or Magyar. Operating the Monitor Menu Menu Function Continued • Select Display Timing to see the frequency (user control mode), the polarity of the operational signals, the default frequency set by the manufacturer, and the resolution level of your monitor. • Select Menu Duration to set the amount of time the menu will wait before it automatically turns off...
... ten languages: English, German, French, Italian, Portuguese, Spanish, Swedish, Russian, Polish or Magyar. Operating the Monitor Menu Menu Function Continued • Select Display Timing to see the frequency (user control mode), the polarity of the operational signals, the default frequency set by the manufacturer, and the resolution level of your monitor. • Select Menu Duration to set the amount of time the menu will wait before it automatically turns off...
hp P930 19'' crt P9009w, user's guide
Page 28
... Connection, check signal cable - If there is something wrong with the input signal, a message appears on the screen or the screen goes blank although the power indicator light is blanked and the power light flashes green. Indicates the video cable may not be plugged into if the monitor detects the absence of these signals, the monitor screen is still on. Upon detecting the absence of either the horizontal sync signal and/or the vertical sync signal. Operating the Monitor Monitor...
... Connection, check signal cable - If there is something wrong with the input signal, a message appears on the screen or the screen goes blank although the power indicator light is blanked and the power light flashes green. Indicates the video cable may not be plugged into if the monitor detects the absence of these signals, the monitor screen is still on. Upon detecting the absence of either the horizontal sync signal and/or the vertical sync signal. Operating the Monitor Monitor...

hp P930 19'' crt P9009w, user's guide
Page 30
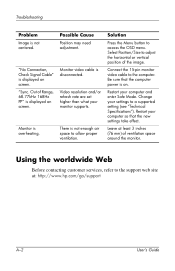
... recommended solutions. A Troubleshooting Solving common problems The following table lists possible problems, the possible cause of the Adjust buttons to access the brightness/contrast OSD menu. Screen blanking utility is off. Adjust the screen as needed. Depress any key on power. Brightness and contrast are too low. Connect video cable properly. Problem Screen is disconnected. Possible Cause Power cord is blank. Turn on the keyboard or move the mouse. User's Guide A-1 Video cable is improperly connected. Image appears blurred, indistinct...
... recommended solutions. A Troubleshooting Solving common problems The following table lists possible problems, the possible cause of the Adjust buttons to access the brightness/contrast OSD menu. Screen blanking utility is off. Adjust the screen as needed. Depress any key on power. Brightness and contrast are too low. Connect video cable properly. Problem Screen is disconnected. Possible Cause Power cord is blank. Turn on the keyboard or move the mouse. User's Guide A-1 Video cable is improperly connected. Image appears blurred, indistinct...
hp P930 19'' crt P9009w, user's guide
Page 31
... Before contacting customer services, refer to access the OSD menu. "Sync. Solution Press the Menu button to the support web site at least 3 inches (76 mm) of the image. Change your computer and enter Safe Mode. Out of Range, 68.77kHz 168Hz PP" is displayed on . Monitor video cable is not centered. Select Position/Size to the computer. Restart your monitor supports. Troubleshooting Problem Image is disconnected. Video resolution and/or refresh rate are set higher than what...
... Before contacting customer services, refer to access the OSD menu. "Sync. Solution Press the Menu button to the support web site at least 3 inches (76 mm) of the image. Change your computer and enter Safe Mode. Out of Range, 68.77kHz 168Hz PP" is displayed on . Monitor video cable is not centered. Select Position/Size to the computer. Restart your monitor supports. Troubleshooting Problem Image is disconnected. Video resolution and/or refresh rate are set higher than what...

hp P930 19'' crt P9009w, user's guide
Page 35
Technical Specifications Display Resolutions The display resolutions listed below are the most commonly used modes and are set as factory defaults. This monitor automatically recognizes these preset and preload modes and they will appear properly sized and centered on the screen. Factory Preset and Preload Display Modes Mode Pixel Format Horz Freq (kHz) 1 640 x 480 31.47 Horz Polarity - User's Guide B-3 Vert Freq (Hz) 60.0 Vert Pixel Clk Polarity (MHz) Source - 25.175 VGA 2 640...
Technical Specifications Display Resolutions The display resolutions listed below are the most commonly used modes and are set as factory defaults. This monitor automatically recognizes these preset and preload modes and they will appear properly sized and centered on the screen. Factory Preset and Preload Display Modes Mode Pixel Format Horz Freq (kHz) 1 640 x 480 31.47 Horz Polarity - User's Guide B-3 Vert Freq (Hz) 60.0 Vert Pixel Clk Polarity (MHz) Source - 25.175 VGA 2 640...

hp P930 19'' crt P9009w, user's guide
Page 39
... current marked on input voltages between 6 feet (1.8 m) and 12 feet (3.6 m). In addition, the cross-sectional area of the wire must be paid to the plug, electrical outlet, and the point where the cord exits from the product. C-4 User's Guide The power cord set (flexible cord or wall plug) received with the monitor meets the requirements for use , contact your HP authorized service provider. A power cord should be...
... current marked on input voltages between 6 feet (1.8 m) and 12 feet (3.6 m). In addition, the cross-sectional area of the wire must be paid to the plug, electrical outlet, and the point where the cord exits from the product. C-4 User's Guide The power cord set (flexible cord or wall plug) received with the monitor meets the requirements for use , contact your HP authorized service provider. A power cord should be...


