HP Color LaserJet CP6015 Series - User Guide
Page 12
...the product 234 Output is curled or wrinkled 234 Product will not duplex or duplexes incorrectly 235 Understand lights on the formatter 236 HP Jetdirect LEDs ...236 Heartbeat LED ...236 Solve image quality problems ...237 Example print quality problems 237 Repetitive defects ruler ... Order through service or support providers 256 Order directly through the embedded Web server (for printers that are connected to a network) ...256 Order directly through the HP Easy Printer Care software 256 Part numbers ...257 Accessories ...257 Print cartridges ...257 Image drums ...257 Maintenance kits ...
...the product 234 Output is curled or wrinkled 234 Product will not duplex or duplexes incorrectly 235 Understand lights on the formatter 236 HP Jetdirect LEDs ...236 Heartbeat LED ...236 Solve image quality problems ...237 Example print quality problems 237 Repetitive defects ruler ... Order through service or support providers 256 Order directly through the embedded Web server (for printers that are connected to a network) ...256 Order directly through the HP Easy Printer Care software 256 Part numbers ...257 Accessories ...257 Print cartridges ...257 Image drums ...257 Maintenance kits ...
HP Color LaserJet CP6015 Series - User Guide
Page 56
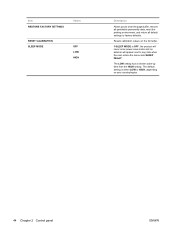
... the HIGH setting. To display: Press Menu, select CONFIGURE DEVICE, and then select RESETS. If SLEEP MODE is either LOW or HIGH, depending on the formatter. The default setting is OFF, the product will never enter power save mode and no asterisk will appear next to factory defaults. Item RESTORE FACTORY...
... the HIGH setting. To display: Press Menu, select CONFIGURE DEVICE, and then select RESETS. If SLEEP MODE is either LOW or HIGH, depending on the formatter. The default setting is OFF, the product will never enter power save mode and no asterisk will appear next to factory defaults. Item RESTORE FACTORY...
HP Color LaserJet CP6015 Series - User Guide
Page 172
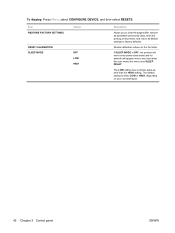
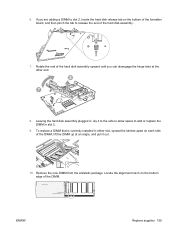
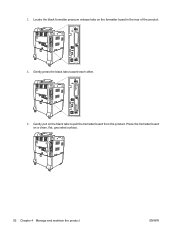
Gently press the black tabs toward each other. 5. Place the formatter board on the black tabs to pull the formatter board from the product. 3. Gently pull on a clean, flat, grounded surface. 158 Chapter 11 Manage and maintain the product ENWW Locate the black formatter pressure release tabs on the formatter board in the rear of the product. 4.
Gently press the black tabs toward each other. 5. Place the formatter board on the black tabs to pull the formatter board from the product. 3. Gently pull on a clean, flat, grounded surface. 158 Chapter 11 Manage and maintain the product ENWW Locate the black formatter pressure release tabs on the formatter board in the rear of the product. 4.
HP Color LaserJet CP6015 Series - User Guide
Page 173
... it to the side to allow space to add or replace the DIMM in either slot, spread the latches apart on the bottom of the formatter board, and then pinch the tab to slot 2, locate the hard disk release tab on each side of the DIMM. To replace a DIMM that is...
... it to the side to allow space to add or replace the DIMM in either slot, spread the latches apart on the bottom of the formatter board, and then pinch the tab to slot 2, locate the hard disk release tab on each side of the DIMM. To replace a DIMM that is...
HP Color LaserJet CP6015 Series - User Guide
Page 174
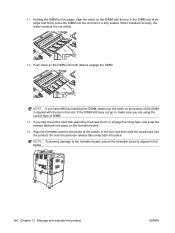
... XOXO XOXOXO NOTE: If you have difficulty inserting the DIMM, make sure you had moved the hard disk assembly to the formatter board, ensure the formatter board is fully seated. Be sure the pressure release tabs snap back into the product. NOTE: To prevent damage to access... the DIMM slot at an angle and firmly press the DIMM into the slot until both latches engage the DIMM. Align the formatter board in the tracks. 160 Chapter 11 Manage and maintain the product ENWW XOXOXOXOXO XOXOXOXOXO XOXOXOXOXO XOXOXOXOXO XOXXOOXXOOXO XOXOXXOOXOXO XOXOXO XOXOXO XOXOXO ...
... XOXO XOXOXO NOTE: If you have difficulty inserting the DIMM, make sure you had moved the hard disk assembly to the formatter board, ensure the formatter board is fully seated. Be sure the pressure release tabs snap back into the product. NOTE: To prevent damage to access... the DIMM slot at an angle and firmly press the DIMM into the slot until both latches engage the DIMM. Align the formatter board in the tracks. 160 Chapter 11 Manage and maintain the product ENWW XOXOXOXOXO XOXOXOXOXO XOXOXOXOXO XOXOXOXOXO XOXXOOXXOOXO XOXOXXOOXOXO XOXOXO XOXOXO XOXOXO ...
HP Color LaserJet CP6015 Series - User Guide
Page 189
12 Solve problems ● Solving general problems ● Control-panel message types ● Control-panel messages ● Jams ● Paper-handling problems ● Understand lights on the formatter ● Solve image quality problems ● Performance problems ● Solve network connectivity problems ● Product software problems ● Solve common Macintosh problems ENWW 175
12 Solve problems ● Solving general problems ● Control-panel message types ● Control-panel messages ● Jams ● Paper-handling problems ● Understand lights on the formatter ● Solve image quality problems ● Performance problems ● Solve network connectivity problems ● Product software problems ● Solve common Macintosh problems ENWW 175
HP Color LaserJet CP6015 Series - User Guide
Page 194
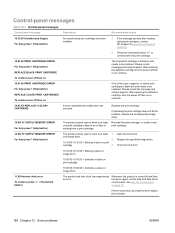
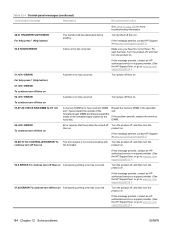
...this print cartridge. 10.91.00 PRINT CARTRIDGE ERROR For help press (Help button) REPLACE COLOR PRINT CARTRIDGES To continue turn off and then turned on again, set the time and ... from a print cartridge. Whenever the product is turned off then on to replace the formatter. 180 Chapter 12 Solve problems ENWW Control-panel messages Table 12-1 Control-panel messages Control... A toner replenishment malfunction has occurred. If the message persists after loading authorized cartridges, contact HP Support at least 1. Please record the message and contact support. See Use the control panel...
...this print cartridge. 10.91.00 PRINT CARTRIDGE ERROR For help press (Help button) REPLACE COLOR PRINT CARTRIDGES To continue turn off and then turned on again, set the time and ... from a print cartridge. Whenever the product is turned off then on to replace the formatter. 180 Chapter 12 Solve problems ENWW Control-panel messages Table 12-1 Control-panel messages Control... A toner replenishment malfunction has occurred. If the message persists after loading authorized cartridges, contact HP Support at least 1. Please record the message and contact support. See Use the control panel...
HP Color LaserJet CP6015 Series - User Guide
Page 198
...printer error has occurred. DIMM slot 1 faces toward the inside of the formatter board. DIMM slot 2 faces toward the outside of the formatter board closest to the hard disk. If this message persists, contact an HPauthorized service or support provider. (See the HP Support flyer, or go to www.hp... then on . If this message persists, contact an HPauthorized service or support provider. (See the HP Support flyer, or go to www.hp.com/ support/cljcp6015.) 51. ERROR A printer error has occurred. To continue turn off then on A temporary printing error has occurred. If the...
...printer error has occurred. DIMM slot 1 faces toward the inside of the formatter board. DIMM slot 2 faces toward the outside of the formatter board closest to the hard disk. If this message persists, contact an HPauthorized service or support provider. (See the HP Support flyer, or go to www.hp... then on . If this message persists, contact an HPauthorized service or support provider. (See the HP Support flyer, or go to www.hp.com/ support/cljcp6015.) 51. ERROR A printer error has occurred. To continue turn off then on A temporary printing error has occurred. If the...
HP Color LaserJet CP6015 Series - User Guide
Page 213
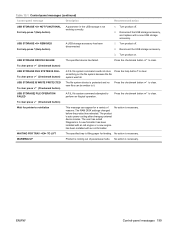
...message Description Recommended action USB STORAGE NOT FUNCTIONAL For help button to clear. Disconnect the USB storage accessory, and replace with an old formatter. Turn product on the file system because the file system was full. something on . Press the checkmark button to perform an ...button to clear. No action is necessary. No action is necessary. Press the checkmark button to clear. The product is lifting paper for printer to reinitialize This message can be written to it. To clear press (Checkmark button) Wait for feeding. Turn product off . 2. ...
...message Description Recommended action USB STORAGE NOT FUNCTIONAL For help button to clear. Disconnect the USB storage accessory, and replace with an old formatter. Turn product on the file system because the file system was full. something on . Press the checkmark button to perform an ...button to clear. No action is necessary. No action is necessary. Press the checkmark button to clear. The product is lifting paper for printer to reinitialize This message can be written to it. To clear press (Checkmark button) Wait for feeding. Turn product off . 2. ...
HP Color LaserJet CP6015 Series - User Guide
Page 250
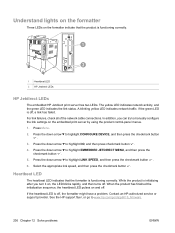
.... Press the down arrow to highlight CONFIGURE DEVICE, and then press the checkmark button . 3. Contact an HP-authorized service or support provider. Understand lights on the formatter Three LEDs on and off. Press Menu. 2. When the product has finished the initialization sequence, the heartbeat... LED pulses on the formatter indicate that the formatter is functioning correctly. Press the down arrow to highlight LINK SPEED, and then press the checkmark button . 6. If the ...
.... Press the down arrow to highlight CONFIGURE DEVICE, and then press the checkmark button . 3. Contact an HP-authorized service or support provider. Understand lights on the formatter Three LEDs on and off. Press Menu. 2. When the product has finished the initialization sequence, the heartbeat... LED pulses on the formatter indicate that the formatter is functioning correctly. Press the down arrow to highlight LINK SPEED, and then press the checkmark button . 6. If the ...

HP Color LaserJet CP6015 Series - User Guide
Page 262
... network printing problems NOTE: HP recommends that you are set up the product on a network. ● Make sure that the network cable is securely seated into the product's RJ45 connector. ● Make sure that the Link LED on the formatter is having problems communicating with... the network might exist. ● Contact your network administrator for your protocol: ◦ Under HP Jetdirect Configuration, the status is "I /O card is correct. ● Try printing ...
... network printing problems NOTE: HP recommends that you are set up the product on a network. ● Make sure that the network cable is securely seated into the product's RJ45 connector. ● Make sure that the Link LED on the formatter is having problems communicating with... the network might exist. ● Contact your network administrator for your protocol: ◦ Under HP Jetdirect Configuration, the status is "I /O card is correct. ● Try printing ...
HP Color LaserJet CP6015 Series - User Guide
Page 291
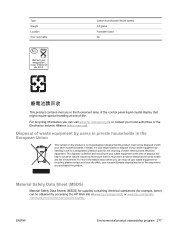
... for the recycling of waste electrical and electronic equipment. ENWW Environmental product stewardship program 277 Disposal of waste equipment by accessing the HP Web site at end-of-life. Instead, it is your responsibility to dispose of your waste equipment by handing it over to...waste. For more information about where you purchased the product. Type Weight Location User removable Carbon monofluoride lithium battery 0.8 grams Formatter board No This product contains mercury in the fluorescent lamp of the control panel liquid crystal display that might require special handling at...
... for the recycling of waste electrical and electronic equipment. ENWW Environmental product stewardship program 277 Disposal of waste equipment by accessing the HP Web site at end-of-life. Instead, it is your responsibility to dispose of your waste equipment by handing it over to...waste. For more information about where you purchased the product. Type Weight Location User removable Carbon monofluoride lithium battery 0.8 grams Formatter board No This product contains mercury in the fluorescent lamp of the control panel liquid crystal display that might require special handling at...
HP Color LaserJet CP6015 Series - User Guide
Page 300
...150 cover pages 65, 125 covers, locating 6 custom-size paper settings Macintosh 65 customer support embedded Web server links 144 HP Printer Utility pages 64 maintenance agreements 265 online 264 D Data light locating 12 date, setting 148 Declaration of Conformity 279 default...formatter lights 236 fraud hotline 150 fuser cleaning 241 error messages 184 G gateway, setting default 79 gateways 79 glossy paper, supported 119 graphical display, control panel 12 grayscale printing 131 H hard disk erasing 146 heartbeat LED 236 held jobs 113 help, Show Me How menu 16 HP Customer Care 264 HP Easy Printer...
...150 cover pages 65, 125 covers, locating 6 custom-size paper settings Macintosh 65 customer support embedded Web server links 144 HP Printer Utility pages 64 maintenance agreements 265 online 264 D Data light locating 12 date, setting 148 Declaration of Conformity 279 default...formatter lights 236 fraud hotline 150 fuser cleaning 241 error messages 184 G gateway, setting default 79 gateways 79 glossy paper, supported 119 graphical display, control panel 12 grayscale printing 131 H hard disk erasing 146 heartbeat LED 236 held jobs 113 help, Show Me How menu 16 HP Customer Care 264 HP Easy Printer...

HP Color LaserJet CP6015 Series - User Guide
Page 301
...firmware updates 173 installing 162 lights 236 models including 2 HP Jetdirect print servers installing 162 HP Printer Utility 63, 64 HP Printer Utility, Macintosh 63 HP tough paper 121 HP Universal Print Driver 52 HP Web Jetadmin firmware updates 172 HP-UX software 59 humidity requirements 271 I I/O (input...locating 12 Korean EMI statement 281 L LAN-connector 4 landscape orientation setting, Windows 126 languages, printer 4 laser safety statements 281 letterhead paper, loading 128 lights control panel 12 formatter 236 link speed 41 Linux software 59 loading Show Me How menu 16 tray 1 92 Trays ...
...firmware updates 173 installing 162 lights 236 models including 2 HP Jetdirect print servers installing 162 HP Printer Utility 63, 64 HP Printer Utility, Macintosh 63 HP tough paper 121 HP Universal Print Driver 52 HP Web Jetadmin firmware updates 172 HP-UX software 59 humidity requirements 271 I I/O (input...locating 12 Korean EMI statement 281 L LAN-connector 4 landscape orientation setting, Windows 126 languages, printer 4 laser safety statements 281 letterhead paper, loading 128 lights control panel 12 formatter 236 link speed 41 Linux software 59 loading Show Me How menu 16 tray 1 92 Trays ...
Service Manual
Page 8
Sequence of operation ...114 Formatter system ...116 Sleep mode ...116 Resolution ...117 Input/output ...117 CPU ...117 Memory ...117 Hard disk ...117 Random-access memory 117 DIMM slot ...118 Firmware ...... detection ...130 Low-voltage power supply 130 Overcurrent/overvoltage protection 131 Safety ...131 Voltage detection 131 Sleep (powersave) mode 131 High-voltage power supply 131 Laser/scanner system ...134 Image-formation system ...136 Image-formation process 137 Step 1: Pre-exposure 138 Step 2: Primary charging 138 Step...
Sequence of operation ...114 Formatter system ...116 Sleep mode ...116 Resolution ...117 Input/output ...117 CPU ...117 Memory ...117 Hard disk ...117 Random-access memory 117 DIMM slot ...118 Firmware ...... detection ...130 Low-voltage power supply 130 Overcurrent/overvoltage protection 131 Safety ...131 Voltage detection 131 Sleep (powersave) mode 131 High-voltage power supply 131 Laser/scanner system ...134 Image-formation system ...136 Image-formation process 137 Step 1: Pre-exposure 138 Step 2: Primary charging 138 Step...
Service Manual
Page 10
...parts ...190 Fuser ...191 Transfer roller ...194 Intermediate-transfer belt (ITB 196 Tray-1 pickup and separation rollers 199 Tray-2, -3, -4, and -5 pickup rollers 201 Formatter ...203 1 x 500-sheet input tray installation 206 3 x 500-sheet input tray installation 207 Tray 2 ...208 Trays 3, 4, and 5 ...208 Removal sequence...sequence 2B ...231 Intermediate-transfer belt (ITB) motor 231 Removal sequence 2C ...232 Face-down output bin 232 Left cover ...233 Laser/scanner-fan duct 234 Removal sequence 2D ...236 Print-cartridge driver PCA 236 Removal sequence 3 ...238 Rear-left cover ...239 ...
...parts ...190 Fuser ...191 Transfer roller ...194 Intermediate-transfer belt (ITB 196 Tray-1 pickup and separation rollers 199 Tray-2, -3, -4, and -5 pickup rollers 201 Formatter ...203 1 x 500-sheet input tray installation 206 3 x 500-sheet input tray installation 207 Tray 2 ...208 Trays 3, 4, and 5 ...208 Removal sequence...sequence 2B ...231 Intermediate-transfer belt (ITB) motor 231 Removal sequence 2C ...232 Face-down output bin 232 Left cover ...233 Laser/scanner-fan duct 234 Removal sequence 2D ...236 Print-cartridge driver PCA 236 Removal sequence 3 ...238 Rear-left cover ...239 ...
Service Manual
Page 15
Understand lights on the formatter 494 HP Jetdirect LEDs 494 Heartbeat LED 495 Engine-test button ...495 Diagnostics menu ...496 Diagnostics mode ...496 Diagnostics that put the engine into the special diagnostics ... test (special-mode test 501 Manual sensor test 2 (special-mode test 502 Component tests ...503 Component test (special-mode test 503 Print/stop test ...507 Color-band test ...507 Service mode functions ...508 Service menu ...508 Product resets ...509 Restore factory-set defaults 509 Hard disk initialization 510 NVRAM initialization 510...
Understand lights on the formatter 494 HP Jetdirect LEDs 494 Heartbeat LED 495 Engine-test button ...495 Diagnostics menu ...496 Diagnostics mode ...496 Diagnostics that put the engine into the special diagnostics ... test (special-mode test 501 Manual sensor test 2 (special-mode test 502 Component tests ...503 Component test (special-mode test 503 Print/stop test ...507 Color-band test ...507 Service mode functions ...508 Service menu ...508 Product resets ...509 Restore factory-set defaults 509 Hard disk initialization 510 NVRAM initialization 510...
Service Manual
Page 29
...output bin ...232 Remove left cover (1 of 2) ...233 Remove left cover (2 of 2) ...233 Remove the laser/scanner-fan duct (1 of 3 234 Remove the laser/scanner-fan duct (2 of 3 234 Remove the laser/scanner-fan duct (3 of 3 235 Remove the print-cartridge driver PCA (1 of 3 236 Remove the print...high-voltage power supply PCA (B) (2 of 3 242 Remove the high-voltage power supply PCA (B) (3 of 3 243 Remove the formatter case (1 of 3 244 Remove the formatter case (2 of 3 244 Remove the formatter case (3 of 3 245 Remove the DC controller PCA (1 of 2 246 Remove the DC controller PCA (2 of 2 247 ...
...output bin ...232 Remove left cover (1 of 2) ...233 Remove left cover (2 of 2) ...233 Remove the laser/scanner-fan duct (1 of 3 234 Remove the laser/scanner-fan duct (2 of 3 234 Remove the laser/scanner-fan duct (3 of 3 235 Remove the print-cartridge driver PCA (1 of 3 236 Remove the print...high-voltage power supply PCA (B) (2 of 3 242 Remove the high-voltage power supply PCA (B) (3 of 3 243 Remove the formatter case (1 of 3 244 Remove the formatter case (2 of 3 244 Remove the formatter case (3 of 3 245 Remove the DC controller PCA (1 of 2 246 Remove the DC controller PCA (2 of 2 247 ...
Service Manual
Page 86
... factory defaults. Resets calibration values on your country/region. 44 Chapter 2 Control panel ENWW If SLEEP MODE is either LOW or HIGH, depending on the formatter. The LOW setting has a shorter wake-up time than the HIGH setting. Item RESTORE FACTORY SETTINGS Values RESET CALIBRATION SLEEP MODE OFF LOW HIGH Description...
... factory defaults. Resets calibration values on your country/region. 44 Chapter 2 Control panel ENWW If SLEEP MODE is either LOW or HIGH, depending on the formatter. The LOW setting has a shorter wake-up time than the HIGH setting. Item RESTORE FACTORY SETTINGS Values RESET CALIBRATION SLEEP MODE OFF LOW HIGH Description...
Service Manual
Page 134
3. Place the formatter board on the black tabs to pull the formatter board from the product. Gently press the black tabs toward each other. 5. Gently pull on a clean, flat, grounded surface. 92 Chapter 4 Manage and maintain the product ENWW Locate the black formatter pressure release tabs on the formatter board in the rear of the product. 4.
3. Place the formatter board on the black tabs to pull the formatter board from the product. Gently press the black tabs toward each other. 5. Gently pull on a clean, flat, grounded surface. 92 Chapter 4 Manage and maintain the product ENWW Locate the black formatter pressure release tabs on the formatter board in the rear of the product. 4.


