User Manual
Page 8
...Embedded Web server ...77 Open the embedded Web server 77 Status tab ...77 Settings tab ...78 Networking tab 78 Links ...78 Use HP Web Jetadmin software 78 Use security features ...78 Secure the embedded Web server 78 Lock the product ...79 Manage supplies ...80 Supplies life...the print cartridge 80 Print-cartridge storage 80 Use genuine HP print cartridges 80 HP policy on non-HP print cartridges 80 Print-cartridge authentication 80 HP fraud hotline and Web site 80 Replace supplies and parts ...82 Supply replacement guidelines 82 Redistribute toner ...82 Change the print cartridge 83...
...Embedded Web server ...77 Open the embedded Web server 77 Status tab ...77 Settings tab ...78 Networking tab 78 Links ...78 Use HP Web Jetadmin software 78 Use security features ...78 Secure the embedded Web server 78 Lock the product ...79 Manage supplies ...80 Supplies life...the print cartridge 80 Print-cartridge storage 80 Use genuine HP print cartridges 80 HP policy on non-HP print cartridges 80 Print-cartridge authentication 80 HP fraud hotline and Web site 80 Replace supplies and parts ...82 Supply replacement guidelines 82 Redistribute toner ...82 Change the print cartridge 83...

User Manual
Page 15
...drivers Resolution Fonts Accessories Connectivity Supplies Supported operating systems Accessibility Description ● 600 MHz processor ● 2-line display ● HP ToolboxFX software (a Web-based status and problem-solving tool) ● Windows® and Macintosh printer drivers ● Embedded ..., page count, and approximate pages remaining. ● The product checks for an authentic HP print cartridge at installation. ● Integration with HP Sure Supply Web site for easy replacement-cartridge reordering ● Microsoft® Windows® 2000, Windows® Server 2003,...
...drivers Resolution Fonts Accessories Connectivity Supplies Supported operating systems Accessibility Description ● 600 MHz processor ● 2-line display ● HP ToolboxFX software (a Web-based status and problem-solving tool) ● Windows® and Macintosh printer drivers ● Embedded ..., page count, and approximate pages remaining. ● The product checks for an authentic HP print cartridge at installation. ● Integration with HP Sure Supply Web site for easy replacement-cartridge reordering ● Microsoft® Windows® 2000, Windows® Server 2003,...

User Manual
Page 81
9 Manage and maintain the product ● Print the information pages ● Use the HP ToolboxFX software ● Manage a network product ● Lock the product ● Manage supplies ● Replace supplies and parts ● Install memory ● Clean the product ENWW 69
9 Manage and maintain the product ● Print the information pages ● Use the HP ToolboxFX software ● Manage a network product ● Lock the product ● Manage supplies ● Replace supplies and parts ● Install memory ● Clean the product ENWW 69
User Manual
Page 88
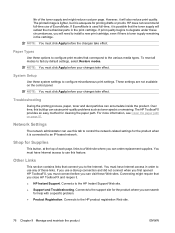
... During the printing process, paper, toner and dust particles can cause print-quality problems such as toner specks or smearing. The HP ToolboxFX provides an easy method for printing drafts or proofs. Network Settings The network administrator can search for help with a specific ...access to use of the toner supply and might require that connect you close HP ToolboxFX and reopen it is connected to degrade under these circumstances, you can order replacement supplies. HP does not recommend full-time use this buildup can accumulate inside the product. Connects...
... During the printing process, paper, toner and dust particles can cause print-quality problems such as toner specks or smearing. The HP ToolboxFX provides an easy method for printing drafts or proofs. Network Settings The network administrator can search for help with a specific ...access to use of the toner supply and might require that connect you close HP ToolboxFX and reopen it is connected to degrade under these circumstances, you can order replacement supplies. HP does not recommend full-time use this buildup can accumulate inside the product. Connects...
User Manual
Page 94
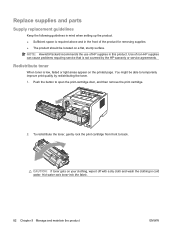
...toner into the fabric. 82 Chapter 9 Manage and maintain the product ENWW You might be located on a flat, sturdy surface. Replace supplies and parts Supply replacement guidelines Keep the following guidelines in mind when setting up the product. ● Sufficient space is required above and in the ...gently rock the print cartridge from front to temporarily improve print quality by the HP warranty or service agreements. Use of HP supplies in cold water. NOTE: Hewlett-Packard recommends the use of non-HP supplies can cause problems requiring service that is low, faded or light areas...
...toner into the fabric. 82 Chapter 9 Manage and maintain the product ENWW You might be located on a flat, sturdy surface. Replace supplies and parts Supply replacement guidelines Keep the following guidelines in mind when setting up the product. ● Sufficient space is required above and in the ...gently rock the print cartridge from front to temporarily improve print quality by the HP warranty or service agreements. Use of HP supplies in cold water. NOTE: Hewlett-Packard recommends the use of non-HP supplies can cause problems requiring service that is low, faded or light areas...

User Manual
Page 95
...life, you are prompted to open the print-cartridge door, and then remove the print cartridge. 2. Push the button to order a replacement. Place the used print cartridge in the bag for recycling. You can continue printing with the current cartridge until redistributing the toner no ...longer yields acceptable print quality. 1. ENWW Replace supplies and parts 83 If the print is still light, install a new print cartridge. Remove the new print cartridge from the bag....
...life, you are prompted to open the print-cartridge door, and then remove the print cartridge. 2. Push the button to order a replacement. Place the used print cartridge in the bag for recycling. You can continue printing with the current cartridge until redistributing the toner no ...longer yields acceptable print quality. 1. ENWW Replace supplies and parts 83 If the print is still light, install a new print cartridge. Remove the new print cartridge from the bag....
User Manual
Page 103
...is complete. This product has a cleaning mode that can accumulate inside the product. ENWW Clean the product 91 Replace the print cartridge, and close the print-cartridge door. 4. Open HP ToolboxFX. 3. Clean the paper path During the printing process, paper, toner, and dust particles can correct ...and prevent these problems. 1. See View HP ToolboxFX on . Click the Device Settings folder, and then click the Troubleshooting page. 3. The product processes a single page, and then ...
...is complete. This product has a cleaning mode that can accumulate inside the product. ENWW Clean the product 91 Replace the print cartridge, and close the print-cartridge door. 4. Open HP ToolboxFX. 3. Clean the paper path During the printing process, paper, toner, and dust particles can correct ...and prevent these problems. 1. See View HP ToolboxFX on . Click the Device Settings folder, and then click the Troubleshooting page. 3. The product processes a single page, and then ...
User Manual
Page 108
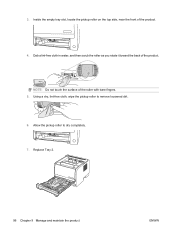
Replace Tray 2. 96 Chapter 9 Manage and maintain the product ENWW NOTE: Do not touch the surface of the product. 4. Allow the pickup roller to remove loosened dirt. 6. Inside the empty tray slot, locate the pickup roller on the top side, near the front of the roller with bare fingers. 5. Dab a lint-free cloth in water, and then scrub the roller as you rotate it toward the back of the product. Using a dry, lint-free cloth, wipe the pickup roller to dry completely. 7. 3.
Replace Tray 2. 96 Chapter 9 Manage and maintain the product ENWW NOTE: Do not touch the surface of the product. 4. Allow the pickup roller to remove loosened dirt. 6. Inside the empty tray slot, locate the pickup roller on the top side, near the front of the roller with bare fingers. 5. Dab a lint-free cloth in water, and then scrub the roller as you rotate it toward the back of the product. Using a dry, lint-free cloth, wipe the pickup roller to dry completely. 7. 3.
User Manual
Page 114
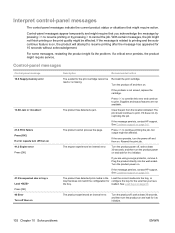
... turn the power off and then on Description Recommended action The e-label for the print cartridge cannot be read or is not solved, replace the cartridge. Clear the jam from the location indicated. loaded. The product experienced an internal error. The product has detected a jam.... 10 Solve problems ENWW If the message is related to printing and the autocontinue feature is on . If the message persists, contact HP support. If you acknowledge the message by pressing OK to resume printing or by pressing X to initialize. See Customer support on page...
... turn the power off and then on Description Recommended action The e-label for the print cartridge cannot be read or is not solved, replace the cartridge. Clear the jam from the location indicated. loaded. The product experienced an internal error. The product has detected a jam.... 10 Solve problems ENWW If the message is related to printing and the autocontinue feature is on . If the message persists, contact HP support. If you acknowledge the message by pressing OK to resume printing or by pressing X to initialize. See Customer support on page...

User Manual
Page 116
... different tray. Close the door. No action necessary. Load paper into the tray, or press OK to be replaced by the message Ready. Load the correct media into a tray. A non-HP supply is requesting. An internal error occurred. Install a DIMM that tray is empty. See Supplies and accessories on... job is installed. Press OK to cancel the job. Turn the product power off then on page 83. The product door is open Genuine HP supply installed Install black cartridge Load paper Load tray # Press [OK] for available media Load tray 1 plain Cleaning mode [OK] to resume...
... different tray. Close the door. No action necessary. Load paper into the tray, or press OK to be replaced by the message Ready. Load the correct media into a tray. A non-HP supply is requesting. An internal error occurred. Install a DIMM that tray is empty. See Supplies and accessories on... job is installed. Press OK to cancel the job. Turn the product power off then on page 83. The product door is open Genuine HP supply installed Install black cartridge Load paper Load tray # Press [OK] for available media Load tray 1 plain Cleaning mode [OK] to resume...
User Manual
Page 118
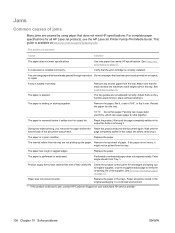
...tray. Reload the paper into the output bin. Replace the paper. If the paper is jammed.1 Cause Solution The paper does not meet HP specifications. Check the product control panel for all HP LaserJet products, see the HP LaserJet Printer Family Print Media Guide. Paper was printed...tray guides are caused by using paper that has already passed through a product Do not use paper that meets HP specifications. The paper is correctly installed. Replace the paper. Paper should be picked from Tray 1. You are not picking up the paper. Wait until the...
...tray. Reload the paper into the output bin. Replace the paper. If the paper is jammed.1 Cause Solution The paper does not meet HP specifications. Check the product control panel for all HP LaserJet products, see the HP LaserJet Printer Family Print Media Guide. Paper was printed...tray guides are caused by using paper that has already passed through a product Do not use paper that meets HP specifications. The paper is correctly installed. Replace the paper. Paper should be picked from Tray 1. You are not picking up the paper. Wait until the...
User Manual
Page 120
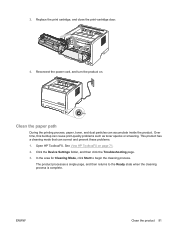
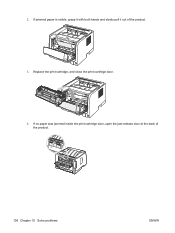
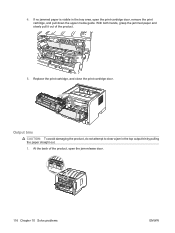
If no paper was jammed inside the print-cartridge door, open the jam-release door at the back of the product. 3. If jammed paper is visible, grasp it with both hands and slowly pull it out of the product. 108 Chapter 10 Solve problems ENWW Replace the print-cartridge, and close the print-cartridge door. 4. 2.
If no paper was jammed inside the print-cartridge door, open the jam-release door at the back of the product. 3. If jammed paper is visible, grasp it with both hands and slowly pull it out of the product. 108 Chapter 10 Solve problems ENWW Replace the print-cartridge, and close the print-cartridge door. 4. 2.
User Manual
Page 123
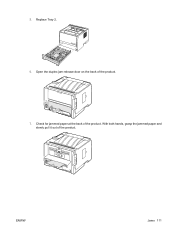
Open the duplex jam-release door on the back of the product. Check for jammed paper at the back of the product. 7. Replace Tray 2. 6. ENWW Jams 111 With both hands, grasp the jammed paper and slowly pull it out of the product. 5.
Open the duplex jam-release door on the back of the product. Check for jammed paper at the back of the product. 7. Replace Tray 2. 6. ENWW Jams 111 With both hands, grasp the jammed paper and slowly pull it out of the product. 5.
User Manual
Page 125
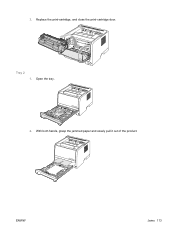
3. Open the tray. 2. With both hands, grasp the jammed paper and slowly pull it out of the product. Replace the print-cartridge, and close the print-cartridge door. Tray 2 1. ENWW Jams 113
3. Open the tray. 2. With both hands, grasp the jammed paper and slowly pull it out of the product. Replace the print-cartridge, and close the print-cartridge door. Tray 2 1. ENWW Jams 113
User Manual
Page 126
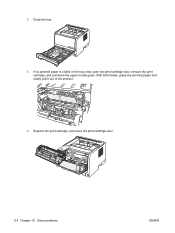
If no jammed paper is visible in the tray area, open the print-cartridge door, remove the print cartridge, and pull down the upper media guide. Replace the print-cartridge, and close the print-cartridge door. 114 Chapter 10 Solve problems ENWW With both hands, grasp the jammed paper and slowly pull it out of the product. 5. 3. Close the tray. 4.
If no jammed paper is visible in the tray area, open the print-cartridge door, remove the print cartridge, and pull down the upper media guide. Replace the print-cartridge, and close the print-cartridge door. 114 Chapter 10 Solve problems ENWW With both hands, grasp the jammed paper and slowly pull it out of the product. 5. 3. Close the tray. 4.
User Manual
Page 127
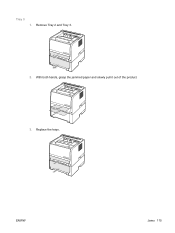
ENWW Jams 115 Remove Tray 2 and Tray 3. 2. With both hands, grasp the jammed paper and slowly pull it out of the product. 3. Replace the trays. Tray 3 1.
ENWW Jams 115 Remove Tray 2 and Tray 3. 2. With both hands, grasp the jammed paper and slowly pull it out of the product. 3. Replace the trays. Tray 3 1.
User Manual
Page 128
With both hands, grasp the jammed paper and slowly pull it out of the product, open the print-cartridge door, remove the print cartridge, and pull down the upper media guide. Output bins CAUTION: To avoid damaging the product, do not attempt to clear a jam in the tray area, open the jam-release door. 116 Chapter 10 Solve problems ENWW 4. At the back of the product. 5. If no jammed paper is visible in the top output bin by pulling the paper straight out. 1. Replace the print-cartridge, and close the print-cartridge door.
With both hands, grasp the jammed paper and slowly pull it out of the product, open the print-cartridge door, remove the print cartridge, and pull down the upper media guide. Output bins CAUTION: To avoid damaging the product, do not attempt to clear a jam in the tray area, open the jam-release door. 116 Chapter 10 Solve problems ENWW 4. At the back of the product. 5. If no jammed paper is visible in the top output bin by pulling the paper straight out. 1. Replace the print-cartridge, and close the print-cartridge door.
User Manual
Page 136
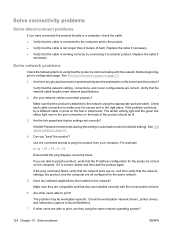
.... ● Verify that the cable is connected to the computer and to the product. ● Verify that the IP address configuration for the same network. 5. Replace the cable if necessary. ● Verify that the product is attached to another product. If the problem continues, try a different cable or ports on page... should be workstation-specific. For example: ping 192.168.45.39 Ensure that the network settings, the product, and the computer are on page 41. 4. Replace the cable if necessary.
.... ● Verify that the cable is connected to the computer and to the product. ● Verify that the IP address configuration for the same network. 5. Replace the cable if necessary. ● Verify that the product is attached to another product. If the problem continues, try a different cable or ports on page... should be workstation-specific. For example: ping 192.168.45.39 Ensure that the network settings, the product, and the computer are on page 41. 4. Replace the cable if necessary.

User Manual
Page 139
... Ethernet hub, try connecting directly to the computer or use a different port. Cause The product software might not have been installed or was installed incorrectly. Replace the interface cable. The Postscript Printer Description (PPD) file is being used. Reinstall the software. Make sure to use a high-quality cable. See Print the...
... Ethernet hub, try connecting directly to the computer or use a different port. Cause The product software might not have been installed or was installed incorrectly. Replace the interface cable. The Postscript Printer Description (PPD) file is being used. Reinstall the software. Make sure to use a high-quality cable. See Print the...

User Manual
Page 140
.../PPDs/Contents/Resources/ .lproj The product might be defective or of binary encoding. Verify that you might need the Apple USB Adapter Card Support software. Replace the interface cable. Cause This error occurs when the software for the language that the name, IP address, or Rendezvous host name on the configuration...
.../PPDs/Contents/Resources/ .lproj The product might be defective or of binary encoding. Verify that you might need the Apple USB Adapter Card Support software. Replace the interface cable. Cause This error occurs when the software for the language that the name, IP address, or Rendezvous host name on the configuration...


