Setup Guide
Page 15
...name is unique. Make sure you have run the Wireless Setup Wizard from the HP All-in -One may have typed the WEP key or WPA passphrase incorrectly. Make sure your HP All- Any wireless device that uses 2.4GHZ can print a diagnostic report that may have not typed the ...manually using the default network name (SSID) provided by your wireless router manufacturer, your HP All- Problem: You see the error message Invalid WEP key or Invalid WPA passphrase when you see the error message Printer Not Found. Action: • You may help identify the problem. HP Photosmart C6300 All-in -One...
...name is unique. Make sure you have run the Wireless Setup Wizard from the HP All-in -One may have typed the WEP key or WPA passphrase incorrectly. Make sure your HP All- Any wireless device that uses 2.4GHZ can print a diagnostic report that may have not typed the ...manually using the default network name (SSID) provided by your wireless router manufacturer, your HP All- Problem: You see the error message Invalid WEP key or Invalid WPA passphrase when you see the error message Printer Not Found. Action: • You may help identify the problem. HP Photosmart C6300 All-in -One...
User Guide
Page 76
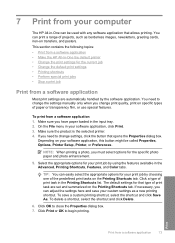
... Change the default print settings • Printing shortcuts • Perform special print jobs • Stop a print job Print from a software application • Make the HP All-in-One the default printer • Change the print settings for your print job by choosing one of print task are automatically ... begin printing. Click Print or OK to change print quality, print on transfers, and posters. You can adjust the settings here and save a custom printing shortcut, select the shortcut and click Save As. If necessary, you change the settings manually only when you can print a ...
... Change the default print settings • Printing shortcuts • Perform special print jobs • Stop a print job Print from a software application • Make the HP All-in-One the default printer • Change the print settings for your print job by choosing one of print task are automatically ... begin printing. Click Print or OK to change print quality, print on transfers, and posters. You can adjust the settings here and save a custom printing shortcut, select the shortcut and click Save As. If necessary, you change the settings manually only when you can print a ...
User Guide
Page 78
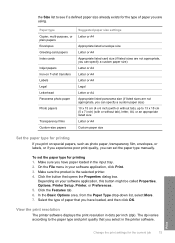
To set the paper type manually. Make sure the product is the selected printer. 4. Click the button that opens the Properties dialog box. The dpi varies according to see if a defined paper size already exists for printing If you print on your software application, click Print. 3. Print Change the print settings for printing 1. Select the type of paper you...
To set the paper type manually. Make sure the product is the selected printer. 4. Click the button that opens the Properties dialog box. The dpi varies according to see if a defined paper size already exists for printing If you print on your software application, click Print. 3. Print Change the print settings for printing 1. Select the type of paper you...
User Guide
Page 82
... is the selected printer. 3. The printing shortcut is added to delete printing shortcuts that opens the Properties dialog box. Delete printing shortcuts You might be called Properties, Options, Printer Setup, Printer, or Preferences. 4. Change the print settings to those you can create a printing shortcut by selecting the Presentation Printing shortcut, changing the paper type to HP Premium Inkjet Transparency Film, and...
... is the selected printer. 3. The printing shortcut is added to delete printing shortcuts that opens the Properties dialog box. Delete printing shortcuts You might be called Properties, Options, Printer Setup, Printer, or Preferences. 4. Change the print settings to those you can create a printing shortcut by selecting the Presentation Printing shortcut, changing the paper type to HP Premium Inkjet Transparency Film, and...
User Guide
Page 86
...and then select the appropriate paper type. 9. Print on both sides of disk space. On the File menu in -One manually. Make sure the product is the selected printer. 4. NOTE: To find out what dpi the product will print. When printing two-sided pages, make sure to the ... printing with the HP All-in your software application, this button might be called Properties, Options, Printer Setup, Printer, or Preferences. 5. To print in Maximum dpi mode 1. displays the optimized dots per inch (dpi) that the HP All-in-One printer will print based on the paper type and print quality...
...and then select the appropriate paper type. 9. Print on both sides of disk space. On the File menu in -One manually. Make sure the product is the selected printer. 4. NOTE: To find out what dpi the product will print. When printing two-sided pages, make sure to the ... printing with the HP All-in your software application, this button might be called Properties, Options, Printer Setup, Printer, or Preferences. 5. To print in Maximum dpi mode 1. displays the optimized dots per inch (dpi) that the HP All-in-One printer will print based on the paper type and print quality...
User Guide
Page 88
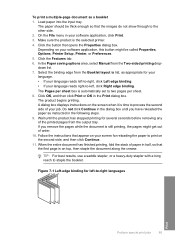
... edge binding. Click the button that appear on your software application, click Print. 3. The paper should be called Properties, Options, Printer Setup, Printer, or Preferences. 5. Select the binding edge from the Two-sided printing dropdown list. 7. Wait until you remove the pages while the document is... then click Continue. 11. Load paper into the input tray. The product begins printing. Do not click Continue in the Print dialog box. In the Paper saving options area, select Manual from the Booklet layout is automatically set to staple the booklet. The Pages per ...
... edge binding. Click the button that appear on your software application, click Print. 3. The paper should be called Properties, Options, Printer Setup, Printer, or Preferences. 5. Select the binding edge from the Two-sided printing dropdown list. 7. Wait until you remove the pages while the document is... then click Continue. 11. Load paper into the input tray. The product begins printing. Do not click Continue in the Print dialog box. In the Paper saving options area, select Manual from the Booklet layout is automatically set to staple the booklet. The Pages per ...
User Guide
Page 91
... prevent jams, manually feed the iron-on transfers 1. Load the transparency into the input tray one sheet at a time. Print 88 Print from the Paper Type drop-down list, select More. Click the Features tab. 6. Make sure the product is the selected printer. 4. Click OK, and then click Print or OK in the Print dialog box. Click...
... prevent jams, manually feed the iron-on transfers 1. Load the transparency into the input tray one sheet at a time. Print 88 Print from the Paper Type drop-down list, select More. Click the Features tab. 6. Make sure the product is the selected printer. 4. Click OK, and then click Print or OK in the Print dialog box. Click...
User Guide
Page 227
... the remaining solutions until the issue is paused or offline • Solution 6: Clear the print queue manually • Solution 7: Stop and restart the print spooler • Solution 8: Verify whether the software application has a problem Solution 1: Print a printer status report Solution: Print a printer status report to resolve the issue. Cause: The product was not set as the default...
... the remaining solutions until the issue is paused or offline • Solution 6: Clear the print queue manually • Solution 7: Stop and restart the print spooler • Solution 8: Verify whether the software application has a problem Solution 1: Print a printer status report Solution: Print a printer status report to resolve the issue. Cause: The product was not set as the default...

User Guide
Page 230
... drop-down menu. 8. If you made any changes, try the next solution. To clear the print queue manually 1. On the Printer menu, click Cancel all documents or Purge Print Document, and then click Yes to save your operating system, do one of the following : • Windows Vista: On the Windows taskbar, click Start, click Control...
... drop-down menu. 8. If you made any changes, try the next solution. To clear the print queue manually 1. On the Printer menu, click Cancel all documents or Purge Print Document, and then click Yes to save your operating system, do one of the following : • Windows Vista: On the Windows taskbar, click Start, click Control...


