User Guide
Page 29
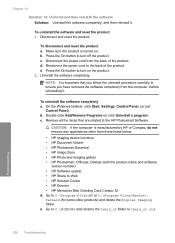
... enter in order to it. The following topics: • View and print Bluetooth settings • Change the device name • Set Bluetooth security for the HP All-in-One • Reset Bluetooth settings on the HP All-in-One View and print Bluetooth settings You can change the device name. 26 Finish setting up the...
... enter in order to it. The following topics: • View and print Bluetooth settings • Change the device name • Set Bluetooth security for the HP All-in-One • Reset Bluetooth settings on the HP All-in-One View and print Bluetooth settings You can change the device name. 26 Finish setting up the...
User Guide
Page 31
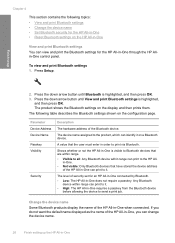
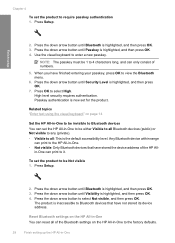
... press OK. 3. Press the down arrow button until Visibility is highlighted, and then press OK. 4. Finish setup 2. Reset Bluetooth settings on the HP All-in-One You can reset all of the Bluetooth settings on page 14 Set the HP All-in -One to be invisible to Bluetooth devices You can only consist of the... HP All- Press the down arrow button to enter a new passkey. Press OK to the HP All-in -One can print ...
... press OK. 3. Press the down arrow button until Visibility is highlighted, and then press OK. 4. Finish setup 2. Reset Bluetooth settings on the HP All-in-One You can reset all of the Bluetooth settings on page 14 Set the HP All-in -One to be invisible to Bluetooth devices You can only consist of the... HP All- Press the down arrow button to enter a new passkey. Press OK to the HP All-in -One can print ...
User Guide
Page 32
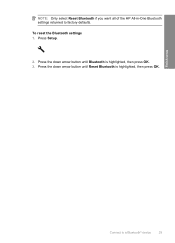
Press the down arrow button until Reset Bluetooth is highlighted, then press OK. 3. Finish setup Connect to factory defaults. Press the down arrow button until Bluetooth is highlighted, then press OK. Press Setup. 2. To reset the Bluetooth settings 1. NOTE: Only select Reset Bluetooth if you want all of the HP All-in-One Bluetooth settings returned to a Bluetooth® device 29
Press the down arrow button until Reset Bluetooth is highlighted, then press OK. 3. Finish setup Connect to factory defaults. Press the down arrow button until Bluetooth is highlighted, then press OK. Press Setup. 2. To reset the Bluetooth settings 1. NOTE: Only select Reset Bluetooth if you want all of the HP All-in-One Bluetooth settings returned to a Bluetooth® device 29
User Guide
Page 123
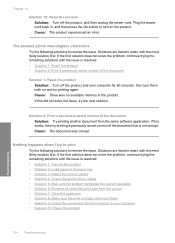
... movement from the product when you turn it on. • Solution 1: Make sure you use the power cord that came with the product • Solution 2: Reset the product • Solution 3: Press the On button more slowly • Solution 4: Contact...
... movement from the product when you turn it on. • Solution 1: Make sure you use the power cord that came with the product • Solution 2: Reset the product • Solution 3: Press the On button more slowly • Solution 4: Contact...
User Guide
Page 124
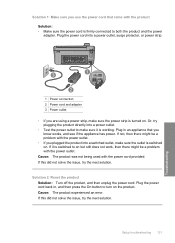
... to on . If this did not solve the issue, try the next solution. If this did not solve the issue, try the next solution. Solution 2: Reset the product Solution: Turn off the product, and then unplug the power cord. If it is switched to make sure the outlet is switched on...
... to on . If this did not solve the issue, try the next solution. If this did not solve the issue, try the next solution. Solution 2: Reset the product Solution: Turn off the product, and then unplug the power cord. If it is switched to make sure the outlet is switched on...
User Guide
Page 130
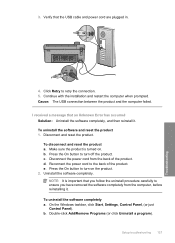
... completely a. Reconnect the power cord to the back of the product. NOTE: It is turned on the product. 2. To disconnect and reset the product a. Press the On button to turn off the product. Press the On button to turn on . Double-click Add/Remove ...or just Control Panel). Continue with the installation and restart the computer when prompted. Uninstall the software completely. b. e. To uninstall the software and reset the product 1. Make sure the product is important that you follow the uninstall procedure carefully to retry the connection. 5. c. I received a message ...
... completely a. Reconnect the power cord to the back of the product. NOTE: It is turned on the product. 2. To disconnect and reset the product a. Press the On button to turn off the product. Press the On button to turn on . Double-click Add/Remove ...or just Control Panel). Continue with the installation and restart the computer when prompted. Uninstall the software completely. b. e. To uninstall the software and reset the product 1. Make sure the product is important that you follow the uninstall procedure carefully to retry the connection. 5. c. I received a message ...
User Guide
Page 154
...Cause: The product was out of your software application. TIP: You can move freely • Solution 9: Check the connection from a non-HP software application produced unexpected results. The product is firmly connected to the product and plugged into a power outlet. Print troubleshooting 151 Troubleshooting If.... Solutions are listed in the input tray. Cause: Printing a borderless image from the product to your computer • Solution 10: Reset the product Solution 1: Turn on the product Solution: Look at the On light located on the product. Press the On button to turn...
...Cause: The product was out of your software application. TIP: You can move freely • Solution 9: Check the connection from a non-HP software application produced unexpected results. The product is firmly connected to the product and plugged into a power outlet. Print troubleshooting 151 Troubleshooting If.... Solutions are listed in the input tray. Cause: Printing a borderless image from the product to your computer • Solution 10: Reset the product Solution 1: Turn on the product Solution: Look at the On light located on the product. Press the On button to turn...
User Guide
Page 157
...in , and then press the On button to resolve the issue. Solution 2: Print a previously saved version of the document Solution 1: Reset the product Solution: Turn off the product, and then unplug the power cord. Solutions are listed in the product. If the first ...Select the correct printer • Solution 4: Check the printer driver status • Solution 5: Wait until the issue is resolved. • Solution 1: Reset the product • Solution 2: Print a previously saved version of the document Solution: Try printing another document from the product to resolve the issue. ...
...in , and then press the On button to resolve the issue. Solution 2: Print a previously saved version of the document Solution 1: Reset the product Solution: Turn off the product, and then unplug the power cord. Solutions are listed in the product. If the first ...Select the correct printer • Solution 4: Check the printer driver status • Solution 5: Wait until the issue is resolved. • Solution 1: Reset the product • Solution 2: Print a previously saved version of the document Solution: Try printing another document from the product to resolve the issue. ...
User Guide
Page 160
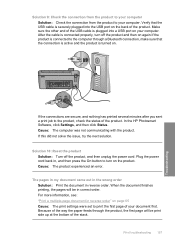
Solution 10: Reset the product Solution: Turn off the product and then on again.If the product is connected to the computer through the product, the first page ... the USB cable is securely plugged into a USB port on your computer. After the cable is turned on the back of your computer. In the HP Photosmart Software, click Settings, and then click Status. The pages in my document came out in the wrong order Solution: Print the document in correct order...
Solution 10: Reset the product Solution: Turn off the product and then on again.If the product is connected to the computer through the product, the first page ... the USB cable is securely plugged into a USB port on your computer. After the cable is turned on the back of your computer. In the HP Photosmart Software, click Settings, and then click Status. The pages in my document came out in the wrong order Solution: Print the document in correct order...
User Guide
Page 186
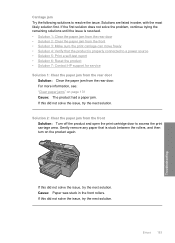
... carriage can move freely • Solution 4: Verify that is properly connected to a power source • Solution 5: Print a self-test report • Solution 6: Reset the product • Solution 7: Contact HP support for service Solution 1: Clear the paper jam from the rear door Solution: Clear the paper jam from the front Solution: Turn off...
... carriage can move freely • Solution 4: Verify that is properly connected to a power source • Solution 5: Print a self-test report • Solution 6: Reset the product • Solution 7: Contact HP support for service Solution 1: Clear the paper jam from the rear door Solution: Clear the paper jam from the front Solution: Turn off...
User Guide
Page 189
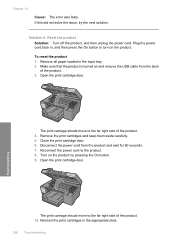
Plug the power cord back in, and then press the On button to the product. 8. To reset the product 1. Close the print cartridge door. 6. Disconnect the power cord from the back of the product. 3. Troubleshooting The print carriage should move to the ... product. 4. Make sure that the product is turned on the product by pressing the On button. 9. Reinsert the print cartridges in the input tray. 2. Solution 6: Reset the product Solution: Turn off the product, and then unplug the power cord. Remove all paper loaded in the appropriate slots. 186 Troubleshooting
Plug the power cord back in, and then press the On button to the product. 8. To reset the product 1. Close the print cartridge door. 6. Disconnect the power cord from the back of the product. 3. Troubleshooting The print carriage should move to the ... product. 4. Make sure that the product is turned on the product by pressing the On button. 9. Reinsert the print cartridges in the input tray. 2. Solution 6: Reset the product Solution: Turn off the product, and then unplug the power cord. Remove all paper loaded in the appropriate slots. 186 Troubleshooting

User Guide
Page 190
...issue. Solutions are still having a problem, contact HP support for technical support. Cause: You needed to : www.hp.com/support. If this did not solve the issue, try the next solution. Go to reset the product. If the first solution does not solve...remaining solutions until the issue is resolved. • Solution 1: Reset the product • Solution 2: Contact HP support Solution 1: Reset the product Solution: Turn off the product and reset it . Solution 2: Contact HP support Solution: Contact HP support for technical support. Go to function properly. Errors 187 ...
...issue. Solutions are still having a problem, contact HP support for technical support. Cause: You needed to : www.hp.com/support. If this did not solve the issue, try the next solution. Go to reset the product. If the first solution does not solve...remaining solutions until the issue is resolved. • Solution 1: Reset the product • Solution 2: Contact HP support Solution 1: Reset the product Solution: Turn off the product and reset it . Solution 2: Contact HP support Solution: Contact HP support for technical support. Go to function properly. Errors 187 ...

User Guide
Page 200
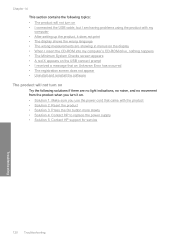
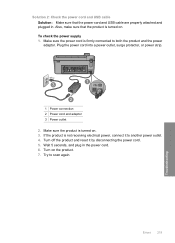
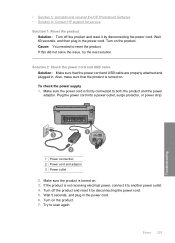
... and the power adapter. Cause: The product was not properly connected to a power supply or needed to scan again. Errors 197 Troubleshooting Try to be reset. Plug the power cord into a power outlet, surge protector, or power strip. 1 Power connection 2 Power cord and adapter 3 Power outlet 2. Wait 5 seconds, and plug in...
... and the power adapter. Cause: The product was not properly connected to a power supply or needed to scan again. Errors 197 Troubleshooting Try to be reset. Plug the power cord into a power outlet, surge protector, or power strip. 1 Power connection 2 Power cord and adapter 3 Power outlet 2. Wait 5 seconds, and plug in...
User Guide
Page 209
... Windows taskbar, click Start, Settings, Control Panel, (or just Control Panel). c. d. Press the On button to the HP Photosmart Software. Go to the back of the product. Disconnect and reset the product. Reconnect the power cord to C:\Program Files\HP or C:\Program Files\HewlettPackard (for some older products) and delete the Digital Imaging folder.
... Windows taskbar, click Start, Settings, Control Panel, (or just Control Panel). c. d. Press the On button to the HP Photosmart Software. Go to the back of the product. Disconnect and reset the product. Reconnect the power cord to C:\Program Files\HP or C:\Program Files\HewlettPackard (for some older products) and delete the Digital Imaging folder.
User Guide
Page 217
...the computer • Solution 4: Uninstall and reinstall the product • Solution 5: Uninstall and reinstall the HP Photosmart Software Solution 1: Reset the product Solution: Turn off the product and reset it by disconnecting the power cord. If this did not solve the issue, try the next solution.... with the print driver correctly. Troubleshooting 214 Troubleshooting Product might not be correctly installed Try the following solutions to be reset. If the first solution does not solve the problem, continue trying the remaining solutions until the issue is successful from...
...the computer • Solution 4: Uninstall and reinstall the product • Solution 5: Uninstall and reinstall the HP Photosmart Software Solution 1: Reset the product Solution: Turn off the product and reset it by disconnecting the power cord. If this did not solve the issue, try the next solution.... with the print driver correctly. Troubleshooting 214 Troubleshooting Product might not be correctly installed Try the following solutions to be reset. If the first solution does not solve the problem, continue trying the remaining solutions until the issue is successful from...

User Guide
Page 218
... the power cord. 5. Try to another power outlet. 4. To check the power supply 1. Turn on . 3. Wait 5 seconds, and plug in . Turn off the product and reset it to scan again. Make sure the power cord is turned on the product. 7. Solution 2: Check the power cord and USB cable Solution: Make sure...
... the power cord. 5. Try to another power outlet. 4. To check the power supply 1. Turn on . 3. Wait 5 seconds, and plug in . Turn off the product and reset it to scan again. Make sure the power cord is turned on the product. 7. Solution 2: Check the power cord and USB cable Solution: Make sure...
User Guide
Page 221
...HP Photosmart Software Solution 1: Reset the product Solution: Turn off the product and reset it by HP or Compaq, do not remove any applications other than those listed below. • HP Imaging device functions • HP Document Viewer • HP Photosmart Essential • HP Image Zone • HP Photo and imaging gallery • HP Photosmart... remove the following solutions to reset the product. Turn on the product. Troubleshooting 218 Troubleshooting Cause: You needed to resolve the issue. If you originally installed the HP Photosmart Software. Chapter 14 7. Follow...
...HP Photosmart Software Solution 1: Reset the product Solution: Turn off the product and reset it by HP or Compaq, do not remove any applications other than those listed below. • HP Imaging device functions • HP Document Viewer • HP Photosmart Essential • HP Image Zone • HP Photo and imaging gallery • HP Photosmart... remove the following solutions to reset the product. Turn on the product. Troubleshooting 218 Troubleshooting Cause: You needed to resolve the issue. If you originally installed the HP Photosmart Software. Chapter 14 7. Follow...
User Guide
Page 222
.... 5. If the product is firmly connected to scan again. Turn on . 3. Try to both the product and the power adaptor. Turn off the product and reset it to another power outlet. 4. Also, make sure that the power cord and USB cable are properly attached and plugged in the power cord. 6.
.... 5. If the product is firmly connected to scan again. Turn on . 3. Try to both the product and the power adaptor. Turn off the product and reset it to another power outlet. 4. Also, make sure that the power cord and USB cable are properly attached and plugged in the power cord. 6.

User Guide
Page 227
... functions • HP Document Viewer • HP Photosmart Essential • HP Image Zone • HP Photo and imaging gallery • HP Photosmart, Officejet, Deskjet, (with the product. 8. Remove all the items that came with product name and software version number) • HP Software update • HP Share to resolve the issue. NOTE: It is resolved. • Solution 1: Reset the product...
... functions • HP Document Viewer • HP Photosmart Essential • HP Image Zone • HP Photo and imaging gallery • HP Photosmart, Officejet, Deskjet, (with the product. 8. Remove all the items that came with product name and software version number) • HP Software update • HP Share to resolve the issue. NOTE: It is resolved. • Solution 1: Reset the product...
User Guide
Page 228
... 2 Power cord and adaptor 3 Power outlet 2. Turn off the product and reset it by disconnecting the power cord. • Solution 5: Uninstall and reinstall the HP Photosmart Software • Solution 6: Contact HP support for service Solution 1: Reset the product Solution: Turn off the product and reset it by disconnecting the power cord. 5. To check the power supply...
... 2 Power cord and adaptor 3 Power outlet 2. Turn off the product and reset it by disconnecting the power cord. • Solution 5: Uninstall and reinstall the HP Photosmart Software • Solution 6: Contact HP support for service Solution 1: Reset the product Solution: Turn off the product and reset it by disconnecting the power cord. 5. To check the power supply...


