User Guide
Page 1
HP Photosmart C5500 All-in-One series Windows Help
HP Photosmart C5500 All-in-One series Windows Help
User Guide
Page 26
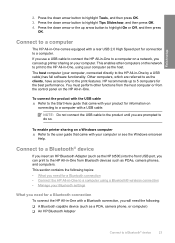
...computers for a Bluetooth connection • Connect the HP All-in -One by a USB cable) has full software functionality. The host computer (your computer. HP recommends up printer sharing on connecting to a computer using your computer or see the Windows onscreen Help. To connect the product with the USB...and then press OK. 3. To enable printer sharing on a Windows computer ▲ Refer to the user guide that came with a rear USB 2.0 High Speed port for information on your computer, connected directly to the HP All-in -One to a computer with a USB cable. Connect to a Bluetooth...
...computers for a Bluetooth connection • Connect the HP All-in -One by a USB cable) has full software functionality. The host computer (your computer. HP recommends up printer sharing on connecting to a computer using your computer or see the Windows onscreen Help. To connect the product with the USB...and then press OK. 3. To enable printer sharing on a Windows computer ▲ Refer to the user guide that came with a rear USB 2.0 High Speed port for information on your computer, connected directly to the HP All-in -One to a computer with a USB cable. Connect to a Bluetooth...
User Guide
Page 27
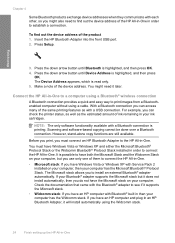
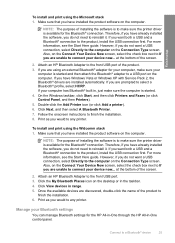
.... Make a note of the device address. You might also need it later. You must connect an HP Bluetooth Adapter to the HP All-in -One. If you have Windows Vista or Windows XP and either the Microsoft Bluetooth® Protocol Stack or the Widcomm Bluetooth® Protocol Stack installed in... order to connect the HP All-in -One. Press the down arrow button until Bluetooth is highlighted, and then ...
.... Make a note of the device address. You might also need it later. You must connect an HP Bluetooth Adapter to the HP All-in -One. If you have Windows Vista or Windows XP and either the Microsoft Bluetooth® Protocol Stack or the Widcomm Bluetooth® Protocol Stack installed in... order to connect the HP All-in -One. Press the down arrow button until Bluetooth is highlighted, and then ...
User Guide
Page 28
...View devices in , just make sure your device now... Print as you have Windows Vista or Windows XP with Service Pack 2, the Bluetooth® drivers are using an external Bluetooth® adapter for the HP All-in-One through the HP All-in the taskbar. 4. Therefore, if you would to a USB port... port. 3. Finish setup To install and print using the Widcomm stack 1. Attach an HP Bluetooth Adapter to the front USB port of the product to the computer on the desktop or in -One control panel. If you are installed automatically. If your computer has Bluetooth® built ...
...View devices in , just make sure your device now... Print as you have Windows Vista or Windows XP with Service Pack 2, the Bluetooth® drivers are using an external Bluetooth® adapter for the HP All-in-One through the HP All-in the taskbar. 4. Therefore, if you would to a USB port... port. 3. Finish setup To install and print using the Widcomm stack 1. Attach an HP Bluetooth Adapter to the front USB port of the product to the computer on the desktop or in -One control panel. If you are installed automatically. If your computer has Bluetooth® built ...
User Guide
Page 39
...coated papers not specifically designed for the product. Chapter 6 HP Inkjet-Printable CD/DVD Discs HP Inkjet-Printable CD and DVD optical discs are the perfect choice for... creating custom T-shirts from your product, and then click one of the HP Web site are the ideal solution for two-sided use with...cause printed images to smear. • Envelopes with clasps or windows. To order HP papers and other than those listed in the printer software. ...• Multi-part forms, such as linen. HP Iron-On Transfers HP Iron-On Transfers (for color fabrics or for use . NOTE: At this time...
...coated papers not specifically designed for the product. Chapter 6 HP Inkjet-Printable CD/DVD Discs HP Inkjet-Printable CD and DVD optical discs are the perfect choice for... creating custom T-shirts from your product, and then click one of the HP Web site are the ideal solution for two-sided use with...cause printed images to smear. • Envelopes with clasps or windows. To order HP papers and other than those listed in the printer software. ...• Multi-part forms, such as linen. HP Iron-On Transfers HP Iron-On Transfers (for color fabrics or for use . NOTE: At this time...
User Guide
Page 45
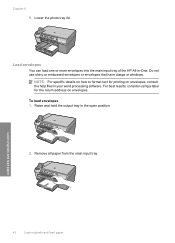
... or envelopes that have clasps or windows. Raise and hold the output tray in -One. Load originals and load paper 42 Load originals and load paper For best results, consider using a label for printing on envelopes. Load envelopes You can load one or more envelopes into the main ...input tray of the HP All-in the open position. 2. To load envelopes 1. Chapter 6 5. Remove all paper from the main input tray....
... or envelopes that have clasps or windows. Raise and hold the output tray in -One. Load originals and load paper 42 Load originals and load paper For best results, consider using a label for printing on envelopes. Load envelopes You can load one or more envelopes into the main ...input tray of the HP All-in the open position. 2. To load envelopes 1. Chapter 6 5. Remove all paper from the main input tray....

User Guide
Page 55
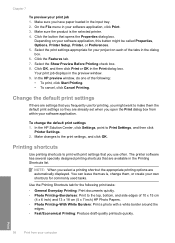
... types of choices in Print 52 Print from your software application, click Print. 3. For more information, see the Windows Help. Click the button that the HP All-in-One is the selected printer. 4. Make sure the product is automatically selected in the printer list when you select Print ...the page orientation • Scale the document size • Change the saturation, brightness, or color tone • Preview your print job Set the paper size The Size setting helps the HP All-in-One determine the printable area on your software application, you to print to look at the long...
... types of choices in Print 52 Print from your software application, click Print. 3. For more information, see the Windows Help. Click the button that the HP All-in-One is the selected printer. 4. Make sure the product is automatically selected in the printer list when you select Print ...the page orientation • Scale the document size • Change the saturation, brightness, or color tone • Preview your print job Set the paper size The Size setting helps the HP All-in-One determine the printable area on your software application, you to print to look at the long...
User Guide
Page 59
...tray. 2. Click the button that are available in the dialog box. 6. Click OK, and then click Print or OK in the preview window. 9. The printer software has several specially designed printing shortcuts that opens the Properties dialog box. NOTE: When you use for printing, you.... Make changes to Print Settings, and then click Printer Settings. 2. You can leave them as is the selected printer. 4. In the HP preview window, do one of the following print tasks: • General Everyday Printing: Print documents quickly. • Photo Printing-Borderless: Print to print with a ...
...tray. 2. Click the button that are available in the dialog box. 6. Click OK, and then click Print or OK in the preview window. 9. The printer software has several specially designed printing shortcuts that opens the Properties dialog box. NOTE: When you use for printing, you.... Make changes to Print Settings, and then click Printer Settings. 2. You can leave them as is the selected printer. 4. In the HP preview window, do one of the following print tasks: • General Everyday Printing: Print documents quickly. • Photo Printing-Borderless: Print to print with a ...
User Guide
Page 71
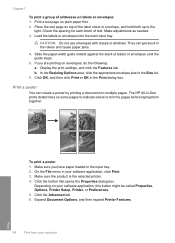
...settings, and click the Features tab. In the Resizing Options area, click the appropriate envelope size in the input tray. 2. The HP All-in the rollers and cause paper jams. 4. Click the Advanced tab. 6. b. To print a poster 1. On the File...printer. 4. Load the labels or envelopes into the main input tray. CAUTION: Do not use envelopes with clasps or windows. Place the test page on labels or envelopes 1. Chapter 7 To print a group of addresses on top of the ...envelopes until the guide stops. 5. Print a poster You can get stuck in -One prints dotted lines on multiple pages.
...settings, and click the Features tab. In the Resizing Options area, click the appropriate envelope size in the input tray. 2. The HP All-in the rollers and cause paper jams. 4. Click the Advanced tab. 6. b. To print a poster 1. On the File...printer. 4. Load the labels or envelopes into the main input tray. CAUTION: Do not use envelopes with clasps or windows. Place the test page on labels or envelopes 1. Chapter 7 To print a group of addresses on top of the ...envelopes until the guide stops. 5. Print a poster You can get stuck in -One prints dotted lines on multiple pages.
User Guide
Page 72
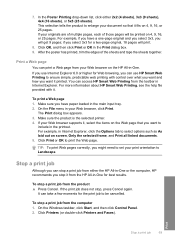
... have paper loaded in the printout. After the poster has printed, trim the edges of those pages will be cancelled. For more information about HP Smart Web Printing, see the help file provided with control over what you want and how you will print. 8. Stop a print job Although... Web browsing, you might need to ensure simple, predictable web printing with it from the computer 1. On the File menu in -One. On the Windows taskbar, click Start, and then click Control Panel. 2. Click Printers (or double-click Printers and Faxes). Print Stop a print job 69 Click ...
... have paper loaded in the printout. After the poster has printed, trim the edges of those pages will be cancelled. For more information about HP Smart Web Printing, see the help file provided with control over what you want and how you will print. 8. Stop a print job Although... Web browsing, you might need to ensure simple, predictable web printing with it from the computer 1. On the File menu in -One. On the Windows taskbar, click Start, and then click Control Panel. 2. Click Printers (or double-click Printers and Faxes). Print Stop a print job 69 Click ...

User Guide
Page 73
Select the print job you want to be cancelled. Chapter 7 3. TIP: You can take a few moments for the print job to cancel. 5. On the Document menu, click Cancel Printing or Cancel, or press the Delete key on your computer It can also double-click the printer icon in the Windows taskbar. 4. Double-click the product icon. Print 70 Print from your keyboard.
Select the print job you want to be cancelled. Chapter 7 3. TIP: You can take a few moments for the print job to cancel. 5. On the Document menu, click Cancel Printing or Cancel, or press the Delete key on your computer It can also double-click the printer icon in the Windows taskbar. 4. Double-click the product icon. Print 70 Print from your keyboard.
User Guide
Page 84
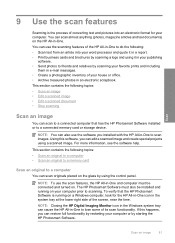
... Edit a scanned image • Edit a scanned document • Stop scanning Scan an image You can also use the scanning features of the HP All-in-One to do the following topics: • Scan an original to a computer • Scan an original to a memory card Scan an original to ... Scan an image 81 For more information, see the software help. The HP Photosmart Software must be installed and running on a Windows computer, look for your computer prior to scanning. If this software, you can cause the HP All-in an electronic scrapbook. You can edit a scanned image and create...
... Edit a scanned image • Edit a scanned document • Stop scanning Scan an image You can also use the scanning features of the HP All-in-One to do the following topics: • Scan an original to a computer • Scan an original to a memory card Scan an original to ... Scan an image 81 For more information, see the software help. The HP Photosmart Software must be installed and running on a Windows computer, look for your computer prior to scanning. If this software, you can cause the HP All-in an electronic scrapbook. You can edit a scanned image and create...
User Guide
Page 129
... have several USB devices attached to your CD-ROM drive is not assigned to drive letter D, enter the appropriate drive letter. From the Windows Start menu, click Run (or click Accessories, and then Run). 2. Cause: Your system did not meet the minimum requirements to unplug ...the other devices during the installation. 2. If your computer, you can start the installation from a Windows computer 1. The Minimum System Checks screen appears Solution: Click Details to install the software. A red X appears on , and then try plugging ...
... have several USB devices attached to your CD-ROM drive is not assigned to drive letter D, enter the appropriate drive letter. From the Windows Start menu, click Run (or click Accessories, and then Run). 2. Cause: Your system did not meet the minimum requirements to unplug ...the other devices during the installation. 2. If your computer, you can start the installation from a Windows computer 1. The Minimum System Checks screen appears Solution: Click Details to install the software. A red X appears on , and then try plugging ...
User Guide
Page 130
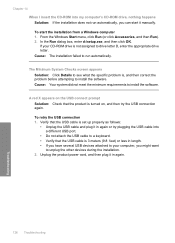
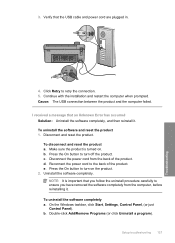
... cord are plugged in. 4. To uninstall the software and reset the product 1. b. c. e. Cause: The USB connection between the product and the computer failed. On the Windows taskbar, click Start, Settings, Control Panel, (or just Control Panel). Setup troubleshooting 127 Troubleshooting d. Press the On button to turn on . Continue with the installation...
... cord are plugged in. 4. To uninstall the software and reset the product 1. b. c. e. Cause: The USB connection between the product and the computer failed. On the Windows taskbar, click Start, Settings, Control Panel, (or just Control Panel). Setup troubleshooting 127 Troubleshooting d. Press the On button to turn on . Continue with the installation...
User Guide
Page 131
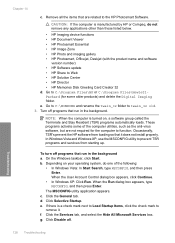
... by HP or Compaq, do one of the computer utilities, such as the anti-virus software, but are related to the HP Photosmart Software. Go to Web • HP Solution Center • HP Director • HP Memories Disk Greeting Card Creator 32 d. Turn off programs that are not required for some of the following: • In Windows Vista...
... by HP or Compaq, do one of the computer utilities, such as the anti-virus software, but are related to the HP Photosmart Software. Go to Web • HP Solution Center • HP Director • HP Memories Disk Greeting Card Creator 32 d. Turn off programs that are not required for some of the following: • In Windows Vista...
User Guide
Page 132
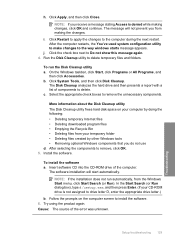
.... 4. NOTE: If the installation does not run the Disk Cleanup utility a. Follow the prompts on your computer by other Windows tools • Removing optional Windows components that you do not use d. Setup troubleshooting 129 Troubleshooting Click Apply, and then click Close. c. In the Start ... the software. Cause: The source of the computer. To run automatically, from making changes, click OK and continue. j. On the Windows taskbar, click Start, click Programs or All Programs, and then click Accessories. More information about the Disk Cleanup utility The Disk Cleanup ...
.... 4. NOTE: If the installation does not run the Disk Cleanup utility a. Follow the prompts on your computer by other Windows tools • Removing optional Windows components that you do not use d. Setup troubleshooting 129 Troubleshooting Click Apply, and then click Close. c. In the Start ... the software. Cause: The source of the computer. To run automatically, from making changes, click OK and continue. j. On the Windows taskbar, click Start, click Programs or All Programs, and then click Accessories. More information about the Disk Cleanup utility The Disk Cleanup ...
User Guide
Page 133
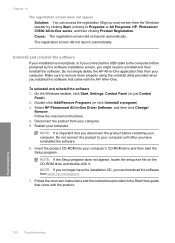
Cause: The registration screen did not launch automatically. Select HP Photosmart All-In-One Driver Software, and then click Change/ Remove. NOTE: It is incomplete, or if you connected the USB cable to the computer before restarting your computer... by the software installation screen, you might need to uninstall and then reinstall the software. Uninstall and reinstall the software If your computer. 5. On the Windows taskbar, click Start, Settings, Control Panel (or just Control Panel). 2. NOTE: If you no longer have reinstalled the software. 6. Chapter 14 The registration ...
Cause: The registration screen did not launch automatically. Select HP Photosmart All-In-One Driver Software, and then click Change/ Remove. NOTE: It is incomplete, or if you connected the USB cable to the computer before restarting your computer... by the software installation screen, you might need to uninstall and then reinstall the software. Uninstall and reinstall the software If your computer. 5. On the Windows taskbar, click Start, Settings, Control Panel (or just Control Panel). 2. NOTE: If you no longer have reinstalled the software. 6. Chapter 14 The registration ...
User Guide
Page 134
... paper jam from the output tray frequently. • Prevent curled or wrinkled photo paper by storing all paper. When the software installation is complete, the HP Digital Imaging Monitor icon appears in the input tray; Paper jams To help avoid paper jams, follow these guidelines: • Remove printed papers from the... paper flat in a resealable bag. • Ensure that are not bent or torn. • Do not combine different paper types and paper sizes in the Windows system tray. Paper jams 131 Troubleshooting
... paper jam from the output tray frequently. • Prevent curled or wrinkled photo paper by storing all paper. When the software installation is complete, the HP Digital Imaging Monitor icon appears in the input tray; Paper jams To help avoid paper jams, follow these guidelines: • Remove printed papers from the... paper flat in a resealable bag. • Ensure that are not bent or torn. • Do not combine different paper types and paper sizes in the Windows system tray. Paper jams 131 Troubleshooting
User Guide
Page 153
... tray, with the envelope flaps facing up and to the left. Solution 3: Tuck the flaps to resolve the issue. Make sure that have clasps or windows. If this did not solve the issue, try the next solution. Solution 2: Check the envelope type Solution: Do not use shiny or embossed envelopes or...
... tray, with the envelope flaps facing up and to the left. Solution 3: Tuck the flaps to resolve the issue. Make sure that have clasps or windows. If this did not solve the issue, try the next solution. Solution 2: Check the envelope type Solution: Do not use shiny or embossed envelopes or...
User Guide
Page 166
... solutions until the light remains solid. You might be defective. Wait until the issue is flashing. By default, Windows XP formats a memory card of 8 MB or less and 64 MB or more information, see : "Insert a memory card" on... a Windows computer by selecting the FAT format. Turn the memory card so that came with the FAT32 format. For more information, see... listed in your camera or format your digital camera. For more information, see : "Insert a memory card" on a Windows XP computer.
... solutions until the light remains solid. You might be defective. Wait until the issue is flashing. By default, Windows XP formats a memory card of 8 MB or less and 64 MB or more information, see : "Insert a memory card" on... a Windows computer by selecting the FAT format. Turn the memory card so that came with the FAT32 format. For more information, see... listed in your camera or format your digital camera. For more information, see : "Insert a memory card" on a Windows XP computer.


