Basics Guide
Page 4
Contents 1 HP All-in-One overview 2 The HP All-in-One at a glance 2 Control panel features 4 Use the HP Photosmart software 5 Find more information 6 Access the onscreen Help 6 Finish setting up networking 7 Load originals and load paper 10 Avoid paper jams 12 Make a copy...12 ...
Contents 1 HP All-in-One overview 2 The HP All-in-One at a glance 2 Control panel features 4 Use the HP Photosmart software 5 Find more information 6 Access the onscreen Help 6 Finish setting up networking 7 Load originals and load paper 10 Avoid paper jams 12 Make a copy...12 ...
Basics Guide
Page 5
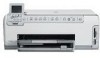
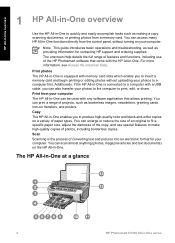
...and posters. The HP All-in-One at a glance 2 HP Photosmart C5100 All-in -One is connected to a computer with the HP All-in -One. You can access many HP All-in-One functions directly from a memory card. HP All-in-One overview 1 HP All-in-One overview Use the HP All-in-One to quickly and ...onscreen Help details the full range of features and functions, including use special features to produce high-quality color and black-and-white copies on the HP All-in -One. Note This guide introduces basic operations and troubleshooting, as well as making a copy, scanning documents, ...
...and posters. The HP All-in-One at a glance 2 HP Photosmart C5100 All-in -One is connected to a computer with the HP All-in -One. You can access many HP All-in-One functions directly from a memory card. HP All-in-One overview 1 HP All-in-One overview Use the HP All-in-One to quickly and ...onscreen Help details the full range of features and functions, including use special features to produce high-quality color and black-and-white copies on the HP All-in -One. Note This guide introduces basic operations and troubleshooting, as well as making a copy, scanning documents, ...
Basics Guide
Page 7
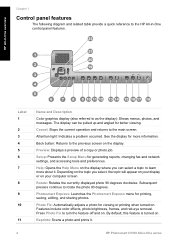
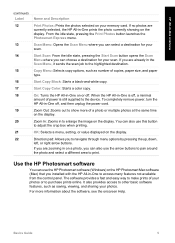
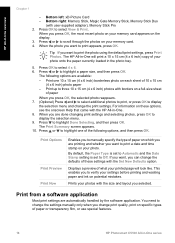
See the display for more about it . 4 HP Photosmart C5100 All-in-One series Setup: Presents the Setup Menu for printing, saving, editing, and sharing photos. Photosmart Express: Launches the Photosmart Express menu for generating reports, changing fax and network settings, and accessing tools and ...where you select, the topic will appear on your computer screen. Label 1 2 3 4 5 6 7 8 9 10 11 Name and Description Color graphics display (also referred to turn the feature off and on. Subsequent presses continue to the main screen. Attention light: Indicates a problem occurred....
See the display for more about it . 4 HP Photosmart C5100 All-in-One series Setup: Presents the Setup Menu for printing, saving, editing, and sharing photos. Photosmart Express: Launches the Photosmart Express menu for generating reports, changing fax and network settings, and accessing tools and ...where you select, the topic will appear on your computer screen. Label 1 2 3 4 5 6 7 8 9 10 11 Name and Description Color graphics display (also referred to turn the feature off and on. Subsequent presses continue to the main screen. Attention light: Indicates a problem occurred....
Basics Guide
Page 8
...button to access many features not available from the control panel. Use the HP Photosmart software You can choose a destination for your memory card. Scan Menu: Opens the Scan Menu where you are zooming in -One to adjust the crop box when printing. If you can also use the... Start Copy Color: Starts a color copy. OK: Selects a menu, setting, or value displayed on your scan. The software provides a fast and easy way to print. From the idle state, pressing the Print Photos button launches the Photosmart Express menu. To completely remove power, turn the HP All-in -One on the ...
...button to access many features not available from the control panel. Use the HP Photosmart software You can choose a destination for your memory card. Scan Menu: Opens the Scan Menu where you are zooming in -One to adjust the crop box when printing. If you can also use the... Start Copy Color: Starts a color copy. OK: Selects a menu, setting, or value displayed on your scan. The software provides a fast and easy way to print. From the idle state, pressing the Print Photos button launches the Photosmart Express menu. To completely remove power, turn the HP All-in -One on the ...
Basics Guide
Page 9
... that are not described in this guide. ● HP Photosmart Software Tour (Windows) The HP Photosmart Software Tour is available from your HP All-in -One. You can get a brief overview of the software included with your HP All-in -One and installing software. The HP Photosmart Mac Help appears. 6 HP Photosmart C5100 All-in -One. 2. To access help and support from the...
... that are not described in this guide. ● HP Photosmart Software Tour (Windows) The HP Photosmart Software Tour is available from your HP All-in -One. You can get a brief overview of the software included with your HP All-in -One and installing software. The HP Photosmart Mac Help appears. 6 HP Photosmart C5100 All-in -One. 2. To access help and support from the...
Basics Guide
Page 10
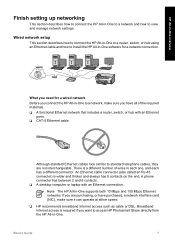
... hub with an Ethernet connection. An Ethernet cable connector (also called an RJ-45 connector) is required if you want to access HP Photosmart Share directly from the HP All-in -One supports both 10 Mbps and 100 Mbps Ethernet networks. Broadband Internet access is wider and thicker and always has 8 contacts on the...
... hub with an Ethernet connection. An Ethernet cable connector (also called an RJ-45 connector) is required if you want to access HP Photosmart Share directly from the HP All-in -One supports both 10 Mbps and 100 Mbps Ethernet networks. Broadband Internet access is wider and thicker and always has 8 contacts on the...
Basics Guide
Page 11
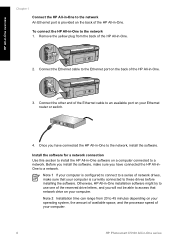
... can range from the back of the Ethernet cable to an available port on a computer connected to a network. To connect the HP All-in -One series Otherwise, HP All-in -One to the network, install the software. Note 1 If your computer is configured to connect to a series of the...to 45 minutes depending on your operating system, the amount of available space, and the processor speed of the HP All-in -One software on your computer. 8 HP Photosmart C5100 All-in -One to a network. Connect the Ethernet cable to the Ethernet port on the back of your Ethernet router or switch...
... can range from the back of the Ethernet cable to an available port on a computer connected to a network. To connect the HP All-in -One series Otherwise, HP All-in -One to the network, install the software. Note 1 If your computer is configured to connect to a series of the...to 45 minutes depending on your operating system, the amount of available space, and the processor speed of the HP All-in -One software on your computer. 8 HP Photosmart C5100 All-in -One to a network. Connect the Ethernet cable to the Ethernet port on the back of your Ethernet router or switch...
Basics Guide
Page 13
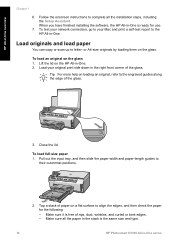
... a stack of rips, dust, wrinkles, and curled or bent edges. - When you have finished installing the software, the HP All-in-One is the same size and type. 10 HP Photosmart C5100 All-in the right front corner of the glass. 3. or A4-size originals by loading them on the glass 1. Lift the lid... on a flat surface to the HP All-in -One. 2. Close the lid. To test your network connection, go to complete all the paper...
... a stack of rips, dust, wrinkles, and curled or bent edges. - When you have finished installing the software, the HP All-in-One is the same size and type. 10 HP Photosmart C5100 All-in the right front corner of the glass. 3. or A4-size originals by loading them on the glass 1. Lift the lid... on a flat surface to the HP All-in -One. 2. Close the lid. To test your network connection, go to complete all the paper...
Basics Guide
Page 15
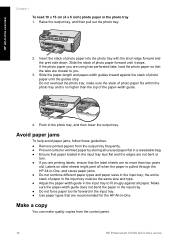
...different paper types and paper sizes in -One series Avoid paper jams To help avoid paper jams, follow these guidelines. ● Remove printed papers from the control panel. 12 HP Photosmart C5100 All-in the input tray; If ...input tray must be the same size and type. ● Adjust the paper-width guide in -One. Slide the paper-length and paper-width guides inward against all unused paper flat in a resealable bag...the photo tray 1. Raise the output tray, and then pull out the photo tray. 2. HP All-in-One overview Chapter 1 To load 10 x 15 cm (4 x 6 inch) photo paper in the photo tray,...
...different paper types and paper sizes in -One series Avoid paper jams To help avoid paper jams, follow these guidelines. ● Remove printed papers from the control panel. 12 HP Photosmart C5100 All-in the input tray; If ...input tray must be the same size and type. ● Adjust the paper-width guide in -One. Slide the paper-length and paper-width guides inward against all unused paper flat in a resealable bag...the photo tray 1. Raise the output tray, and then pull out the photo tray. 2. HP All-in-One overview Chapter 1 To load 10 x 15 cm (4 x 6 inch) photo paper in the photo tray,...
Basics Guide
Page 16
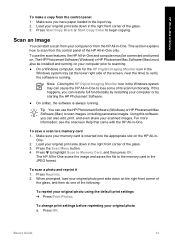
...the software is always running. One. 2. The HP All-in-One scans the image and saves the file to the memory card in the input tray. 2. Basics Guide 13 Press Start Copy Black or Start Copy Color to a memory card 1. The HP Photosmart Software (Windows) or HP Photosmart Mac Software (Mac) must... be installed and running . Load your computer or from the HP All-in -One overview To make a copy from the control panel 1. Press ...
...the software is always running. One. 2. The HP All-in-One scans the image and saves the file to the memory card in the input tray. 2. Basics Guide 13 Press Start Copy Black or Start Copy Color to a memory card 1. The HP Photosmart Software (Windows) or HP Photosmart Mac Software (Mac) must... be installed and running . Load your computer or from the HP All-in -One overview To make a copy from the control panel 1. Press ...
Basics Guide
Page 17
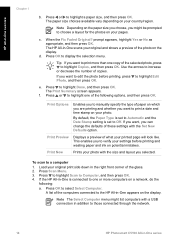
... Select Computer. Print Options Enables you to manually specify the type of copies. This enables you might list computers with a USB connection in -One is set to Automatic and the Date Stamp setting is connected to a computer 1. Note Depending on the paper size you choose, you to ... Defaults option. c. Press to highlight Edit Photo, and then press OK. Press to highlight Scan to those connected through the network. 14 HP Photosmart C5100 All-in the right front corner of these settings with the size and layout you can change the defaults of the glass. 2. Note...
... Select Computer. Print Options Enables you to manually specify the type of copies. This enables you might list computers with a USB connection in -One is set to Automatic and the Date Stamp setting is connected to a computer 1. Note Depending on the paper size you choose, you to ... Defaults option. c. Press to highlight Edit Photo, and then press OK. Press to highlight Scan to those connected through the network. 14 HP Photosmart C5100 All-in the right front corner of these settings with the size and layout you can change the defaults of the glass. 2. Note...
Basics Guide
Page 19
... you can change print quality, print on your photo onto the paper currently loaded in -One. 8. Tip If you change the defaults of paper or transparency film, or use special features. 16 HP Photosmart C5100 All-in -One overview Chapter 1 - Press to select 4 x 6. 6. If you want to manually ...size and layout you want to display the selection menu. 9. Prints your settings before printing and wasting paper and ink on your photo. HP All-in -One series Print one of 10 x 15 cm (4 x 6 inch) photo paper - Press OK to highlight a paper size, and then press OK. For...
... you can change print quality, print on your photo onto the paper currently loaded in -One. 8. Tip If you change the defaults of paper or transparency film, or use special features. 16 HP Photosmart C5100 All-in -One overview Chapter 1 - Press to select 4 x 6. 6. If you want to manually ...size and layout you want to display the selection menu. 9. Prints your settings before printing and wasting paper and ink on your photo. HP All-in -One series Print one of 10 x 15 cm (4 x 6 inch) photo paper - Press OK to highlight a paper size, and then press OK. For...
Basics Guide
Page 21
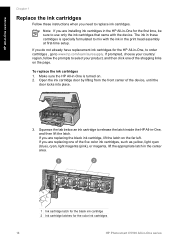
...with the ink in -One is turned on. 2. Squeeze the tab below an ink cartridge to release the latch inside the HP All-in -One series If you do not already have replacement ink cartridges for the HP All-in -One for the color ink cartridges 18 HP Photosmart C5100 All-in -One, and then lift ...the latch. Make sure the HP All-in the print head assembly at ...
...with the ink in -One is turned on. 2. Squeeze the tab below an ink cartridge to release the latch inside the HP All-in -One series If you do not already have replacement ink cartridges for the HP All-in -One for the color ink cartridges 18 HP Photosmart C5100 All-in -One, and then lift ...the latch. Make sure the HP All-in the print head assembly at ...
Basics Guide
Page 23
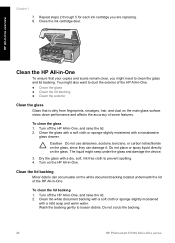
...document backing with a soft cloth or sponge slightly moistened with a nonabrasive glass cleaner. Close the ink cartridge door. HP All-in-One overview Clean the HP All-in-One To ensure that is dirty from fingerprints, smudges, hair, and dust on the main glass surface slows down performance and... backing located underneath the lid of some features. Wash the backing gently to prevent spotting. 4. Do not scrub the backing. 20 HP Photosmart C5100 All-in -One. ● Clean the glass ● Clean the lid backing ● Clean the exterior Clean the glass Glass that your copies ...
...document backing with a soft cloth or sponge slightly moistened with a nonabrasive glass cleaner. Close the ink cartridge door. HP All-in-One overview Clean the HP All-in-One To ensure that is dirty from fingerprints, smudges, hair, and dust on the main glass surface slows down performance and... backing located underneath the lid of some features. Wash the backing gently to prevent spotting. 4. Do not scrub the backing. 20 HP Photosmart C5100 All-in -One. ● Clean the glass ● Clean the lid backing ● Clean the exterior Clean the glass Glass that your copies ...
Basics Guide
Page 25
... chapter also provides warranty and support information. Restart your computer. 5. Note It is complete, the HP Digital Imaging Monitor icon appears in the Windows system tray. 22 HP Photosmart C5100 All-in -One. On the Windows taskbar, click Start, Settings, Control Panel. 2. Follow the onscreen instructions and the instructions provided in the Setup Guide...
... chapter also provides warranty and support information. Restart your computer. 5. Note It is complete, the HP Digital Imaging Monitor icon appears in the Windows system tray. 22 HP Photosmart C5100 All-in -One. On the Windows taskbar, click Start, Settings, Control Panel. 2. Follow the onscreen instructions and the instructions provided in the Setup Guide...
Basics Guide
Page 27
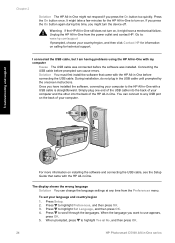
.... Press to highlight Preferences, and then press OK. 3. When prompted, press to highlight Yes or No, and then press OK. 24 HP Photosmart C5100 All-in -One with a USB cable is straightforward. Press to highlight Set Language, and then press OK. 4. I connected the USB cable, but I... am having problems using the HP All-in -One series Connecting the USB cable before connecting the USB cable. If you press the On button again during this time, you have a mechanical...
.... Press to highlight Preferences, and then press OK. 3. When prompted, press to highlight Yes or No, and then press OK. 24 HP Photosmart C5100 All-in -One with a USB cable is straightforward. Press to highlight Set Language, and then press OK. 4. I connected the USB cable, but I... am having problems using the HP All-in -One series Connecting the USB cable before connecting the USB cable. If you press the On button again during this time, you have a mechanical...
Basics Guide
Page 29
... the following : a. If the connections are connected properly. ● Cables between the HP All-in -One Internet connection (if applicable) Cause Your Local Area Network card (LAN card) is not turned on the HP All-in-One. 26 HP Photosmart C5100 All-in -One is not set up for TCP/IP. Press the On button on the... Menu bar. 2. To check your LAN card appears in -One off , there is being sent or received by the device over...
... the following : a. If the connections are connected properly. ● Cables between the HP All-in -One Internet connection (if applicable) Cause Your Local Area Network card (LAN card) is not turned on the HP All-in-One. 26 HP Photosmart C5100 All-in -One is not set up for TCP/IP. Press the On button on the... Menu bar. 2. To check your LAN card appears in -One off , there is being sent or received by the device over...
Basics Guide
Page 31
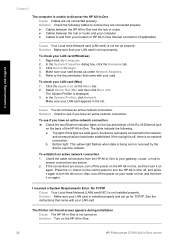
... following ink cartridges cannot be used after device initialization and must use AutoIP to assign IP addresses to the other computers and to the HP All-in -One, more paper jams are likely to release the door. Do not assign a static IP address. Caution Trying to continue the current job. Caution If... the paper tears when you are expired 28 HP Photosmart C5100 All-in -One can damage the print mechanism. Press in -One has a paper jam, check the rear door. Gently pull the paper out of the HP All-in -One series If you do not have IP addresses Cause If you have...
... following ink cartridges cannot be used after device initialization and must use AutoIP to assign IP addresses to the other computers and to the HP All-in -One, more paper jams are likely to release the door. Do not assign a static IP address. Caution Trying to continue the current job. Caution If... the paper tears when you are expired 28 HP Photosmart C5100 All-in -One can damage the print mechanism. Press in -One has a paper jam, check the rear door. Gently pull the paper out of the HP All-in -One series If you do not have IP addresses Cause If you have...
Basics Guide
Page 33
... date. Solution Replace the indicated ink cartridge(s). Troubleshooting and support Chapter 2 If prompted, choose your computer screen. HP recommends that you purchased genuine HP ink cartridge(s), go to: 30 HP Photosmart C5100 All-in -One detected non-HP ink. If you believe you use of using expired ink will not be covered under warranty. For more...
... date. Solution Replace the indicated ink cartridge(s). Troubleshooting and support Chapter 2 If prompted, choose your computer screen. HP recommends that you purchased genuine HP ink cartridge(s), go to: 30 HP Photosmart C5100 All-in -One detected non-HP ink. If you believe you use of using expired ink will not be covered under warranty. For more...
Basics Guide
Page 35
... installed Cause The wrong ink cartridge(s) are installed incorrectly. The ink in these ink cartridges is specially formulated to : www.hp.com/support 32 HP Photosmart C5100 All-in this message after cleaning the ink cartridge contacts, you might fail. To resolve this error, replace the affected ...your country/region, and then click Contact HP for information on the control panel to install the ink cartridges that you might be cleaned. Cause One or more ink cartridge is defective. If the problem persists, clean the copper-colored contacts of the ink cartridges are not installed...
... installed Cause The wrong ink cartridge(s) are installed incorrectly. The ink in these ink cartridges is specially formulated to : www.hp.com/support 32 HP Photosmart C5100 All-in this message after cleaning the ink cartridge contacts, you might fail. To resolve this error, replace the affected ...your country/region, and then click Contact HP for information on the control panel to install the ink cartridges that you might be cleaned. Cause One or more ink cartridge is defective. If the problem persists, clean the copper-colored contacts of the ink cartridges are not installed...


