Basic Guide
Page 27
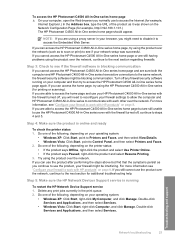
..., and then select Printers and Faxes. 2. Delete any firewall security software running To restart the HP Network Device Support service 1. For more information see "Configure your computer, open the Web browser you cannot access the HP Photosmart C4500 All-in -One series (for example, http://192.168.1.101.) The HP Photosmart C4500 All-in-One series home page should...
..., and then select Printers and Faxes. 2. Delete any firewall security software running To restart the HP Network Device Support service 1. For more information see "Configure your computer, open the Web browser you cannot access the HP Photosmart C4500 All-in -One series (for example, http://192.168.1.101.) The HP Photosmart C4500 All-in-One series home page should...
Basic Guide
Page 29
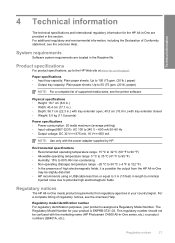
...due to 50 (75 gsm. (20 lb.) paper) NOTE: For a complete list of supported media sizes, see the printer software. This regulatory number should not be slightly distorted • HP recommends using a USB cable less than or equal to 3 m (10 feet) in your country/region. The Regulatory Model...requirements are provided in -One series, etc.) or product numbers (Q8401A, etc.). Product specifications For product specifications, go to 240 V ~ 600 mA 50-60 Hz • Output voltage: DC 32 V===375 mA, 16 V===500 mA NOTE: Use only with the marketing name (HP Photosmart C4500 All-in this ...
...due to 50 (75 gsm. (20 lb.) paper) NOTE: For a complete list of supported media sizes, see the printer software. This regulatory number should not be slightly distorted • HP recommends using a USB cable less than or equal to 3 m (10 feet) in your country/region. The Regulatory Model...requirements are provided in -One series, etc.) or product numbers (Q8401A, etc.). Product specifications For product specifications, go to 240 V ~ 600 mA 50-60 Hz • Output voltage: DC 32 V===375 mA, 16 V===500 mA NOTE: Use only with the marketing name (HP Photosmart C4500 All-in this ...
User Guide
Page 4
Contents Contents 1 HP Photosmart C4500 All-in-One series Help 3 2 HP All-in-One overview The HP All-in-One at a glance...5 Control panel features...6 Menu overview...7 Use the HP Photosmart Software 8 3 Find more information...9 4 Connection information Supported connection types...11 USB connection...11 Network connection...12 5 How ... copying 31 Load paper...34 Avoid paper jams...40 7 Print from your computer Print from a software application 43 Make the HP All-in-One the default printer 44 Change the print settings for the current job 44 Change the default print settings 48 Printing...
Contents Contents 1 HP Photosmart C4500 All-in-One series Help 3 2 HP All-in-One overview The HP All-in-One at a glance...5 Control panel features...6 Menu overview...7 Use the HP Photosmart Software 8 3 Find more information...9 4 Connection information Supported connection types...11 USB connection...11 Network connection...12 5 How ... copying 31 Load paper...34 Avoid paper jams...40 7 Print from your computer Print from a software application 43 Make the HP All-in-One the default printer 44 Change the print settings for the current job 44 Change the default print settings 48 Printing...

User Guide
Page 84
.../buy/supplies. Open the print cartridge door. NOTE: You can also check the ink levels by using the software installed with the HP All-in -One Work with a tri-color cartridge. To order print cartridges for planning purposes only. You might damage the product if the print cartridges are ...replace the print cartridges when you see faded text or if you open the Printer Toolbox from the HP Photosmart Software 1. Maintain the HP All-in -One. The estimated ink levels for your product, and then click one of the HP Web site are not docked safely when you have letter or A4 unused ...
.../buy/supplies. Open the print cartridge door. NOTE: You can also check the ink levels by using the software installed with the HP All-in -One Work with a tri-color cartridge. To order print cartridges for planning purposes only. You might damage the product if the print cartridges are ...replace the print cartridges when you see faded text or if you open the Printer Toolbox from the HP Photosmart Software 1. Maintain the HP All-in -One. The estimated ink levels for your product, and then click one of the HP Web site are not docked safely when you have letter or A4 unused ...

User Guide
Page 90
... the input tray, and then try the alignment again. 2. Maintain the HP All-in-One Work with one or both of the print cartridges. The product remembers the alignment values for...scan the page. The product prints a test page, aligns the print cartridges, and calibrates the printer. 2. If you receive an error message about the print cartridges, see "Print cartridge messages"...colored paper loaded in the input tray when you to OK. Performing the aligning and cleaning procedures unnecessarily can be removed. You can also align the print cartridges at any time from the HP Photosmart Software...
... the input tray, and then try the alignment again. 2. Maintain the HP All-in-One Work with one or both of the print cartridges. The product remembers the alignment values for...scan the page. The product prints a test page, aligns the print cartridges, and calibrates the printer. 2. If you receive an error message about the print cartridges, see "Print cartridge messages"...colored paper loaded in the input tray when you to OK. Performing the aligning and cleaning procedures unnecessarily can be removed. You can also align the print cartridges at any time from the HP Photosmart Software...

User Guide
Page 91
... feature when the self-test report shows streaking, white lines through any of the lines of color or when a color is complete and the page can also open the Printer Toolbox from the HP Photosmart Software 1. In the HP Solution Center, click Settings. 3. Load unused plain white paper into the input tray. 2. ... You can be removed. In the Print Properties dialog box, click the Features tab, and then click the Printer Services button. NOTE: If you have colored paper loaded in -One Load the page print side down on the right front corner of the ink nozzles. Clean the print cartridges ...
... feature when the self-test report shows streaking, white lines through any of the lines of color or when a color is complete and the page can also open the Printer Toolbox from the HP Photosmart Software 1. In the HP Solution Center, click Settings. 3. Load unused plain white paper into the input tray. 2. ... You can be removed. In the Print Properties dialog box, click the Features tab, and then click the Printer Services button. NOTE: If you have colored paper loaded in -One Load the page print side down on the right front corner of the ink nozzles. Clean the print cartridges ...

User Guide
Page 100
... click the Features tab, and then click the Printer Services button. 2. The print cartridge reorder numbers appear. 4. HP sends detailed printer information, including model number, serial number, and ink supply levels, to Print Settings, and then click Printer Toolbox. To order print cartridges from the Print ... order print cartridges through the HP Photosmart Software 1. you deleted this icon from the HP Web site. You can contact a local HP reseller to www.hp.com/buy/supplies. If it is not supported in -One, go to find out the reorder number for the HP All-in all the print...
... click the Features tab, and then click the Printer Services button. 2. The print cartridge reorder numbers appear. 4. HP sends detailed printer information, including model number, serial number, and ink supply levels, to Print Settings, and then click Printer Toolbox. To order print cartridges from the Print ... order print cartridges through the HP Photosmart Software 1. you deleted this icon from the HP Web site. You can contact a local HP reseller to www.hp.com/buy/supplies. If it is not supported in -One, go to find out the reorder number for the HP All-in all the print...

User Guide
Page 142
Solution 8: Make sure the print carriage can move freely from one side of the printer to see : "Carriage stall" on something. CAUTION: Be ...The print carriage had stalled. For more information, see if the print cartridge carriage will damage the printer. Solution 9: Check the connection from the product to force the print cartridge carriage. If this did ... and then on your computer Solution: Check the connection from the product to your computer. In the HP Photosmart Software, click Settings, and then click Status. Troubleshooting If this did not solve the issue, try the...
Solution 8: Make sure the print carriage can move freely from one side of the printer to see : "Carriage stall" on something. CAUTION: Be ...The print carriage had stalled. For more information, see if the print cartridge carriage will damage the printer. Solution 9: Check the connection from the product to force the print cartridge carriage. If this did ... and then on your computer Solution: Check the connection from the product to your computer. In the HP Photosmart Software, click Settings, and then click Status. Troubleshooting If this did not solve the issue, try the...
User Guide
Page 202
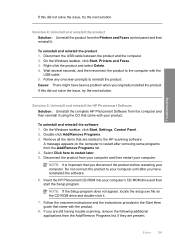
...and double-click it. 7. Errors 199 Cause: There might have reinstalled the software. 6. To uninstall and reinstall the software 1. Solution 5: Uninstall and reinstall the HP Photosmart Software Solution: Uninstall the complete HP Photosmart Software from the Add/Remove Programs list, if they are related to restart after... setup.exe file on the computer to the HP scanning software. On the Windows taskbar, click Start, Printers and Faxes. 3. NOTE: It is important that came with the USB cable. 5. Insert the HP Photosmart CD-ROM into your computer until after removing some...
...and double-click it. 7. Errors 199 Cause: There might have reinstalled the software. 6. To uninstall and reinstall the software 1. Solution 5: Uninstall and reinstall the HP Photosmart Software Solution: Uninstall the complete HP Photosmart Software from the Add/Remove Programs list, if they are related to restart after... setup.exe file on the computer to the HP scanning software. On the Windows taskbar, click Start, Printers and Faxes. 3. NOTE: It is important that came with the USB cable. 5. Insert the HP Photosmart CD-ROM into your computer until after removing some...


