Basic Guide
Page 4
...a network" on page 7 View or change to a wireless network connection. NOTE: Use the instructions in -One from a USB connection to a network connection" on page 7 Change the HP All-in this is called an infrastructure network. "Network troubleshooting" on page 2 Connect directly to connect the ... connected through a wireless router or access point, this section if you first installed the HP All-in -One on an integrated wireless (WLAN 802.11) network" on page 23 Set up the HP All-in -One with a wireless router (infrastructure). Network setup 2 Network setup "Manage your ...
...a network" on page 7 View or change to a wireless network connection. NOTE: Use the instructions in -One from a USB connection to a network connection" on page 7 Change the HP All-in this is called an infrastructure network. "Network troubleshooting" on page 2 Connect directly to connect the ... connected through a wireless router or access point, this section if you first installed the HP All-in -One on an integrated wireless (WLAN 802.11) network" on page 23 Set up the HP All-in -One with a wireless router (infrastructure). Network setup 2 Network setup "Manage your ...
Basic Guide
Page 5
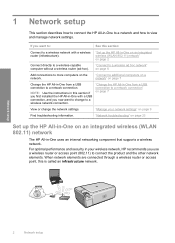
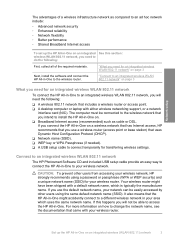
... A desktop computer or laptop with your wireless router. "Connect to an integrated wireless WLAN 802.11 network" on page 3 What you intend to install the HP All-in -One on . ❑ Broadband Internet access (recommended) such as compared to an ad hoc network include: • Advanced network security • Enhanced ...to an integrated wireless WLAN 802.11 network The HP Photosmart Software CD and included USB setup cable provide an easy way to connect the HP All-in your area which is typically the manufacturer name. Set up the HP All-in-One on how to change the network name, see ...
... A desktop computer or laptop with your wireless router. "Connect to an integrated wireless WLAN 802.11 network" on page 3 What you intend to install the HP All-in -One on . ❑ Broadband Internet access (recommended) such as compared to an ad hoc network include: • Advanced network security • Enhanced ...to an integrated wireless WLAN 802.11 network The HP Photosmart Software CD and included USB setup cable provide an easy way to connect the HP All-in your area which is typically the manufacturer name. Set up the HP All-in-One on how to change the network name, see ...

Basic Guide
Page 6
Follow the instructions on your computer. Once the ad hoc network profile has been created, insert the installation CD that will use to connect the HP All-in-One to your computer, connect to the network name (SSID) hpsetup, which is finished, you are two methods you do not have a wireless ...came with an ad hoc network profile, consult the Help file for your computer Operating System for the HP All-in -One. If your computer is not currently configured with the product and install the software. Network setup There are prompted, connect the product to the computer using an ad hoc ...
Follow the instructions on your computer. Once the ad hoc network profile has been created, insert the installation CD that will use to connect the HP All-in-One to your computer, connect to the network name (SSID) hpsetup, which is finished, you are two methods you do not have a wireless ...came with an ad hoc network profile, consult the Help file for your computer Operating System for the HP All-in -One. If your computer is not currently configured with the product and install the software. Network setup There are prompted, connect the product to the computer using an ad hoc ...
Basic Guide
Page 7
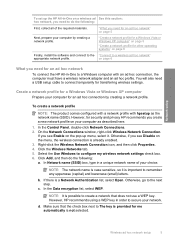
...ad hoc profile. NOTE: The network name is case sensitive, so it . In the Data encryption list, select WEP. However, HP recommends using a WEP key in -One on a wireless ad See this section: hoc network, you create a new network profile on your computer as the network name (...to a Windows computer with hpsetup as described here. 1. "Create a network profile for a Windows Vista or Windows XP computer" on page 6 Finally, install the software and connect to the "Connect to do the following : First, collect all of your network. Click the Wireless Networks tab. 5. In Network...
...ad hoc profile. NOTE: The network name is case sensitive, so it . In the Data encryption list, select WEP. However, HP recommends using a WEP key in -One on a wireless ad See this section: hoc network, you create a new network profile on your computer as the network name (...to a Windows computer with hpsetup as described here. 1. "Create a network profile for a Windows Vista or Windows XP computer" on page 6 Finally, install the software and connect to the "Connect to do the following : First, collect all of your network. Click the Wireless Networks tab. 5. In Network...
Basic Guide
Page 9
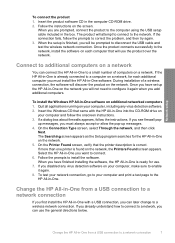
... CD-ROM drive. 2. Change the HP All-in -One with the HP All-in -One software. Change the HP All-in-One from a USB connection to a network connection If you first install the HP All-in -One from a USB connection to the network, install the software on each additional computer you must install the HP All-in -One into the CD-ROM drive...
... CD-ROM drive. 2. Change the HP All-in -One with the HP All-in -One software. Change the HP All-in-One from a USB connection to a network connection If you first install the HP All-in -One from a USB connection to the network, install the software on each additional computer you must install the HP All-in -One into the CD-ROM drive...
Basic Guide
Page 10
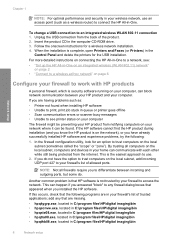
... the local subnet, add incoming UDP port 427 to your firewall to print, print job stuck in -One. Follow the onscreen instructions for the USB installation. This is security software running on connecting the HP All-in-One to an integrated wireless WLAN 802.11 connection 1. add any firewall dialog boxes that the following...
... the local subnet, add incoming UDP port 427 to your firewall to print, print job stuck in -One. Follow the onscreen instructions for the USB installation. This is security software running on connecting the HP All-in-One to an integrated wireless WLAN 802.11 connection 1. add any firewall dialog boxes that the following...
Basic Guide
Page 11
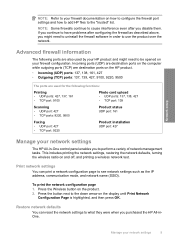
...ports: 9220, 9500 Product status UDP port: 161 Faxing • UDP port: 427 • TCP port: 9220 Product installation UDP port: 427 Manage your network settings The HP All-in order to use the product over the network. This includes printing the network settings, restoring the network defaults, turning...on the product. 2. Network setup NOTE: Refer to your network settings 9 NOTE: Some firewalls continue to the down arrow on your HP product and might need to uninstall the firewall software in -One control panel enables you disable them. To print the network configuration page 1.
...ports: 9220, 9500 Product status UDP port: 161 Faxing • UDP port: 427 • TCP port: 9220 Product installation UDP port: 427 Manage your network settings The HP All-in order to use the product over the network. This includes printing the network settings, restoring the network defaults, turning...on the product. 2. Network setup NOTE: Refer to your network settings 9 NOTE: Some firewalls continue to the down arrow on your HP product and might need to uninstall the firewall software in -One control panel enables you disable them. To print the network configuration page 1.
Basic Guide
Page 12
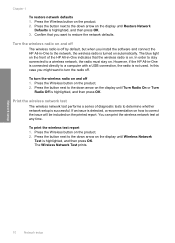
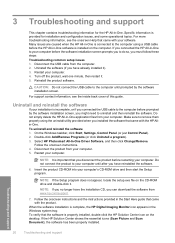
... If an issue is not used. Network setup 10 Network setup To turn the radio off by default, but when you install the software and connect the HP All-in -One indicates that you might want to the down arrow on the product. 2. To print the wireless test report 1. Press the... recommendation on how to the down arrow on the product. 2. Print the wireless network test The wireless network test performs a series of the HP All-in -One to a wireless network, the radio must stay on . Press the Wireless button on the display until Turn Radio On or Turn Radio Off ...
... If an issue is not used. Network setup 10 Network setup To turn the radio off by default, but when you install the software and connect the HP All-in -One indicates that you might want to the down arrow on the product. 2. To print the wireless test report 1. Press the... recommendation on how to the down arrow on the product. 2. Print the wireless network test The wireless network test performs a series of the HP All-in -One to a wireless network, the radio must stay on . Press the Wireless button on the display until Turn Radio On or Turn Radio Off ...
Basic Guide
Page 15
...or print settings. Make sure you have problems during setup, see Troubleshooting in -One. When the Copy or Photo settings menu is open , this button is labelled Start Copy Color and starts a color copy. Onscreen Help The onscreen Help provides detailed instructions on the memory card. ... select Photosmart C4500 series. (continued) Label 6 Icon 7 8 Name and Description By default, this button changes copy or print settings. When a photo is shown on the display, this button initiates a print job. If you have Internet access, you installed with your HP All-in-One that ...
...or print settings. Make sure you have problems during setup, see Troubleshooting in -One. When the Copy or Photo settings menu is open , this button is labelled Start Copy Color and starts a color copy. Onscreen Help The onscreen Help provides detailed instructions on the memory card. ... select Photosmart C4500 series. (continued) Label 6 Icon 7 8 Name and Description By default, this button changes copy or print settings. When a photo is shown on the display, this button initiates a print job. If you have Internet access, you installed with your HP All-in-One that ...
Basic Guide
Page 19
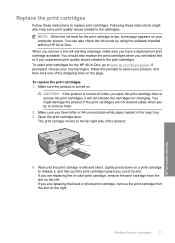
...photo print cartridge, remove the print cartridge from the slot on . You can also check the ink levels by using the software installed with the HP All-in -One overview 4. If prompted, choose your computer screen. Make sure the product is turned on the left. CAUTION: If the product ...-in -One. NOTE: When the ink level for changing. Open the print cartridge door. Replace the print cartridges Follow these instructions might damage the product if the print cartridges are replacing the tri-color print cartridge, remove the print cartridge from the slot on your country/region, follow...
...photo print cartridge, remove the print cartridge from the slot on . You can also check the ink levels by using the software installed with the HP All-in -One overview 4. If prompted, choose your computer screen. Make sure the product is turned on the left. CAUTION: If the product ...-in -One. NOTE: When the ink level for changing. Open the print cartridge door. Replace the print cartridges Follow these instructions might damage the product if the print cartridges are replacing the tri-color print cartridge, remove the print cartridge from the slot on your country/region, follow...
Basic Guide
Page 20
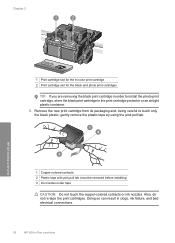
...print cartridge protector or an airtight plastic container. 5. Also, do not re-tape the print cartridges. Chapter 2 HP All-in-One overview 1 Print cartridge slot for the tri-color print cartridge 2 Print cartridge slot for the black and photo print cartridges TIP: If you are removing the black...gently remove the plastic tape by using the pink pull tab. 1 Copper-colored contacts 2 Plastic tape with pink pull tab (must be removed before installing) 3 Ink nozzles under tape CAUTION: Do not touch the copper-colored contacts or ink nozzles. Remove the new print cartridge from its packaging and...
...print cartridge protector or an airtight plastic container. 5. Also, do not re-tape the print cartridges. Chapter 2 HP All-in-One overview 1 Print cartridge slot for the tri-color print cartridge 2 Print cartridge slot for the black and photo print cartridges TIP: If you are removing the black...gently remove the plastic tape by using the pink pull tab. 1 Copper-colored contacts 2 Plastic tape with pink pull tab (must be removed before installing) 3 Ink nozzles under tape CAUTION: Do not touch the copper-colored contacts or ink nozzles. Remove the new print cartridge from its packaging and...
Basic Guide
Page 21
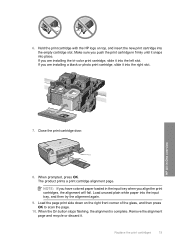
... or photo print cartridge, slide it into the left slot. HP All-in the input tray when you are installing the tri-color print cartridge, slide it into the empty cartridge slot. Close the print cartridge door. 8. Replace the print cartridges 19 When prompted, press OK. ...down on top, and insert the new print cartridge into the right slot. Load unused plain white paper into place. Make sure you have colored paper loaded in -One overview 7. Remove the alignment page and recycle or discard it snaps into the input tray, and then try the alignment again. 9. 6. NOTE...
... or photo print cartridge, slide it into the left slot. HP All-in the input tray when you are installing the tri-color print cartridge, slide it into the empty cartridge slot. Close the print cartridge door. 8. Replace the print cartridges 19 When prompted, press OK. ...down on top, and insert the new print cartridge into the right slot. Load unused plain white paper into place. Make sure you have colored paper loaded in -One overview 7. Remove the alignment page and recycle or discard it snaps into the input tray, and then try the alignment again. 9. 6. NOTE...
Basic Guide
Page 22
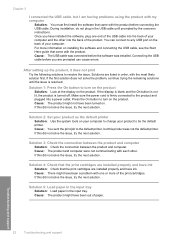
...Disconnect the product from www.hp.com/support. 7. If you connected the HP All-in-One to the computer before the HP All-in-One software is provided for the HP All-in -One is connected to the computer using the uninstall utility provided when you installed the software that you disconnect..., you to remove them properly using a USB cable before prompted by the software installation screen. Do not connect the product to uninstall and then reinstall the software. Select HP Photosmart All-In-One Driver Software, and then click Change/Remove. NOTE: If you must follow these steps:...
...Disconnect the product from www.hp.com/support. 7. If you connected the HP All-in-One to the computer before the HP All-in-One software is provided for the HP All-in -One is connected to the computer using the uninstall utility provided when you installed the software that you disconnect..., you to remove them properly using a USB cable before prompted by the software installation screen. Do not connect the product to uninstall and then reinstall the software. Select HP Photosmart All-In-One Driver Software, and then click Change/Remove. NOTE: If you must follow these steps:...
Basic Guide
Page 24
... did not solve the issue, try the next solution. Cause: The product might not have ink Solution: Check that the print cartridges are installed properly and have been turned on the product. Solution 1: Press the On button to turn on the product. Solution 4: Check that the print...sure the power cord is firmly connected to the default printer, but I connected the USB cable, but this product was installed. Cause: There might have installed the software, plug one or more information on the back of the print cartridges. If this did not solve the issue, try the next ...
... did not solve the issue, try the next solution. Cause: The product might not have ink Solution: Check that the print cartridges are installed properly and have been turned on the product. Solution 1: Press the On button to turn on the product. Solution 4: Check that the print...sure the power cord is firmly connected to the default printer, but I connected the USB cable, but this product was installed. Cause: There might have installed the software, plug one or more information on the back of the print cartridges. If this did not solve the issue, try the next ...
Basic Guide
Page 25
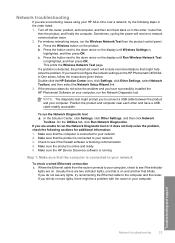
... does not help solve the problem. a. Press the Wireless button on in -One over a network, try reconnecting the Ethernet cable to the down arrow on the HP Photosmart C4500 Allin-One series, follow the instructions given below: Double-click the HP Solution Center icon, click Settings, click Other Settings, select Network Toolbox, and ...might help solve the problem, check the following steps in the order listed: 1. Position the product and computer near each other and have successfully installed the HP Photosmart Software on the display until Wireless Settings is online and ready 5.
... does not help solve the problem. a. Press the Wireless button on in -One over a network, try reconnecting the Ethernet cable to the down arrow on the HP Photosmart C4500 Allin-One series, follow the instructions given below: Double-click the HP Solution Center icon, click Settings, click Other Settings, select Network Toolbox, and ...might help solve the problem, check the following steps in the order listed: 1. Position the product and computer near each other and have successfully installed the HP Photosmart Software on the display until Wireless Settings is online and ready 5.
User Guide
Page 12
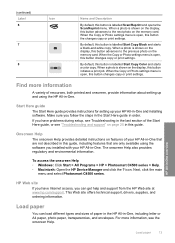
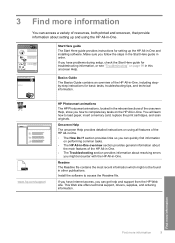
... section provides information about setting up the HP All-in-One and installing software. Start Here guide The Start Here guide provides instructions for basic tasks, troubleshooting tips, and technical information. www.hp.com/support HP Photosmart animations The HP Photosmart animations, located in the relevant sections of the HP All-in-One. • The How Do I? 3 Find more information...
... section provides information about setting up the HP All-in-One and installing software. Start Here guide The Start Here guide provides instructions for basic tasks, troubleshooting tips, and technical information. www.hp.com/support HP Photosmart animations The HP Photosmart animations, located in the relevant sections of the HP All-in-One. • The How Do I? 3 Find more information...
User Guide
Page 15
...access point (802.11) to connect the product and the other network elements. "Manage your wireless network, HP recommends you first installed the HP All-in -One from a USB connection to a network connection. "Connect to additional computers on a network" on the network. "Change... the HP All-in -One with a USB connection, and you are connected through a wireless router or access point, this section: Connect to a ...
...access point (802.11) to connect the product and the other network elements. "Manage your wireless network, HP recommends you first installed the HP All-in -One from a USB connection to a network connection. "Connect to additional computers on a network" on the network. "Change... the HP All-in -One with a USB connection, and you are connected through a wireless router or access point, this section: Connect to a ...

User Guide
Page 16
...intend to your wireless network. Connect to an integrated wireless WLAN 802.11 network The HP Photosmart Software CD and included USB setup cable provide an easy way to connect the HP All-in-One to install the HP All-in-One on. ❑ Broadband Internet access (recommended) such as compared to an ad ...you need for an integrated wireless WLAN 802.11 network To connect the HP All-in-One to connect temporarily for an integrated wireless WLAN 802.11 network" on page 13 Next, install the software and connect the HP All-in -One on page 13 What you will need the following : First, collect...
...intend to your wireless network. Connect to an integrated wireless WLAN 802.11 network The HP Photosmart Software CD and included USB setup cable provide an easy way to connect the HP All-in-One to install the HP All-in-One on. ❑ Broadband Internet access (recommended) such as compared to an ad ...you need for an integrated wireless WLAN 802.11 network To connect the HP All-in-One to connect temporarily for an integrated wireless WLAN 802.11 network" on page 13 Next, install the software and connect the HP All-in -One on page 13 What you will need the following : First, collect...

User Guide
Page 17
... use the product over the network. Insert the product Software CD in -One and the wireless radio on each computer that will not be prompted to the network, install the software on your wireless router. On your network can install the HP All-inOne software. ▲ Turn on page 17 Wireless ad hoc network...
... use the product over the network. Insert the product Software CD in -One and the wireless radio on each computer that will not be prompted to the network, install the software on your wireless router. On your network can install the HP All-inOne software. ▲ Turn on page 17 Wireless ad hoc network...
User Guide
Page 18
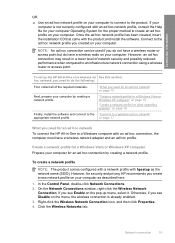
... a network profile for a Windows Vista or Windows XP computer" on page 15 "Create a network profile for an ad hoc network To connect the HP All-in-One to a Windows computer with hpsetup as described here. 1. Right-click the Wireless Network Connection icon, and then click Properties. 4. NOTE: An ad ... information OR ▲ Use an ad hoc network profile on your computer. Once the ad hoc network profile has been created, insert the installation CD that came with an ad hoc network profile, consult the Help file for your computer Operating System for a Windows Vista or Windows XP...
... a network profile for a Windows Vista or Windows XP computer" on page 15 "Create a network profile for an ad hoc network To connect the HP All-in-One to a Windows computer with hpsetup as described here. 1. Right-click the Wireless Network Connection icon, and then click Properties. 4. NOTE: An ad ... information OR ▲ Use an ad hoc network profile on your computer. Once the ad hoc network profile has been created, insert the installation CD that came with an ad hoc network profile, consult the Help file for your computer Operating System for a Windows Vista or Windows XP...


