
End User License Agreement
Page 2
... Product except as expressly provided in this EULA, and if applicable, the Certificate of the HP Product with/for commercial timesharing or bureau use a Software Product identified as eligible for your upgrade eligibility. 3. You may not rent, lease or lend the Software Product or use the... purchased. f. floppy disk, CD or DVD) or an equivalent solution delivered in the Software Product and user documentation are protected by HP as an upgrade, you fail to the transfer, the end user receiving the transferred product must include all the EULA terms. Upon transfer of this ...
... Product except as expressly provided in this EULA, and if applicable, the Certificate of the HP Product with/for commercial timesharing or bureau use a Software Product identified as eligible for your upgrade eligibility. 3. You may not rent, lease or lend the Software Product or use the... purchased. f. floppy disk, CD or DVD) or an equivalent solution delivered in the Software Product and user documentation are protected by HP as an upgrade, you fail to the transfer, the end user receiving the transferred product must include all the EULA terms. Upon transfer of this ...

Warranty
Page 9
... save considerable repair time. You can be returned with transportation of these service upgrades, refer to you , at HP's expense, packaging to use to pack your own courier and pay all areas. Service Upgrades HP has a range of additional support and service coverage for insuring any shipping charges, taxes, or duties associated with the...
... save considerable repair time. You can be returned with transportation of these service upgrades, refer to you , at HP's expense, packaging to use to pack your own courier and pay all areas. Service Upgrades HP has a range of additional support and service coverage for insuring any shipping charges, taxes, or duties associated with the...

Warranty
Page 13
...updates or supplements to all component parts, media, printed materials, this EULA, and if applicable, the Certificate of the Software Product, your upgrade eligibility. 3. TRANSFER. Third Party. The transfer may not be licensed for in its affiliates may make a one-time transfer of a.... Prior to the transfer, the end user receiving the transferred product must agree to the original Software Product provided by HP unless HP provides other terms along with any product identification, copyright notices or proprietary restrictions from the Software Product. 6. All intellectual ...
...updates or supplements to all component parts, media, printed materials, this EULA, and if applicable, the Certificate of the Software Product, your upgrade eligibility. 3. TRANSFER. Third Party. The transfer may not be licensed for in its affiliates may make a one-time transfer of a.... Prior to the transfer, the end user receiving the transferred product must agree to the original Software Product provided by HP unless HP provides other terms along with any product identification, copyright notices or proprietary restrictions from the Software Product. 6. All intellectual ...
Warranty
Page 23
... your local television stations, www.DTV.gov, or 1-888-CALL-FCC (TTY 1-888-TELL-FCC), and from your local television stations may result in the Upgrading and Servicing Guide may switch sooner. Laser Safety Statement Class 1 LED Product The CD and DVD drives contain a laser system and are classified as before...
... your local television stations, www.DTV.gov, or 1-888-CALL-FCC (TTY 1-888-TELL-FCC), and from your local television stations may result in the Upgrading and Servicing Guide may switch sooner. Laser Safety Statement Class 1 LED Product The CD and DVD drives contain a laser system and are classified as before...
Upgrading and Servicing Guide
Page 5
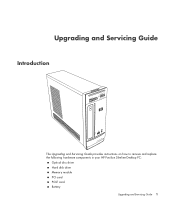
Upgrading and Servicing Guide Introduction The Upgrading and Servicing Guide provides instructions on how to remove and replace the following hardware components in your HP Pavilion Slimline Desktop PC: Optical disc drive Hard disk drive Memory module PCI card PCI-E card Battery Upgrading and Servicing Guide 1
Upgrading and Servicing Guide Introduction The Upgrading and Servicing Guide provides instructions on how to remove and replace the following hardware components in your HP Pavilion Slimline Desktop PC: Optical disc drive Hard disk drive Memory module PCI card PCI-E card Battery Upgrading and Servicing Guide 1
Upgrading and Servicing Guide
Page 6
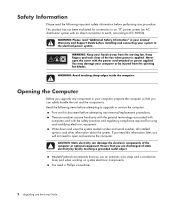
... may damage your computer or be injured from the moving fan. Hewlett-Packard recommends that you will not need a Phillips screwdriver. 2 Upgrading and Servicing Guide Safety Information Please read "Additional Safety Information" in your computer, prepare the computer so that you can damage the electronic... Read the following important safety information before performing any procedure. This product has not been evaluated for connection to upgrade or service the computer: Print out this information later, you are discharged of the fan when power is applied. Ensure that you...
... may damage your computer or be injured from the moving fan. Hewlett-Packard recommends that you will not need a Phillips screwdriver. 2 Upgrading and Servicing Guide Safety Information Please read "Additional Safety Information" in your computer, prepare the computer so that you can damage the electronic... Read the following important safety information before performing any procedure. This product has not been evaluated for connection to upgrade or service the computer: Print out this information later, you are discharged of the fan when power is applied. Ensure that you...
Upgrading and Servicing Guide
Page 7
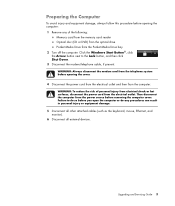
Then disconnect the computer from the power source before removing the computer cover. Upgrading and Servicing Guide 3 WARNING: Always disconnect the modem cord from the telephone system before opening the computer: 1 Remove any procedures can result in personal injury ...
Then disconnect the computer from the power source before removing the computer cover. Upgrading and Servicing Guide 3 WARNING: Always disconnect the modem cord from the telephone system before opening the computer: 1 Remove any procedures can result in personal injury ...
Upgrading and Servicing Guide
Page 8
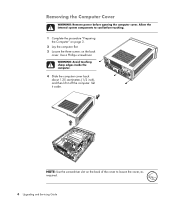
... "Preparing the Computer" on page 3. 2 Lay the computer flat. 3 Loosen the three screws on the back of the cover to loosen the cover, as required. 4 Upgrading and Servicing Guide Set it off the computer. Allow the internal system components to cool before opening the computer cover. WARNING: Avoid touching sharp edges...
... "Preparing the Computer" on page 3. 2 Lay the computer flat. 3 Loosen the three screws on the back of the cover to loosen the cover, as required. 4 Upgrading and Servicing Guide Set it off the computer. Allow the internal system components to cool before opening the computer cover. WARNING: Avoid touching sharp edges...
Upgrading and Servicing Guide
Page 9
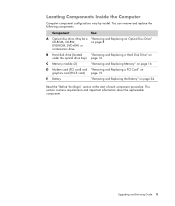
C Memory module (2) "Removing and Replacing Memory" on page 8. Read the "Before You Begin" section at the start of each component procedure. Upgrading and Servicing Guide 5 You can remove and replace the following components: Component See: A Optical disc drive. May be a "Removing and Replacing an Optical Disc Drive" ...
C Memory module (2) "Removing and Replacing Memory" on page 8. Read the "Before You Begin" section at the start of each component procedure. Upgrading and Servicing Guide 5 You can remove and replace the following components: Component See: A Optical disc drive. May be a "Removing and Replacing an Optical Disc Drive" ...
Upgrading and Servicing Guide
Page 10
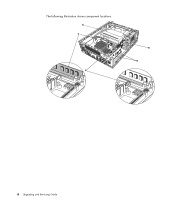
The following illustration shows component locations: A C digitOaUl aT udiowriaenletesnsnLaAN S-VIDEO E B D 6 Upgrading and Servicing Guide
The following illustration shows component locations: A C digitOaUl aT udiowriaenletesnsnLaAN S-VIDEO E B D 6 Upgrading and Servicing Guide

Upgrading and Servicing Guide
Page 11
... cover onto the computer about 2.5 centimeters (1 inch) back. T 4 Align the screws on the computer cover with the cover tabs. 3 Slide the cover forward on page 7. Upgrading and Servicing Guide 7 After Closing the Computer To avoid injury and equipment damage, always follow this order after closing the computer: WARNING: To reduce the...
... cover onto the computer about 2.5 centimeters (1 inch) back. T 4 Align the screws on the computer cover with the cover tabs. 3 Slide the cover forward on page 7. Upgrading and Servicing Guide 7 After Closing the Computer To avoid injury and equipment damage, always follow this order after closing the computer: WARNING: To reduce the...
Upgrading and Servicing Guide
Page 12
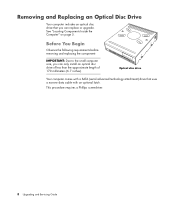
... computer includes an optical disc drive that uses a narrow data cable with an optional latch. This procedure requires a Phillips screwdriver. 8 Upgrading and Servicing Guide Optical disc drive Your computer comes with a SATA (serial advanced technology attachment) drive that you can replace or... upgrade. Before You Begin Observe the following requirements before removing and replacing the component: IMPORTANT: Due to the small computer size, ...
... computer includes an optical disc drive that uses a narrow data cable with an optional latch. This procedure requires a Phillips screwdriver. 8 Upgrading and Servicing Guide Optical disc drive Your computer comes with a SATA (serial advanced technology attachment) drive that you can replace or... upgrade. Before You Begin Observe the following requirements before removing and replacing the component: IMPORTANT: Due to the small computer size, ...

Upgrading and Servicing Guide
Page 13
Press the two tabs apart at the bottom of the cover, and press the two tabs together at the top of the chassis. digitaOlUauTdio wiraenletsesnLnAaN S-VIDEO 3 If your computer includes a Pocket Media Drive, lift the tab on page 2. 2 Remove the front cover from the computer. Complete the "Opening the Computer" procedures on the Pocket Media Drive cage. Upgrading and Servicing Guide 9 Removing an Optical Disc Drive 1 Prepare the computer and remove the computer cover. then push the cover out. Then pull the cage back and out of the cover;
Press the two tabs apart at the bottom of the cover, and press the two tabs together at the top of the chassis. digitaOlUauTdio wiraenletsesnLnAaN S-VIDEO 3 If your computer includes a Pocket Media Drive, lift the tab on page 2. 2 Remove the front cover from the computer. Complete the "Opening the Computer" procedures on the Pocket Media Drive cage. Upgrading and Servicing Guide 9 Removing an Optical Disc Drive 1 Prepare the computer and remove the computer cover. then push the cover out. Then pull the cage back and out of the cover;
Upgrading and Servicing Guide
Page 14
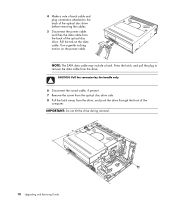
... computer. Pull the tab on the power cable. NOTE: The SATA data cable may include a latch. IMPORTANT: Do not tilt the drive during removal. 10 Upgrading and Servicing Guide 4 Make a note of each cable and plug orientation attached to remove the data cable from the drive. Use a gentle rocking motion on...
... computer. Pull the tab on the power cable. NOTE: The SATA data cable may include a latch. IMPORTANT: Do not tilt the drive during removal. 10 Upgrading and Servicing Guide 4 Make a note of each cable and plug orientation attached to remove the data cable from the drive. Use a gentle rocking motion on...
Upgrading and Servicing Guide
Page 15
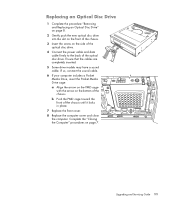
.... 6 If your computer includes a Pocket Media Drive, insert the Pocket Media Drive cage: a Align the arrow on the PMD cage with the arrow on page 7. Upgrading and Servicing Guide 11 Ensure that the cables are completely inserted. 5 Some drive models may have a sound cable. b Push the PMD cage toward the front...
.... 6 If your computer includes a Pocket Media Drive, insert the Pocket Media Drive cage: a Align the arrow on the PMD cage with the arrow on page 7. Upgrading and Servicing Guide 11 Ensure that the cables are completely inserted. 5 Some drive models may have a sound cable. b Push the PMD cage toward the front...
Upgrading and Servicing Guide
Page 16
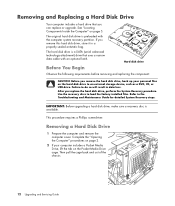
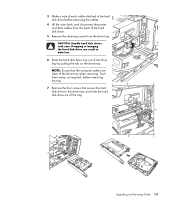
... Maintenance Guide for detailed System Recovery steps. Refer to load the factory-installed files. The hard disk drive is available. IMPORTANT: Before upgrading a hard disk drive, make sure a recovery disc is a SATA (serial advanced technology attachment) drive that you replace the hard disk... drive, perform the System Recovery procedure. After you can replace or upgrade. Complete the "Opening the Computer" procedures on page 2. 2 If your personal files on the Pocket Media Drive cage. Then pull ...
... Maintenance Guide for detailed System Recovery steps. Refer to load the factory-installed files. The hard disk drive is available. IMPORTANT: Before upgrading a hard disk drive, make sure a recovery disc is a SATA (serial advanced technology attachment) drive that you replace the hard disk... drive, perform the System Recovery procedure. After you can replace or upgrade. Complete the "Opening the Computer" procedures on page 2. 2 If your personal files on the Pocket Media Drive cage. Then pull ...
Upgrading and Servicing Guide
Page 17
... can result in data loss. 6 Slide the hard disk drive tray out of the hard disk drive. 5 Remove the retaining screw from the drive tray. Upgrading and Servicing Guide 13 3 Make a note of each cable attached to the drive tray, and slide the hard disk drive out of the tray. Push...
... can result in data loss. 6 Slide the hard disk drive tray out of the hard disk drive. 5 Remove the retaining screw from the drive tray. Upgrading and Servicing Guide 13 3 Make a note of each cable attached to the drive tray, and slide the hard disk drive out of the tray. Push...
Upgrading and Servicing Guide
Page 18
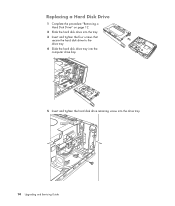
Replacing a Hard Disk Drive 1 Complete the procedure "Removing a Hard Disk Drive" on page 12. 2 Slide the hard disk drive into the tray. 3 Insert and tighten the four screws that secure the hard disk drive to the drive tray. 4 Slide the hard disk drive tray into the computer drive bay. 5 Insert and tighten the hard disk drive retaining screw into the drive tray. 14 Upgrading and Servicing Guide
Replacing a Hard Disk Drive 1 Complete the procedure "Removing a Hard Disk Drive" on page 12. 2 Slide the hard disk drive into the tray. 3 Insert and tighten the four screws that secure the hard disk drive to the drive tray. 4 Slide the hard disk drive tray into the computer drive bay. 5 Insert and tighten the hard disk drive retaining screw into the drive tray. 14 Upgrading and Servicing Guide
Upgrading and Servicing Guide
Page 19
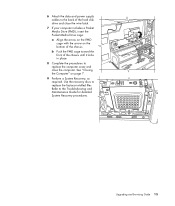
... Drive (PMD), insert the Pocket Media Drive cage: a Align the arrow on the PMD cage with the arrow on page 7. 9 Perform a System Recovery, as required. Upgrading and Servicing Guide 15 See "Closing the Computer" on the bottom of the chassis. 6 Attach the data and power supply cables to the back of...
... Drive (PMD), insert the Pocket Media Drive cage: a Align the arrow on the PMD cage with the arrow on page 7. 9 Perform a System Recovery, as required. Upgrading and Servicing Guide 15 See "Closing the Computer" on the bottom of the chassis. 6 Attach the data and power supply cables to the back of...

Upgrading and Servicing Guide
Page 20
Be careful to http://www.hp.com/support in -line memory modules). Memory module WARNING: Using the wrong type of memory module your computer uses, and for DDR DIMMs (double data ... two memory module sockets for specific memory module information and specifications: 1 Go to not touch any memory module contacts. Avoid touching the memory chips. 16 Upgrading and Servicing Guide Before You Begin Observe the following requirements before removing and replacing the component: To determine which type and speed of memory module...
Be careful to http://www.hp.com/support in -line memory modules). Memory module WARNING: Using the wrong type of memory module your computer uses, and for DDR DIMMs (double data ... two memory module sockets for specific memory module information and specifications: 1 Go to not touch any memory module contacts. Avoid touching the memory chips. 16 Upgrading and Servicing Guide Before You Begin Observe the following requirements before removing and replacing the component: To determine which type and speed of memory module...


