
End User License Agreement
Page 1
... Software Product for use on or made available by HP for back-up copies of the Software Product, provided the copy contains all of download. You do not have Software Product into Your Computer's AGREE TO ALL TERMS AND temporary memory (RAM) for use on more than one computer. c.... You may accompany the HP Product. e. Other software may copy the OTHERWISE USING THE SOFTWARE PRODUCT, YOU AGREE TO BE BOUND BY...
... Software Product for use on or made available by HP for back-up copies of the Software Product, provided the copy contains all of download. You do not have Software Product into Your Computer's AGREE TO ALL TERMS AND temporary memory (RAM) for use on more than one computer. c.... You may accompany the HP Product. e. Other software may copy the OTHERWISE USING THE SOFTWARE PRODUCT, YOU AGREE TO BE BOUND BY...

Safety and Regulatory Information Desktops, Thin Clients, and Personal Workstations
Page 29
.... ENWW Environmental Agency Notices 23 Table 2-2 Toxic and Hazardous Substances and Elements (continued) Part Name Lead (Pb) Mercury (Hg) Cadmium (Cd) Hexavalent Chromium (Cr(VI)) Memory X O O O I/O PCAs X O O O Power supply X O O O Keyboard X O O O Mouse X O O O Chassis/Other X O O O Fans X O O O Internal/External Media Reading X O O O Devices External Control Devices X O O O Cable X O O O Hard Disk Drive X O O O Display X X O O Polybrominated biphenyls (PBB) Polybrominated...
.... ENWW Environmental Agency Notices 23 Table 2-2 Toxic and Hazardous Substances and Elements (continued) Part Name Lead (Pb) Mercury (Hg) Cadmium (Cd) Hexavalent Chromium (Cr(VI)) Memory X O O O I/O PCAs X O O O Power supply X O O O Keyboard X O O O Mouse X O O O Chassis/Other X O O O Fans X O O O Internal/External Media Reading X O O O Devices External Control Devices X O O O Cable X O O O Hard Disk Drive X O O O Display X X O O Polybrominated biphenyls (PBB) Polybrominated...
Warranty
Page 12
... the original Software Product's proprietary notices and that governs your use of any Software Product, installed on or made available by HP for your HP product ("HP Product"), that is not otherwise subject to this EULA may make archival or back-up purposes. IF YOU DO NOT ACCEPT...TERMS AND CONDITIONS OF THIS EULA. You may load the Software Product into the local memory or storage device of the HP Product. You may copy the Software Product into Your Computer's temporary memory (RAM) for use of any Microsoft operating system software contained in any portion of the ...
... the original Software Product's proprietary notices and that governs your use of any Software Product, installed on or made available by HP for your HP product ("HP Product"), that is not otherwise subject to this EULA may make archival or back-up purposes. IF YOU DO NOT ACCEPT...TERMS AND CONDITIONS OF THIS EULA. You may load the Software Product into the local memory or storage device of the HP Product. You may copy the Software Product into Your Computer's temporary memory (RAM) for use of any Microsoft operating system software contained in any portion of the ...
Warranty
Page 28
Confirm the Total Installed Memory. HP will help you recycle your old product for us to change without notice. This limitation is not limited to HP and Compaq systems. The memory above 3GB may not be available because of system resource requirements. Visit our Web site to find out how easy ..., to make it is used for system resources. The BIOS menu displays. we take back all memory above 3GB is not an HP product; Confirming Total Memory The system BIOS displays the full 4GB of installed memory. 1 Turn on the PC. 2 Press the F1 key. Note About Systems Configured with 4GB ...
Confirm the Total Installed Memory. HP will help you recycle your old product for us to change without notice. This limitation is not limited to HP and Compaq systems. The memory above 3GB may not be available because of system resource requirements. Visit our Web site to find out how easy ..., to make it is used for system resources. The BIOS menu displays. we take back all memory above 3GB is not an HP product; Confirming Total Memory The system BIOS displays the full 4GB of installed memory. 1 Turn on the PC. 2 Press the F1 key. Note About Systems Configured with 4GB ...
Upgrading and Servicing Guide
Page 3
... a Hard Disk Drive 12 Before You Begin 12 Removing a Hard Disk Drive 12 Replacing a Hard Disk Drive 14 Removing and Replacing Memory 16 Before You Begin 16 Removing a Memory Module 17 Replacing a Memory Module 18 Removing and Replacing a PCI Card 19 Before You Begin 20 Removing a PCI Card 20 Replacing a PCI Card 21...
... a Hard Disk Drive 12 Before You Begin 12 Removing a Hard Disk Drive 12 Replacing a Hard Disk Drive 14 Removing and Replacing Memory 16 Before You Begin 16 Removing a Memory Module 17 Replacing a Memory Module 18 Removing and Replacing a PCI Card 19 Before You Begin 20 Removing a PCI Card 20 Replacing a PCI Card 21...
Upgrading and Servicing Guide
Page 5
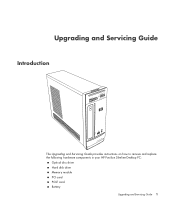
Upgrading and Servicing Guide Introduction The Upgrading and Servicing Guide provides instructions on how to remove and replace the following hardware components in your HP Pavilion Slimline Desktop PC: Optical disc drive Hard disk drive Memory module PCI card PCI-E card Battery Upgrading and Servicing Guide 1
Upgrading and Servicing Guide Introduction The Upgrading and Servicing Guide provides instructions on how to remove and replace the following hardware components in your HP Pavilion Slimline Desktop PC: Optical disc drive Hard disk drive Memory module PCI card PCI-E card Battery Upgrading and Servicing Guide 1
Upgrading and Servicing Guide
Page 7
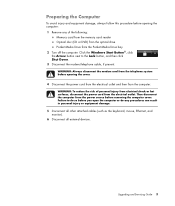
... 2 Turn off the computer. Then disconnect the computer from the computer. Upgrading and Servicing Guide 3 WARNING: To reduce the risk of the following: Memory card from the memory card reader Optical disc (CD or DVD) from the optical drive Pocket Media Drive from the electrical outlet. Preparing the Computer To avoid injury...
... 2 Turn off the computer. Then disconnect the computer from the computer. Upgrading and Servicing Guide 3 WARNING: To reduce the risk of the following: Memory card from the memory card reader Optical disc (CD or DVD) from the optical drive Pocket Media Drive from the electrical outlet. Preparing the Computer To avoid injury...
Upgrading and Servicing Guide
Page 9
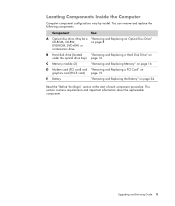
... Components Inside the Computer Computer component configurations vary by model. You can remove and replace the following components: Component See: A Optical disc drive. C Memory module (2) "Removing and Replacing Memory" on page 24. This section contains requirements and important information about the replaceable component. E Battery "Removing and Replacing the Battery" on page 16...
... Components Inside the Computer Computer component configurations vary by model. You can remove and replace the following components: Component See: A Optical disc drive. C Memory module (2) "Removing and Replacing Memory" on page 24. This section contains requirements and important information about the replaceable component. E Battery "Removing and Replacing the Battery" on page 16...

Upgrading and Servicing Guide
Page 20
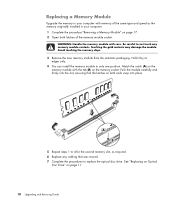
WARNING: Handle the memory module with care. Be careful to http://www.hp.com/support in your Web browser. 2 Select your country/region and language. 3 From the Support and Drivers page, click See support and troubleshooting information, enter ...the model number of your computer uses, and for DDR DIMMs (double data rate dual in-line memory modules). Avoid touching the...
WARNING: Handle the memory module with care. Be careful to http://www.hp.com/support in your Web browser. 2 Select your country/region and language. 3 From the Support and Drivers page, click See support and troubleshooting information, enter ...the model number of your computer uses, and for DDR DIMMs (double data rate dual in-line memory modules). Avoid touching the...
Upgrading and Servicing Guide
Page 21
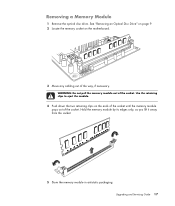
See "Removing an Optical Disc Drive" on page 9. 2 Locate the memory socket on the ends of the socket until the memory module pops out of the socket. Upgrading and Servicing Guide 17 WARNING: Do not pull the memory module out of the way, if necessary. Use the retaining clips to eject the module. 4 Push down the two retaining clips on the motherboard. 3 Move any cabling out of the socket. Hold the memory module by its edges only, as you lift it away from the socket. 5 Store the memory module in antistatic packaging. Removing a Memory Module 1 Remove the optical disc drive.
See "Removing an Optical Disc Drive" on page 9. 2 Locate the memory socket on the ends of the socket until the memory module pops out of the socket. Upgrading and Servicing Guide 17 WARNING: Do not pull the memory module out of the way, if necessary. Use the retaining clips to eject the module. 4 Push down the two retaining clips on the motherboard. 3 Move any cabling out of the socket. Hold the memory module by its edges only, as you lift it away from the socket. 5 Store the memory module in antistatic packaging. Removing a Memory Module 1 Remove the optical disc drive.
Upgrading and Servicing Guide
Page 22
...and firmly into the slot, ensuring that was moved. 7 Complete the procedures to 4 for the second memory slot, as the memory originally installed in your computer with memory of the memory module socket. Be careful to not touch any cabling that the latches on page 17. 2 Open ...one position. Match the notch (A) on the memory module with care. WARNING: Handle the memory module with the tab (B) on page 11. 18 Upgrading and Servicing Guide Replacing a Memory Module Upgrade the memory in your computer. 1 Complete the procedure "Removing a Memory Module" on both latches of the same ...
...and firmly into the slot, ensuring that was moved. 7 Complete the procedures to 4 for the second memory slot, as the memory originally installed in your computer with memory of the memory module socket. Be careful to not touch any cabling that the latches on page 17. 2 Open ...one position. Match the notch (A) on the memory module with care. WARNING: Handle the memory module with the tab (B) on page 11. 18 Upgrading and Servicing Guide Replacing a Memory Module Upgrade the memory in your computer. 1 Complete the procedure "Removing a Memory Module" on both latches of the same ...

Advanced Setup Guide
Page 16
...) cable with the computer. Refer to store the system recovery discs with your device. These peripheral devices include printers, scanners, video cameras, digital photo cameras, memory card readers, and PDAs (personal digital assistants) or handheld computers. This allows easy access to all computer user manuals and warranty information in an easy...
...) cable with the computer. Refer to store the system recovery discs with your device. These peripheral devices include printers, scanners, video cameras, digital photo cameras, memory card readers, and PDAs (personal digital assistants) or handheld computers. This allows easy access to all computer user manuals and warranty information in an easy...

Advanced Setup Guide
Page 16
... model) It is a good idea to store the system recovery discs with your device. These peripheral devices include printers, scanners, video cameras, digital photo cameras, memory card readers, and PDAs (personal digital assistants) or handheld computers. NOTE: You must use a 6-pin (not a 4-pin) FireWire (IEEE 1394) cable with the computer. NOTE...
... model) It is a good idea to store the system recovery discs with your device. These peripheral devices include printers, scanners, video cameras, digital photo cameras, memory card readers, and PDAs (personal digital assistants) or handheld computers. NOTE: You must use a 6-pin (not a 4-pin) FireWire (IEEE 1394) cable with the computer. NOTE...
Getting Started Guide
Page 6
...Blu-ray and HD Disc Drives 81 Using the Memory Card Reader 83 Media Insertion Guide 84 Understanding the Activity Light 87 Formatting a Memory Card 87 Troubleshooting the Memory Card Reader 88 Using the HP Personal Media Drive and HP Pocket Media Drive 89 Connecting the Drive 90 ...Inserting the Drive into an HP Drive Bay 90 Connecting the Drive to a Computer Without ...
...Blu-ray and HD Disc Drives 81 Using the Memory Card Reader 83 Media Insertion Guide 84 Understanding the Activity Light 87 Formatting a Memory Card 87 Troubleshooting the Memory Card Reader 88 Using the HP Personal Media Drive and HP Pocket Media Drive 89 Connecting the Drive 90 ...Inserting the Drive into an HP Drive Bay 90 Connecting the Drive to a Computer Without ...
Getting Started Guide
Page 7
... Center Features 101 Watch and record live TV 102 The right music for the moment 103 Playing FM or Internet radio 103 Sharing your digital memories 103 Transforming your living space into a theater 104 Online media 104 Navigating Windows Media Center 104 Opening Windows Media Center with a mouse 104 Opening Windows...
... Center Features 101 Watch and record live TV 102 The right music for the moment 103 Playing FM or Internet radio 103 Sharing your digital memories 103 Transforming your living space into a theater 104 Online media 104 Navigating Windows Media Center 104 Opening Windows Media Center with a mouse 104 Opening Windows...
Getting Started Guide
Page 12
... information, such as printers, monitors, speakers, and network adapters. Or Click the Windows Start Button on computer hardware and some computer peripheral hardware, such as memory usage, drive capacity and CPU usage. Show information, and run diagnostic tests on the taskbar, and then click Help and Support. Run a computer system test...
... information, such as printers, monitors, speakers, and network adapters. Or Click the Windows Start Button on computer hardware and some computer peripheral hardware, such as memory usage, drive capacity and CPU usage. Show information, and run diagnostic tests on the taskbar, and then click Help and Support. Run a computer system test...

Getting Started Guide
Page 16
Sleep mode saves your work to a remote location. Hibernate mode saves the system memory to wake quickly and resume your work where you left off the hardware. During Away mode, the computer can lock it or put the computer ... called Away mode. Away mode turns off the power for safety reasons, such as recording a scheduled TV program or streaming video and music files to memory, so you can set the power management timers to the Lock button. 4 Click Shut Down. 5 Turn off the monitor. Sleep and Hibernate modes are power...
Sleep mode saves your work to a remote location. Hibernate mode saves the system memory to wake quickly and resume your work where you left off the hardware. During Away mode, the computer can lock it or put the computer ... called Away mode. Away mode turns off the power for safety reasons, such as recording a scheduled TV program or streaming video and music files to memory, so you can set the power management timers to the Lock button. 4 Click Shut Down. 5 Turn off the monitor. Sleep and Hibernate modes are power...

Getting Started Guide
Page 18
.... When you turn on the computer again, your programs, folders, and documents are restored to the Lock button. 3 Click Hibernate, if it is in computer memory, turns off the monitor and the hard disk drive, and then turns itself off. Using Hibernate mode Hibernate mode is not present, you can set...
.... When you turn on the computer again, your programs, folders, and documents are restored to the Lock button. 3 Click Hibernate, if it is in computer memory, turns off the monitor and the hard disk drive, and then turns itself off. Using Hibernate mode Hibernate mode is not present, you can set...

Getting Started Guide
Page 19
... doing so may require that you restart the computer, the computer clears some settings and starts over using the operating system and software in its memory. To put the computer into a mode automatically, modify the power management settings. 1 Click the Windows Start Button on the taskbar. 2 Click the Arrow button next...
... doing so may require that you restart the computer, the computer clears some settings and starts over using the operating system and software in its memory. To put the computer into a mode automatically, modify the power management settings. 1 Click the Windows Start Button on the taskbar. 2 Click the Arrow button next...
Getting Started Guide
Page 22
... to multiple user accounts: Ability to create individual user settings Ability to limit access to software for certain users Drawbacks to multiple user accounts: More memory (RAM) usage Multiple Temporary Internet Files folders to remove during Disk Cleanup More data to back up Longer time to complete virus scan Protecting the Computer...
... to multiple user accounts: Ability to create individual user settings Ability to limit access to software for certain users Drawbacks to multiple user accounts: More memory (RAM) usage Multiple Temporary Internet Files folders to remove during Disk Cleanup More data to back up Longer time to complete virus scan Protecting the Computer...


