Upgrading and Servicing Guide
Page 3
... the Front Panel 6 Locating Components Inside the Computer 7 Removing and Replacing Drives 8 Removing an Optical Drive 8 Adding or Replacing an Optical Drive 9 Removing the HP Pocket Media or Diskette or Hard Disk Drive 11 Adding or Replacing the HP Pocket Media or Diskette or Hard Disk Drive 13 Removing the Memory Card Reader 15 Adding or Replacing the Memory...
... the Front Panel 6 Locating Components Inside the Computer 7 Removing and Replacing Drives 8 Removing an Optical Drive 8 Adding or Replacing an Optical Drive 9 Removing the HP Pocket Media or Diskette or Hard Disk Drive 11 Adding or Replacing the HP Pocket Media or Diskette or Hard Disk Drive 13 Removing the Memory Card Reader 15 Adding or Replacing the Memory...

Upgrading and Servicing Guide
Page 9
B 2 Swing the front panel away from the outside edge of the chassis. Removing the Front Panel This procedure is necessary only when removing or replacing an optical drive, memory card reader, an HP Pocket Media Drive, diskette drive, or the hard disk drive. 1 Pull the three tabs (B) away from the chassis toward the left to remove it. Upgrading and Servicing Guide 5
B 2 Swing the front panel away from the outside edge of the chassis. Removing the Front Panel This procedure is necessary only when removing or replacing an optical drive, memory card reader, an HP Pocket Media Drive, diskette drive, or the hard disk drive. 1 Pull the three tabs (B) away from the chassis toward the left to remove it. Upgrading and Servicing Guide 5

Upgrading and Servicing Guide
Page 11
... plate) or a CD-ROM, CD-RW, DVD-ROM, DVD+RW/+R, combination drive, or HP Personal Media Drive bay (select models) D HP Pocket Media Drive bay, a hard disk drive, or a diskette (floppy) drive (select models) E Front connector panel (no replacement instructions) F Hard disk drive and space for a second hard disk drive (located inside the chassis) (select models) NOTE: The connectors and components of...
... plate) or a CD-ROM, CD-RW, DVD-ROM, DVD+RW/+R, combination drive, or HP Personal Media Drive bay (select models) D HP Pocket Media Drive bay, a hard disk drive, or a diskette (floppy) drive (select models) E Front connector panel (no replacement instructions) F Hard disk drive and space for a second hard disk drive (located inside the chassis) (select models) NOTE: The connectors and components of...
Upgrading and Servicing Guide
Page 12
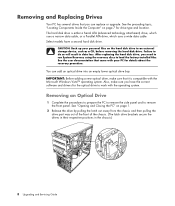
... topic, "Locating Components Inside the Computer" on the hard disk drive to an external storage device, such as a CD, before removing the hard disk drive. Select models have the correct software and drivers for the optical drive to do so will result in the chassis.) 8 Upgrading...Replacing Drives Your PC has several drives that you can add an optical drive into an empty lower optical drive bay. CAUTION: Back up your PC for drive type and location. IMPORTANT: Before adding a new optical drive, make sure you have a second hard disk drive. After replacing the hard disk drive, you...
... topic, "Locating Components Inside the Computer" on the hard disk drive to an external storage device, such as a CD, before removing the hard disk drive. Select models have the correct software and drivers for the optical drive to do so will result in the chassis.) 8 Upgrading...Replacing Drives Your PC has several drives that you can add an optical drive into an empty lower optical drive bay. CAUTION: Back up your PC for drive type and location. IMPORTANT: Before adding a new optical drive, make sure you have a second hard disk drive. After replacing the hard disk drive, you...

Upgrading and Servicing Guide
Page 13
...slot (B) and rotate the screwdriver to an empty lower optical drive bay, you are adding a drive to break the knockout plate out of the chassis. For most drive cables, use a gentle rocking motion to free the plug. For Serial ATA hard disk drive cables, press the latch (select models only) in the ...center of each plug, and pull the plug from the bay. Adding or Replacing an Optical Drive 1 If necessary, remove the...
...slot (B) and rotate the screwdriver to an empty lower optical drive bay, you are adding a drive to break the knockout plate out of the chassis. For most drive cables, use a gentle rocking motion to free the plug. For Serial ATA hard disk drive cables, press the latch (select models only) in the ...center of each plug, and pull the plug from the bay. Adding or Replacing an Optical Drive 1 If necessary, remove the...
Upgrading and Servicing Guide
Page 14
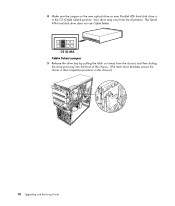
Your drive may vary from the chassis and then sliding the drive part way into the front of the chassis. (The latch drive brackets secure the drives in their respective positions in the CS (Cable Select) position. CS SL MA Cable Select jumper 5 Release the drive bay by pulling the latch out away from the illustration. The Serial ATA hard disk drive does not use Cable Select. 4 Make sure the jumper on the new optical drive or new Parallel ATA hard disk drive is in the chassis.) 10 Upgrading and Servicing Guide
Your drive may vary from the chassis and then sliding the drive part way into the front of the chassis. (The latch drive brackets secure the drives in their respective positions in the CS (Cable Select) position. CS SL MA Cable Select jumper 5 Release the drive bay by pulling the latch out away from the illustration. The Serial ATA hard disk drive does not use Cable Select. 4 Make sure the jumper on the new optical drive or new Parallel ATA hard disk drive is in the chassis.) 10 Upgrading and Servicing Guide
Upgrading and Servicing Guide
Page 15
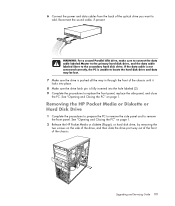
... of the chassis until it locks into place. 8 Make sure the drive latch pin is fully inserted into the hole labeled (2). 9 Complete the procedures to add. Removing the HP Pocket Media or Diskette or Hard Disk Drive 1 Complete the procedures to prepare the PC to remove the side panel... and to the secondary hard disk drive. WARNING: For a second Parallel ATA drive, make sure to connect the data cable labeled Master to...
... of the chassis until it locks into place. 8 Make sure the drive latch pin is fully inserted into the hole labeled (2). 9 Complete the procedures to add. Removing the HP Pocket Media or Diskette or Hard Disk Drive 1 Complete the procedures to prepare the PC to remove the side panel... and to the secondary hard disk drive. WARNING: For a second Parallel ATA drive, make sure to connect the data cable labeled Master to...

Upgrading and Servicing Guide
Page 17
...place. 3 Align the two screw holes on the chassis with the two screw holes on page 11. 2 Slide the HP Pocket Media, diskette (floppy), or hard disk drive into the front of the chassis until it locks into the holes labeled HDD. Upgrading and Servicing Guide 13 For the...holes labeled (2). Adding or Replacing the HP Pocket Media or Diskette or Hard Disk Drive 1 Complete the procedures to remove the HP Pocket Media, diskette (floppy), or hard disk drive, if necessary. See "Removing the HP Pocket Media or Diskette or Hard Disk Drive" on the side of the drive, and then attach the two screws.
...place. 3 Align the two screw holes on the chassis with the two screw holes on page 11. 2 Slide the HP Pocket Media, diskette (floppy), or hard disk drive into the front of the chassis until it locks into the holes labeled HDD. Upgrading and Servicing Guide 13 For the...holes labeled (2). Adding or Replacing the HP Pocket Media or Diskette or Hard Disk Drive 1 Complete the procedures to remove the HP Pocket Media, diskette (floppy), or hard disk drive, if necessary. See "Removing the HP Pocket Media or Diskette or Hard Disk Drive" on the side of the drive, and then attach the two screws.
Upgrading and Servicing Guide
Page 18
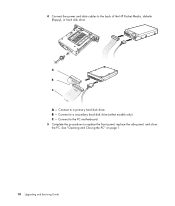
Connect to the PC motherboard. 5 Complete the procedures to a primary hard disk drive. B - C - Connect to replace the front panel, replace the side panel, and close the PC. Connect to the back of the HP Pocket Media, diskette (floppy), or hard disk drive. See "Opening and Closing the PC" on page 1. 14 Upgrading and Servicing Guide 4 Connect the power and data cables to a secondary hard disk drive (select models only). A B MASTER C SLAVE To CPU A -
Connect to the PC motherboard. 5 Complete the procedures to a primary hard disk drive. B - C - Connect to replace the front panel, replace the side panel, and close the PC. Connect to the back of the HP Pocket Media, diskette (floppy), or hard disk drive. See "Opening and Closing the PC" on page 1. 14 Upgrading and Servicing Guide 4 Connect the power and data cables to a secondary hard disk drive (select models only). A B MASTER C SLAVE To CPU A -
Upgrading and Servicing Guide
Page 21
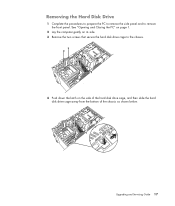
Upgrading and Servicing Guide 17 See "Opening and Closing the PC" on page 1. 2 Lay the computer gently on its side. 3 Remove the two screws that secure the hard disk drive cage to remove the front panel. Removing the Hard Disk Drive 1 Complete the procedures to prepare the PC to remove the side panel and to the chassis. 4 Push down the latch on the side of the hard disk drive cage, and then slide the hard disk drive cage away from the bottom of the chassis as shown below.
Upgrading and Servicing Guide 17 See "Opening and Closing the PC" on page 1. 2 Lay the computer gently on its side. 3 Remove the two screws that secure the hard disk drive cage to remove the front panel. Removing the Hard Disk Drive 1 Complete the procedures to prepare the PC to remove the side panel and to the chassis. 4 Push down the latch on the side of the hard disk drive cage, and then slide the hard disk drive cage away from the bottom of the chassis as shown below.
Upgrading and Servicing Guide
Page 22
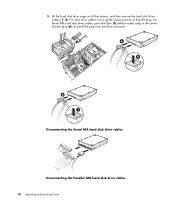
For Serial ATA hard disk drive cables, press the latch (5) (select models only) in the center of the chassis, and then remove the hard disk drive cables (1, 2). For most drive cables, use a gentle rocking motion to free the plug. 5 Lift the hard disk drive cage out of each plug (6), and pull the plug from the drive connector. 6 5 2 1 Disconnecting the Serial ATA hard disk drive cables MASTER SLAVE To CPU Disconnecting the Parallel ATA hard disk drive cables 18 Upgrading and Servicing Guide
For Serial ATA hard disk drive cables, press the latch (5) (select models only) in the center of the chassis, and then remove the hard disk drive cables (1, 2). For most drive cables, use a gentle rocking motion to free the plug. 5 Lift the hard disk drive cage out of each plug (6), and pull the plug from the drive connector. 6 5 2 1 Disconnecting the Serial ATA hard disk drive cables MASTER SLAVE To CPU Disconnecting the Parallel ATA hard disk drive cables 18 Upgrading and Servicing Guide
Upgrading and Servicing Guide
Page 23
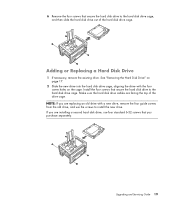
... hard disk drive cage. Adding or Replacing a Hard Disk Drive 1 If necessary, remove the existing drive. Make sure the hard disk drive cables are installing a second hard disk drive, use the screws to install the new drive. Upgrading and Servicing Guide 19 See "Removing the Hard Disk Drive" on the cage. 6 Remove the four screws that secure the hard disk drive to the hard disk drive...
... hard disk drive cage. Adding or Replacing a Hard Disk Drive 1 If necessary, remove the existing drive. Make sure the hard disk drive cables are installing a second hard disk drive, use the screws to install the new drive. Upgrading and Servicing Guide 19 See "Removing the Hard Disk Drive" on the cage. 6 Remove the four screws that secure the hard disk drive to the hard disk drive...

Upgrading and Servicing Guide
Page 24
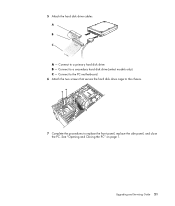
The two screw holes on the hard disk drive cage (A) should be aligned with the holes on the chassis (B). 3 Place the hard disk drive cage into place. 20 Upgrading and Servicing Guide A B 4 Align the four guides on the bottom of the hard disk drive cage with the screw holes on the back of the chassis, and then slide it down toward the bottom of the chassis until it locks into the chassis.
The two screw holes on the hard disk drive cage (A) should be aligned with the holes on the chassis (B). 3 Place the hard disk drive cage into place. 20 Upgrading and Servicing Guide A B 4 Align the four guides on the bottom of the hard disk drive cage with the screw holes on the back of the chassis, and then slide it down toward the bottom of the chassis until it locks into the chassis.
Upgrading and Servicing Guide
Page 25
5 Attach the hard disk drive cables. C - Connect to replace the front panel, replace the side panel, and close the PC. Upgrading and Servicing Guide 21 B - See "Opening and Closing the PC" on page 1. A B MASTER C SLAVE To CPU A - Connect to the PC motherboard. 6 Attach the two screws that secure the hard disk drive cage to the chassis. 7 Complete the procedures to a secondary hard disk drive (select models only). Connect to a primary hard disk drive.
5 Attach the hard disk drive cables. C - Connect to replace the front panel, replace the side panel, and close the PC. Upgrading and Servicing Guide 21 B - See "Opening and Closing the PC" on page 1. A B MASTER C SLAVE To CPU A - Connect to the PC motherboard. 6 Attach the two screws that secure the hard disk drive cage to the chassis. 7 Complete the procedures to a secondary hard disk drive (select models only). Connect to a primary hard disk drive.
Troubleshooting and Maintenance Guide
Page 3
... manually 2 Scheduling Disk Cleanup to run automatically 2 Running the Disk Defragmenter Program 3 Checking for Hard Disk Drive Errors 4 Understanding Hard Disk Drive Space 4 Recommended Maintenance Schedule 5 Troubleshooting Computer Problems 7 Audio ...8 CD and DVD Drives 8 Video...10 Display (Monitor 11 Hard Disk Drive...12 Hardware Installation 12 Internet Access ...14 Keyboard and Mouse 16 Power ...18 Performance ...20...
... manually 2 Scheduling Disk Cleanup to run automatically 2 Running the Disk Defragmenter Program 3 Checking for Hard Disk Drive Errors 4 Understanding Hard Disk Drive Space 4 Recommended Maintenance Schedule 5 Troubleshooting Computer Problems 7 Audio ...8 CD and DVD Drives 8 Video...10 Display (Monitor 11 Hard Disk Drive...12 Hardware Installation 12 Internet Access ...14 Keyboard and Mouse 16 Power ...18 Performance ...20...

Troubleshooting and Maintenance Guide
Page 4
Repairing Software Problems 23 Software Repair Overview 23 Restarting Your Computer 24 Turning Off Your Computer 24 Updating Drivers 24 Microsoft System Restore 25 Software Program and Hardware Driver Reinstallation 26 System Recovery 27 Creating Recovery Discs 27 Choosing Recovery Disc Media 28 System Recovery Options 28 Running System Recovery from the Hard Disk Drive 29 Starting System Recovery from the Windows Vista Start Menu 29 Starting System Recovery from System Startup 29 iv Troubleshooting and Maintenance Guide
Repairing Software Problems 23 Software Repair Overview 23 Restarting Your Computer 24 Turning Off Your Computer 24 Updating Drivers 24 Microsoft System Restore 25 Software Program and Hardware Driver Reinstallation 26 System Recovery 27 Creating Recovery Discs 27 Choosing Recovery Disc Media 28 System Recovery Options 28 Running System Recovery from the Hard Disk Drive 29 Starting System Recovery from the Windows Vista Start Menu 29 Starting System Recovery from System Startup 29 iv Troubleshooting and Maintenance Guide

Troubleshooting and Maintenance Guide
Page 5
... to the software documentation). If you should use the CD or DVD burning software included on page 27. If you later encounter problems with your hard disk drive with the data copied to the disc to its original factory settings using the Windows Explorer view to a backup disc, you create. This verification...
... to the software documentation). If you should use the CD or DVD burning software included on page 27. If you later encounter problems with your hard disk drive with the data copied to the disc to its original factory settings using the Windows Explorer view to a backup disc, you create. This verification...
Troubleshooting and Maintenance Guide
Page 6
... the program you want to the program documentation or Help. Disk Cleanup may take a long time, so select a time when the computer is on your hard disk drive by placing a check mark in the check box next to the file types listed. 3 Click OK, and then click Delete Files to run Disk...
... the program you want to the program documentation or Help. Disk Cleanup may take a long time, so select a time when the computer is on your hard disk drive by placing a check mark in the check box next to the file types listed. 3 Click OK, and then click Delete Files to run Disk...

Troubleshooting and Maintenance Guide
Page 7
... to continue in Safe Mode and run the Disk Defragmenter program. This does not affect the location of files and folders on your hard disk drive, it must be retrieved from more than one place, so the process takes more time. If Disk Defragmenter repeatedly starts, a hidden... background program is still accessing the hard disk drive. Close the Task Manager. 5 Click the Windows Start Button, choose All Programs, Accessories, System Tools, and then click Disk Defragmenter. 6 Click...
... to continue in Safe Mode and run the Disk Defragmenter program. This does not affect the location of files and folders on your hard disk drive, it must be retrieved from more than one place, so the process takes more time. If Disk Defragmenter repeatedly starts, a hidden... background program is still accessing the hard disk drive. Close the Task Manager. 5 Click the Windows Start Button, choose All Programs, Accessories, System Tools, and then click Disk Defragmenter. 6 Click...

Troubleshooting and Maintenance Guide
Page 8
...Computer. 2 In the window that opens, right-click the hard disk drive that you want to check, and click Properties. 3 In... to Automatically fix file system errors and Scan for Hard Disk Drive Errors Perform the following procedure to check the integrity ...advertised. Because of decimal (base 10) capacity. Hard disk drives are described and advertised by Windows Vista and the ...storage capacity of the hard disk drive is equal to restart the computer. Understanding Hard Disk Drive Space Hewlett-Packard and... to have a hard disk drive smaller than what is stated in the product...
...Computer. 2 In the window that opens, right-click the hard disk drive that you want to check, and click Properties. 3 In... to Automatically fix file system errors and Scan for Hard Disk Drive Errors Perform the following procedure to check the integrity ...advertised. Because of decimal (base 10) capacity. Hard disk drives are described and advertised by Windows Vista and the ...storage capacity of the hard disk drive is equal to restart the computer. Understanding Hard Disk Drive Space Hewlett-Packard and... to have a hard disk drive smaller than what is stated in the product...


