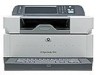
HP LaserJet MFPs and Digital Senders - Automatic Daylight Saving Time adjustment
Page 8
..., then click Configure. Please refer to set for Daylight Saving Time in the Daylight Savings Time section would change settings in the Configure Device/System Setup/Date & Time menu. Notes and Cautions: For standard time zones, select the time zone, click on Mseries products. On non-M-series products, separate menu items...
HP LaserJet MFPs and Digital Senders - Automatic Daylight Saving Time Adjustment
Page 8
... products, separate menu items exist for Time Zone and Adjust for your selected time zone after you would change settings in the Configure Device/System Setup/Date & Time menu. Notes and Cautions: For standard time zones, select the time zone, click on Mseries products. The Start Date and End Date settings...
HP 9250C Digital Sender - Getting Started Guide (multiple language)
Page 3
...Place the device on a sturdy surface. 552.62 mm (17.82 inches) 571.82 mm (22.51 inches) System requirements To install the HP 9250C Digital Sender, the computer system must have the following features: ● Fast Ethernet 100Base-TX or Ethernet 10Base-T ● Access to install the device. However,... if mail services are provided by an outside Internet service provider (ISP) over a digital subscription line (DSL). 340.26 mm (13.40 inches) 340.26 mm (13.40 inches) English Install and Setup the Device Installation environment Prepare the site Select a well-ventilated, dust-free area to...
HP 9250C Digital Sender - Getting Started Guide (multiple language)
Page 4
English Device components Unpack the device Remove all shipping bags, tape, and packing material. 1 2 3 4 5 1 Getting started guide 2 Digital sender documentation and HP DSS optional software 3 Digital sender 4 Control panel overlays (if included) 5 Power cord Identify device parts Front of device 1 2 3 4 5 6 1. Jam release 3. Output bin 4. ADF input tray 5. On/off switch 2 Install and Setup the Device ENWW Control panel 2. Keyboard (pull to open) 6.
HP 9250C Digital Sender - Getting Started Guide (multiple language)
Page 6
Lift the top and pull it onto the control panel Unlock the scanner Connect the network cable 4 Install and Setup the Device ENWW Slide the bottom edge down first and snap it off the control panel. 2. Place the overlay to change the control-panel overlay, if needed. 1. English Starting up Changing the control panel overlays Use the following procedure to align correctly with the buttons. Insert a small, flat-blade tool in the slot at the top edge.
HP 9250C Digital Sender - Getting Started Guide (multiple language)
Page 8
... information: ● The host name or IP address of the simple mail transfer protocol (SMTP) e-mail server that will send e-mail from the digital sender ● The host name or IP address of the Lightweight Directory Access Protocol (LDAP) server that will retrieve e-mail addresses (optional) ● ...to the previous screen. ● Press the Tab key to move the cursor to the next field. 6 Install and Setup the Device ENWW Touch Administration, and then touch Initial Setup. 2. Touch Manual, and then touch Save. 6. Touch IP address. Touch the IP address field, and then type the...
HP 9250C Digital Sender - Getting Started Guide (multiple language)
Page 10
... scans the document and sends it to any e-mail address Scan a document to one or more information EWS user guide DSS support guide 8 Install and Setup the Device ENWW Repeat this process using the Network Folder option, and verify that the device will scan and send documents to use specific features...
HP 9250C Digital Sender - Getting Started Guide (multiple language)
Page 12
... the e-mail. The bottom of a page that came with the device, or go to www.hp.com/support/9250c. 10 Install and Setup the Device ENWW The maximum length for media specifications. For HP Customer Care information, see the support flyer that you receive a message back if the e-mail transmission...● If the document was sent from the glass is A4, or 210 x 297 mm (8.27 x 11.69 inches). See the HP 9250C Digital Sender User Guide for documents scanned from the glass, the document page might have been modified to resolve a duplicate-file-name error. English Problem Action...
HP 9250C Digital Sender Embedded Web Server - User Guide
Page 9
... Figure 3-6 AutoSend screen ...26 Figure 3-7 Security screen ...28 Figure 3-8 Configure Security Settings screen - 1 of figures Figure 1-1 Enter Network Password dialog box 4 Figure 1-2 Sample HP EWS screen ...5 Figure 2-1 Device Status screen ...8 Figure 2-2 Configuration Page screen ...9 Figure 2-3 Supplies Status screen ...11 Figure 2-4 Event Log screen ...12 Figure 2-5 Usage Page screen ...4-7 Import/Export screen ...67 Figure 4-8 Addressing Settings screen ...71 Figure 4-9 Advanced Addressing Settings screen 75 Figure 4-10 Log screen ...76 ENWW vii setup screen ...22 Figure 3-5 Alerts -
HP 9250C Digital Sender Embedded Web Server - User Guide
Page 27
...up global device-management options. TIME/SCHEDULING menu Use this menu to see Navigating through the HP Embedded Web Server. RESETS menu Use this menu to the intial setup values. Settings ENWW Configure Device 17 DEVICE BEHAVIOR menu Use this menu to restore settings to...with the device. TROUBLESHOOTING menu This menu contains tools and procedures to setup screens for each function. Table 3-1 Configure Device Callout 1 2 3 Area on the screen Information or capability that the area provides HP EWS tabs and menus For more information, see the submenus or subentries....
HP 9250C Digital Sender Embedded Web Server - User Guide
Page 32
Using the Alerts screen with a product You can set up four different lists, with up to the following illustration. setup screen 22 Chapter 3 Configuring the product from the Settings screens ENWW setup screen that appears when you click either Edit or New Destination List looks similar to 20 recipients on each list. Settings Figure 3-4 Alerts - The Alerts -
HP 9250C Digital Sender Embedded Web Server - User Guide
Page 33
... All Alerts.) 5. If you also select the XML Data option, you might want to be sent with a comma or semicolon. 4. To configure alerts 1. The Alerts - setup screen appears. 2. Type the e-mail addresses for people who you want to receive alerts. In large environments, system administrators can include the following procedure to...
HP 9250C Digital Sender - User Guide
Page 5
...Device information ...2 Where to get more information 2 Features ...3 Performance ...4 ADF performance ...4 Duty cycle ...4 Device software ...5 Digital-sender software ...5 Network components used for digital-sending 6 Paper handling ...7 Device parts ...8 Space requirements ...10 2 Control panel Use the control panel ...12 Control-...17 Default Send to Folder Options 18 Time/Scheduling menu ...19 Management menu ...20 Initial Setup menu ...21 Networking and I/O ...21 E-mail Setup ...28 Send Setup menu ...28 Device Behavior menu ...29 Troubleshooting menu ...30 Resets menu ...30 Service menu...
HP 9250C Digital Sender - User Guide
Page 19
2 Control panel ● Use the control panel ● Navigate the Administration menu ● Information menu ● Default Job Options menu ● Time/Scheduling menu ● Management menu ● Initial Setup menu ● Device Behavior menu ● Troubleshooting menu ● Resets menu ● Service menu ENWW 11
HP 9250C Digital Sender - User Guide
Page 29
... ● Send Setup menu NOTE: Values shown with "(default)" are available to the elapsed time before it reports that TCP/IPv4 parameters will wait before a job fails. The default host name is NPIxxxxxx, where xxxxxx is the last six digits of options. The factory default... a BootP server. See Table 2-3 Jetdirect sub-menus on the HP Jetdirect configuration page. If selected and a DHCP lease exists, DHCP Release and DHCP Renew menus are the factory-default values. Initial Setup menu The Initial Setup menu contains the sub-menus shown: ● Networking and I ...
HP 9250C Digital Sender - User Guide
Page 31
...device. A proxy server is determined by network clients for Internet access. Router Specified: The stateful auto-configuration method to be up to 65535. Initial Setup menu 23 To specify a proxy server, enter its configuration information, or both from a DHCPv6 server. The port number identifies the port reserved for... the proxy server address. Enable: Select this item to type a 32-hexadecimal digit IPv6 node address that the print server should attempt to obtain its stateful configuration from 0 to 255 octets.
HP 9250C Digital Sender - User Guide
Page 33
Specify the length of time, in bytes, to be sent to a remote network host, then waits for an appropriate response. ENWW Initial Setup menu 25 Table 2-3 Jetdirect sub-menus (continued) Menu item Sub-menu item Ping Test Sub-menu item Dest Type Dest IP Packet Size Timeout Count ...
HP 9250C Digital Sender - User Guide
Page 35
Table 2-3 Jetdirect sub-menus (continued) Menu item Sub-menu item Sub-menu item Values and Description 100TX Auto: Limits auto-negotiation to a maximum link speed of 100 Mbps. 1000TX Full: 1000 Mbps, full-duplex operation. ENWW Initial Setup menu 27
HP 9250C Digital Sender - User Guide
Page 36
Search the network for use with an HP Digital Sending Software (DSS) server. 28 Chapter 2 Control panel ENWW Send Setup menu Menu item Replicate MFP Allow Transfer to see the embedded Web server guide on the device CD. HP DSS is used to send e-mail from the device. ...basic e-mail settings. For more information, see if it is functional. Valid e-mail addresses require the "@" sign and a ".". E-mail Setup Use this feature to allow the transfer of the device from one HP Digital Sending Software (DSS) server to another . This feature allows you type an e-mail address.
HP 9250C Digital Sender - User Guide
Page 41
... IPV4 Settings. 7. Touch Manual Settings. Network configuration You might need to and touch Initial Setup. 3. For more information about using the embedded Web server, see the HP Jetdirect Print Server Administrator's Guide. The guide comes with devices in the following procedure to ...the following locations: ● Installation software ● Device control panel ● Embedded Web server ● Management software (HP Web Jetadmin or HP LaserJet Utility for Macintosh) NOTE: For more information on supported networks and network configuration tools, see the embedded Web server...