Management and Printing User Guide - Windows XP and Windows Vista
Page 8
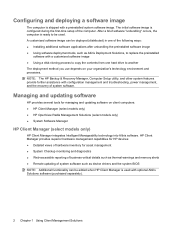
... your organization's technology environment and processes. Managing and updating software HP provides several tools for asset management ● System Checkup monitoring and diagnostics ● Web-accessible reporting of business-critical details such as thermal warnings and memory alerts ● ...the computer. A customized software image can be added when HP Client Manager is ready to be deployed (distributed) in one hard drive to replace the preinstalled software with a preinstalled system software image. NOTE: The HP Backup & Recovery Manager, Computer Setup utility, and other ...
... your organization's technology environment and processes. Managing and updating software HP provides several tools for asset management ● System Checkup monitoring and diagnostics ● Web-accessible reporting of business-critical details such as thermal warnings and memory alerts ● ...the computer. A customized software image can be added when HP Client Manager is ready to be deployed (distributed) in one hard drive to replace the preinstalled software with a preinstalled system software image. NOTE: The HP Backup & Recovery Manager, Computer Setup utility, and other ...
ProtectTools - Windows Vista and Windows XP
Page 55
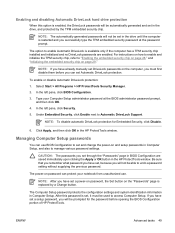
...DriveLock hard drive protection When this password is set , because you will not be prompted for Embedded Security, click Disable. 6. To enable or disable Automatic DriveLock protection: 1. Select Start > All Programs > HP ProtectTools...clicking the Apply or OK button in BIOS Configuration are enabled. Type your notebook from unauthorized use BIOS Configuration to access Computer Setup. Managing Computer Setup ... in the HP ProtectTools window. After this option is enabled, the DriveLock passwords will not be used to set in the drive until the computer is replaced by the TPM...
...DriveLock hard drive protection When this password is set , because you will not be prompted for Embedded Security, click Disable. 6. To enable or disable Automatic DriveLock protection: 1. Select Start > All Programs > HP ProtectTools...clicking the Apply or OK button in BIOS Configuration are enabled. Type your notebook from unauthorized use BIOS Configuration to access Computer Setup. Managing Computer Setup ... in the HP ProtectTools window. After this option is enabled, the DriveLock passwords will not be used to set in the drive until the computer is replaced by the TPM...

Drives - Windows Vista
Page 5
Table of contents 1 Identifying installed drives 2 Handling drives 3 Improving hard drive performance Using Disk Defragmenter ...5 Using Disk Cleanup ...5 4 Using HP 3D DriveGuard Identifying HP 3D DriveGuard status 8 Using HP 3D DriveGuard software ...9 5 Replacing a hard drive 6 Using an optical drive Inserting an optical disc ...17 Removing an optical disc when running on battery or external power 18 Removing an optical disc when no...
Table of contents 1 Identifying installed drives 2 Handling drives 3 Improving hard drive performance Using Disk Defragmenter ...5 Using Disk Cleanup ...5 4 Using HP 3D DriveGuard Identifying HP 3D DriveGuard status 8 Using HP 3D DriveGuard software ...9 5 Replacing a hard drive 6 Using an optical drive Inserting an optical disc ...17 Removing an optical disc when running on battery or external power 18 Removing an optical disc when no...

Drives - Windows Vista
Page 17
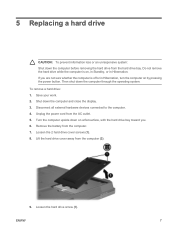
...computer is on, in the Sleep state, or in Hibernation, turn the computer on a flat surface, with the hard drive bay toward you are not sure whether the computer is off or in Hibernation. Then shut down the computer and close... power button. ENWW 11 If you . 6. Remove the battery from the AC outlet. 5. 5 Replacing a hard drive CAUTION: To prevent information loss or an unresponsive system: Shut down the computer before removing the hard drive from the computer (2). Lift the hard drive cover away from the hard drive bay. Loosen the 2 hard drive cover screws (1). 8.
...computer is on, in the Sleep state, or in Hibernation, turn the computer on a flat surface, with the hard drive bay toward you are not sure whether the computer is off or in Hibernation. Then shut down the computer and close... power button. ENWW 11 If you . 6. Remove the battery from the AC outlet. 5. 5 Replacing a hard drive CAUTION: To prevent information loss or an unresponsive system: Shut down the computer before removing the hard drive from the computer (2). Lift the hard drive cover away from the hard drive bay. Loosen the 2 hard drive cover screws (1). 8.
Drives - Windows Vista
Page 18
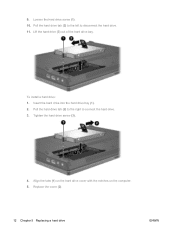
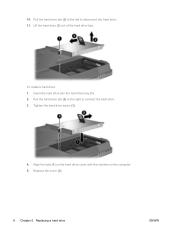
9. Tighten the hard drive screw (3). 4. To install a hard drive: 1. Lift the hard drive (3) out of the hard drive bay. Pull the hard drive tab (2) to the right to disconnect the hard drive. 11. Align the tabs (1) on the hard drive cover with the notches on the computer. 5. Pull the hard drive tab (2) to the left to connect the hard drive. 3. Loosen the hard drive screw (1). 10. Insert the hard drive into the hard drive bay (1). 2. Replace the cover (2). 12 Chapter 5 Replacing a hard drive ENWW
9. Tighten the hard drive screw (3). 4. To install a hard drive: 1. Lift the hard drive (3) out of the hard drive bay. Pull the hard drive tab (2) to the right to disconnect the hard drive. 11. Align the tabs (1) on the hard drive cover with the notches on the computer. 5. Pull the hard drive tab (2) to the left to connect the hard drive. 3. Loosen the hard drive screw (1). 10. Insert the hard drive into the hard drive bay (1). 2. Replace the cover (2). 12 Chapter 5 Replacing a hard drive ENWW

Drives - Windows Vista
Page 20
14 Chapter 5 Replacing a hard drive ENWW
14 Chapter 5 Replacing a hard drive ENWW
Drives - Windows Vista
Page 31
... inserting 17 removing, with power 18 removing, without power 19 CD drive 15, 21 hard drive external 21 HP 3D DriveGuard 7 installing 12 replacing 11 HP 3D DriveGuard 7 L light, drive 8 D Disk Cleanup software 5 Disk Defragmenter software 5 disk performance 5 diskette drive 21 drive light 8 drives caring for 3 diskette 21 external 21 hard 11, 12, 21 MultiBay 21, 23 optical 15, 21 See...
... inserting 17 removing, with power 18 removing, without power 19 CD drive 15, 21 hard drive external 21 HP 3D DriveGuard 7 installing 12 replacing 11 HP 3D DriveGuard 7 L light, drive 8 D Disk Cleanup software 5 Disk Defragmenter software 5 disk performance 5 diskette drive 21 drive light 8 drives caring for 3 diskette 21 external 21 hard 11, 12, 21 MultiBay 21, 23 optical 15, 21 See...

Drives - Windows XP
Page 5
Table of contents 1 Identifying installed drives 2 Handling drives 3 Improving hard drive performance Using Disk Defragmenter ...5 Using Disk Cleanup ...5 4 Using HP 3D DriveGuard Identifying HP 3D DriveGuard status 8 Using HP 3D DriveGuard software ...9 5 Replacing a hard drive 6 Using an optical drive Inserting an optical disc ...17 Removing an optical disc when running on battery or external power 18 Removing an optical disc when no...
Table of contents 1 Identifying installed drives 2 Handling drives 3 Improving hard drive performance Using Disk Defragmenter ...5 Using Disk Cleanup ...5 4 Using HP 3D DriveGuard Identifying HP 3D DriveGuard status 8 Using HP 3D DriveGuard software ...9 5 Replacing a hard drive 6 Using an optical drive Inserting an optical disc ...17 Removing an optical disc when running on battery or external power 18 Removing an optical disc when no...

Drives - Windows XP
Page 17
...the display. 3. Shut down the computer through the operating system. Turn the computer upside down on a flat surface, with the hard drive bay toward you are not sure whether the computer is on, in the Sleep state, or in Hibernation, turn the computer on... the computer. 4. ENWW 11 Do not remove the hard drive while the computer is off or in Hibernation. Remove the battery from the computer (2). Loosen the 2 hard drive cover screws (1). 8. Unplug the power cord from the hard drive bay. 5 Replacing a hard drive CAUTION: To prevent information loss or an unresponsive system:...
...the display. 3. Shut down the computer through the operating system. Turn the computer upside down on a flat surface, with the hard drive bay toward you are not sure whether the computer is on, in the Sleep state, or in Hibernation, turn the computer on... the computer. 4. ENWW 11 Do not remove the hard drive while the computer is off or in Hibernation. Remove the battery from the computer (2). Loosen the 2 hard drive cover screws (1). 8. Unplug the power cord from the hard drive bay. 5 Replacing a hard drive CAUTION: To prevent information loss or an unresponsive system:...

Drives - Windows XP
Page 18
Pull the hard drive tab (2) to the right to disconnect the hard drive. 11. Align the tabs (1) on the hard drive cover with the notches on the computer. 5. Tighten the hard drive screw (3). 4. Lift the hard drive (3) out of the hard drive bay. To install a hard drive: 1. Insert the hard drive into the hard drive bay (1). 2. Replace the cover (2). 12 Chapter 5 Replacing a hard drive ENWW Loosen the hard drive screw (1). 10. 9. Pull the hard drive tab (2) to the left to connect the hard drive. 3.
Pull the hard drive tab (2) to the right to disconnect the hard drive. 11. Align the tabs (1) on the hard drive cover with the notches on the computer. 5. Tighten the hard drive screw (3). 4. Lift the hard drive (3) out of the hard drive bay. To install a hard drive: 1. Insert the hard drive into the hard drive bay (1). 2. Replace the cover (2). 12 Chapter 5 Replacing a hard drive ENWW Loosen the hard drive screw (1). 10. 9. Pull the hard drive tab (2) to the left to connect the hard drive. 3.

Drives - Windows XP
Page 20
14 Chapter 5 Replacing a hard drive ENWW
14 Chapter 5 Replacing a hard drive ENWW

Drives - Windows XP
Page 31
... inserting 17 removing, with power 18 removing, without power 19 CD drive 15, 21 hard drive external 21 HP 3D DriveGuard 7 installing 12 replacing 11 HP 3D DriveGuard 7 L light, drive 8 D Disk Cleanup software 5 Disk Defragmenter software 5 disk performance 5 diskette drive 21 drive light 8 drives caring for 3 diskette 21 external 21 hard 11, 12, 21 MultiBay 21, 23 optical 15, 21 See...
... inserting 17 removing, with power 18 removing, without power 19 CD drive 15, 21 hard drive external 21 HP 3D DriveGuard 7 installing 12 replacing 11 HP 3D DriveGuard 7 L light, drive 8 D Disk Cleanup software 5 Disk Defragmenter software 5 disk performance 5 diskette drive 21 drive light 8 drives caring for 3 diskette 21 external 21 hard 11, 12, 21 MultiBay 21, 23 optical 15, 21 See...
Drives Windows XP
Page 5
... contents 1 Identifying installed drives 2 Handling drives 3 Improving hard drive performance Using Disk Defragmenter ...3 Using Disk Cleanup ...3 4 HP 3D DriveGuard HP 3D DriveGuard status ...5 HP 3D DriveGuard software ...6 5 Replacing a hard drive 6 MultiBay II drive MulitBay II security screw ...11 MultiBay II hard drive ...12 Inserting a hard drive module 12 Removing a hard drive module 12 MultiBay II optical drive ...13 Inserting an optical drive ...13 Removing an optical drive 13 7 Using an...
... contents 1 Identifying installed drives 2 Handling drives 3 Improving hard drive performance Using Disk Defragmenter ...3 Using Disk Cleanup ...3 4 HP 3D DriveGuard HP 3D DriveGuard status ...5 HP 3D DriveGuard software ...6 5 Replacing a hard drive 6 MultiBay II drive MulitBay II security screw ...11 MultiBay II hard drive ...12 Inserting a hard drive module 12 Removing a hard drive module 12 MultiBay II optical drive ...13 Inserting an optical drive ...13 Removing an optical drive 13 7 Using an...
Drives Windows XP
Page 13
... outlet. 5. Then shut down the computer and close the display. 3. ENWW 7 Loosen the 2 hard drive cover screws (1). 8. Remove the battery from the hard drive bay. 5 Replacing a hard drive CAUTION: To prevent information loss or an unresponsive system: Shut down on a flat surface, with the hard drive bay toward you are not sure whether the computer is on, in Standby...
... outlet. 5. Then shut down the computer and close the display. 3. ENWW 7 Loosen the 2 hard drive cover screws (1). 8. Remove the battery from the hard drive bay. 5 Replacing a hard drive CAUTION: To prevent information loss or an unresponsive system: Shut down on a flat surface, with the hard drive bay toward you are not sure whether the computer is on, in Standby...
Drives Windows XP
Page 14
Tighten the hard drive screw (3). 4. 10. Lift the hard drive (3) out of the hard drive bay. Pull the hard drive tab (2) to the left to connect the hard drive. 3. Align the tabs (1) on the hard drive cover with the notches on the computer. 5. Replace the cover (2). 8 Chapter 5 Replacing a hard drive ENWW Insert the hard drive into the hard drive bay (1). 2. To install a hard drive: 1. Pull the hard drive tab (2) to the right to disconnect the hard drive. 11.
Tighten the hard drive screw (3). 4. 10. Lift the hard drive (3) out of the hard drive bay. Pull the hard drive tab (2) to the left to connect the hard drive. 3. Align the tabs (1) on the hard drive cover with the notches on the computer. 5. Replace the cover (2). 8 Chapter 5 Replacing a hard drive ENWW Insert the hard drive into the hard drive bay (1). 2. To install a hard drive: 1. Pull the hard drive tab (2) to the right to disconnect the hard drive. 11.
Drives Windows XP
Page 28
..., with power 17 removing, without power 18 DVD drive 14, 19 E external drive 19 H hard disk drive external 19 HP 3D DriveGuard 4 installing 8 replacing 7 hard drive external 19 HP 3D DriveGuard 4 installing 8 MultiBay 12 replacing 7 HP 3D DriveGuard 4 L light, drive 5 M maintenance Disk Cleanup 3 Disk Defragmenter 3 MultiBay hard drive, inserting 12 hard drive, removing 12 optical drive, inserting 13 optical drive, removing 13 security screw 11 O optical disc inserting...
..., with power 17 removing, without power 18 DVD drive 14, 19 E external drive 19 H hard disk drive external 19 HP 3D DriveGuard 4 installing 8 replacing 7 hard drive external 19 HP 3D DriveGuard 4 installing 8 MultiBay 12 replacing 7 HP 3D DriveGuard 4 L light, drive 5 M maintenance Disk Cleanup 3 Disk Defragmenter 3 MultiBay hard drive, inserting 12 hard drive, removing 12 optical drive, inserting 13 optical drive, removing 13 security screw 11 O optical disc inserting...

Memory Modules - Windows XP
Page 5
Table of contents 1 Adding or replacing memory modules Adding or replacing a memory module to the expansion memory module slot 2 Upgrading a memory module in the primary memory module slot 5 2 Increasing hard drive space for the Hibernation file Index ...11 ENWW v
Table of contents 1 Adding or replacing memory modules Adding or replacing a memory module to the expansion memory module slot 2 Upgrading a memory module in the primary memory module slot 5 2 Increasing hard drive space for the Hibernation file Index ...11 ENWW v
Memory Modules - Windows XP
Page 17
Index H hard disk drive space 10 hard drive space 10 Hibernation 10 Hibernation file 10 K keyboard screws removing 5 replacing 9 M memory increasing 10 memory module inserting 7 removing 2, 6 replacing 2, 5 upgrading primary 5 memory module compartment cover removing 2 replacing 3 memory, replacing memory modules 2, 5 ENWW Index 11
Index H hard disk drive space 10 hard drive space 10 Hibernation 10 Hibernation file 10 K keyboard screws removing 5 replacing 9 M memory increasing 10 memory module inserting 7 removing 2, 6 replacing 2, 5 upgrading primary 5 memory module compartment cover removing 2 replacing 3 memory, replacing memory modules 2, 5 ENWW Index 11
Notebook Tour - Windows Vista
Page 20
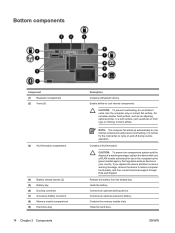
...routine operation. CAUTION: To prevent an unresponsive system and the display of a warning message, replace the device with only a WLAN module authorized for the internal fan to cycle on a hard, flat surface. Release the battery from the battery bay. Contains the memory module slots. ... country. Holds the battery. Connects an optional accessory battery. Holds the hard drive. CAUTION: To prevent overheating, do not obstruct vents. NOTE: The computer fan starts up automatically to block airflow. If you replace the device and then receive a warning message, remove the device to ...
...routine operation. CAUTION: To prevent an unresponsive system and the display of a warning message, replace the device with only a WLAN module authorized for the internal fan to cycle on a hard, flat surface. Release the battery from the battery bay. Contains the memory module slots. ... country. Holds the battery. Connects an optional accessory battery. Holds the hard drive. CAUTION: To prevent overheating, do not obstruct vents. NOTE: The computer fan starts up automatically to block airflow. If you replace the device and then receive a warning message, remove the device to ...


