
HP LaserJet 8150 Series Printer - User Guide
Page 13
... Envelopes Automatically (Optional Envelope Feeder) . . . . . 123 Inserting the Envelope Feeder . . 125 Loading Envelopes into the Envelope Feeder 126 Changing Fuser Levers for Printing Envelopes 128 Printing Envelopes from Tray 1 . . 130 Loading Envelopes in Tray 1 . . . . 132 Printing Envelopes from Your ...Tray 1 . . . . 139 Printing Cards, Custom-size, and Heavy Paper 141 13 3 Advanced Printing Tasks Overview 144 Using Features in the Printer Driver 146 Different First Page 149 Blank Back Page 151 Printing Multiple Pages on One Sheet of Paper 152 Customizing Tray 1 Operation . . . ...
... Envelopes Automatically (Optional Envelope Feeder) . . . . . 123 Inserting the Envelope Feeder . . 125 Loading Envelopes into the Envelope Feeder 126 Changing Fuser Levers for Printing Envelopes 128 Printing Envelopes from Tray 1 . . 130 Loading Envelopes in Tray 1 . . . . 132 Printing Envelopes from Your ...Tray 1 . . . . 139 Printing Cards, Custom-size, and Heavy Paper 141 13 3 Advanced Printing Tasks Overview 144 Using Features in the Printer Driver 146 Different First Page 149 Blank Back Page 151 Printing Multiple Pages on One Sheet of Paper 152 Customizing Tray 1 Operation . . . ...

HP LaserJet 8150 Series Printer - User Guide
Page 50
... units C3914A C3915A Documentation HP LaserJet Printer Family Paper Specification Guide A guide to the printer when the printer is included only with HP LaserJet printers. 5090-3392 Accessories and Supplies Chapter 1 Printer Basics 50 Item Description ...or Use Order Number Cable and Interface Accessories (continued) Power Box For connecting a multibin mailbox to using paper and other print media with the 2000-sheet Input Tray and the 2 x 500-sheet Input Tray. C4789A Maintenance Kit Preventive Maintenance Kit Contains replacement fuser...
... units C3914A C3915A Documentation HP LaserJet Printer Family Paper Specification Guide A guide to the printer when the printer is included only with HP LaserJet printers. 5090-3392 Accessories and Supplies Chapter 1 Printer Basics 50 Item Description ...or Use Order Number Cable and Interface Accessories (continued) Power Box For connecting a multibin mailbox to using paper and other print media with the 2000-sheet Input Tray and the 2 x 500-sheet Input Tray. C4789A Maintenance Kit Preventive Maintenance Kit Contains replacement fuser...

HP LaserJet 8150 Series Printer - User Guide
Page 92
If Tray 1 is in Tray 1 and press SELECT. Loading the Input Tray Note Paper heavier than plain paper, see Changing the Variable Fuser Mode on page 160. Press - VALUE + to change the size to avoid curl. If you are having trouble printing on media other than 28 lb (105 g/m²) should be printed from Tray 1 to the Face-up Bin to match the paper size in CASSETTE mode, the printer Attention light will flash. Chapter 2 Printing Tasks 92 6 Slide the paper into the printer until paper fits squarely and firmly between the paper width 6 guides, without bending.
If Tray 1 is in Tray 1 and press SELECT. Loading the Input Tray Note Paper heavier than plain paper, see Changing the Variable Fuser Mode on page 160. Press - VALUE + to change the size to avoid curl. If you are having trouble printing on media other than 28 lb (105 g/m²) should be printed from Tray 1 to the Face-up Bin to match the paper size in CASSETTE mode, the printer Attention light will flash. Chapter 2 Printing Tasks 92 6 Slide the paper into the printer until paper fits squarely and firmly between the paper width 6 guides, without bending.

HP LaserJet 8150 Series Printer - User Guide
Page 128
Printing Envelopes Chapter 2 Printing Tasks 128 Changing Fuser Levers for Printing Envelopes Note 1 Once you have used this method to print envelopes, return the fuser levers to the down position for standard paper (media) types. 1 Open the left door. (If an optional output device is installed, first push it away from the 2 printer to access the left door.) WARNING! Avoid touching the adjacent fusing area. It may be HOT. 2 Locate and lift up the two "T" shaped levers as shown in figure 2. Continued on next page.
Printing Envelopes Chapter 2 Printing Tasks 128 Changing Fuser Levers for Printing Envelopes Note 1 Once you have used this method to print envelopes, return the fuser levers to the down position for standard paper (media) types. 1 Open the left door. (If an optional output device is installed, first push it away from the 2 printer to access the left door.) WARNING! Avoid touching the adjacent fusing area. It may be HOT. 2 Locate and lift up the two "T" shaped levers as shown in figure 2. Continued on next page.

HP LaserJet 8150 Series Printer - User Guide
Page 129
Printing Envelopes Chapter 2 Printing Tasks 129 3 Close the left door. 3 4 Ensure that the Face-up Bin is selected when printing envelopes. When you are done printing on envelopes, make sure you return the fuser levers to return levers in the down position. CAUTION Failure to the down position for standard paper types may result in poor print quality.
Printing Envelopes Chapter 2 Printing Tasks 129 3 Close the left door. 3 4 Ensure that the Face-up Bin is selected when printing envelopes. When you are done printing on envelopes, make sure you return the fuser levers to return levers in the down position. CAUTION Failure to the down position for standard paper types may result in poor print quality.

HP LaserJet 8150 Series Printer - User Guide
Page 132
... the size to the Face-up . 2 4 Slide the paper width guides until they lightly touch both sides of the envelope stack without bending it. The fuser lever should be changed for the envelope size you are printing. 3 Place up to ten envelopes between the paper width guides, face up Bin to... page 128). Press - Note 3 Paper heavier than 28 lb (105 g/m2) should be printed from Tray 1 to match the paper size in CASSETTE mode, the printer Attention light will flash.
... the size to the Face-up . 2 4 Slide the paper width guides until they lightly touch both sides of the envelope stack without bending it. The fuser lever should be changed for the envelope size you are printing. 3 Place up to ten envelopes between the paper width guides, face up Bin to... page 128). Press - Note 3 Paper heavier than 28 lb (105 g/m2) should be printed from Tray 1 to match the paper size in CASSETTE mode, the printer Attention light will flash.
HP LaserJet 8150 Series Printer - User Guide
Page 144
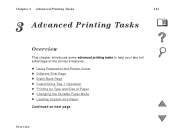
Different First Page ! Printing by Type and Size of the printer's features. ! Blank Back Page ! Loading Custom-size Paper Continued on next page. Customizing Tray 1 Operation ! Changing the Variable Fuser Mode ! Overview Chapter 3 Advanced Printing Tasks 144 3 Advanced Printing Tasks Overview This chapter introduces some advanced printing tasks to help you take full advantage of Paper ! Using Features in the Printer Driver !
Different First Page ! Printing by Type and Size of the printer's features. ! Blank Back Page ! Loading Custom-size Paper Continued on next page. Customizing Tray 1 Operation ! Changing the Variable Fuser Mode ! Overview Chapter 3 Advanced Printing Tasks 144 3 Advanced Printing Tasks Overview This chapter introduces some advanced printing tasks to help you take full advantage of Paper ! Using Features in the Printer Driver !

HP LaserJet 8150 Series Printer - User Guide
Page 160
... in the driver for a specific type of the following: ! plain ! preprinted ! labels ! Chapter 3 Advanced Printing Tasks 160 Changing the Variable Fuser Mode The variable fuser mode specifies the temperature and printing speed for the job must be one of paper. cardstock ! The user can change the variable... fuser mode to improve the print quality for paper that is associated with the paper type. The variable fuser mode is having problems (such as heavy, light, or rough media) even though the...
... in the driver for a specific type of the following: ! plain ! preprinted ! labels ! Chapter 3 Advanced Printing Tasks 160 Changing the Variable Fuser Mode The variable fuser mode specifies the temperature and printing speed for the job must be one of paper. cardstock ! The user can change the variable... fuser mode to improve the print quality for paper that is associated with the paper type. The variable fuser mode is having problems (such as heavy, light, or rough media) even though the...
HP LaserJet 8150 Series Printer - User Guide
Page 161
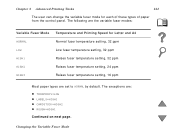
...The user can change the variable fuser mode for Letter and A4 NORMAL Normal fuser temperature setting, 32 ppm LOW Low fuser temperature setting, 32 ppm HIGH1 Raises fuser temperature setting, 32 ppm HIGH2 Raises fuser temperature setting, 24 ppm HIGH3 Raises fuser temperature setting, 16 ppm Most ...paper types are : ! TRNSPRNCY=LOW ! CARDSTOCK=HIGH2 ! Changing the Variable Fuser Mode ROUGH=HIGH1 Continued on next page. The following are the variable fuser modes: Variable Fuser Mode Temperature and Printing Speed for each of these types of paper from the control ...
...The user can change the variable fuser mode for Letter and A4 NORMAL Normal fuser temperature setting, 32 ppm LOW Low fuser temperature setting, 32 ppm HIGH1 Raises fuser temperature setting, 32 ppm HIGH2 Raises fuser temperature setting, 24 ppm HIGH3 Raises fuser temperature setting, 16 ppm Most ...paper types are : ! TRNSPRNCY=LOW ! CARDSTOCK=HIGH2 ! Changing the Variable Fuser Mode ROUGH=HIGH1 Continued on next page. The following are the variable fuser modes: Variable Fuser Mode Temperature and Printing Speed for each of these types of paper from the control ...

HP LaserJet 8150 Series Printer - User Guide
Page 162
... 5 Press ITEM repeatedly until the desired variable fuser mode appears. 7 Press SELECT to select the variable fuser mode. 8 Press GO to the NORMAL setting when you change the variable fuser mode to HIGH1, HIGH2, or HIGH3, be sure to change the variable fuser mode for a paper type from the control ...panel: 1 Press MENU repeatedly until PAPER HANDLING MENU appears. 2 Press ITEM repeatedly until CONFIGURE FUSER MODE MENU=NO appears. 3 Press - CAUTION If you are done printing that job. VALUE + repeatedly until the desired paper type appears. 6 Press ...
... 5 Press ITEM repeatedly until the desired variable fuser mode appears. 7 Press SELECT to select the variable fuser mode. 8 Press GO to the NORMAL setting when you change the variable fuser mode to HIGH1, HIGH2, or HIGH3, be sure to change the variable fuser mode for a paper type from the control ...panel: 1 Press MENU repeatedly until PAPER HANDLING MENU appears. 2 Press ITEM repeatedly until CONFIGURE FUSER MODE MENU=NO appears. 3 Press - CAUTION If you are done printing that job. VALUE + repeatedly until the desired paper type appears. 6 Press ...

HP LaserJet 8150 Series Printer - User Guide
Page 218
... Jams It may be HOT. 2 Remove any jammed or damaged paper from the printer to remove all pieces of the printer (A). 3 Press down on the green tabs (B) and carefully check for paper. Chapter 5 Problem Solving 218 Clearing the Left Door (Fuser Area) 1 Open the left door. (If an optional output device is installed...
... Jams It may be HOT. 2 Remove any jammed or damaged paper from the printer to remove all pieces of the printer (A). 3 Press down on the green tabs (B) and carefully check for paper. Chapter 5 Problem Solving 218 Clearing the Left Door (Fuser Area) 1 Open the left door. (If an optional output device is installed...

HP LaserJet 8150 Series Printer - User Guide
Page 246
... an HP-authorized service or support provider. (See the HP Customer Care pages at least 5 minutes, and then turn the printer on . Turn the printer off for at the front of this user guide.) Understanding Printer Messages ...The message might clear and then reappear when the next print job is sent. Turn the printer off , then turn the printer on . Chapter 5 Problem Solving 246 Printer Messages (continued) Message Explanation or Recommended Action 50.x FUSER...
... an HP-authorized service or support provider. (See the HP Customer Care pages at least 5 minutes, and then turn the printer on . Turn the printer off for at the front of this user guide.) Understanding Printer Messages ...The message might clear and then reappear when the next print job is sent. Turn the printer off , then turn the printer on . Chapter 5 Problem Solving 246 Printer Messages (continued) Message Explanation or Recommended Action 50.x FUSER...
HP LaserJet 8150 Series Printer - User Guide
Page 258
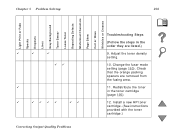
Install a new HP toner cartridge. (See instructions provided with the toner cartridge.) Check that the orange packing spacers are listed.) 9. Light Print or Fade Specks Dropouts Lines Gray ... (page 195). 12. Adjust the toner density setting. 10. Redistribute the toner in the order they are removed from the fusing area. 11. Change the fuser mode setting (page 160).
Install a new HP toner cartridge. (See instructions provided with the toner cartridge.) Check that the orange packing spacers are listed.) 9. Light Print or Fade Specks Dropouts Lines Gray ... (page 195). 12. Adjust the toner density setting. 10. Redistribute the toner in the order they are removed from the fusing area. 11. Change the fuser mode setting (page 160).

HP LaserJet 8150 Series Printer - User Guide
Page 260
Avoid touching the adjacent fusing area. Correcting Output Quality Problems It may be HOT. 2 Locate and lift up the two "T" shaped levers as shown in figure 2. Continued on Envelopes Note 1 Once you have used this method to print envelopes, return the fuser levers to the down position for standard paper (media) types. 1 Open the left door. (If an optional output device is installed, first push it away from the 2 printer to access the left door.) WARNING! Chapter 5 Problem Solving 260 Correcting Wrinkles on next page.
Avoid touching the adjacent fusing area. Correcting Output Quality Problems It may be HOT. 2 Locate and lift up the two "T" shaped levers as shown in figure 2. Continued on Envelopes Note 1 Once you have used this method to print envelopes, return the fuser levers to the down position for standard paper (media) types. 1 Open the left door. (If an optional output device is installed, first push it away from the 2 printer to access the left door.) WARNING! Chapter 5 Problem Solving 260 Correcting Wrinkles on next page.

HP LaserJet 8150 Series Printer - User Guide
Page 261
When you are done printing on envelopes, make sure you return the fuser levers to return levers in poor print quality. Correcting Output Quality Problems CAUTION Failure to the down position for standard paper types may result in the down position. Chapter 5 Problem Solving 261 3 Close the left door. 3 4 Ensure that the Face-up Bin is selected when printing envelopes.
When you are done printing on envelopes, make sure you return the fuser levers to return levers in poor print quality. Correcting Output Quality Problems CAUTION Failure to the down position for standard paper types may result in the down position. Chapter 5 Problem Solving 261 3 Close the left door. 3 4 Ensure that the Face-up Bin is selected when printing envelopes.

HP LaserJet 8150 Series Printer - User Guide
Page 295
...must be sure to push them all the way down . ! Make sure you are fed into the printer. Make sure the Optional Envelope Feeder extension is down to the into the printer. ! When loading the envelopes, be closer to touch the rollers. No envelopes are not overloading the ...envelope feeder. ! Correcting Output Quality Problems Make sure the envelopes are properly set (page 128). Make sure that the fuser levers are properly loaded. ! pick...
...must be sure to push them all the way down . ! Make sure you are fed into the printer. Make sure the Optional Envelope Feeder extension is down to the into the printer. ! When loading the envelopes, be closer to touch the rollers. No envelopes are not overloading the ...envelope feeder. ! Correcting Output Quality Problems Make sure the envelopes are properly set (page 128). Make sure that the fuser levers are properly loaded. ! pick...

HP LaserJet 8150 Series Printer - User Guide
Page 315
... printed at the high fuser temperature is the manufacturing page. This page contains information that may assist HP Customer Care representatives in the log, the maximum number of entries in solving possible printer problems. Continued on next page. Checking the Printer's Configuration Chapter 5 Problem Solving 315 1 4 2 5 3 6 7 1 Printer Information lists the serial number, HP JetSend IP addresses...
... printed at the high fuser temperature is the manufacturing page. This page contains information that may assist HP Customer Care representatives in the log, the maximum number of entries in solving possible printer problems. Continued on next page. Checking the Printer's Configuration Chapter 5 Problem Solving 315 1 4 2 5 3 6 7 1 Printer Information lists the serial number, HP JetSend IP addresses...

HP LaserJet 8150 Series Printer - User Guide
Page 431
... can only be changed from this menu option in the printer (or to the Information Menu, and print a menu map (page 424). Appendix B Control Panel Menus 431 Item OVERRIDE A4/LETTER=NO Values NO YES CONFIGURE NO FUSER MODE YES MENU=NO Explanation Choose YES to print on letter size paper...when a letter job is sent, but no letter paper is loaded in the printer). Note To see [TYPE]=NORMAL on certain paper types.) NO: The fuser mode menu items are not accessible. YES: Additional items appear (see the default fuser mode for each paper type. (This is loaded in the control panel. ...
... can only be changed from this menu option in the printer (or to the Information Menu, and print a menu map (page 424). Appendix B Control Panel Menus 431 Item OVERRIDE A4/LETTER=NO Values NO YES CONFIGURE NO FUSER MODE YES MENU=NO Explanation Choose YES to print on letter size paper...when a letter job is sent, but no letter paper is loaded in the printer). Note To see [TYPE]=NORMAL on certain paper types.) NO: The fuser mode menu items are not accessible. YES: Additional items appear (see the default fuser mode for each paper type. (This is loaded in the control panel. ...

HP LaserJet 8150 Series Printer - User Guide
Page 433
... page. Paper Handling Menu Appendix B Control Panel Menus 433 Item Values [TYPE]=NORMAL NORMAL LOW HIGH1 HIGH2 HIGH3 Explanation This item appears only when CONFIGURE FUSER MODE MENU=YES. The printer speeds are for Letter or A4.
... page. Paper Handling Menu Appendix B Control Panel Menus 433 Item Values [TYPE]=NORMAL NORMAL LOW HIGH1 HIGH2 HIGH3 Explanation This item appears only when CONFIGURE FUSER MODE MENU=YES. The printer speeds are for Letter or A4.

HP LaserJet 8150 Series Printer - User Guide
Page 434
CAUTION If you change the fuser mode to HIGH1, HIGH2, or HIGH3, be sure to change it back to HIGH1, HIGH2, or HIGH3 might cause other failures or jams. Paper Handling Menu Appendix B Control Panel Menus 434 Item Values Explanation For a complete list of some consumables, such as the fuser, and might shor ten the life of supported paper types, see page 397. Setting a paper type to the default when you are done printing.
CAUTION If you change the fuser mode to HIGH1, HIGH2, or HIGH3, be sure to change it back to HIGH1, HIGH2, or HIGH3 might cause other failures or jams. Paper Handling Menu Appendix B Control Panel Menus 434 Item Values Explanation For a complete list of some consumables, such as the fuser, and might shor ten the life of supported paper types, see page 397. Setting a paper type to the default when you are done printing.


