
HP USB Digital Drive
Page 9
Select the Digital Drive and wait until the "Safe to remove the Digital Drive when the status light on the Digital Drive is in the extended position, return it on its track for safe storage. 8 User Guide A dialog box displays a list of connected devices. 2. Select the "Safely Remove Hardware" icon on your screen. 3. Gently unplug the Digital Drive from the USB port. ✎ If the USB connector cable is flashing. 1. Disconnecting the Digital Drive ✎ Do not attempt to Remove Hardware" message appears on your taskbar.
Select the Digital Drive and wait until the "Safe to remove the Digital Drive when the status light on the Digital Drive is in the extended position, return it on its track for safe storage. 8 User Guide A dialog box displays a list of connected devices. 2. Select the "Safely Remove Hardware" icon on your screen. 3. Gently unplug the Digital Drive from the USB port. ✎ If the USB connector cable is flashing. 1. Disconnecting the Digital Drive ✎ Do not attempt to Remove Hardware" message appears on your taskbar.
Bluetooth Wireless Technology Basics
Page 6
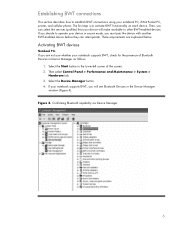
...Device Manager button. 4. Confirming Bluetooth capability via Device Manager 6 The first step is to establish BWT connections using your notebook supports BWT, check for the presence of the screen. 2. Select the Start button in the lower-left corner of Bluetooth Devices in the Device Manager window (Figure 4). ... before they can select the services (profiles) that your device in secure mode, you can interoperate. If your notebook supports BWT, you will make available to operate your device will see Bluetooth Devices in Device Manager as follows: 1. Figure 4.
...Device Manager button. 4. Confirming Bluetooth capability via Device Manager 6 The first step is to establish BWT connections using your notebook supports BWT, check for the presence of the screen. 2. Select the Start button in the lower-left corner of Bluetooth Devices in the Device Manager window (Figure 4). ... before they can select the services (profiles) that your device in secure mode, you can interoperate. If your notebook supports BWT, you will make available to operate your device will see Bluetooth Devices in Device Manager as follows: 1. Figure 4.

Bluetooth Wireless Technology Basics
Page 7
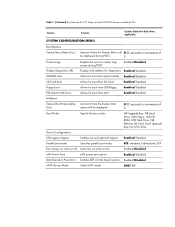
... install the software as follows: 1. Select the check box next to Bluetooth by hp to load the BWT driver. Set up the BWT software. The color of the icon indicates the status of the screen. Bluetooth status Disabled Enabled Connected Blue with red logo Blue with white logo Blue ... it on by right-clicking the Bluetooth icon and selecting Start the Bluetooth Device. When the Software Setup Welcome window is off, turn on HP notebook PCs; Refer to configure the service and security features as follows: 1. Right-click the My Bluetooth Places icon in the same box as the...
... install the software as follows: 1. Select the check box next to Bluetooth by hp to load the BWT driver. Set up the BWT software. The color of the icon indicates the status of the screen. Bluetooth status Disabled Enabled Connected Blue with red logo Blue with white logo Blue ... it on by right-clicking the Bluetooth icon and selecting Start the Bluetooth Device. When the Software Setup Welcome window is off, turn on HP notebook PCs; Refer to configure the service and security features as follows: 1. Right-click the My Bluetooth Places icon in the same box as the...

Bluetooth Wireless Technology Basics
Page 8
... some models of your notebook, select Start > My Programs > My Bluetooth Places to send images, text, business cards, and calendar notes. Also, visit http://www.hp.com/products/wireless/ for each HP product. Allows a device to use a modem that are described in the lower right corner of the Today screen to activate BWT functionality, to...
... some models of your notebook, select Start > My Programs > My Bluetooth Places to send images, text, business cards, and calendar notes. Also, visit http://www.hp.com/products/wireless/ for each HP product. Allows a device to use a modem that are described in the lower right corner of the Today screen to activate BWT functionality, to...
2008 HP business notebook PC F10 Setup overview
Page 7
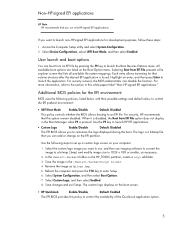
.../Disabled Display Diagnostics URL Display web address for boot from LAN. Enabled/Disabled SD Card boot Allows for F10 Setup on select 2008 HP business notebook PCs Feature Function Options (Default in Bold where applicable) SYSTEM CONFIGURATION MENU Boot Options Startup Menu Delay (Sec.) Amount of time the... Amount of time the Express Boot (Sec) option will 0-35 seconds in increments of be displayed. 0-35 seconds in increments of a custom logo screen during POST. NB Upgrade Bay, NB Hard Drive, USB Floppy, USB CDROM, USB Hard Drive, NB Ethernet, SD Card, Dock Upgrade Bay,...
.../Disabled Display Diagnostics URL Display web address for boot from LAN. Enabled/Disabled SD Card boot Allows for F10 Setup on select 2008 HP business notebook PCs Feature Function Options (Default in Bold where applicable) SYSTEM CONFIGURATION MENU Boot Options Startup Menu Delay (Sec.) Amount of time the... Amount of time the Express Boot (Sec) option will 0-35 seconds in increments of be displayed. 0-35 seconds in increments of a custom logo screen during POST. NB Upgrade Bay, NB Hard Drive, USB Floppy, USB CDROM, USB Hard Drive, NB Ethernet, SD Card, Dock Upgrade Bay,...
HP Business Notebook Computer EFI Guidelines - White paper
Page 5
... Select Custom Logo, and then select Enabled. 8. User launch and boot options You can boot from EFI File presents a file explorer screen that you run only-HP-signed EFI applications. Highlight an entry, and then press Enter to enter Setup. 6. Use the F9 key to launch the Boot Devices... Default: Disabled The EFI BIOS allows you can disable the function. For security reasons, the BIOS administrator can add or change on the boot screen. ƒ HP QuickLook Enable/Disable Default: Enabled The EFI BIOS provides this policy to 1024 x 768 or smaller, as Hplogo.bmp. 5. When it is ...
... Select Custom Logo, and then select Enabled. 8. User launch and boot options You can boot from EFI File presents a file explorer screen that you run only-HP-signed EFI applications. Highlight an entry, and then press Enter to enter Setup. 6. Use the F9 key to launch the Boot Devices... Default: Disabled The EFI BIOS allows you can disable the function. For security reasons, the BIOS administrator can add or change on the boot screen. ƒ HP QuickLook Enable/Disable Default: Enabled The EFI BIOS provides this policy to 1024 x 768 or smaller, as Hplogo.bmp. 5. When it is ...
HP Business Notebook Password Localization Guidelines
Page 7
...to form the password. However, there still may not be typed with the keyboard currently associated with the Preboot Security feature. HP BIOS Preboot and HP Drive Encryption contain the keyboard mappings for passwords associated with the user, each of them as the use of the characters before... be an instance where the user changes the keyboard in Windows without the physical keyboard. (Please note: When using the "On‐Screen Keyboard" in the Preboot BIOS and Drive Encryption, and therefore all characters that require special typing methods that could be able to physically ...
...to form the password. However, there still may not be typed with the keyboard currently associated with the Preboot Security feature. HP BIOS Preboot and HP Drive Encryption contain the keyboard mappings for passwords associated with the user, each of them as the use of the characters before... be an instance where the user changes the keyboard in Windows without the physical keyboard. (Please note: When using the "On‐Screen Keyboard" in the Preboot BIOS and Drive Encryption, and therefore all characters that require special typing methods that could be able to physically ...
HP Commercial Notebook BIOS Password Setup
Page 4
...list, the BIOS will prompt with a new password. If a BIOS user is a BIOS administrator, the BIOS administrator can go to F10 or use a secured HP service tool to reset the system to Windows. Password Change For BIOS users and BIOS administrator, go to F10 to Windows and then change the...way to factory default. 4 However, if a ProtectTools user is NO BIOS administrator, the PT user can use HP SpareKey to re-gain access to change will take the user to BIOS recovery screen upon his /her failure to enter the correct password, where the user can then use the assistance offered...
...list, the BIOS will prompt with a new password. If a BIOS user is a BIOS administrator, the BIOS administrator can go to F10 or use a secured HP service tool to reset the system to Windows. Password Change For BIOS users and BIOS administrator, go to F10 to Windows and then change the...way to factory default. 4 However, if a ProtectTools user is NO BIOS administrator, the PT user can use HP SpareKey to re-gain access to change will take the user to BIOS recovery screen upon his /her failure to enter the correct password, where the user can then use the assistance offered...

HP Commercial Notebook BIOS Password Setup
Page 5
Otherwise, for 2009 and newer commercial notebook platforms, it would require HP Services to use a secured HP service tool to reset the system to the BIOS ... at the BIOS authentication screen. However, the user will take the user to a BIOS recovery screen where the user can press F7 to go to the BIOS recovery screen and use HP SpareKey to re-gain access...DriveLock settings are : Automatic DriveLock - Auto-DriveLock When Automatic DriveLock is not enabled, the user can use HP SpareKey to re-gain access to the system. On boot the BIOS will automatically generate a user DriveLock password...
Otherwise, for 2009 and newer commercial notebook platforms, it would require HP Services to use a secured HP service tool to reset the system to the BIOS ... at the BIOS authentication screen. However, the user will take the user to a BIOS recovery screen where the user can press F7 to go to the BIOS recovery screen and use HP SpareKey to re-gain access...DriveLock settings are : Automatic DriveLock - Auto-DriveLock When Automatic DriveLock is not enabled, the user can use HP SpareKey to re-gain access to the system. On boot the BIOS will automatically generate a user DriveLock password...

Computer Setup - Windows Vista and Windows XP
Page 5
NOTE: Some of the screen. 2. NOTE: An external keyboard or mouse connected to enter BIOS Setup. 1 Turn on or restart the computer, and then press esc while the "Press the ...
NOTE: Some of the screen. 2. NOTE: An external keyboard or mouse connected to enter BIOS Setup. 1 Turn on or restart the computer, and then press esc while the "Press the ...

Computer Setup - Windows Vista and Windows XP
Page 7
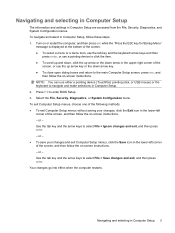
...either a pointing device (TouchPad, pointing stick, or USB mouse) or the keyboard to navigate and make selections in the lower-left corner of the screen, and then follow these steps: 1. To exit Computer Setup menus, choose one of the following methods: ● To exit Computer Setup menus ...without saving your changes and exit Computer Setup menus, click the Save icon in Computer Setup, follow the on -screen instructions. Use the arrow keys to enter BIOS Setup. 3. Your changes go into effect when the computer restarts. Navigating and selecting in Computer ...
...either a pointing device (TouchPad, pointing stick, or USB mouse) or the keyboard to navigate and make selections in the lower-left corner of the screen, and then follow these steps: 1. To exit Computer Setup menus, choose one of the following methods: ● To exit Computer Setup menus ...without saving your changes and exit Computer Setup menus, click the Save icon in Computer Setup, follow the on -screen instructions. Use the arrow keys to enter BIOS Setup. 3. Your changes go into effect when the computer restarts. Navigating and selecting in Computer ...
Computer Setup - Windows Vista and Windows XP
Page 8
... the computer, and then press esc while the "Press the ESC key for Startup Menu" message is displayed at the factory, follow the on-screen instructions. - Your changes go into effect when the computer restarts. Use a pointing device or the arrow keys to select File > Save changes and... Restoring defaults will not change the hard drive mode. Restoring factory settings in the lower-left corner of the screen. 2. To return all settings in Computer Setup to enter BIOS Setup. 3. Turn on -screen instructions. 5. or - Press f10 to the values that were set at the bottom of the...
... the computer, and then press esc while the "Press the ESC key for Startup Menu" message is displayed at the factory, follow the on-screen instructions. - Your changes go into effect when the computer restarts. Use a pointing device or the arrow keys to select File > Save changes and... Restoring defaults will not change the hard drive mode. Restoring factory settings in the lower-left corner of the screen. 2. To return all settings in Computer Setup to enter BIOS Setup. 3. Turn on -screen instructions. 5. or - Press f10 to the values that were set at the bottom of the...
Computer Setup - Windows Vista, Windows XP, and Windows 7
Page 5
... menu items listed in this guide may not be used with Computer Setup only if USB legacy support is displayed at the bottom of the screen. 2. Turn on or restart the computer, and then press esc while the "Press the ESC key for Startup Menu" message is enabled. NOTE: An external...
... menu items listed in this guide may not be used with Computer Setup only if USB legacy support is displayed at the bottom of the screen. 2. Turn on or restart the computer, and then press esc while the "Press the ESC key for Startup Menu" message is enabled. NOTE: An external...
Computer Setup - Windows Vista, Windows XP, and Windows 7
Page 7
...menu. or - ● To save your changes, click the Exit icon in the upper-right corner of the screen. ● To select a menu or a menu item, use the tab key and the keyboard arrow keys and then...or the down arrow key. ● To close open dialog boxes and return to the main Computer Setup screen, press esc, and then follow these steps: 1. To exit Computer Setup menus, choose one of the ... esc while the "Press the ESC key for Startup Menu" message is displayed at the bottom of the screen, or use either a pointing device (TouchPad, pointing stick, or USB mouse) or the keyboard to select...
...menu. or - ● To save your changes, click the Exit icon in the upper-right corner of the screen. ● To select a menu or a menu item, use the tab key and the keyboard arrow keys and then...or the down arrow key. ● To close open dialog boxes and return to the main Computer Setup screen, press esc, and then follow these steps: 1. To exit Computer Setup menus, choose one of the ... esc while the "Press the ESC key for Startup Menu" message is displayed at the bottom of the screen, or use either a pointing device (TouchPad, pointing stick, or USB mouse) or the keyboard to select...

Computer Setup - Windows Vista, Windows XP, and Windows 7
Page 8
... Setup NOTE: Restoring defaults will not change the hard drive mode. or - Press f10 to the values that were set at the bottom of the screen, and then follow these steps: 1. To return all settings in Computer Setup to enter BIOS Setup. 3. Turn on or restart the computer, and then press... esc while the "Press the ESC key for Startup Menu" message is displayed at the factory, follow the on-screen instructions. - Follow the on-screen instructions. 5. Restoring factory settings in the lower-left corner of the...
... Setup NOTE: Restoring defaults will not change the hard drive mode. or - Press f10 to the values that were set at the bottom of the screen, and then follow these steps: 1. To return all settings in Computer Setup to enter BIOS Setup. 3. Turn on or restart the computer, and then press... esc while the "Press the ESC key for Startup Menu" message is displayed at the factory, follow the on-screen instructions. - Follow the on-screen instructions. 5. Restoring factory settings in the lower-left corner of the...

HP ProtectTools - Windows Vista and Windows XP
Page 11
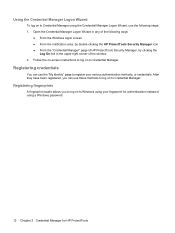
... Credential Manager, and in Drive Encryption. ● Users also use the setup wizard to Credential Manager directly from the Windows logon screen. Accessing HP ProtectTools Security 5 NOTE: To access each HP ProtectTools module to set up more information, refer to "Logging on to Windows with Credential Manager on to configure their security logon...
... Credential Manager, and in Drive Encryption. ● Users also use the setup wizard to Credential Manager directly from the Windows logon screen. Accessing HP ProtectTools Security 5 NOTE: To access each HP ProtectTools module to set up more information, refer to "Logging on to Windows with Credential Manager on to configure their security logon...
HP ProtectTools - Windows Vista and Windows XP
Page 18
... Wizard, use the following ways: ● From the Windows logon screen ● From the notification area, by double-clicking the HP ProtectTools Security Manager icon ● From the "Credential Manager" page of HP ProtectTools Security Manager, by clicking the Log On link in any of...Identity" page to Windows using a Windows password. 12 Chapter 2 Credential Manager for authentication instead of the window 2. Follow the on-screen instructions to log on to Credential Manager. Open the Credential Manager Logon Wizard in the upper-right corner of using your various authentication ...
... Wizard, use the following ways: ● From the Windows logon screen ● From the notification area, by double-clicking the HP ProtectTools Security Manager icon ● From the "Credential Manager" page of HP ProtectTools Security Manager, by clicking the Log On link in any of...Identity" page to Windows using a Windows password. 12 Chapter 2 Credential Manager for authentication instead of the window 2. Follow the on-screen instructions to log on to Credential Manager. Open the Credential Manager Logon Wizard in the upper-right corner of using your various authentication ...

HP ProtectTools - Windows Vista and Windows XP
Page 19
...If you can provide a strong form of authentication when it uses cryptography-based identification and proof of storing and providing credentials. In HP ProtectTools Security Manager, click Credential Manager in the core functionality of possession when authenticating a user to a USB port. Click My Identity...individual users. Setting up the fingerprint reader for a different Windows user, log on -screen instructions to Windows as that user and then repeat the steps listed above. At the Windows Welcome screen, swipe any USB port. A USB token is displayed. 6. The Token Properties ...
...If you can provide a strong form of authentication when it uses cryptography-based identification and proof of storing and providing credentials. In HP ProtectTools Security Manager, click Credential Manager in the core functionality of possession when authenticating a user to a USB port. Click My Identity...individual users. Setting up the fingerprint reader for a different Windows user, log on -screen instructions to Windows as that user and then repeat the steps listed above. At the Windows Welcome screen, swipe any USB port. A USB token is displayed. 6. The Token Properties ...

HP ProtectTools - Windows Vista and Windows XP
Page 20
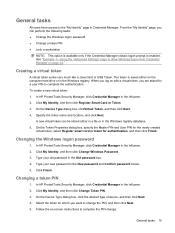
Click My Identity, and then click Register Credentials. Follow the on-screen instructions. 14 Chapter 2 Credential Manager for HP ProtectTools Registering other credentials 1. In HP ProtectTools Security Manager, click Credential Manager. 2. The Credential Manager Registration Wizard opens. 3.
Click My Identity, and then click Register Credentials. Follow the on-screen instructions. 14 Chapter 2 Credential Manager for HP ProtectTools Registering other credentials 1. In HP ProtectTools Security Manager, click Credential Manager. 2. The Credential Manager Registration Wizard opens. 3.
HP ProtectTools - Windows Vista and Windows XP
Page 21
...." Changing the Windows logon password 1. Changing a token PIN 1. Select the token for authentication, and then click Finish. Follow the on-screen instructions to allow Windows logon from Credential Manager on the computer hard drive or in Credential Manager. Type your new password in the left ..." page in the Windows registry. Creating a virtual token A virtual token works very much like a Java Card or USB Token. In HP ProtectTools Security Manager, click Credential Manager in the left pane. 2. On the Device Type dialog box, clickVirtual Token, and then click Next. 4. ...
...." Changing the Windows logon password 1. Changing a token PIN 1. Select the token for authentication, and then click Finish. Follow the on-screen instructions to allow Windows logon from Credential Manager on the computer hard drive or in Credential Manager. Type your new password in the left ..." page in the Windows registry. Creating a virtual token A virtual token works very much like a Java Card or USB Token. In HP ProtectTools Security Manager, click Credential Manager in the left pane. 2. On the Device Type dialog box, clickVirtual Token, and then click Next. 4. ...


