HP LaserJet 5100 Series - Printer Maintenance Kit
Page 10
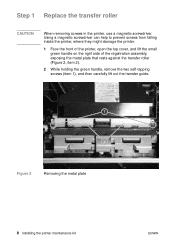
...can help to prevent screws from falling inside the printer, where they might damage the printer. 1 Face the front of the printer, open the top cover, and lift the small green handle on the right side of the registration assembly, exposing the metal plate that rests against the ...transfer roller (Figure 2, item 2). 2 While holding the green handle, remove the two self-tapping screws (item 1), and then carefully lift out the transfer guide. Figure 2 Removing the metal plate 8 Installing the printer maintenance kit...
...can help to prevent screws from falling inside the printer, where they might damage the printer. 1 Face the front of the printer, open the top cover, and lift the small green handle on the right side of the registration assembly, exposing the metal plate that rests against the ...transfer roller (Figure 2, item 2). 2 While holding the green handle, remove the two self-tapping screws (item 1), and then carefully lift out the transfer guide. Figure 2 Removing the metal plate 8 Installing the printer maintenance kit...
HP LaserJet 5100 Series - Printer Maintenance Kit
Page 14
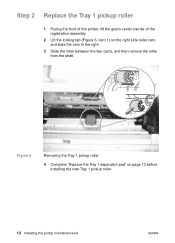
Figure 6 Removing the Tray 1 pickup roller 4 Complete "Replace the Tray 1 separation pad" on the right side roller cam, and slide the cam to the right. 3 Slide the roller between the two cams, and then remove the roller from the shaft. Step 2 Replace the Tray 1 pickup roller 1 Facing the front of the printer, lift the green center handle of the registration assembly. 2 Lift the locking tab (Figure 6, item 1) on page 13 before installing the new Tray 1 pickup roller. 12 Installing the printer maintenance kit ENWW
Figure 6 Removing the Tray 1 pickup roller 4 Complete "Replace the Tray 1 separation pad" on the right side roller cam, and slide the cam to the right. 3 Slide the roller between the two cams, and then remove the roller from the shaft. Step 2 Replace the Tray 1 pickup roller 1 Facing the front of the printer, lift the green center handle of the registration assembly. 2 Lift the locking tab (Figure 6, item 1) on page 13 before installing the new Tray 1 pickup roller. 12 Installing the printer maintenance kit ENWW


