Backup and Recovery - Windows Vista
Page 11
...Windows operating system loads. 3. Click Next. 6. When prompted, press any software installed on the computer are unable to http://www.hp.com/support, select your computer. 7. For contact information, refer to reboot the computer and repair the operating system. All files ...you have created and any keyboard key. 4. Using a Windows Vista operating system DVD (purchased separately) 7 When reformatting is easily accessible. Select Repair your country or region...
...Windows operating system loads. 3. Click Next. 6. When prompted, press any software installed on the computer are unable to http://www.hp.com/support, select your computer. 7. For contact information, refer to reboot the computer and repair the operating system. All files ...you have created and any keyboard key. 4. Using a Windows Vista operating system DVD (purchased separately) 7 When reformatting is easily accessible. Select Repair your country or region...
Backup and Recovery - Windows 7
Page 11
For contact information, refer to the Worldwide Telephone Numbers booklet included with the computer. All files you have created and any keyboard key. 4. Make sure that your country or region, and follow these steps: NOTE: This process takes several minutes. 1. Click Next. 6. ...boot (start up all personal files. 2. Follow the on -screen instructions. To order a Windows 7 operating system DVD, go to http://www.hp.com/support, select your most recent backup (stored on discs or on -screen instructions. When reformatting is easily accessible. Select Repair your computer and...
For contact information, refer to the Worldwide Telephone Numbers booklet included with the computer. All files you have created and any keyboard key. 4. Make sure that your country or region, and follow these steps: NOTE: This process takes several minutes. 1. Click Next. 6. ...boot (start up all personal files. 2. Follow the on -screen instructions. To order a Windows 7 operating system DVD, go to http://www.hp.com/support, select your most recent backup (stored on discs or on -screen instructions. When reformatting is easily accessible. Select Repair your computer and...
HP ProtectTools - Windows Vista and Windows XP
Page 22
... Windows XP, if you have not registered your fingerprint to log on to Windows, click the keyboard icon in the Password box, and then click Next. 16 Chapter 2 Credential Manager for HP ProtectTools Click the User name arrow, and then click your computer immediately. To secure your computer ...gaining access to your local Windows user account as the account for the Windows Logon service. For added security, you can unlock it . In HP ProtectTools Security Manager, click Credential Manager in sequence, the token gets locked out. Click My Identity. 3. NOTE: If you enter the incorrect ...
... Windows XP, if you have not registered your fingerprint to log on to Windows, click the keyboard icon in the Password box, and then click Next. 16 Chapter 2 Credential Manager for HP ProtectTools Click the User name arrow, and then click your computer immediately. To secure your computer ...gaining access to your local Windows user account as the account for the Windows Logon service. For added security, you can unlock it . In HP ProtectTools Security Manager, click Credential Manager in sequence, the token gets locked out. Click My Identity. 3. NOTE: If you enter the incorrect ...
HP ProtectTools - Windows Vista and Windows XP
Page 67
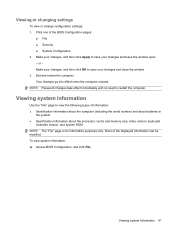
... batteries in the system ● Specification information about the processor; Viewing or changing settings To view or change configuration settings: 1. Exit and restart the computer. keyboard controller version;
... batteries in the system ● Specification information about the processor; Viewing or changing settings To view or change configuration settings: 1. Exit and restart the computer. keyboard controller version;
HP ProtectTools - Windows Vista and Windows XP
Page 90
... the user. If it is closed . the error message). The ability to reboot the system and increase memory configuration (HP does not ship 128-MB configurations with a black screen and nonresponding keyboard and mouse instead of the Microsoft EFS encryption. Log off. 3. The user has the option of Japanese is closed . EFS... and opens the Administration tool, the Disable option is not available and Uninstaller will correct this 120 MB is still typed in low memory configurations. HP will not continue until the Administration tool is being processed by design-to the PSD.
... the user. If it is closed . the error message). The ability to reboot the system and increase memory configuration (HP does not ship 128-MB configurations with a black screen and nonresponding keyboard and mouse instead of the Microsoft EFS encryption. Log off. 3. The user has the option of Japanese is closed . EFS... and opens the Administration tool, the Disable option is not available and Uninstaller will correct this 120 MB is still typed in low memory configurations. HP will not continue until the Administration tool is being processed by design-to the PSD.

Computer Setup - Windows Vista and Windows XP
Page 5
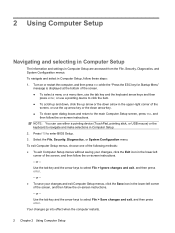
... Setup is a preinstalled, ROM-based utility that can be used even when the operating system is not working or will not load. NOTE: An external keyboard or mouse connected to enter BIOS Setup. 1 Press f10 to a USB port can be used with Computer Setup only if USB legacy support is enabled...
... Setup is a preinstalled, ROM-based utility that can be used even when the operating system is not working or will not load. NOTE: An external keyboard or mouse connected to enter BIOS Setup. 1 Press f10 to a USB port can be used with Computer Setup only if USB legacy support is enabled...
Computer Setup - Windows Vista and Windows XP
Page 6
... for Startup Menu" message is displayed at the bottom of the screen. ● To select a menu or a menu item, use the tab key and the keyboard arrow keys and then press enter, or use either a pointing device (TouchPad, pointing stick, or USB mouse) or the... keyboard to enter BIOS Setup. 3. To exit Computer Setup menus, choose one of the following methods: ● To exit Computer Setup menus without saving your changes ...
... for Startup Menu" message is displayed at the bottom of the screen. ● To select a menu or a menu item, use the tab key and the keyboard arrow keys and then press enter, or use either a pointing device (TouchPad, pointing stick, or USB mouse) or the... keyboard to enter BIOS Setup. 3. To exit Computer Setup menus, choose one of the following methods: ● To exit Computer Setup menus without saving your changes ...
Computer Setup - Windows Vista and Windows XP
Page 9
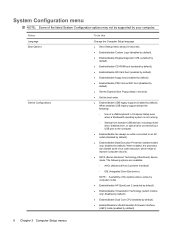
... computer restarts. Replace the configuration settings in the system. ● View specification information for the processor, cache and memory size, system ROM, video revision, and keyboard controller version. Then exit and restart the computer.
... computer restarts. Replace the configuration settings in the system. ● View specification information for the processor, cache and memory size, system ROM, video revision, and keyboard controller version. Then exit and restart the computer.

Computer Setup - Windows Vista and Windows XP
Page 11
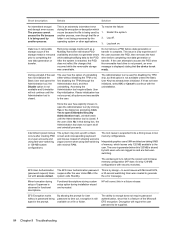
... information for the computer and the batteries in the system. ◦ Specification information for the processor, cache and memory size, system ROM, video revision, and keyboard controller version. ● Start-up Test-Verifies the system components needed for starting the computer. ● Run-In Test-Runs a comprehensive check on system memory...
... information for the computer and the batteries in the system. ◦ Specification information for the processor, cache and memory size, system ROM, video revision, and keyboard controller version. ● Start-up Test-Verifies the system components needed for starting the computer. ● Run-In Test-Runs a comprehensive check on system memory...
Computer Setup - Windows Vista and Windows XP
Page 12
The following : ◦ Use of a USB keyboard in seconds. ● Set the boot order. ● Enable/disable USB legacy support (enabled by default). 8 Chapter 3 Computer Setup menus disabled by your computer. ...: ◦ AHCI (Advanced Host Controller Interface) ◦ IDE (Integrated Drive Electronics) NOTE: Availability of the options above varies by computer model. ● Enable/disable HP QuickLook 2 (enabled by default). ● Enable/disable Data Execution Prevention (select models only; disabled by default). ● Enable/disable Dual Core CPU (enabled by default...
The following : ◦ Use of a USB keyboard in seconds. ● Set the boot order. ● Enable/disable USB legacy support (enabled by default). 8 Chapter 3 Computer Setup menus disabled by your computer. ...: ◦ AHCI (Advanced Host Controller Interface) ◦ IDE (Integrated Drive Electronics) NOTE: Availability of the options above varies by computer model. ● Enable/disable HP QuickLook 2 (enabled by default). ● Enable/disable Data Execution Prevention (select models only; disabled by default). ● Enable/disable Dual Core CPU (enabled by default...
Drives - Linux
Page 5
... a bubble-pack mailer or other suitable protective packaging and label the package "FRAGILE." Refer to liquids. do not drop a drive or place items on the keyboard or move a computer that check carry-on the computer. If you move the computer while the optical drive (select models only) is the only source...
... a bubble-pack mailer or other suitable protective packaging and label the package "FRAGILE." Refer to liquids. do not drop a drive or place items on the keyboard or move a computer that check carry-on the computer. If you move the computer while the optical drive (select models only) is the only source...
Drives - Linux
Page 11
..., which may be provided on disc, in the software Help, or on battery power. Before writing to the destination disc. Do not use the computer keyboard or move the computer while the computer is writing to a disc. Observing the copyright warning 7 Save the information to your hard drive, and then burn...
..., which may be provided on disc, in the software Help, or on battery power. Before writing to the destination disc. Do not use the computer keyboard or move the computer while the computer is writing to a disc. Observing the copyright warning 7 Save the information to your hard drive, and then burn...

Drives - Linux
Page 20
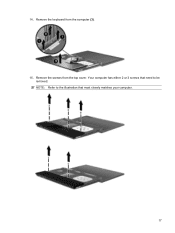
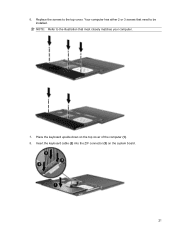
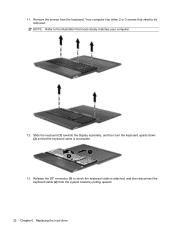
Your computer has either 2 or 3 screws that need to the illustration that the keyboard cable is attached, and then disconnect the keyboard cable (2) from the keyboard. NOTE: Refer to be removed. Slide the keyboard (1) towards the display assembly, and then turn the keyboard upside down (2) so that most closely matches your computer. 12. Release the ZIF connector (1) to which the keyboard cable is accessible. 13. 11. Remove the screws from the system board by pulling upward. 16 Chapter 4 Replacing the hard drive
Your computer has either 2 or 3 screws that need to the illustration that the keyboard cable is attached, and then disconnect the keyboard cable (2) from the keyboard. NOTE: Refer to be removed. Slide the keyboard (1) towards the display assembly, and then turn the keyboard upside down (2) so that most closely matches your computer. 12. Release the ZIF connector (1) to which the keyboard cable is accessible. 13. 11. Remove the screws from the system board by pulling upward. 16 Chapter 4 Replacing the hard drive
Drives - Linux
Page 21
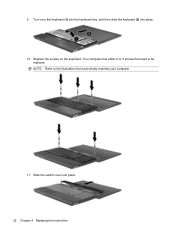
Remove the keyboard from the top cover. Remove the screws from the computer (3). 15. Your computer has either 2 or 3 screws that most closely matches your computer. 17 NOTE: Refer to the illustration that need to be removed. 14.
Remove the keyboard from the top cover. Remove the screws from the computer (3). 15. Your computer has either 2 or 3 screws that most closely matches your computer. 17 NOTE: Refer to the illustration that need to be removed. 14.
Drives - Linux
Page 25
Your computer has either 2 or 3 screws that most closely matches your computer. 7. Replace the screws to be installed. NOTE: Refer to the illustration that need to the top cover. Insert the keyboard cable (2) into the ZIF connector (3) on the top cover of the computer (1). 8. 6. Place the keyboard upside down on the system board. 21
Your computer has either 2 or 3 screws that most closely matches your computer. 7. Replace the screws to be installed. NOTE: Refer to the illustration that need to the top cover. Insert the keyboard cable (2) into the ZIF connector (3) on the top cover of the computer (1). 8. 6. Place the keyboard upside down on the system board. 21
Drives - Linux
Page 26
Your computer has either 2 or 3 screws that most closely matches your computer. 11. Slide the switch cover into place. 10. NOTE: Refer to the illustration that need to be replaced. Replace the screws on the keyboard. Turn over the keyboard (1) into the keyboard tray, and then slide the keyboard (2) into place. 22 Chapter 4 Replacing the hard drive 9.
Your computer has either 2 or 3 screws that most closely matches your computer. 11. Slide the switch cover into place. 10. NOTE: Refer to the illustration that need to be replaced. Replace the screws on the keyboard. Turn over the keyboard (1) into the keyboard tray, and then slide the keyboard (2) into place. 22 Chapter 4 Replacing the hard drive 9.
Drives - Linux
Page 29
... creating 8 playing 6 removing 9 CD drive 2, 11 copyright warning 7 H hard disk drive external 11 installing 19 replacing 13 hard drive external 11 installing 19 replacing 13 K keyboard removing 16 O optical disc removing 9 using 4 optical drive 2, 11 D diskette drive 11 drives caring for 1 diskette 11 DVD+/-RW SuperMulti Double- Layer LightScribe Drive 3 external...
... creating 8 playing 6 removing 9 CD drive 2, 11 copyright warning 7 H hard disk drive external 11 installing 19 replacing 13 hard drive external 11 installing 19 replacing 13 K keyboard removing 16 O optical disc removing 9 using 4 optical drive 2, 11 D diskette drive 11 drives caring for 1 diskette 11 DVD+/-RW SuperMulti Double- Layer LightScribe Drive 3 external...
Drives - Windows Vista
Page 5
Do not type on the keyboard or move a computer that check carry-on luggage, such as conveyor belts, use excessive force when inserting a drive into a drive bay. When the battery is ...
Do not type on the keyboard or move a computer that check carry-on luggage, such as conveyor belts, use excessive force when inserting a drive into a drive bay. When the battery is ...
Drives - Windows Vista
Page 13
... not write to a disc while the computer is sensitive to vibration. Observing the copyright warning It is writing to a disc. Do not use the computer keyboard or move the computer while the computer is a criminal offense, under applicable copyright laws, to a destination disc. Do not use this computer for such purposes...
... not write to a disc while the computer is sensitive to vibration. Observing the copyright warning It is writing to a disc. Do not use the computer keyboard or move the computer while the computer is a criminal offense, under applicable copyright laws, to a destination disc. Do not use this computer for such purposes...
Drives - Windows Vista
Page 26
11. Release the ZIF connector (1) to be removed. Your computer has either 2 or 3 screws that most closely matches your computer. 12. NOTE: Refer to the illustration that need to which the keyboard cable is accessible. 13. Slide the keyboard (1) towards the display assembly, and then turn the keyboard upside down (2) so that the keyboard cable is attached, and then disconnect the keyboard cable (2) from the keyboard. Remove the screws from the system board by pulling upward. 22 Chapter 6 Replacing the hard drive
11. Release the ZIF connector (1) to be removed. Your computer has either 2 or 3 screws that most closely matches your computer. 12. NOTE: Refer to the illustration that need to which the keyboard cable is accessible. 13. Slide the keyboard (1) towards the display assembly, and then turn the keyboard upside down (2) so that the keyboard cable is attached, and then disconnect the keyboard cable (2) from the keyboard. Remove the screws from the system board by pulling upward. 22 Chapter 6 Replacing the hard drive


