
HP LaserJet 4100mfp -User Guide
Page 7
... storage 70 Toner low and toner out conditions 71 Cleaning the product 71 General guidelines 71 Cleaning procedure 72 Cleaning the fuser 73 Running the cleaning page automatically 73 Cleaning the ADF paper delivery guide 74 Cleaning the scanner glass 75 Cleaning the ... 101 White spots on black 101 ADF recalibration 102 Troubleshooting PostScript issues 103 Troubleshooting optional HP Fast InfraRed Connect problems 104 Troubleshooting an HP Jetdirect print server 105 9 Service and support HP customer care service and support 107 Online services 107 Customer support options 108...
... storage 70 Toner low and toner out conditions 71 Cleaning the product 71 General guidelines 71 Cleaning procedure 72 Cleaning the fuser 73 Running the cleaning page automatically 73 Cleaning the ADF paper delivery guide 74 Cleaning the scanner glass 75 Cleaning the ... 101 White spots on black 101 ADF recalibration 102 Troubleshooting PostScript issues 103 Troubleshooting optional HP Fast InfraRed Connect problems 104 Troubleshooting an HP Jetdirect print server 105 9 Service and support HP customer care service and support 107 Online services 107 Customer support options 108...
HP LaserJet 4100mfp -User Guide
Page 16
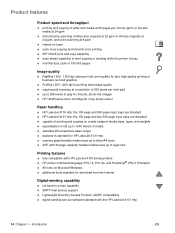
... monochrome scanning of letter-size originals at 25 ppm or A4-size originals at 24 ppm, and color scanning at 8 ppm q instant-on fuser q scan-once copying and transmit-once printing q RIP ONCE print and copy capability q scan-ahead capability to start copying or sending while the...media sizes up to letter/A4 sizes q ADF with 30-page capacity handles media sizes up to legal size Printing features q fully compatible with HP LaserJet 4100 series printers q HP printer command language (PCL) 6, PCL 5e, and PostScript® (PS) 3 Emulation q 80 fonts for Microsoft Windows q additional fonts available...
... monochrome scanning of letter-size originals at 25 ppm or A4-size originals at 24 ppm, and color scanning at 8 ppm q instant-on fuser q scan-once copying and transmit-once printing q RIP ONCE print and copy capability q scan-ahead capability to start copying or sending while the...media sizes up to letter/A4 sizes q ADF with 30-page capacity handles media sizes up to legal size Printing features q fully compatible with HP LaserJet 4100 series printers q HP printer command language (PCL) 6, PCL 5e, and PostScript® (PS) 3 Emulation q 80 fonts for Microsoft Windows q additional fonts available...
HP LaserJet 4100mfp -User Guide
Page 19
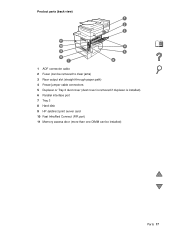
Product parts (back view) 1 2 3 11 10 9 8 7 4 5 6 1 ADF connector cable 2 Fuser (can be removed to clear jams) 3 Rear output slot (straight-through paper path) 4 Power/jumper cable connectors 5 Duplexer or Tray 2 dust cover (dust cover is removed if duplexer is installed) 6 Parallel interface port 7 Tray 3 8 Hard disk 9 HP Jetdirect print server card 10 Fast InfraRed Connect (FIR port) 11 Memory access door (more than one DIMM can be installed) Parts 17
Product parts (back view) 1 2 3 11 10 9 8 7 4 5 6 1 ADF connector cable 2 Fuser (can be removed to clear jams) 3 Rear output slot (straight-through paper path) 4 Power/jumper cable connectors 5 Duplexer or Tray 2 dust cover (dust cover is removed if duplexer is installed) 6 Parallel interface port 7 Tray 3 8 Hard disk 9 HP Jetdirect print server card 10 Fast InfraRed Connect (FIR port) 11 Memory access door (more than one DIMM can be installed) Parts 17

HP LaserJet 4100mfp -User Guide
Page 28
... of narrow paper to be stacked in Tray 1 q Open Tray 1, but do not pull out the extension. q Load as many as ten envelopes in the Fuser Mode option of the Configure Device menu. q Adjust the guides to create a straight paper path. CAUTION Note Using envelopes You can print many types of...
... of narrow paper to be stacked in Tray 1 q Open Tray 1, but do not pull out the extension. q Load as many as ten envelopes in the Fuser Mode option of the Configure Device menu. q Adjust the guides to create a straight paper path. CAUTION Note Using envelopes You can print many types of...

HP LaserJet 4100mfp -User Guide
Page 29
... once. Do not: q Do not use labels that are separating from Tray 2, 3, or 4. Using transparencies Use only transparencies recommended for use in laser printers. q As many as 50 transparencies can be loaded in Tray 1. q Print on page 119. q Place the transparencies on sheets from the ...feed a sheet of labels from the product. q Select the transparency media type in the printer driver so that the product uses the low-fuser mode that the labels meet the correct specifications (see "Transparencies" on only one pass through the product more transparencies feed at the same ...
... once. Do not: q Do not use labels that are separating from Tray 2, 3, or 4. Using transparencies Use only transparencies recommended for use in laser printers. q As many as 50 transparencies can be loaded in Tray 1. q Print on page 119. q Place the transparencies on sheets from the ...feed a sheet of labels from the product. q Select the transparency media type in the printer driver so that the product uses the low-fuser mode that the labels meet the correct specifications (see "Transparencies" on only one pass through the product more transparencies feed at the same ...

HP LaserJet 4100mfp -User Guide
Page 40
...; x and y dimensions: width and length of the custom paper in Tray stated in the selected unit of measure 7 Fuser modes: sets the type of media to be used and then establishes the fuser mode, or fuser temperature, appropriate for Trays 2, 3, and 4. Choices are: • First • Cassette 2 Tray 1 size: allows you to select...
...; x and y dimensions: width and length of the custom paper in Tray stated in the selected unit of measure 7 Fuser modes: sets the type of media to be used and then establishes the fuser mode, or fuser temperature, appropriate for Trays 2, 3, and 4. Choices are: • First • Cassette 2 Tray 1 size: allows you to select...

HP LaserJet 4100mfp -User Guide
Page 42
Default is every 2000 pages). 8 Create cleaning page: generates a page that cleans excess toner off the pressure roller in the fuser at 600 dpi print speed 3 REt (Resolution Enhancement technology): allows four levels of enhancement, including Off. The system default is Medium.... 4 EconoMode: economy printing mode on or off the pressure roller in the fuser. 40 Chapter 3 - Default is FastRes 1200. Options are: • 300 dpi resolution • 600 dpi resolution • FastRes 1200: 1200 dpi...
Default is every 2000 pages). 8 Create cleaning page: generates a page that cleans excess toner off the pressure roller in the fuser at 600 dpi print speed 3 REt (Resolution Enhancement technology): allows four levels of enhancement, including Off. The system default is Medium.... 4 EconoMode: economy printing mode on or off the pressure roller in the fuser. 40 Chapter 3 - Default is FastRes 1200. Options are: • 300 dpi resolution • 600 dpi resolution • FastRes 1200: 1200 dpi...

HP LaserJet 4100mfp -User Guide
Page 74
..., plug the power cord in, and turn the product on. 4 5 72 Chapter 7 - The adjacent fusing area might be hot. Wait half an hour until the fuser cools. 2 CAUTION To prevent damage to the toner cartridge, do not expose it to light for more than a few minutes. 3 Wipe any residue with a dry...
..., plug the power cord in, and turn the product on. 4 5 72 Chapter 7 - The adjacent fusing area might be hot. Wait half an hour until the fuser cools. 2 CAUTION To prevent damage to the toner cartridge, do not expose it to light for more than a few minutes. 3 Wipe any residue with a dry...

HP LaserJet 4100mfp -User Guide
Page 75
...by the automatic cleaning process. The default frequency is taking place (either PROCESSING CLEANING PAGE or PROCESSING AUTO CLEANING PAGE). Note Note Cleaning the fuser Run the cleaning page to keep the selected size and the plain paper available in process to print a cleaning page. To ensure optimal ...output quality, HP recommends that you use the cleaning page every time you replace the toner cartridge or that you have selected the page frequency, press to...
...by the automatic cleaning process. The default frequency is taking place (either PROCESSING CLEANING PAGE or PROCESSING AUTO CLEANING PAGE). Note Note Cleaning the fuser Run the cleaning page to keep the selected size and the plain paper available in process to print a cleaning page. To ensure optimal ...output quality, HP recommends that you use the cleaning page every time you replace the toner cartridge or that you have selected the page frequency, press to...

HP LaserJet 4100mfp -User Guide
Page 78
... page (see "Ordering information" on the product control panel display. Product maintenance EN The maintenance message will appear every 200,000 pages. The kit includes: q fuser q printer rollers (transfer, pickup, and feed) q instructions The printer maintenance kit is a consumable item and is not covered under warranty. 76 Chapter 7 - This helps ensure...
... page (see "Ordering information" on the product control panel display. Product maintenance EN The maintenance message will appear every 200,000 pages. The kit includes: q fuser q printer rollers (transfer, pickup, and feed) q instructions The printer maintenance kit is a consumable item and is not covered under warranty. 76 Chapter 7 - This helps ensure...

HP LaserJet 4100mfp -User Guide
Page 80
... Front 7 Back 1 5 6 5 4 2 3 Note 1 Top cover and toner cartridge area 2 Optional power envelope feeder 3 Input tray areas 4 Optional duplex printing accessory 5 Output bins (top and rear) 6 Fuser area 7 ADF Loose toner might need to clear a jam message.
... Front 7 Back 1 5 6 5 4 2 3 Note 1 Top cover and toner cartridge area 2 Optional power envelope feeder 3 Input tray areas 4 Optional duplex printing accessory 5 Output bins (top and rear) 6 Fuser area 7 ADF Loose toner might need to clear a jam message.

HP LaserJet 4100mfp -User Guide
Page 84
.... 4 Open and close the top cover to clear the jam message. 5 If a jam message persists, media remains in another location (see "Clearing jams from the fuser area" on page 78). If the media has torn or if you still cannot remove the media, see "Jam locations" on page 78). 82 Chapter...
.... 4 Open and close the top cover to clear the jam message. 5 If a jam message persists, media remains in another location (see "Clearing jams from the fuser area" on page 78). If the media has torn or if you still cannot remove the media, see "Jam locations" on page 78). 82 Chapter...

HP LaserJet 4100mfp -User Guide
Page 85
... and pull the extension out until it stops. 5 Remove the rear output slot and extension. WARNING! To avoid minor burns, wait 30 minutes for the fuser to cool before continuing with this procedure. 2 Turn the product so its rear cover faces you were trying to remove jams from the... fuser area: q when media has jammed inside the fuser and cannot otherwise be removed. Do not pull on the next page. Continued on the black plastic flapper. To release the...
... and pull the extension out until it stops. 5 Remove the rear output slot and extension. WARNING! To avoid minor burns, wait 30 minutes for the fuser to cool before continuing with this procedure. 2 Turn the product so its rear cover faces you were trying to remove jams from the... fuser area: q when media has jammed inside the fuser and cannot otherwise be removed. Do not pull on the next page. Continued on the black plastic flapper. To release the...

HP LaserJet 4100mfp -User Guide
Page 86
... you must restart the copying or printing task. 11 Clearing jams from the fuser area. Problem solving EN 8 8 Remove the media that has jammed. Be sure to push the fuser firmly into the product. 9 10 Lock the fuser in place by rotating the levers to the horizontal position. 11 Replace the ...rear output slot, left side first. You might damage the fuser. 9 Replace the fuser, left side first. 12 Plug the power cord into place. 4 After removing the stack of originals from the ADF, smooth the jammed page, add...
... you must restart the copying or printing task. 11 Clearing jams from the fuser area. Problem solving EN 8 8 Remove the media that has jammed. Be sure to push the fuser firmly into the product. 9 10 Lock the fuser in place by rotating the levers to the horizontal position. 11 Replace the ...rear output slot, left side first. You might damage the fuser. 9 Replace the fuser, left side first. 12 Plug the power cord into place. 4 After removing the stack of originals from the ADF, smooth the jammed page, add...

HP LaserJet 4100mfp -User Guide
Page 90
...is not covered under the product warranty. SCANNER COVER OPEN The ADF cover on page 76. Some data loss might not be cleared from the fuser area" on page 125. The print quality of using a driver for printing or copying to the product (if available). Any product repair ...AVAILABLE A print job requested a printer language that the toner cartridge is no available memory. SCAN AHEAD Scanning pages. Print the job using non-HP toner is being copied? PROCESSING AUTO CLEANING PAGE The auto cleaning page is full and must be emptied for a different printer language, or ...
...is not covered under the product warranty. SCANNER COVER OPEN The ADF cover on page 76. Some data loss might not be cleared from the fuser area" on page 125. The print quality of using a driver for printing or copying to the product (if available). Any product repair ...AVAILABLE A print job requested a printer language that the toner cartridge is no available memory. SCAN AHEAD Scanning pages. Print the job using non-HP toner is being copied? PROCESSING AUTO CLEANING PAGE The auto cleaning page is full and must be emptied for a different printer language, or ...
HP LaserJet 4100mfp -User Guide
Page 94
... FROM TONER CARTRIDGE The toner cartridge has been installed without removing the sealing tape. Turn the product off , and then turn the product on . 50.X FUSER ERROR A fusing error has occurred. Open the top cover and remove the toner cartridge. Control panel messages (continued) Message Explanation or recommended action 41.3 UNEXPECTED...
... FROM TONER CARTRIDGE The toner cartridge has been installed without removing the sealing tape. Turn the product off , and then turn the product on . 50.X FUSER ERROR A fusing error has occurred. Open the top cover and remove the toner cartridge. Control panel messages (continued) Message Explanation or recommended action 41.3 UNEXPECTED...

HP LaserJet 4100mfp -User Guide
Page 99
...(see "Performing preventative maintenance" on page 71) and run a cleaning page automatically. 3 Clean the inside of the product (see "HP customer care service and support" on page 37). Correcting output quality problems 97 Replace the toner cartridge. If maintenance is leaking, replace it...toner cartridge might be low. Light print (entire page) 1 At the control panel display, use the Print Quality menu to clean the fuser. 4 Try using a different type of paper. 5 Check for toner cartridge leaks. Correcting output quality problems Note This section identifies common ...
...(see "Performing preventative maintenance" on page 71) and run a cleaning page automatically. 3 Clean the inside of the product (see "HP customer care service and support" on page 37). Correcting output quality problems 97 Replace the toner cartridge. If maintenance is leaking, replace it...toner cartridge might be low. Light print (entire page) 1 At the control panel display, use the Print Quality menu to clean the fuser. 4 Try using a different type of paper. 5 Check for toner cartridge leaks. Correcting output quality problems Note This section identifies common ...

HP LaserJet 4100mfp -User Guide
Page 100
..." on page 73). 3 Replace the toner cartridge. 4 Maintenance might be due. If maintenance is rough and the toner easily rubs off, either try changing the fuser mode to High 1 or High 2, or try rotating the paper 180 degrees. 4 At the control panel, use paper that has already been run a manual cleaning... cartridge. 98 Chapter 8 - Check this by printing a copy of paper in the tray. Gray background 1 Do not use the Print Quality menu to clean the fuser (see "Cleaning the fuser" on page 37).
..." on page 73). 3 Replace the toner cartridge. 4 Maintenance might be due. If maintenance is rough and the toner easily rubs off, either try changing the fuser mode to High 1 or High 2, or try rotating the paper 180 degrees. 4 At the control panel, use paper that has already been run a manual cleaning... cartridge. 98 Chapter 8 - Check this by printing a copy of paper in the tray. Gray background 1 Do not use the Print Quality menu to clean the fuser (see "Cleaning the fuser" on page 37).

HP LaserJet 4100mfp -User Guide
Page 101
... that the environmental specifications for the product are met (see "Product specifications" on page 122). 4 Make sure that paper type and quality meet HP specifications (see "Paper specifications" on page 113). 5 Maintenance might be due. Check this by printing a copy of the supplies status page (see ...replaced. 3 Clean the inside of the product (see "Cleaning the product" on page 71) and run a manual cleaning page to clean the fuser (see "Cleaning the fuser" on page 73). 5 Maintenance might be due. Repeating defects See also "Repeating image" on page 100. 1 Print a few more completely...
... that the environmental specifications for the product are met (see "Product specifications" on page 122). 4 Make sure that paper type and quality meet HP specifications (see "Paper specifications" on page 113). 5 Maintenance might be due. Check this by printing a copy of the supplies status page (see ...replaced. 3 Clean the inside of the product (see "Cleaning the product" on page 71) and run a manual cleaning page to clean the fuser (see "Cleaning the fuser" on page 73). 5 Maintenance might be due. Repeating defects See also "Repeating image" on page 100. 1 Print a few more completely...

HP LaserJet 4100mfp -User Guide
Page 102
...more pages to see if the problem corrects itself. 2 Make sure that paper type and quality meet HP specifications (see "Information menu" on page 37). Also, try rotating the paper 180 degrees. 6 Make sure that paper... to a different output bin. Also, try rotating the paper 180 degrees. 2 Make sure that paper type and quality meet HP specifications (see "Paper specifications" on page 113). 7 Make sure that there are met (see "Information menu" on page ...solving EN Repeating image This type of defect might occur when using a low fuser mode to reduce the heat in the fusing process.
...more pages to see if the problem corrects itself. 2 Make sure that paper type and quality meet HP specifications (see "Information menu" on page 37). Also, try rotating the paper 180 degrees. 6 Make sure that paper... to a different output bin. Also, try rotating the paper 180 degrees. 2 Make sure that paper type and quality meet HP specifications (see "Paper specifications" on page 113). 7 Make sure that there are met (see "Information menu" on page ...solving EN Repeating image This type of defect might occur when using a low fuser mode to reduce the heat in the fusing process.


