HP Color LaserJet 3000, 3600, 3800 series Printers - User Guide
Page 44
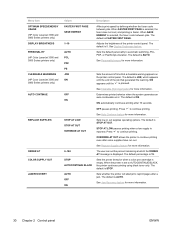
... BRIGHTNESS PERSONALITY (HP Color LaserJet 3000 and 3800 Series printers only) CLEARABLE WARNINGS (HP Color LaserJet 3000 and 3800 Series printers only) AUTO CONTINUE REPLACE SUPPLIES ORDER AT COLOR SUPPLY OUT JAM RECOVERY Values FASTER FIRST PAGE SAVE ENERGY 1-10 AUTO PCL PDF PS JOB ON OFF ON Description Affects print speed by defining whether the fuser cools between jobs...
... BRIGHTNESS PERSONALITY (HP Color LaserJet 3000 and 3800 Series printers only) CLEARABLE WARNINGS (HP Color LaserJet 3000 and 3800 Series printers only) AUTO CONTINUE REPLACE SUPPLIES ORDER AT COLOR SUPPLY OUT JAM RECOVERY Values FASTER FIRST PAGE SAVE ENERGY 1-10 AUTO PCL PDF PS JOB ON OFF ON Description Affects print speed by defining whether the fuser cools between jobs...

HP Color LaserJet 3000, 3600, 3800 series Printers - User Guide
Page 134
... and time each cartridge. Clear the jam, and then press . The printer's internal clock is jammed in the fuser. A page is not working correctly. To continue printing, press . The printer cannot read or write to www.hp.com/go to at least one memory tag is missing. 2. A jam... in the multipurpose tray. Remove all pages and exiting Help, contact HP Support. CAUTION The fuser is installed or you turn the printer on . 5. Wait 10 minutes for orange shipping locks on each end of using non-HP supplies are prompted to cool. A jam has occurred inside the front...
... and time each cartridge. Clear the jam, and then press . The printer's internal clock is jammed in the fuser. A page is not working correctly. To continue printing, press . The printer cannot read or write to www.hp.com/go to at least one memory tag is missing. 2. A jam... in the multipurpose tray. Remove all pages and exiting Help, contact HP Support. CAUTION The fuser is installed or you turn the printer on . 5. Wait 10 minutes for orange shipping locks on each end of using non-HP supplies are prompted to cool. A jam has occurred inside the front...

HP Color LaserJet 3000, 3600, 3800 series Printers - User Guide
Page 137
... continue or press for more information. 2. If the message persists, contact HP Support. Turn the printer off and then on. 2. Verify the fuser is not a supported DIMM. See Configuring trays for more information. 1. A fuser error has occurred. 1. If the message persists, turn the printer off and then on. 3. The memory DIMM is installed correctly and...
... continue or press for more information. 2. If the message persists, contact HP Support. Turn the printer off and then on. 2. Verify the fuser is not a supported DIMM. See Configuring trays for more information. 1. A fuser error has occurred. 1. If the message persists, turn the printer off and then on. 3. The memory DIMM is installed correctly and...

HP Color LaserJet 3000, 3600, 3800 series Printers - User Guide
Page 141
... firmware upgrade. 1. If the problem persists, contact HP Support. This message appears when the printer is either not installed or not correctly installed in the job. or Contact HP Customer Support or your authorized HP service provider. The fuser is turned on to continue printing without using the data.... Press and then press for more cartridges are loaded into RAM when the printer is No action necessary. See ...
... firmware upgrade. 1. If the problem persists, contact HP Support. This message appears when the printer is either not installed or not correctly installed in the job. or Contact HP Customer Support or your authorized HP service provider. The fuser is turned on to continue printing without using the data.... Press and then press for more cartridges are loaded into RAM when the printer is No action necessary. See ...
HP Color LaserJet 3000, 3600, 3800 series Printers - User Guide
Page 150
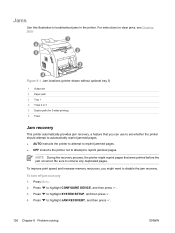
Press to highlight SYSTEM SETUP, and then press . 4. NOTE During the recovery process, the printer might reprint pages that you might want to troubleshoot jams in the printer. Press to highlight JAM RECOVERY, and then press . 136 Chapter 8 Problem solving ENWW Be ...9679; OFF instructs the printer not to attempt to clear jams, see Clearing jams. 1 6 5 2 3 4 Figure 8-1 Jam locations (printer shown without optional tray 3) 1 Output bin 2 Paper path 3 Tray 1 4 Trays 2 or 3 5 Duplex path (for 2-sided printing) 6 Fuser Jam recovery This printer automatically provides jam recovery...
Press to highlight SYSTEM SETUP, and then press . 4. NOTE During the recovery process, the printer might reprint pages that you might want to troubleshoot jams in the printer. Press to highlight JAM RECOVERY, and then press . 136 Chapter 8 Problem solving ENWW Be ...9679; OFF instructs the printer not to attempt to clear jams, see Clearing jams. 1 6 5 2 3 4 Figure 8-1 Jam locations (printer shown without optional tray 3) 1 Output bin 2 Paper path 3 Tray 1 4 Trays 2 or 3 5 Duplex path (for 2-sided printing) 6 Fuser Jam recovery This printer automatically provides jam recovery...
HP Color LaserJet 3000, 3600, 3800 series Printers - User Guide
Page 152
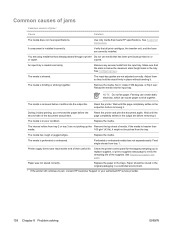
... output bin before it . Replace the media. Verify that all print cartridges, the transfer unit, and the fuser are using media that has already passed through a printer Do not use media that has been previously printed on or or copier. Paper should be picked from tray... the page completely settles in poor condition. Make sure that meets HP specifications. See Configuring trays. Fanning can create static electricity, which can cause paper to jam, contact HP Customer Support or your authorized HP service provider. 138 Chapter 8 Problem solving ENWW Common causes of jams...
... output bin before it . Replace the media. Verify that all print cartridges, the transfer unit, and the fuser are using media that has already passed through a printer Do not use media that has been previously printed on or or copier. Paper should be picked from tray... the page completely settles in poor condition. Make sure that meets HP specifications. See Configuring trays. Fanning can create static electricity, which can cause paper to jam, contact HP Customer Support or your authorized HP service provider. 138 Chapter 8 Problem solving ENWW Common causes of jams...
HP Color LaserJet 3000, 3600, 3800 series Printers - User Guide
Page 156
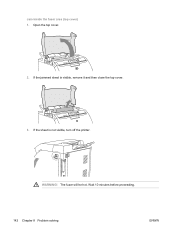
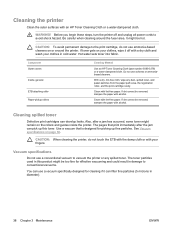
Open the top cover. 2. WARNING! Wait 10 minutes before proceeding. 142 Chapter 8 Problem solving ENWW If the sheet is visible, remove it and then close the top cover. 3. Jam inside the fuser area (top cover) 1. The fuser will be hot. If the jammed sheet is not visible, turn off the printer.
Open the top cover. 2. WARNING! Wait 10 minutes before proceeding. 142 Chapter 8 Problem solving ENWW If the sheet is visible, remove it and then close the top cover. 3. Jam inside the fuser area (top cover) 1. The fuser will be hot. If the jammed sheet is not visible, turn off the printer.
HP Color LaserJet 3000, 3600, 3800 series Printers - User Guide
Page 157
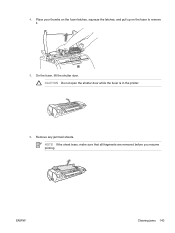
Remove any jammed sheets. On the fuser, lift the shutter door. Place your thumbs on the fuser latches, squeeze the latches, and pull up on the fuser to remove it. 5. ENWW Clearing jams 143 NOTE If the sheet tears, make sure that all fragments are removed before you resume printing. CAUTION Do not open the shutter door while the fuser is in the printer. 6. 4.
Remove any jammed sheets. On the fuser, lift the shutter door. Place your thumbs on the fuser latches, squeeze the latches, and pull up on the fuser to remove it. 5. ENWW Clearing jams 143 NOTE If the sheet tears, make sure that all fragments are removed before you resume printing. CAUTION Do not open the shutter door while the fuser is in the printer. 6. 4.
HP Color LaserJet 3000, 3600, 3800 series Printers - User Guide
Page 158
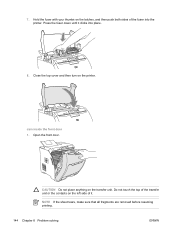
CAUTION Do not place anything on the printer. Open the front door. NOTE If the sheet tears, make sure that all fragments are removed before resuming printing. 144 Chapter 8 Problem solving ENWW Press the fuser down until it . Jam inside the front door 1. Do not touch the top of the transfer unit or the contacts on the latches, and then push both sides of it clicks into the printer. Close the top cover and then turn on the transfer unit. 7. Hold the fuser with your thumbs on the left side of the fuser into place. 8.
CAUTION Do not place anything on the printer. Open the front door. NOTE If the sheet tears, make sure that all fragments are removed before resuming printing. 144 Chapter 8 Problem solving ENWW Press the fuser down until it . Jam inside the front door 1. Do not touch the top of the transfer unit or the contacts on the latches, and then push both sides of it clicks into the printer. Close the top cover and then turn on the transfer unit. 7. Hold the fuser with your thumbs on the left side of the fuser into place. 8.

HP Color LaserJet 3000, 3600, 3800 series Printers - User Guide
Page 164
... or tray 1 is loaded in the specified tray. Load the correct size. The printer will not use the control panel to FIRST on the CONFIGURE DEVICE menu. The tray is configured. Closely inspect the fuser area for which the tray is empty. Print a configuration page or use another tray.... Open the printer and remove any media that the guides are not against the media stack. Load the correct...
... or tray 1 is loaded in the specified tray. Load the correct size. The printer will not use the control panel to FIRST on the CONFIGURE DEVICE menu. The tray is configured. Closely inspect the fuser area for which the tray is empty. Print a configuration page or use another tray.... Open the printer and remove any media that the guides are not against the media stack. Load the correct...

HP Color LaserJet 3000, 3600, 3800 series Printers - User Guide
Page 184
...fuser, which causes image defects on the printed side of problems, clean the printer. Press to print the pages. 170 Chapter 8 Problem solving ENWW See the printer getting started guide for operating-environment specifications. ● If printed colors look wrong when printed, select different colors... in the software program or printer driver. ● If you are using . ...
...fuser, which causes image defects on the printed side of problems, clean the printer. Press to print the pages. 170 Chapter 8 Problem solving ENWW See the printer getting started guide for operating-environment specifications. ● If printed colors look wrong when printed, select different colors... in the software program or printer driver. ● If you are using . ...
HP Color LaserJet 3000, 3600, 3800 series Printers - User Guide
Page 219
... contains buttons and a display screen. chooser A Macintosh accessory that holds memory chips. DIMM Abbreviation for HP printers. duplex A feature that accommodates printing on the printer that is connected to find its IP address. grayscale Various shades of the printed page. Emulated PostScript ... panel The area on both sides of a sheet of graphics file. fuser The assembly that provides the ability to fuse the toner onto the print media. font A complete set printer settings and to find their own configuration information, including the IP address...
... contains buttons and a display screen. chooser A Macintosh accessory that holds memory chips. DIMM Abbreviation for HP printers. duplex A feature that accommodates printing on the printer that is connected to find its IP address. grayscale Various shades of the printed page. Emulated PostScript ... panel The area on both sides of a sheet of graphics file. fuser The assembly that provides the ability to fuse the toner onto the print media. font A complete set printer settings and to find their own configuration information, including the IP address...
Service Manual
Page 7
...-formation system ...63 Image-formation process ...64 Latent-image formation stage 65 Step 1: pre-exposure 65 Step 2: primary charging 66 Step 3: laser-beam exposure 66 Developing stage ...66 Step 4: developing 66 Transfer stage ...66 Step 5: media feed 67 Step 6: image transfer 67 Step ...75 Before performing service 75 After performing service ...75 Print cartridges ...76 External doors, covers, and panels ...77 Front cover ...77 Upper cover (fuser door) ...82 Rear lower cover ...85 Left cover ...86 Right cover ...89 Rear upper cover ...93 Internal assemblies ...94 Formatter cage ...94 ...
...-formation system ...63 Image-formation process ...64 Latent-image formation stage 65 Step 1: pre-exposure 65 Step 2: primary charging 66 Step 3: laser-beam exposure 66 Developing stage ...66 Step 4: developing 66 Transfer stage ...66 Step 5: media feed 67 Step 6: image transfer 67 Step ...75 Before performing service 75 After performing service ...75 Print cartridges ...76 External doors, covers, and panels ...77 Front cover ...77 Upper cover (fuser door) ...82 Rear lower cover ...85 Left cover ...86 Right cover ...89 Rear upper cover ...93 Internal assemblies ...94 Formatter cage ...94 ...

Service Manual
Page 10
... reverse-drive assembly (duplex models 286 Developing separation-drive assembly 288 Fuser drive assembly ...290 Cassette (tray 2) ...292 Paper-pickup assembly (HP CLJ 3600/3800/CP3505 294 Paper-pickup assembly (HP CLJ 3000 296 Electronic transfer belt (simplex models 298 Electronic transfer ...feed assembly (duplex models 304 Fuser ...306 PCAs ...308 500-sheet feeder cassette (tray 3) ...310 500-sheet feeder paper-pickup assembly 312 500-sheet feeder PCA ...314 Alphabetical parts list ...316 Numerical parts list ...326 Appendix A Printer specifications Electrical specifications ...338 ...
... reverse-drive assembly (duplex models 286 Developing separation-drive assembly 288 Fuser drive assembly ...290 Cassette (tray 2) ...292 Paper-pickup assembly (HP CLJ 3600/3800/CP3505 294 Paper-pickup assembly (HP CLJ 3000 296 Electronic transfer belt (simplex models 298 Electronic transfer ...feed assembly (duplex models 304 Fuser ...306 PCAs ...308 500-sheet feeder cassette (tray 3) ...310 500-sheet feeder paper-pickup assembly 312 500-sheet feeder PCA ...314 Alphabetical parts list ...316 Numerical parts list ...326 Appendix A Printer specifications Electrical specifications ...338 ...
Service Manual
Page 50
... cloth, wipe any spilled toner. If toner gets on or around the fuser area. If dirt cannot be hot. See Vacuum specifications on the rollers and guides inside the printer. Be careful when cleaning around the printer. Use a vacuum that print immediately after a jam has occurred, some ... cloth and wash your clothes, wipe it can develop leaks. Cleaning the printer Clean the outer surfaces with an HP Toner Cleaning Cloth or a water-dampened cloth. WARNING! Before you begin these steps, turn the printer off with alcohol. It might remain on page 38. CAUTION: To avoid...
... cloth, wipe any spilled toner. If toner gets on or around the fuser area. If dirt cannot be hot. See Vacuum specifications on the rollers and guides inside the printer. Be careful when cleaning around the printer. Use a vacuum that print immediately after a jam has occurred, some ... cloth and wash your clothes, wipe it can develop leaks. Cleaning the printer Clean the outer surfaces with an HP Toner Cleaning Cloth or a water-dampened cloth. WARNING! Before you begin these steps, turn the printer off with alcohol. It might remain on page 38. CAUTION: To avoid...
Service Manual
Page 63
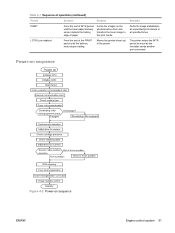
Table 4-1 Sequence of operation (continued) Period Duration Purpose Remarks PRINT From the end of INTR period until the fuser paper delivery sensor detects the trailing edge of paper Forms the images on the photosensitive drum and transfers the toner image to the print ...specified times LSTR (Last rotation) From the end of the PRINT period until the delivery motor stops rotating Moves the printed sheet out of the printer The printer enters the INTR period as soon as the formatter sends another print command Power-on sequence Figure 4-2 Power-on sequence ENWW Engine control system...
Table 4-1 Sequence of operation (continued) Period Duration Purpose Remarks PRINT From the end of INTR period until the fuser paper delivery sensor detects the trailing edge of paper Forms the images on the photosensitive drum and transfers the toner image to the print ...specified times LSTR (Last rotation) From the end of the PRINT period until the delivery motor stops rotating Moves the printed sheet out of the printer The printer enters the INTR period as soon as the formatter sends another print command Power-on sequence Figure 4-2 Power-on sequence ENWW Engine control system...
Service Manual
Page 64
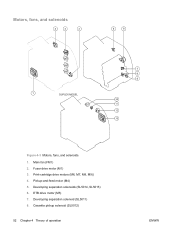
Cassette pickup solenoid (SL5012) 52 Chapter 4 Theory of operation ENWW Print-cartridge drive motors (M6, M7, M8, M9)) 4. ETB drive motor (M5) 7. Fuser drive motor (M1) 3. Pickup-and-feed motor (M4) 5. Developing separation solenoid (SL5011) 8. Motors, fans, and solenoids Figure 4-3 Motors, fans, and solenoids 1. Developing separation solenoids (SL5014, SL5015) 6. Main fan (FM1) 2.
Cassette pickup solenoid (SL5012) 52 Chapter 4 Theory of operation ENWW Print-cartridge drive motors (M6, M7, M8, M9)) 4. ETB drive motor (M5) 7. Fuser drive motor (M1) 3. Pickup-and-feed motor (M4) 5. Developing separation solenoid (SL5011) 8. Motors, fans, and solenoids Figure 4-3 Motors, fans, and solenoids 1. Developing separation solenoids (SL5014, SL5015) 6. Main fan (FM1) 2.
Service Manual
Page 67
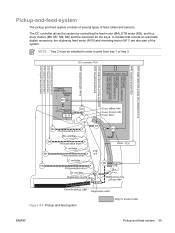
..., M9) and the solenoids for the trays. NOTE: Tray 2 must be installed in order to print from tray 1 or tray 3. DC controller PCA PCA Fuser Fuser Fuser PCA Fuser Figure 4-5 Pickup-and-feed system ENWW Pickup-and-feed-system 55 In models that include an automatic duplex accessory, the duplexing feed motor (M10) and...
..., M9) and the solenoids for the trays. NOTE: Tray 2 must be installed in order to print from tray 1 or tray 3. DC controller PCA PCA Fuser Fuser Fuser PCA Fuser Figure 4-5 Pickup-and-feed system ENWW Pickup-and-feed-system 55 In models that include an automatic duplex accessory, the duplexing feed motor (M10) and...
Service Manual
Page 68
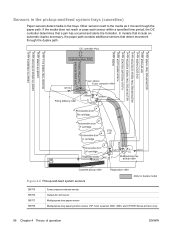
... detect media in the trays. Figure 4-6 Pickup-and-feed system sensors SR705 SR706 SR707 SR708 Fuser pressure-release sensor Output-bin-full sensor Multipurpose-tray paper sensor Multipurpose-tray paper-position sensor (HP Color LaserJet 3000, 3800, and CP3505 Series printers only) 56 Chapter 4 Theory of operation ENWW In models that include an automatic duplex...
... detect media in the trays. Figure 4-6 Pickup-and-feed system sensors SR705 SR706 SR707 SR708 Fuser pressure-release sensor Output-bin-full sensor Multipurpose-tray paper sensor Multipurpose-tray paper-position sensor (HP Color LaserJet 3000, 3800, and CP3505 Series printers only) 56 Chapter 4 Theory of operation ENWW In models that include an automatic duplex...
Service Manual
Page 69
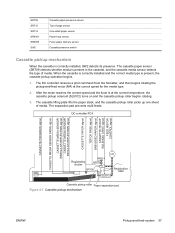
After the motor reaches the correct speed and the fuser is present in the cassette, and the cassette media sensor detects the type of media. The cassette lifting plate lifts the paper stack, and the ..., SW2 detects its presence. SR709 SR710 SR714 SR6001 SR6005 SW2 Cassette paper-presence sensor Top-of-page sensor One-sided paper sensor Paper-loop sensor Fuser paper delivery sensor Cassette-presence switch Cassette pickup mechanism When the cassette is present, the cassette pickup operation begins. 1. The DC controller receives a print command...
After the motor reaches the correct speed and the fuser is present in the cassette, and the cassette media sensor detects the type of media. The cassette lifting plate lifts the paper stack, and the ..., SW2 detects its presence. SR709 SR710 SR714 SR6001 SR6005 SW2 Cassette paper-presence sensor Top-of-page sensor One-sided paper sensor Paper-loop sensor Fuser paper delivery sensor Cassette-presence switch Cassette pickup mechanism When the cassette is present, the cassette pickup operation begins. 1. The DC controller receives a print command...


