
HP Color LaserJet 3000, 3600, 3800 series Printers - User Guide
Page 134
...has a shipping 1. A jam has occurred in the fuser. Open the top cover and clear the jam. This message appears until an HP supply is not working correctly. Wait 10 minutes for orange... Recommended action A new, non-HP supply has been installed. Close the front door. 4. The first pending print job will be cancelled. lock attached. The printer cannot read or write to set...not covered under HP warranty. A jam has occurred inside the front door. See Clearing jams. If the message persists after clearing all pages and exiting Help, contact HP Support. A page is hot.
...has a shipping 1. A jam has occurred in the fuser. Open the top cover and clear the jam. This message appears until an HP supply is not working correctly. Wait 10 minutes for orange... Recommended action A new, non-HP supply has been installed. Close the front door. 4. The first pending print job will be cancelled. lock attached. The printer cannot read or write to set...not covered under HP warranty. A jam has occurred inside the front door. See Clearing jams. If the message persists after clearing all pages and exiting Help, contact HP Support. A page is hot.
HP Color LaserJet 3000, 3600, 3800 series Printers - User Guide
Page 156
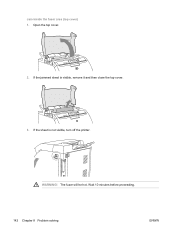
WARNING! Wait 10 minutes before proceeding. 142 Chapter 8 Problem solving ENWW The fuser will be hot. Open the top cover. 2. Jam inside the fuser area (top cover) 1. If the jammed sheet is not visible, turn off the printer. If the sheet is visible, remove it and then close the top cover. 3.
WARNING! Wait 10 minutes before proceeding. 142 Chapter 8 Problem solving ENWW The fuser will be hot. Open the top cover. 2. Jam inside the fuser area (top cover) 1. If the jammed sheet is not visible, turn off the printer. If the sheet is visible, remove it and then close the top cover. 3.
Service Manual
Page 50
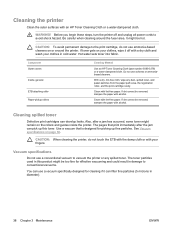
... not use ammonia-based cleaners on the rollers and guides inside the printer. If dirt cannot be hot. Also, after the jam can filter fine particles (5 microns in this... with lint-free paper. It might remain on or around the fuser area. CAUTION: To avoid permanent damage to vacuum the printer or any dust, spilled toner, and paper particles from the paper... print immediately after a jam has occurred, some toner might be removed, dampen the paper with an HP Toner Cleaning Cloth or a water-dampened cloth. Vacuum specifications Do not use a vacuum specifically designed for...
... not use ammonia-based cleaners on the rollers and guides inside the printer. If dirt cannot be hot. Also, after the jam can filter fine particles (5 microns in this... with lint-free paper. It might remain on or around the fuser area. CAUTION: To avoid permanent damage to vacuum the printer or any dust, spilled toner, and paper particles from the paper... print immediately after a jam has occurred, some toner might be removed, dampen the paper with an HP Toner Cleaning Cloth or a water-dampened cloth. Vacuum specifications Do not use a vacuum specifically designed for...
Service Manual
Page 94
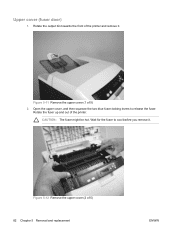
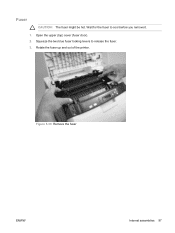
Figure 5-12 Remove the upper cover (2 of the printer. Wait for the fuser to release the fuser. CAUTION: The fuser might be hot. Open the upper cover, and then squeeze the two blue fuser-locking levers to cool before you remove it . Rotate the fuser up and out of 5) 82 Chapter 5 Removal and replacement ENWW Figure 5-11 Remove the upper cover (1 of the printer and remove it . Rotate the output bin towards the front of 5) 2. Upper cover (fuser door) 1.
Figure 5-12 Remove the upper cover (2 of the printer. Wait for the fuser to release the fuser. CAUTION: The fuser might be hot. Open the upper cover, and then squeeze the two blue fuser-locking levers to cool before you remove it . Rotate the fuser up and out of 5) 82 Chapter 5 Removal and replacement ENWW Figure 5-11 Remove the upper cover (1 of the printer and remove it . Rotate the output bin towards the front of 5) 2. Upper cover (fuser door) 1.
Service Manual
Page 109
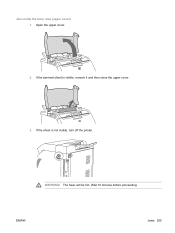
Figure 5-30 Remove the fuser ENWW Internal assemblies 97 Squeeze the two blue fuser locking levers to cool before you remove it. 1. Open the upper (top) cover (fuser door). 2. Rotate the fuser up and out of the printer. Wait for the fuser to release the fuser. 3. Fuser CAUTION: The fuser might be hot.
Figure 5-30 Remove the fuser ENWW Internal assemblies 97 Squeeze the two blue fuser locking levers to cool before you remove it. 1. Open the upper (top) cover (fuser door). 2. Rotate the fuser up and out of the printer. Wait for the fuser to release the fuser. 3. Fuser CAUTION: The fuser might be hot.
Service Manual
Page 194
... EIO devices as necessary. Replace the formatter and calibrate the printer. The fuser is installed correctly and fully seated. If the resistance is no conduction in the fuser heater, measure the resistance between fuser connectors J6007LA-1 and J6007LA-3. X Description: 1 Low fuser temperature WARNING! Verify the fuser is hot. Replace the connector as necessary. 10. If there is...
... EIO devices as necessary. Replace the formatter and calibrate the printer. The fuser is installed correctly and fully seated. If the resistance is no conduction in the fuser heater, measure the resistance between fuser connectors J6007LA-1 and J6007LA-3. X Description: 1 Low fuser temperature WARNING! Verify the fuser is hot. Replace the connector as necessary. 10. If there is...
Service Manual
Page 217
Wait 10 minutes before proceeding. Open the upper cover. 2. The fuser will be hot. If the sheet is visible, remove it and then close the upper cover. 3. ENWW Jams 205 WARNING! If the jammed sheet is not visible, turn off the printer. Jam inside the fuser area (upper cover) 1.
Wait 10 minutes before proceeding. Open the upper cover. 2. The fuser will be hot. If the sheet is visible, remove it and then close the upper cover. 3. ENWW Jams 205 WARNING! If the jammed sheet is not visible, turn off the printer. Jam inside the fuser area (upper cover) 1.


