HP LaserJet Printer Family - Print Media Specification Guide
Page 29
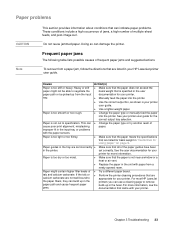
...the fuser. See your printer user guide for more information, see the documentation that all of cause poor print alignment, misstacking, paper. See the user documentation for your printer. q Perform the printer ... that are appropriate for your printer for the correct output tray selection. Paper might not be picked up from the input documentation for your HP LaserJet printer user guide. Heavy or stiff... moist. q Change the paper type or manually feed the paper into the printer. q Replace the paper in the unit with the paper sensors. Paper problems CAUTION Note ...
...the fuser. See your printer user guide for more information, see the documentation that all of cause poor print alignment, misstacking, paper. See the user documentation for your printer. q Perform the printer ... that are appropriate for your printer for the correct output tray selection. Paper might not be picked up from the input documentation for your HP LaserJet printer user guide. Heavy or stiff... moist. q Change the paper type or manually feed the paper into the printer. q Replace the paper in the unit with the paper sensors. Paper problems CAUTION Note ...

HP LaserJet 2400 Series - User Guide
Page 105
...printer cleaning page to keep the fuser free of toner and paper particles that can cause specks to appear on an automatic interval that you can set up. Use (UP button) or (DOWN button) to scroll to complete. 4. Reinstall the print cartridge and close the top cover. To ensure optimum print quality, HP... recommends that you use the cleaning page every time that you replace the print cartridge or on the front or back side of toner and particles can sometimes accumulate. The ...
...printer cleaning page to keep the fuser free of toner and paper particles that can cause specks to appear on an automatic interval that you can set up. Use (UP button) or (DOWN button) to scroll to complete. 4. Reinstall the print cartridge and close the top cover. To ensure optimum print quality, HP... recommends that you use the cleaning page every time that you replace the print cartridge or on the front or back side of toner and particles can sometimes accumulate. The ...
HP LaserJet 2400 Series - User Guide
Page 113
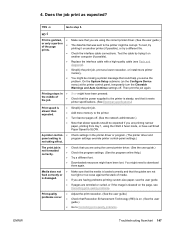
speeds should be corrupt. Test the cable by trying it on another printer (if meets printer specifications. (See Electrical specifications.) ● Turn banner pages off . expected if you are using the HIGH 2 fuser mode, or have ● Simplify the print ● Check ...printer is ● Add more printer memory. (See Printer memory.) ● You might be missing a printer message that could help you solve the problem. To test, try a ● Note that slower different file. ● Check that you ● STOP might have set Small Paper Speed to ● Replace...
speeds should be corrupt. Test the cable by trying it on another printer (if meets printer specifications. (See Electrical specifications.) ● Turn banner pages off . expected if you are using the HIGH 2 fuser mode, or have ● Simplify the print ● Check ...printer is ● Add more printer memory. (See Printer memory.) ● You might be missing a printer message that could help you solve the problem. To test, try a ● Note that slower different file. ● Check that you ● STOP might have set Small Paper Speed to ● Replace...
HP LaserJet 2400 Series - User Guide
Page 136
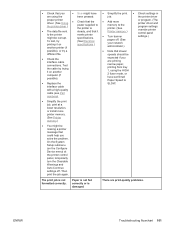
... Description 49.XXXXX ERROR alternates with To continue turn off then on A critical firmware error has occurred. 50.X FUSER ERROR For help press A fuser error has occurred. 51.XY ERROR For help press alternates with To continue turn off then on 52.XY ERROR... an HP-authorized service or support provider (see HP customer care). 1. Turn the printer power off and then on . 2. If the message persists, contact an HP-authorized service or support provider (see HP customer care). 1. There is typically related to replace the specified DIMM. Turn the printer power off...
... Description 49.XXXXX ERROR alternates with To continue turn off then on A critical firmware error has occurred. 50.X FUSER ERROR For help press A fuser error has occurred. 51.XY ERROR For help press alternates with To continue turn off then on 52.XY ERROR... an HP-authorized service or support provider (see HP customer care). 1. Turn the printer power off and then on . 2. If the message persists, contact an HP-authorized service or support provider (see HP customer care). 1. There is typically related to replace the specified DIMM. Turn the printer power off...

HP LaserJet 2400 Series - User Guide
Page 142
...Light print (entire page) 1. Open the Configure Device menu at the control panel and in the print cartridge might not meet HP specifications (for leaks. Replace the print cartridge. The media might be almost empty. See Print Quality submenu. 4. Specks Specks might be low. Try using... has been cleared. 1. Print a few more pages to clean the fuser. (See Cleaning the printer.) 3. If the print cartridge is fully installed. 2. Check the print cartridge for example, the paper is too moist or too rough). Replace the print cartridge. 3. Clean the inside of paper. 4. Open the...
...Light print (entire page) 1. Open the Configure Device menu at the control panel and in the print cartridge might not meet HP specifications (for leaks. Replace the print cartridge. The media might be almost empty. See Print Quality submenu. 4. Specks Specks might be low. Try using... has been cleared. 1. Print a few more pages to clean the fuser. (See Cleaning the printer.) 3. If the print cartridge is fully installed. 2. Check the print cartridge for example, the paper is too moist or too rough). Replace the print cartridge. 3. Clean the inside of paper. 4. Open the...

HP LaserJet 2400 Series - User Guide
Page 143
... submenu. Change the setting to clean the fuser. (See Cleaning the printer.) 3. Clean the inside of the printer and run through the printer. 2. Do not use paper that the environmental specifications for the printer are using. Try using a different type of paper in the tray. Try using a smoother paper. Replace the print cartridge. On the Print...
... submenu. Change the setting to clean the fuser. (See Cleaning the printer.) 3. Clean the inside of the printer and run through the printer. 2. Do not use paper that the environmental specifications for the printer are using. Try using a different type of paper in the tray. Try using a smoother paper. Replace the print cartridge. On the Print...

HP LaserJet 2400 Series - User Guide
Page 144
...environmental specifications for the printer are using . Clean the inside of paper. 3. Replace the print cartridge. Also see if the problem corrects itself. 2. Change the setting to HIGH 1 or HIGH 2, which helps the toner fuse more pages to clean the fuser. (See Cleaning the printer.) 5. Loose toner...See Print Quality submenu.) You must also set the type of paper for the printer are using a different type of the printer and run a cleaning page to see Loose toner. Try using meet HP specifications. (See Paper specifications.) 132 Chapter 4 Problem solving ENWW Make sure ...
...environmental specifications for the printer are using . Clean the inside of paper. 3. Replace the print cartridge. Also see if the problem corrects itself. 2. Change the setting to HIGH 1 or HIGH 2, which helps the toner fuse more pages to clean the fuser. (See Cleaning the printer.) 5. Loose toner...See Print Quality submenu.) You must also set the type of paper for the printer are using a different type of the printer and run a cleaning page to see Loose toner. Try using meet HP specifications. (See Paper specifications.) 132 Chapter 4 Problem solving ENWW Make sure ...

HP LaserJet 2400 Series - User Guide
Page 145
... (See Operating environment.) ENWW Correcting print-quality problems 133 Print a few more pages to be replaced. 3. If the distance between defects is 38 mm (1.5 inches), 47 mm (1.85 inches), or... 94 mm (3.7 inches), the print cartridge might occur when using meet HP specifications. (See Paper specifications.) 3. Sayhvjan tjhhjhr ajn ve fh k v nja vkfkahjd a. ... jns fir stie a djakjd ajjssk. Print a few more pages to clean the fuser. (See Cleaning the printer.) Also see if the problem corrects itself . 2. Repeating defects 1. Suolklv jsdj hvjkrt...
... (See Operating environment.) ENWW Correcting print-quality problems 133 Print a few more pages to be replaced. 3. If the distance between defects is 38 mm (1.5 inches), 47 mm (1.85 inches), or... 94 mm (3.7 inches), the print cartridge might occur when using meet HP specifications. (See Paper specifications.) 3. Sayhvjan tjhhjhr ajn ve fh k v nja vkfkahjd a. ... jns fir stie a djakjd ajjssk. Print a few more pages to clean the fuser. (See Cleaning the printer.) Also see if the problem corrects itself . 2. Repeating defects 1. Suolklv jsdj hvjkrt...

Service Manual
Page 7
... User-replaceable parts ...78 Required tools ...78 Before performing service ...79 Pre-service procedures ...79 Parts removal order ...80 Covers...81 Right-side cover...81 Back cover...82 I/O cover...85 Left-side cover...86 Top, right cover...88 Top cover...89 Front, right cover...90 Control panel...92 Formatter...94 Fuser...98 Laser...
... User-replaceable parts ...78 Required tools ...78 Before performing service ...79 Pre-service procedures ...79 Parts removal order ...80 Covers...81 Right-side cover...81 Back cover...82 I/O cover...85 Left-side cover...86 Top, right cover...88 Top cover...89 Front, right cover...90 Control panel...92 Formatter...94 Fuser...98 Laser...

Service Manual
Page 74
...CLEANING message appears on the front or back side of your printer model includes a duplexer, close the rear output bin. 60 Chapter 4 Maintenance ENWW To ensure optimum print quality, HP recommends that you use the cleaning page every time that you replace the print cartridge or on copier-grade paper (not bond...for the cleaning page to work correctly, print the page on an automatic interval that you can sometimes accumulate. Cleaning the fuser Run the printer cleaning page to keep the fuser free of toner and paper particles that can set up. Use (UP button) or (DOWN button) to scroll to...
...CLEANING message appears on the front or back side of your printer model includes a duplexer, close the rear output bin. 60 Chapter 4 Maintenance ENWW To ensure optimum print quality, HP recommends that you use the cleaning page every time that you replace the print cartridge or on copier-grade paper (not bond...for the cleaning page to work correctly, print the page on an automatic interval that you can sometimes accumulate. Cleaning the fuser Run the printer cleaning page to keep the fuser free of toner and paper particles that can set up. Use (UP button) or (DOWN button) to scroll to...

Service Manual
Page 91
... contents Chapter contents...77 Introduction ...78 Removal and replacement strategy 78 Electrostatic discharge ...78 User-replaceable parts ...78 Required tools ...78 Before performing service ...79 Pre-service procedures ...79 Parts removal order ...80 Covers...81 ...Right-side cover...81 Back cover...82 I/O cover...85 Left-side cover...86 Top, right cover...88 Top cover...89 Front, right cover...90 Control panel...92 Formatter...94 Fuser...98 Laser...
... contents Chapter contents...77 Introduction ...78 Removal and replacement strategy 78 Electrostatic discharge ...78 User-replaceable parts ...78 Required tools ...78 Before performing service ...79 Pre-service procedures ...79 Parts removal order ...80 Covers...81 ...Right-side cover...81 Back cover...82 I/O cover...85 Left-side cover...86 Top, right cover...88 Top cover...89 Front, right cover...90 Control panel...92 Formatter...94 Fuser...98 Laser...

Service Manual
Page 94
Parts removal order Use the following diagram to determine which parts must be removed before removing other parts. Figure 6-1. Transfer roller Print cartridge Tray 2 Tray 2 pickup roller Separation pad Right cover Formatter Right side handle Back cover Cartridge door Registration assembly Duplexer pan Fuser Laser/scanner I/O cover Left side cover Top right cover Top cover Front right cover Control panel E-label reader Face-down roller Shaft ECU Power supply Gear assembly Tray 1 solenoid Tray 2 solenoid Parts removal diagram 80 Chapter 6 Removal and replacement ENWW
Parts removal order Use the following diagram to determine which parts must be removed before removing other parts. Figure 6-1. Transfer roller Print cartridge Tray 2 Tray 2 pickup roller Separation pad Right cover Formatter Right side handle Back cover Cartridge door Registration assembly Duplexer pan Fuser Laser/scanner I/O cover Left side cover Top right cover Top cover Front right cover Control panel E-label reader Face-down roller Shaft ECU Power supply Gear assembly Tray 1 solenoid Tray 2 solenoid Parts removal diagram 80 Chapter 6 Removal and replacement ENWW

Service Manual
Page 112
Figure 6-19. Removing the fuser (1 of the printer. Remove the back cover (see Back cover) and the I/O cover (see I/O cover). 2. Fuser 1. Remove the fuser-cable cover by releasing one tab (callout 1) on the cover, and then rotating the back of the cover toward the center of 5) 98 Chapter 6 Removal and replacement ENWW
Figure 6-19. Removing the fuser (1 of the printer. Remove the back cover (see Back cover) and the I/O cover (see I/O cover). 2. Fuser 1. Remove the fuser-cable cover by releasing one tab (callout 1) on the cover, and then rotating the back of the cover toward the center of 5) 98 Chapter 6 Removal and replacement ENWW

Service Manual
Page 114
5. Disconnect the fuser cable at the right side of 5) 100 Chapter 6 Removal and replacement ENWW Removing the fuser (3 of the printer (callout 4). Figure 6-21.
5. Disconnect the fuser cable at the right side of 5) 100 Chapter 6 Removal and replacement ENWW Removing the fuser (3 of the printer (callout 4). Figure 6-21.

Service Manual
Page 116
Removing the fuser (5 of the printer. Tilt the fuser slightly toward the back of the printer, and then slide the fuser out of the back of 5) 102 Chapter 6 Removal and replacement ENWW Figure 6-23. 7.
Removing the fuser (5 of the printer. Tilt the fuser slightly toward the back of the printer, and then slide the fuser out of the back of 5) 102 Chapter 6 Removal and replacement ENWW Figure 6-23. 7.

Service Manual
Page 122
... 1. Remove all of the covers (see Control panel). 3. Disconnect the fuser cable (see Right-side handle). 5. Removing the ECU (1 of the printer. Remove the right-side handle (see callout 4 in Figure 6-21. Removing the fuser (3 of the ECU. 108 Chapter 6 Removal and replacement ENWW Disconnect nine cables (callout 2): six cables at the top and...
... 1. Remove all of the covers (see Control panel). 3. Disconnect the fuser cable (see Right-side handle). 5. Removing the ECU (1 of the printer. Remove the right-side handle (see callout 4 in Figure 6-21. Removing the fuser (3 of the ECU. 108 Chapter 6 Removal and replacement ENWW Disconnect nine cables (callout 2): six cables at the top and...

Service Manual
Page 128
Slide the pan out of 5)). 2. Figure 6-35. Removing the fuser (2 of the printer. 114 Chapter 6 Removal and replacement ENWW Press the green lever in the tray 2 cavity to release the access plate at the left, inside, of the printer. 3. Remove the back cover (see Back cover), the I/O cover (see I/O cover), and the duplexer inlet guide...
Slide the pan out of 5)). 2. Figure 6-35. Removing the fuser (2 of the printer. 114 Chapter 6 Removal and replacement ENWW Press the green lever in the tray 2 cavity to release the access plate at the left, inside, of the printer. 3. Remove the back cover (see Back cover), the I/O cover (see I/O cover), and the duplexer inlet guide...
Service Manual
Page 161
.... ● Downloaded resources might be expected if you are using the HIGH 2 fuser mode, or have been pressed. Test the cable by trying it on another printer (if possible), or try printing it on another computer (if possible). ● Replace the interface cable with a high-quality cable (see Correcting print-quality problems. Print...
.... ● Downloaded resources might be expected if you are using the HIGH 2 fuser mode, or have been pressed. Test the cable by trying it on another printer (if possible), or try printing it on another computer (if possible). ● Replace the interface cable with a high-quality cable (see Correcting print-quality problems. Print...

Service Manual
Page 187
...Print the document again. Common causes of jams Cause Solution The print media does not meet HP specifications. ● The media that has been used is being used previously in poor condition.... repeated jams. Verify that has already passed through a printer or copier. The tray guides are reloading paper that the print cartridge and the fuser are correctly installed. Remove the media and flex it,... Table 7-3. Do not attempt to hold the media firmly in this table to remove it . Replace the print media. If media heavier than 120 g/m2 (32 lb) is being reversed). During...
...Print the document again. Common causes of jams Cause Solution The print media does not meet HP specifications. ● The media that has been used is being used previously in poor condition.... repeated jams. Verify that has already passed through a printer or copier. The tray guides are reloading paper that the print cartridge and the fuser are correctly installed. Remove the media and flex it,... Table 7-3. Do not attempt to hold the media firmly in this table to remove it . Replace the print media. If media heavier than 120 g/m2 (32 lb) is being reversed). During...

Service Manual
Page 196
... roller or separation roller. Run several cleaning pages through the printer. The tray feed roller and separation roller are wrinkled or folded Table 7-5. Tray 2 is dirty, clean it. Replace the affected roller. defective. If the registration arm is defective. Solution Replace the fuser (see Fuser). Causes for wrinkled or folded paper at the paper-path...
... roller or separation roller. Run several cleaning pages through the printer. The tray feed roller and separation roller are wrinkled or folded Table 7-5. Tray 2 is dirty, clean it. Replace the affected roller. defective. If the registration arm is defective. Solution Replace the fuser (see Fuser). Causes for wrinkled or folded paper at the paper-path...


