14 Notebook PC Maintenance and Service Guide
Page 8
...32 Keyboard ...34 6 Removal and replacement procedures for Authorized Service Provider parts 37 Component replacement procedures ...37 Display panel ...38 Top cover ...41 Hard drive ...44 Power button board ...47 TouchPad button board ...49 Optical drive connector cable ...50 System board ...52 RTC battery ...56 Fan ...58 Heat sink assembly ...60 Power connector cable ...62 Speakers ...63 Display assembly subcomponents 66 7 Using Setup Utility (BIOS) ...72 Starting Setup Utility (BIOS) ...72 Updating the BIOS ...72 Determining the BIOS version ...72 Downloading a BIOS update ...73 8 Using HP...
...32 Keyboard ...34 6 Removal and replacement procedures for Authorized Service Provider parts 37 Component replacement procedures ...37 Display panel ...38 Top cover ...41 Hard drive ...44 Power button board ...47 TouchPad button board ...49 Optical drive connector cable ...50 System board ...52 RTC battery ...56 Fan ...58 Heat sink assembly ...60 Power connector cable ...62 Speakers ...63 Display assembly subcomponents 66 7 Using Setup Utility (BIOS) ...72 Starting Setup Utility (BIOS) ...72 Updating the BIOS ...72 Determining the BIOS version ...72 Downloading a BIOS update ...73 8 Using HP...
14 Notebook PC Maintenance and Service Guide
Page 11
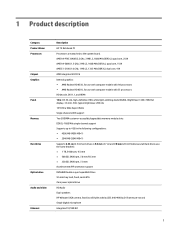
... GB, 5400 rpm, 7.0 mm Accelerometer/HP protection support DVD±RW Double-Layer SuperMulti Drive 9.5 mm tray load, fixed, serial ATA Zero power optical drive HD Audio Dual speakers HP Webcam (VGA camera, fixed (no tilt) with E1 processors HD decode, DX11.1, and HDMI 14 in ) thicknesses (all hard drives use with computer models with activity LED; 640×480 by 24 frames per second Single digital microphone Integrated 10/100 NIC 1
... GB, 5400 rpm, 7.0 mm Accelerometer/HP protection support DVD±RW Double-Layer SuperMulti Drive 9.5 mm tray load, fixed, serial ATA Zero power optical drive HD Audio Dual speakers HP Webcam (VGA camera, fixed (no tilt) with E1 processors HD decode, DX11.1, and HDMI 14 in ) thicknesses (all hard drives use with computer models with activity LED; 640×480 by 24 frames per second Single digital microphone Integrated 10/100 NIC 1

14 Notebook PC Maintenance and Service Guide
Page 12
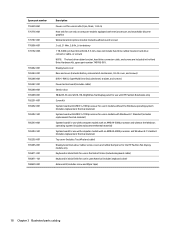
Category Wireless External media cards Ports Keyboard/ pointing devices Power requirements Security Operating system Serviceability Description Integrated wireless local area network (WLAN) options with single antenna (HMC/PCIe) Compatible with Miracast-certified devices Support for the following WLAN formats: ● Realtek RT8723BE 802.11bgn 1x1 Wi-Fi + BT4.0 Combo Adapter ● Realtek RTL8188EE 802.11 bgn 1x1 Wi-Fi adapter HP Multi-Format Memory Card Reader slot with push-push technology, supporting the following digital card formats: ●...
Category Wireless External media cards Ports Keyboard/ pointing devices Power requirements Security Operating system Serviceability Description Integrated wireless local area network (WLAN) options with single antenna (HMC/PCIe) Compatible with Miracast-certified devices Support for the following WLAN formats: ● Realtek RT8723BE 802.11bgn 1x1 Wi-Fi + BT4.0 Combo Adapter ● Realtek RTL8188EE 802.11 bgn 1x1 Wi-Fi adapter HP Multi-Format Memory Card Reader slot with push-push technology, supporting the following digital card formats: ●...

14 Notebook PC Maintenance and Service Guide
Page 13
... quickly from inactivity. ● Blinking white: The hard drive is being accessed. ● Amber: HP 3D DriveGuard has temporarily parked the hard drive. NOTE: When a device is enabled at the factory. The computer shuts off power to the Regulatory, Safety and Environmental Notices. Rapid Start Technology allows your computer model, to an optical disc. This jack does not support optional microphone-only devices. Connects optional powered stereo speakers, headphones, earbuds, a headset, or a television audio cable...
... quickly from inactivity. ● Blinking white: The hard drive is being accessed. ● Amber: HP 3D DriveGuard has temporarily parked the hard drive. NOTE: When a device is enabled at the factory. The computer shuts off power to the Regulatory, Safety and Environmental Notices. Rapid Start Technology allows your computer model, to an optical disc. This jack does not support optional microphone-only devices. Connects optional powered stereo speakers, headphones, earbuds, a headset, or a television audio cable...

14 Notebook PC Maintenance and Service Guide
Page 14
... during routine operation. Connects an optional video or audio device, such as a keyboard, mouse, external drive, printer, scanner or USB hub. NOTE: The security cable is normal for the internal fan to select your computer model. Reads data from and writes data to act as Secure Digital (SD). Enable airflow to the Help and Support webpage. White: The network is using DC power. Component (6) Left side Optical drive eject button Description NOTE...
... during routine operation. Connects an optional video or audio device, such as a keyboard, mouse, external drive, printer, scanner or USB hub. NOTE: The security cable is normal for the internal fan to select your computer model. Reads data from and writes data to act as Secure Digital (SD). Enable airflow to the Help and Support webpage. White: The network is using DC power. Component (6) Left side Optical drive eject button Description NOTE...

14 Notebook PC Maintenance and Service Guide
Page 15
... areas immediately around the antennas free from an Internet service provider, and a wireless router (purchased separately). (2) Internal microphones (2) Record sound. (3) Webcam light On: The webcam is firmly seated. For wireless regulatory notices, see the section of the computer. Component Display Description ▲ Hold the card, label side up a WLAN and connect to the Internet, you to video conference and chat online using streaming video. *The antennas are not...
... areas immediately around the antennas free from an Internet service provider, and a wireless router (purchased separately). (2) Internal microphones (2) Record sound. (3) Webcam light On: The webcam is firmly seated. For wireless regulatory notices, see the section of the computer. Component Display Description ▲ Hold the card, label side up a WLAN and connect to the Internet, you to video conference and chat online using streaming video. *The antennas are not...

14 Notebook PC Maintenance and Service Guide
Page 24
... with the power connector cable, spare part number 732067-001 USB/audio board (includes cable) 734417-001 Hard drive (does not include hard drive rubber bracket, hard drive connector cable, or screws): 1 TB, 5400 rpm, 9.5 mm 778192-005 500 GB, 5400 rpm, 7.0 mm 669299-005 Hard Drive Hardware Kit, includes: 740706-001 Rubber bracket Hard drive connector System board (includes replacement thermal material): AMD A4-5000 for use in models without the Windows operating system 785293...
... with the power connector cable, spare part number 732067-001 USB/audio board (includes cable) 734417-001 Hard drive (does not include hard drive rubber bracket, hard drive connector cable, or screws): 1 TB, 5400 rpm, 9.5 mm 778192-005 500 GB, 5400 rpm, 7.0 mm 669299-005 Hard Drive Hardware Kit, includes: 740706-001 Rubber bracket Hard drive connector System board (includes replacement thermal material): AMD A4-5000 for use in models without the Windows operating system 785293...

14 Notebook PC Maintenance and Service Guide
Page 27
... Hard Drive Hardware Kit, spare part number 740706-001. 2 GB memory module (PC3, 12800, 1600 MHz) 4 GB memory module (PC3, 12800, 1600 MHz) RTC battery Realtek RTL8188EE 802.11 bgn Wi-Fi Adapter Power connector cable (includes bracket) Fan Display panel cable (includes (includes webcamera/microphone module cable and screws ) Display Hinge Kit (includes left and right hinges and screws) USB/audio board (includes cable) TouchPad button board (includes cable) Speakers (include subwoofer, speaker cables, and rubber isolators) Hard Drive Hardware Kit (includes hard drive...
... Hard Drive Hardware Kit, spare part number 740706-001. 2 GB memory module (PC3, 12800, 1600 MHz) 4 GB memory module (PC3, 12800, 1600 MHz) RTC battery Realtek RTL8188EE 802.11 bgn Wi-Fi Adapter Power connector cable (includes bracket) Fan Display panel cable (includes (includes webcamera/microphone module cable and screws ) Display Hinge Kit (includes left and right hinges and screws) USB/audio board (includes cable) TouchPad button board (includes cable) Speakers (include subwoofer, speaker cables, and rubber isolators) Hard Drive Hardware Kit (includes hard drive...
14 Notebook PC Maintenance and Service Guide
Page 28
... display models only Keyboard in black finish for use in the United States (includes keyboard cable) Keyboard in black finish for use in the Hard Drive Hardware Kit, spare part number 740706-001. Display back cover Base enclosure (includes battery release latch mechanism , RJ-45 cover, and screws) DVD+/-RW DL SuperMulti Drive (includes bezel, bracket, and screws) Power button board (includes cable) Service door 14 in (35.56 cm), WLED, HD, BrightView flat display panel for use with HP Pavilion Notebooks...
... display models only Keyboard in black finish for use in the United States (includes keyboard cable) Keyboard in black finish for use in the Hard Drive Hardware Kit, spare part number 740706-001. Display back cover Base enclosure (includes battery release latch mechanism , RJ-45 cover, and screws) DVD+/-RW DL SuperMulti Drive (includes bezel, bracket, and screws) Power button board (includes cable) Service door 14 in (35.56 cm), WLED, HD, BrightView flat display panel for use with HP Pavilion Notebooks...

14 Notebook PC Maintenance and Service Guide
Page 38
... adding memory modules, make sure the computer has the most recent BIOS version, and update the BIOS if needed. Before removing a memory module, follow these steps: 1. Remove the battery (see Service door on page 25). 5. Remove the service door (see Battery on page 26). If you are replacing it, install the new memory module in Hibernation, turn the computer on each side of the memory module (1) you are removing. Remove the memory module: NOTE: Note the location of the memory module slot...
... adding memory modules, make sure the computer has the most recent BIOS version, and update the BIOS if needed. Before removing a memory module, follow these steps: 1. Remove the battery (see Service door on page 25). 5. Remove the service door (see Battery on page 26). If you are replacing it, install the new memory module in Hibernation, turn the computer on each side of the memory module (1) you are removing. Remove the memory module: NOTE: Note the location of the memory module slot...
14 Notebook PC Maintenance and Service Guide
Page 40
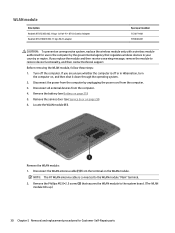
... unresponsive system, replace the wireless module only with a wireless module authorized for Customer Self-Repair parts If you are unsure whether the computer is connected to restore device functionality, and then contact technical support. Disconnect the WLAN antenna cable (1) from the computer. 4. Remove the WLAN module: 1. Turn off or in Hibernation, turn the computer on the WLAN module. Disconnect the power from the computer. 3. Disconnect all external devices from the terminal...
... unresponsive system, replace the wireless module only with a wireless module authorized for Customer Self-Repair parts If you are unsure whether the computer is connected to restore device functionality, and then contact technical support. Disconnect the WLAN antenna cable (1) from the computer. 4. Remove the WLAN module: 1. Turn off or in Hibernation, turn the computer on the WLAN module. Disconnect the power from the computer. 3. Disconnect all external devices from the terminal...

14 Notebook PC Maintenance and Service Guide
Page 48
... (35.56 cm), WLED, HD, BrightView flat display panel Spare part number 785285-001 785289-001 IMPORTANT: Make special note of the display assembly subcomponents: a. Display panel NOTE: Use these steps: 1. Disconnect the power from the computer by unplugging the power cord from the display enclosure. 38 Chapter 6 Removal and replacement procedures for Authorized Service Provider parts Remove the battery (see Display assembly subcomponents on page 25). Flex the...
... (35.56 cm), WLED, HD, BrightView flat display panel Spare part number 785285-001 785289-001 IMPORTANT: Make special note of the display assembly subcomponents: a. Display panel NOTE: Use these steps: 1. Disconnect the power from the computer by unplugging the power cord from the display enclosure. 38 Chapter 6 Removal and replacement procedures for Authorized Service Provider parts Remove the battery (see Display assembly subcomponents on page 25). Flex the...

14 Notebook PC Maintenance and Service Guide
Page 54
... the hard drive rubber bracket, hard drive connector cable, or screws. Disconnect all external devices from the computer. 3. Turn off or in the Hard Drive Hardware Kit, spare part number 740706-001. Memory module (see Keyboard on page 28) c. If you are included in Hibernation, turn the computer on page 32) e. Remove the USB/audio cable Phillips M 2.5×3.0 screw (2) and then lift the USB/audio board (3). Disconnect the power from the computer by flipping open the...
... the hard drive rubber bracket, hard drive connector cable, or screws. Disconnect all external devices from the computer. 3. Turn off or in the Hard Drive Hardware Kit, spare part number 740706-001. Memory module (see Keyboard on page 28) c. If you are included in Hibernation, turn the computer on page 32) e. Remove the USB/audio cable Phillips M 2.5×3.0 screw (2) and then lift the USB/audio board (3). Disconnect the power from the computer by flipping open the...
14 Notebook PC Maintenance and Service Guide
Page 83
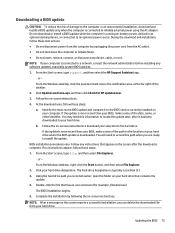
... network administrator before installing any software updates, especially system BIOS updates. 1. NOTE: After a message on your hard drive designation. If the update is complete. From the Start screen, type file, and then select File Explorer. ‒ or - Using the hard drive path you recorded earlier, open the folder on the screen reports a successful installation, you are ready to an optional power source. During the download and installation, follow these steps: 1. From the Windows...
... network administrator before installing any software updates, especially system BIOS updates. 1. NOTE: After a message on your hard drive designation. If the update is complete. From the Start screen, type file, and then select File Explorer. ‒ or - Using the hard drive path you recorded earlier, open the folder on the screen reports a successful installation, you are ready to an optional power source. During the download and installation, follow these steps: 1. From the Windows...

14 Notebook PC Maintenance and Service Guide
Page 84
... keyboard arrow keys to select the type of the page, and then click Download Drivers. 3. Provides access to run diagnostic tests to determine whether the computer hardware is a Unified Extensible Firmware Interface (UEFI) that are two options to download HP PC Hardware Diagnostics to a USB device: Option 1: HP PC Diagnostics homepage- Point to stop a diagnostic test, press esc. In the Diagnostic section, click HP UEFI Support Environment. - Turn on -screen instructions. BIOS...
... keyboard arrow keys to select the type of the page, and then click Download Drivers. 3. Provides access to run diagnostic tests to determine whether the computer hardware is a Unified Extensible Firmware Interface (UEFI) that are two options to download HP PC Hardware Diagnostics to a USB device: Option 1: HP PC Diagnostics homepage- Point to stop a diagnostic test, press esc. In the Diagnostic section, click HP UEFI Support Environment. - Turn on -screen instructions. BIOS...
14 Notebook PC Maintenance and Service Guide
Page 86
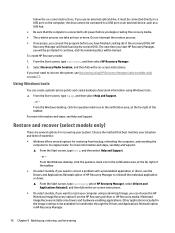
... the Start screen, type recovery, and then select HP Recovery Manager. 2. If you can create system restore points and create backups of HP Recovery Manager to reinstall the individual application or driver. ▲ From the Start screen, type recovery, select HP Recovery Manager, select Drivers and Applications Reinstall, and then follow the on-screen instructions. ● On select models, if you want to reset your computer using HP Recovery Manager (select models only) on the computer; Minimized Image Recovery installs only drivers and hardware-enabling applications. Other...
... the Start screen, type recovery, and then select HP Recovery Manager. 2. If you can create system restore points and create backups of HP Recovery Manager to reinstall the individual application or driver. ▲ From the Start screen, type recovery, select HP Recovery Manager, select Drivers and Applications Reinstall, and then follow the on-screen instructions. ● On select models, if you want to reset your computer using HP Recovery Manager (select models only) on the computer; Minimized Image Recovery installs only drivers and hardware-enabling applications. Other...

14 Notebook PC Maintenance and Service Guide
Page 87
...) HP Recovery Manager software allows you to recover the computer to its original factory state by deleting all hardware- related drivers and software, but not other software applications. ● Factory Reset (select models only)-Restores the computer to its original factory state by using the HP Recovery media that was installed at the factory. See the Worldwide Telephone Numbers booklet included with the computer, you must be used only if the hard drive is still working. Using...
...) HP Recovery Manager software allows you to recover the computer to its original factory state by deleting all hardware- related drivers and software, but not other software applications. ● Factory Reset (select models only)-Restores the computer to its original factory state by using the HP Recovery media that was installed at the factory. See the Worldwide Telephone Numbers booklet included with the computer, you must be used only if the hard drive is still working. Using...
14 Notebook PC Maintenance and Service Guide
Page 97
... 1 F fan removal 58 spare part numbers fn key, identifying 9 17, 58 G graphics, product description 1 H hard drive product description 1 removal 44 spare part numbers 14, 15, 17, 18, 44 specifications 81 Hard Drive Hardware Kit contents 15 spare part number 14, 15, 17, 44 hard drive light, identifying 3 hard drive rubber bracket, removal 46 HDMI port, identifying 4 heat sink spare part numbers 18 heat sink assembly removal 60 spare part numbers 14, 60 HP PC Hardware Diagnostics (UEFI) downloading 74 HP Recovery Manager correcting boot problems 78 starting 78 HP Recovery media creating 75...
... 1 F fan removal 58 spare part numbers fn key, identifying 9 17, 58 G graphics, product description 1 H hard drive product description 1 removal 44 spare part numbers 14, 15, 17, 18, 44 specifications 81 Hard Drive Hardware Kit contents 15 spare part number 14, 15, 17, 44 hard drive light, identifying 3 hard drive rubber bracket, removal 46 HDMI port, identifying 4 heat sink spare part numbers 18 heat sink assembly removal 60 spare part numbers 14, 60 HP PC Hardware Diagnostics (UEFI) downloading 74 HP Recovery Manager correcting boot problems 78 starting 78 HP Recovery media creating 75...
14 Notebook PC Maintenance and Service Guide
Page 98
... 1 product description audio 1 chipset 1 display panel 1 Ethernet 1 external media cards 2 graphics 1 hard drive 1 keyboard 2 memory module 1 microphone 1 operating system 2 optical drive 1 pointing device 2 ports 2 power requirements 2 processors 1 product name 1 security 2 serviceability 2 video 1 wireless 2 product name 1 product name and number, computer 11 R recover options 76 recovery discs 75, 78 HP Recovery Manager 77 media 78 starting 78 supported discs 75 system 77 USB flash drive 78 using HP Recovery media 76 recovery media creating 75 creating using HP Recovery Manager 76 88 Index
... 1 product description audio 1 chipset 1 display panel 1 Ethernet 1 external media cards 2 graphics 1 hard drive 1 keyboard 2 memory module 1 microphone 1 operating system 2 optical drive 1 pointing device 2 ports 2 power requirements 2 processors 1 product name 1 security 2 serviceability 2 video 1 wireless 2 product name 1 product name and number, computer 11 R recover options 76 recovery discs 75, 78 HP Recovery Manager 77 media 78 starting 78 supported discs 75 system 77 USB flash drive 78 using HP Recovery media 76 recovery media creating 75 creating using HP Recovery Manager 76 88 Index
14 Notebook PC Maintenance and Service Guide
Page 99
... 2 slots memory card reader 4 security cable 4 speakers identifying 8 removal 63 spare part number 14, 17, 63 specifications computer 79 display 80 DVD±RW and CD-RW SuperMulti Double-Layer Combination Drive 82 hard drive 81 optical drive 82 SuperMulti DVD±R/RW Double-Layer Drive spare part number 15, 32 supported discs, recovery 75 system board removal 52 spare part numbers 14, 18, 52 system recovery 77 system restore point creating 76 system restore point, creating 75 T top cover removal 41 spare part numbers 14, 18, 41 TouchPad button board removal...
... 2 slots memory card reader 4 security cable 4 speakers identifying 8 removal 63 spare part number 14, 17, 63 specifications computer 79 display 80 DVD±RW and CD-RW SuperMulti Double-Layer Combination Drive 82 hard drive 81 optical drive 82 SuperMulti DVD±R/RW Double-Layer Drive spare part number 15, 32 supported discs, recovery 75 system board removal 52 spare part numbers 14, 18, 52 system recovery 77 system restore point creating 76 system restore point, creating 75 T top cover removal 41 spare part numbers 14, 18, 41 TouchPad button board removal...


