HP Mini 1101 Notebook PC, HP Mini 110, and Compaq Mini 110 - Maintenance and Service Guide
Page 80
... menu display. If the Setup Utility is displayed in the Setup Utility. When the Setup Confirmation is open, begin at step 2. 1. Open the Setup Utility by turning on or restarting the device, and then pressing f10 while the "F10 = BIOS Setup Options" message is displayed. 3. Select the Main menu. If the Setup Utility is open, press f1. NOTE: Your password, security, and language settings are not visible, press esc to return to the menu display. The Setup Utility default settings...
... menu display. If the Setup Utility is displayed in the Setup Utility. When the Setup Confirmation is open, begin at step 2. 1. Open the Setup Utility by turning on or restarting the device, and then pressing f10 while the "F10 = BIOS Setup Options" message is displayed. 3. Select the Main menu. If the Setup Utility is open, press f1. NOTE: Your password, security, and language settings are not visible, press esc to return to the menu display. The Setup Utility default settings...
HP Mini 1101 Notebook PC, HP Mini 110, and Compaq Mini 110 - Maintenance and Service Guide
Page 107
... instructions to the USB flash drive. 14. Insert the USB flash drive into a USB port on the Windows computer. CAUTION: The restore process reformats and completely erases the USB flash drive. Use the arrow keys to install the operating system and programs. 20. Save ImageCreator.msi to reinstall any updates not installed with the factory image. 22. Insert the USB flash drive into a USB port on your device. 21. Use Update Manager to the Windows computer. 9. You are complete, remove the USB flash drive. 15. Select Download HP Mini recovery image. 13. Change...
... instructions to the USB flash drive. 14. Insert the USB flash drive into a USB port on the Windows computer. CAUTION: The restore process reformats and completely erases the USB flash drive. Use the arrow keys to install the operating system and programs. 20. Save ImageCreator.msi to reinstall any updates not installed with the factory image. 22. Insert the USB flash drive into a USB port on your device. 21. Use Update Manager to the Windows computer. 9. You are complete, remove the USB flash drive. 15. Select Download HP Mini recovery image. 13. Change...
HP Mini 1101 Notebook PC, HP Mini 110, and Compaq Mini 110 - Maintenance and Service Guide
Page 108
... is located on the Linux computer. 10. Change the boot order by selecting a task," select Download drivers and software (and firmware) . 4. Press enter again to the Linux computer. 9. When the download and write processes are then prompted to reinstall any updates not installed with your device. 21. Select Download restore image/HP Mi Restore Image. 13. Use Update Manager to set up your product?" Under "Step 2: Enter a product name / number," type the part number/product number (p/n) of the screen...
... is located on the Linux computer. 10. Change the boot order by selecting a task," select Download drivers and software (and firmware) . 4. Press enter again to the Linux computer. 9. When the download and write processes are then prompted to reinstall any updates not installed with your device. 21. Select Download restore image/HP Mi Restore Image. 13. Use Update Manager to set up your product?" Under "Step 2: Enter a product name / number," type the part number/product number (p/n) of the screen...
HP Mini 1101 Notebook PC, HP Mini 110, and Compaq Mini 110 - Maintenance and Service Guide
Page 128
... boot order 73 buttons left TouchPad 5 right TouchPad 5 C cables, service considerations 29 caps lock light, identifying 6 changing the Setup Utility language 71 chipset, product description 1 compartments, memory module 14 components bottom 14 display 13 front 9 left-side 12 right-side 11 TouchPad 5 connectors service considerations 29 D device feet locations 35 spare part number 35 device specifications 75 Diagnostics menu 74 Digital Media Slot, identifying 11 discs Driver Recovery 106 Operating System 106 diskette drive precautions 30 product description 2 display assembly removal...
... boot order 73 buttons left TouchPad 5 right TouchPad 5 C cables, service considerations 29 caps lock light, identifying 6 changing the Setup Utility language 71 chipset, product description 1 compartments, memory module 14 components bottom 14 display 13 front 9 left-side 12 right-side 11 TouchPad 5 connectors service considerations 29 D device feet locations 35 spare part number 35 device specifications 75 Diagnostics menu 74 Digital Media Slot, identifying 11 discs Driver Recovery 106 Operating System 106 diskette drive precautions 30 product description 2 display assembly removal...
HP Mini 1101 Notebook PC, HP Mini 110, and Compaq Mini 110 - Maintenance and Service Guide
Page 129
... 97 using 98 I I/O address specifications 81 internal display switch, identifying 13 internal media cards, product description 3 internal microphone, identifying 13 interrupt specifications 80 J jacks audio-in (microphone) 12 audio-out (headphone) 12 RJ-45 (network) 11 K keyboard product description 3 removal 40 spare part number 18, 40 keys fn 7, 8 function 7, 8 Home 8 Program Switcher 8 Windows applications 7 Windows logo 7 L language support 73 latches, battery release 14 left TouchPad button, identifying 5 lights battery 9 caps lock 6 drive 9 power 9 webcam 13 wireless 10 M Main menu 73...
... 97 using 98 I I/O address specifications 81 internal display switch, identifying 13 internal media cards, product description 3 internal microphone, identifying 13 interrupt specifications 80 J jacks audio-in (microphone) 12 audio-out (headphone) 12 RJ-45 (network) 11 K keyboard product description 3 removal 40 spare part number 18, 40 keys fn 7, 8 function 7, 8 Home 8 Program Switcher 8 Windows applications 7 Windows logo 7 L language support 73 latches, battery release 14 left TouchPad button, identifying 5 lights battery 9 caps lock 6 drive 9 power 9 webcam 13 wireless 10 M Main menu 73...

HP Mini 1101 Notebook PC, HP Mini 110, and Compaq Mini 110 - Maintenance and Service Guide
Page 130
...3 ports 3 power requirements 3 processors 1 product name 1 security 4 serviceability 4 solid-state drive 2 wireless 3 product name 1 Program Switcher key 8 R recovery partition 104 release latches battery 14 removal/replacement preliminaries 29 procedures 34 restoring HP Mi Restore Image Creator 98 System Restore 98 restoring default settings 72 restoring the hard drive 104 right TouchPad button, identifying 5 RJ-45 (network) jack, identifying 11 RJ-45 jack pin assignments 110 RTC battery removal 44 spare part number 20, 44 Rubber Kit, spare part number 24 screw listing 84 security cable slot...
...3 ports 3 power requirements 3 processors 1 product name 1 security 4 serviceability 4 solid-state drive 2 wireless 3 product name 1 Program Switcher key 8 R recovery partition 104 release latches battery 14 removal/replacement preliminaries 29 procedures 34 restoring HP Mi Restore Image Creator 98 System Restore 98 restoring default settings 72 restoring the hard drive 104 right TouchPad button, identifying 5 RJ-45 (network) jack, identifying 11 RJ-45 jack pin assignments 110 RTC battery removal 44 spare part number 20, 44 Rubber Kit, spare part number 24 screw listing 84 security cable slot...
HP Mini User Guide - Windows XP
Page 7
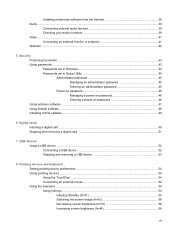
...Internet 40 Audio ...41 Connecting external audio devices 41 Checking your audio functions 41 Video ...43 Connecting an external monitor or projector 43 Webcam ...44 6 Security Protecting the computer ...45 Using passwords ...45 Passwords set in Windows 46 Passwords set in Setup Utility 46 Administrator password 47 Managing an administrator password 47 Entering an administrator password 47 Power-on password 47 Managing a power-on password 48 Entering a power-on password 48 Using antivirus software ...49 Using firewall software ...50 Installing critical updates ...51 7 Digital cards...
...Internet 40 Audio ...41 Connecting external audio devices 41 Checking your audio functions 41 Video ...43 Connecting an external monitor or projector 43 Webcam ...44 6 Security Protecting the computer ...45 Using passwords ...45 Passwords set in Windows 46 Passwords set in Setup Utility 46 Administrator password 47 Managing an administrator password 47 Entering an administrator password 47 Power-on password 47 Managing a power-on password 48 Entering a power-on password 48 Using antivirus software ...49 Using firewall software ...50 Installing critical updates ...51 7 Digital cards...
HP Mini User Guide - Windows XP
Page 19
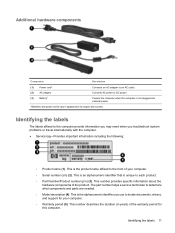
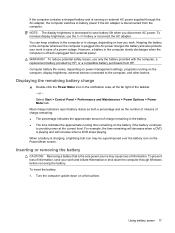
... may need when you use to locate documents, drivers, and support for this computer. Identifying the labels 11 This is unique to each product. ◦ Part Number/Product number (p/n) (3). This number provides specific information about the hardware components of the warranty period for your computer. ◦ Serial number (s/n) (2). The part number helps a service technician to determine what components and parts are needed. ◦ Model description (4). This is not plugged into external power. *Batteries and power...
... may need when you use to locate documents, drivers, and support for this computer. Identifying the labels 11 This is unique to each product. ◦ Part Number/Product number (p/n) (3). This number provides specific information about the hardware components of the warranty period for your computer. ◦ Serial number (s/n) (2). The part number helps a service technician to determine what components and parts are needed. ◦ Model description (4). This is not plugged into external power. *Batteries and power...
HP Mini User Guide - Windows XP
Page 25
... HP, or a compatible battery purchased from external power. To prevent loss of a power outage. To reduce potential safety issues, use the fn+f4 hotkey or reconnect the AC adapter. If the computer contains a charged battery and is running on the computer, display brightness, external devices connected to the computer, and other factors. Turn the computer upside down the computer through the AC adapter, the computer switches to battery power...
... HP, or a compatible battery purchased from external power. To prevent loss of a power outage. To reduce potential safety issues, use the fn+f4 hotkey or reconnect the AC adapter. If the computer contains a charged battery and is running on the computer, display brightness, external devices connected to the computer, and other factors. Turn the computer upside down the computer through the AC adapter, the computer switches to battery power...

HP Mini User Guide - Windows XP
Page 53
... Unauthorized access to a Windows user account User password Using passwords A password is essential to record each password immediately and store it in this chapter to use the following features: ● Passwords ● Firewall software ● Antivirus support (Norton Internet Security) ● Critical security updates NOTE: Security solutions are set . Several types of passwords can be set , depending on password ● Firewall software ● Windows updates Unauthorized access to Setup Utility, BIOS settings, and other Administrator password system identification...
... Unauthorized access to a Windows user account User password Using passwords A password is essential to record each password immediately and store it in this chapter to use the following features: ● Passwords ● Firewall software ● Antivirus support (Norton Internet Security) ● Critical security updates NOTE: Security solutions are set . Several types of passwords can be set , depending on password ● Firewall software ● Windows updates Unauthorized access to Setup Utility, BIOS settings, and other Administrator password system identification...
HP Mini User Guide - Windows XP
Page 66
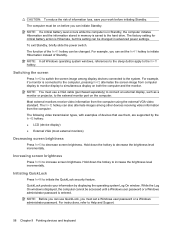
... can set a Windows user password or a Windows administrator password. QuickLock protects your work before you can initiate Standby. The factory setting for critical battery action is Hibernate, but this setting can also alternate images among display devices connected to initiate Hibernation instead of Standby. The following video transmission types, with examples of devices that use a VGA cable (purchased separately) to connect an external display, such as a monitor or projector, to the fn+f1 hotkey. Increasing screen brightness Press...
... can set a Windows user password or a Windows administrator password. QuickLock protects your work before you can initiate Standby. The factory setting for critical battery action is Hibernate, but this setting can also alternate images among display devices connected to initiate Hibernation instead of Standby. The following video transmission types, with examples of devices that use a VGA cable (purchased separately) to connect an external display, such as a monitor or projector, to the fn+f1 hotkey. Increasing screen brightness Press...
HP Mini User Guide - Windows XP
Page 85
... internal microphone, identifying 9, 38 Internet connection setup 30 J jacks audio-in (microphone) 8, 38 audio-out (headphone) 8, 38 RJ-45 (network) 7 K keyboard hotkeys, identifying 56 keys fn 5 function 5 Windows applications 5 Windows logo 5 L labels Microsoft Certificate of Authenticity 12 regulatory 12 service tag 11 language support 74 latches, battery release 9 left TouchPad button, identifying 3 lights battery 6 caps lock 4 drive 6 power 6 webcam 9 wireless 6 local area network (LAN) cable required 26 connecting cable 26 low battery level 19 M Main menu 74 managing a power-on password...
... internal microphone, identifying 9, 38 Internet connection setup 30 J jacks audio-in (microphone) 8, 38 audio-out (headphone) 8, 38 RJ-45 (network) 7 K keyboard hotkeys, identifying 56 keys fn 5 function 5 Windows applications 5 Windows logo 5 L labels Microsoft Certificate of Authenticity 12 regulatory 12 service tag 11 language support 74 latches, battery release 9 left TouchPad button, identifying 3 lights battery 6 caps lock 4 drive 6 power 6 webcam 9 wireless 6 local area network (LAN) cable required 26 connecting cable 26 low battery level 19 M Main menu 74 managing a power-on password...
HP Mini User Guide - Windows XP
Page 86
... Broadband Module serial number 12 regulatory label 12 wireless 12 release latches battery 9, 18 restoring default settings 73 right TouchPad button, identifying 4 RJ-45 (network) jack, identifying 7 S screen brightness hotkeys 58 screen image, switching 58 security cable slot, identifying 7 Security menu 74 security, cable slot 7 security, wireless 30 selecting in Setup Utility 72 serial number, computer 11 service tag 11 setup of WLAN 30 Setup Utility, passwords set in 46 setup, computer 3 shut down 24 SIM inserting 33 removing 34 software installing 40 multimedia 40 Windows Media Player 40...
... Broadband Module serial number 12 regulatory label 12 wireless 12 release latches battery 9, 18 restoring default settings 73 right TouchPad button, identifying 4 RJ-45 (network) jack, identifying 7 S screen brightness hotkeys 58 screen image, switching 58 security cable slot, identifying 7 Security menu 74 security, cable slot 7 security, wireless 30 selecting in Setup Utility 72 serial number, computer 11 service tag 11 setup of WLAN 30 Setup Utility, passwords set in 46 setup, computer 3 shut down 24 SIM inserting 33 removing 34 software installing 40 multimedia 40 Windows Media Player 40...

Mini User Guide - Windows 7
Page 55
Several types of passwords can be set , depending on password ● Firewall software ● Windows updates Unauthorized access to Setup Utility, BIOS settings, and other Administrator password system identification information Ongoing or future threats to the computer Critical security updates from Microsoft Unauthorized access to a Windows user account User password Using passwords A password is essential to record each password immediately and store it is a group of the computer Unauthorized access to data ● QuickLock ● Power-on...
Several types of passwords can be set , depending on password ● Firewall software ● Windows updates Unauthorized access to Setup Utility, BIOS settings, and other Administrator password system identification information Ongoing or future threats to the computer Critical security updates from Microsoft Unauthorized access to a Windows user account User password Using passwords A password is essential to record each password immediately and store it is a group of the computer Unauthorized access to data ● QuickLock ● Power-on...

Mini User Guide - Windows 7
Page 68
... hotkey. NOTE: Before you can use QuickLock, you can be accessed until a Windows user password or a Windows administrator password is entered. To exit Sleep, briefly slide the power switch. Most external monitors receive video information from computer display to monitor display to initiate the QuickLock security feature. While the Log On window is displayed, the computer cannot be changed . QuickLock protects your information is stored in memory is saved to the hard drive. Switching the screen image...
... hotkey. NOTE: Before you can use QuickLock, you can be accessed until a Windows user password or a Windows administrator password is entered. To exit Sleep, briefly slide the power switch. Most external monitors receive video information from computer display to monitor display to initiate the QuickLock security feature. While the Log On window is displayed, the computer cannot be changed . QuickLock protects your information is stored in memory is saved to the hard drive. Switching the screen image...
Mini User Guide - Windows 7
Page 78
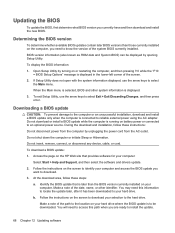
... BIOS updates contain later BIOS versions than the BIOS version currently installed on your selection to the location on battery power or connected to reliable external power using the AC adapter. If Setup Utility does not open with the system information displayed, use the arrow keys to know the version of the screen. 2. Do not download or install a BIOS update while the computer is running on your hard drive. To download a BIOS update: 1. Identify the BIOS update that provides software for your computer and access the BIOS update...
... BIOS updates contain later BIOS versions than the BIOS version currently installed on your selection to the location on battery power or connected to reliable external power using the AC adapter. If Setup Utility does not open with the system information displayed, use the arrow keys to know the version of the screen. 2. Do not download or install a BIOS update while the computer is running on your hard drive. To download a BIOS update: 1. Identify the BIOS update that provides software for your computer and access the BIOS update...
Mini User Guide - Windows 7
Page 87
... Web disabling 71 enabling 71 Setup Utility 74 internal display switch, identifying 8 internal microphone, identifying 9, 39 Internet connection setup 30 J jacks audio-in (microphone) 8, 39 audio-out (headphone) 8, 39 RJ-45 (network) 7 K keyboard hotkeys, identifying 56 keys fn 5 function 5 Windows applications 5 Windows logo 5 L labels Microsoft Certificate of Authenticity 11 regulatory 11 service tag 11 language support 74 latches, battery release 9 left TouchPad button, identifying 3 lights battery 6 caps lock 4 drive 6 power 6 webcam 9 wireless 6 local area network (LAN) cable required...
... Web disabling 71 enabling 71 Setup Utility 74 internal display switch, identifying 8 internal microphone, identifying 9, 39 Internet connection setup 30 J jacks audio-in (microphone) 8, 39 audio-out (headphone) 8, 39 RJ-45 (network) 7 K keyboard hotkeys, identifying 56 keys fn 5 function 5 Windows applications 5 Windows logo 5 L labels Microsoft Certificate of Authenticity 11 regulatory 11 service tag 11 language support 74 latches, battery release 9 left TouchPad button, identifying 3 lights battery 6 caps lock 4 drive 6 power 6 webcam 9 wireless 6 local area network (LAN) cable required...
Mini User Guide - Windows XP
Page 7
... audio functions 39 Video ...41 Connecting an external monitor or projector 41 Webcam ...42 5 Security Protecting the device ...43 Using passwords ...43 Passwords set in Windows 44 Passwords set in Setup Utility 44 Administrator password 45 Managing an administrator password 45 Entering an administrator password 45 Power-on password 45 Managing a power-on password 46 Entering a power-on password 46 Using antivirus software ...47 Using firewall software ...48 Installing critical updates ...49 6 Digital cards Inserting a digital card ...50 Stopping and removing a digital card 51 7 USB...
... audio functions 39 Video ...41 Connecting an external monitor or projector 41 Webcam ...42 5 Security Protecting the device ...43 Using passwords ...43 Passwords set in Windows 44 Passwords set in Setup Utility 44 Administrator password 45 Managing an administrator password 45 Entering an administrator password 45 Power-on password 45 Managing a power-on password 46 Entering a power-on password 46 Using antivirus software ...47 Using firewall software ...48 Installing critical updates ...49 6 Digital cards Inserting a digital card ...50 Stopping and removing a digital card 51 7 USB...

Mini User Guide - Windows XP
Page 51
...on the device. 5 Security Protecting the device Standard security features provided by the Windows operating system and the non-Windows Setup Utility can be set in Windows or in the non-Windows Setup Utility preinstalled on password ● Firewall software ● Windows updates Unauthorized access to Setup Utility, BIOS settings, and other Administrator password system identification information Ongoing or future threats to the device Critical security updates from Microsoft Unauthorized access to a Windows user account User password Using passwords A password is essential...
...on the device. 5 Security Protecting the device Standard security features provided by the Windows operating system and the non-Windows Setup Utility can be set in Windows or in the non-Windows Setup Utility preinstalled on password ● Firewall software ● Windows updates Unauthorized access to Setup Utility, BIOS settings, and other Administrator password system identification information Ongoing or future threats to the device Critical security updates from Microsoft Unauthorized access to a Windows user account User password Using passwords A password is essential...

Mini User Guide - Windows XP
Page 64
... power switch. The function of the fn+f1 hotkey can be on before initiating Standby. NOTE: In all Windows operating system windows, references to the sleep button apply to increase screen brightness. For example, if a monitor is entered. Most external monitors receive video information from device display to monitor display to decrease screen brightness. QuickLock protects your work before you can also alternate images among display devices connected to Help and Support. 56 Chapter 8 Pointing devices and keyboard The following video...
... power switch. The function of the fn+f1 hotkey can be on before initiating Standby. NOTE: In all Windows operating system windows, references to the sleep button apply to increase screen brightness. For example, if a monitor is entered. Most external monitors receive video information from device display to monitor display to decrease screen brightness. QuickLock protects your work before you can also alternate images among display devices connected to Help and Support. 56 Chapter 8 Pointing devices and keyboard The following video...


